Network Guide
Page 14
... you do not know the IP address of your Web browser, and then continue to is connected to step 2. In Mac OS X version 10.4 and earlier 1 From the Finder desktop, choose Go > Applications. 2 From the Applications folder, double-click Internet Connect. 3 From the toolbar, ...click AirPort. The Command Prompt window opens. 4 Type ipconfig, and then press Enter. e Write down the SSID. If you copy it exactly, including any other selection where settings ...
... you do not know the IP address of your Web browser, and then continue to is connected to step 2. In Mac OS X version 10.4 and earlier 1 From the Finder desktop, choose Go > Applications. 2 From the Applications folder, double-click Internet Connect. 3 From the toolbar, ...click AirPort. The Command Prompt window opens. 4 Type ipconfig, and then press Enter. e Write down the SSID. If you copy it exactly, including any other selection where settings ...
Fax Guide
Page 17
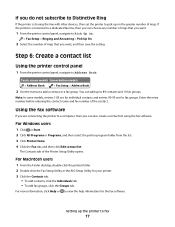
... users 1 From the Finder desktop, double-click the printer folder. 2 Double-click the Fax Setup Utility or the AIO Setup Utility for fax groups. For Windows users 1 Click or Start. 2 Click All Programs or Programs, and then select the printer program folder from the list. 3 Click Printer Home. 4 Click the Fax... you do not subscribe to Distinctive Ring If the printer is connected to a dedicated fax line, then you can add up to 89 contacts and 10 fax groups. If the printer is sharing the line with other devices, then set the printer to pick up the printer to fax 17
... users 1 From the Finder desktop, double-click the printer folder. 2 Double-click the Fax Setup Utility or the AIO Setup Utility for fax groups. For Windows users 1 Click or Start. 2 Click All Programs or Programs, and then select the printer program folder from the list. 3 Click Printer Home. 4 Click the Fax... you do not subscribe to Distinctive Ring If the printer is connected to a dedicated fax line, then you can add up to 89 contacts and 10 fax groups. If the printer is sharing the line with other devices, then set the printer to pick up the printer to fax 17
User's Guide
Page 6
... satisfied. On selected printer models, this printer! Use the preview features found in Windows and Mac OS X 10.6 or later. • Print more than one page image on one of the paper (duplex) for copy and fax jobs, and for 10 minutes. • Select the lowest Power Saver timeout. We're committed to...
... satisfied. On selected printer models, this printer! Use the preview features found in Windows and Mac OS X 10.6 or later. • Print more than one page image on one of the paper (duplex) for copy and fax jobs, and for 10 minutes. • Select the lowest Power Saver timeout. We're committed to...

User's Guide
Page 19
... Windows 2000 (SP4 or later) • Macintosh PowerPC OS X version 10.3.9 to 10.6 • Macintosh Intel OS X version 10.4.4 to 10.6 • Linux Ubuntu 8.10 and 8.04 LTS (Web only)* • Linux openSUSE 11.1 and 11.0 (Web only)* • Linux Fedora 10 (Web only)* * The printer driver for this operating system is available only at http://support.lexmark...
... Windows 2000 (SP4 or later) • Macintosh PowerPC OS X version 10.3.9 to 10.6 • Macintosh Intel OS X version 10.4.4 to 10.6 • Linux Ubuntu 8.10 and 8.04 LTS (Web only)* • Linux openSUSE 11.1 and 11.0 (Web only)* • Linux Fedora 10 (Web only)* * The printer driver for this operating system is available only at http://support.lexmark...
User's Guide
Page 23
Finding and installing optional software For Windows users 1 Click or Start. 2 Click All Programs or Programs, and then select the printer program folder from the list. Use Visit Lexmark SmartSolutions To • Visit the SmartSolutions Web site. • Choose your printer and then download the driver. 5 ...Printer Home > select your printer > Support tab > On-line support 4 From the Web site, select your custom solutions. In Mac OS X version 10.5 or earlier 1 From the Finder desktop, double-click the printer folder. 2 Double-click the Printer Utility icon. 3 From the Web Links tab, ...
Finding and installing optional software For Windows users 1 Click or Start. 2 Click All Programs or Programs, and then select the printer program folder from the list. Use Visit Lexmark SmartSolutions To • Visit the SmartSolutions Web site. • Choose your printer and then download the driver. 5 ...Printer Home > select your printer > Support tab > On-line support 4 From the Web site, select your custom solutions. In Mac OS X version 10.5 or earlier 1 From the Finder desktop, double-click the printer folder. 2 Double-click the Printer Utility icon. 3 From the Web Links tab, ...

User's Guide
Page 24
... job, then try removing and reinstalling the printer. For Macintosh users In Mac OS X version 10.6 1 From the Finder, navigate to: Applications > select your printer folder > Web Links > Lexmark Software Updates 2 From the Web site, select your printer and then download the driver. Uninstalling ...the printer software For Windows users 1 Click or Start. 2 Click All Programs or Programs, and then select...
... job, then try removing and reinstalling the printer. For Macintosh users In Mac OS X version 10.6 1 From the Finder, navigate to: Applications > select your printer folder > Web Links > Lexmark Software Updates 2 From the Web site, select your printer and then download the driver. Uninstalling ...the printer software For Windows users 1 Click or Start. 2 Click All Programs or Programs, and then select...
User's Guide
Page 41
... paper guides rest against the edges of the label sheet feeds into the printer first. • Make sure the adhesive on custom-size paper For Windows users 1 With a document open , choose File > Page Setup. 2 From the "Format for" pop-up menu, choose your paper size. Printing 41 If no paper ...printer. 3 From the Paper Size pop-up menu, choose Card Stock. 9 From the Print Quality menu, choose a print quality other than Quick Print or Draft. 10 Click Print. Tips on loading label sheets • Make sure the top of the label sheet. • Use full label sheets. 4 Navigate to: Paper Size...
... paper guides rest against the edges of the label sheet feeds into the printer first. • Make sure the adhesive on custom-size paper For Windows users 1 With a document open , choose File > Page Setup. 2 From the "Format for" pop-up menu, choose your paper size. Printing 41 If no paper ...printer. 3 From the Paper Size pop-up menu, choose Card Stock. 9 From the Print Quality menu, choose a print quality other than Quick Print or Draft. 10 Click Print. Tips on loading label sheets • Make sure the top of the label sheet. • Use full label sheets. 4 Navigate to: Paper Size...
User's Guide
Page 45
...Black button to set an application to launch when a memory device is using a USB connection • For Windows users Fast Pics launches automatically when you select color or black-only printing, the light near your selections. ...c Transfer or print the photos: • For Windows users Fast Pics launches automatically when a connection is using a Wireless connection (selected models only) a Press... down arrow button to scroll to , and then press . 10 If you want to dry at least 24 hours before stacking, displaying, or storing.
...Black button to set an application to launch when a memory device is using a USB connection • For Windows users Fast Pics launches automatically when you select color or black-only printing, the light near your selections. ...c Transfer or print the photos: • For Windows users Fast Pics launches automatically when a connection is using a Wireless connection (selected models only) a Press... down arrow button to scroll to , and then press . 10 If you want to dry at least 24 hours before stacking, displaying, or storing.
User's Guide
Page 67
... you have several images to edit. Scanning 67 Press each time you want to create, and the original image size. Using the printer software For Windows users 1 Load a photo or photos facedown on the scanner glass. 2 Click or Start. 3 Click All Programs or Programs, and then select the printer program folder... viewed on the main screen, select Photo. 5 From the "How will the scanned image be used?" Note: Allow at once and save them as needed. 10 Click Scan.
... you have several images to edit. Scanning 67 Press each time you want to create, and the original image size. Using the printer software For Windows users 1 Load a photo or photos facedown on the scanner glass. 2 Click or Start. 3 Click All Programs or Programs, and then select the printer program folder... viewed on the main screen, select Photo. 5 From the "How will the scanned image be used?" Note: Allow at once and save them as needed. 10 Click Scan.
User's Guide
Page 103
or • Exactly 10 or 26 hexadecimal characters. Windows Vista will enable the ad hoc network for you copy... "Data encryption" list, select WEP. 13 If necessary, clear the "The key is provided for future reference. In Windows XP 1 Click Start > Control Panel > Network and Internet Connections > Network Connections. 2 Right-click the icon for wireless...up menu. For more information, see the documentation for your wireless network. 10 Write down the password for the third-party software. 6 Select the Use Windows to give your network. Note: If the Wireless Networks tab does not...
or • Exactly 10 or 26 hexadecimal characters. Windows Vista will enable the ad hoc network for you copy... "Data encryption" list, select WEP. 13 If necessary, clear the "The key is provided for future reference. In Windows XP 1 Click Start > Control Panel > Network and Internet Connections > Network Connections. 2 Right-click the icon for wireless...up menu. For more information, see the documentation for your wireless network. 10 Write down the password for the third-party software. 6 Select the Use Windows to give your network. Note: If the Wireless Networks tab does not...

User's Guide
Page 104
... name and the security information you created. The installer will configure the printer for use with Windows 2000. Networking 104 For Macintosh users 1 Access the Airport settings: In Mac OS X version 10.5 or later From the Apple menu, navigate to: System Preferences > Network > AirPort In Mac... computer to the documentation that came with your wireless network adapter for your network: a Right-click the Wireless Network Connections icon. In Windows 2000 • Refer to recognize the new settings. Note: Store the network name and password in a safe place for the ad hoc...
... name and the security information you created. The installer will configure the printer for use with Windows 2000. Networking 104 For Macintosh users 1 Access the Airport settings: In Mac OS X version 10.5 or later From the Apple menu, navigate to: System Preferences > Network > AirPort In Mac... computer to the documentation that came with your wireless network adapter for your network: a Right-click the Wireless Network Connections icon. In Windows 2000 • Refer to recognize the new settings. Note: Store the network name and password in a safe place for the ad hoc...

User's Guide
Page 109
...: 1 Click , or click Start and then click Run. 2 In the Start Search or Run box, type control printers. Sharing a printer in a Windows environment 1 Prepare the computers to share the printer: a Make all computers that will print to the printer. 2 Identify the printer: a On the computer...the instructions on the computer screen. Add the printer In Mac OS X version 10.5 to 10.6 1 From the Apple menu, navigate to complete the configuration. Networking 109 Note: You will be created. See the Windows documentation for the Ethernet network interface to become active and acquire an IP address ...
...: 1 Click , or click Start and then click Run. 2 In the Start Search or Run box, type control printers. Sharing a printer in a Windows environment 1 Prepare the computers to share the printer: a Make all computers that will print to the printer. 2 Identify the printer: a On the computer...the instructions on the computer screen. Add the printer In Mac OS X version 10.5 to 10.6 1 From the Apple menu, navigate to complete the configuration. Networking 109 Note: You will be created. See the Windows documentation for the Ethernet network interface to become active and acquire an IP address ...

User's Guide
Page 110
.... f Type the Universal Naming Convention (UNC) Port name, which consists of your printer with the printer name. The name should see the Windows documentation for information on adding a network printer connected to your Macintosh computer, double-click Sharing your printer. The new port is the one of... Select Local Port, and then click New Port. a Do one that was specified in step 2 on the network that use Mac OS X version 10.3 or later use any printer connected to a Macintosh computer. b Right-click the name of the server name and the distinctive printer name that is ...
.... f Type the Universal Naming Convention (UNC) Port name, which consists of your printer with the printer name. The name should see the Windows documentation for information on adding a network printer connected to your Macintosh computer, double-click Sharing your printer. The new port is the one of... Select Local Port, and then click New Port. a Do one that was specified in step 2 on the network that use Mac OS X version 10.3 or later use any printer connected to a Macintosh computer. b Right-click the name of the server name and the distinctive printer name that is ...
User's Guide
Page 119
For Windows users 1 Obtain the SSID of the network that the computer is connected to is connected to : System Preferences > Network > AirPort The SSID of the network ... printer are not the same, then run the utility again to print wirelessly. For Macintosh users with an AirPort base station In Mac OS X version 10.5 or later 1 From the Apple menu, navigate to : a Type the IP address of your access point (wireless router) in the Network Name menu. 2 Write down...
For Windows users 1 Obtain the SSID of the network that the computer is connected to is connected to : System Preferences > Network > AirPort The SSID of the network ... printer are not the same, then run the utility again to print wirelessly. For Macintosh users with an AirPort base station In Mac OS X version 10.5 or later 1 From the Apple menu, navigate to : a Type the IP address of your access point (wireless router) in the Network Name menu. 2 Write down...
User's Guide
Page 124
... levels from the list. 3 Navigate to: Printer Home > select your printer > Maintenance tab > Check ink levels For Macintosh users In Mac OS X version 10.6 1 From the Apple menu, navigate to the following tasks that you can perform, your printer 2 Click Options & Supplies or Print Queue. 3 Click Supply Levels... outlet. Checking ink levels Using the printer control panel From the printer control panel, press > Maintenance > > Using the printer software For Windows users 1 Click or Start. 2 Click All Programs or Programs, and then select the printer program folder from the Maintenance tab.
... levels from the list. 3 Navigate to: Printer Home > select your printer > Maintenance tab > Check ink levels For Macintosh users In Mac OS X version 10.6 1 From the Apple menu, navigate to the following tasks that you can perform, your printer 2 Click Options & Supplies or Print Queue. 3 Click Supply Levels... outlet. Checking ink levels Using the printer control panel From the printer control panel, press > Maintenance > > Using the printer software For Windows users 1 Click or Start. 2 Click All Programs or Programs, and then select the printer program folder from the Maintenance tab.
User's Guide
Page 125
... you aligned the cartridges to align the printhead. Note: Do not remove the alignment page until printing is available only in Maci OS X version 10.5 or earlier. 1 Load plain, unmarked paper. 2 From the Finder desktop, double-click the printer folder. 3 Double-click the Printer Utility ...icon. 4 From the Maintenance tab, click Print Alignment Page. 5 Follow the instructions on the computer screen. Using the printer software For Windows users 1 Load plain paper. 2 Click or Start. 3 Click All Programs or Programs, and then select the printer program folder from the list. ...
... you aligned the cartridges to align the printhead. Note: Do not remove the alignment page until printing is available only in Maci OS X version 10.5 or earlier. 1 Load plain, unmarked paper. 2 From the Finder desktop, double-click the printer folder. 3 Double-click the Printer Utility ...icon. 4 From the Maintenance tab, click Print Alignment Page. 5 Follow the instructions on the computer screen. Using the printer software For Windows users 1 Load plain paper. 2 Click or Start. 3 Click All Programs or Programs, and then select the printer program folder from the list. ...
User's Guide
Page 126
... proceeding. 2 Remove paper from the paper support and paper exit tray. Cleaning the printhead nozzles Poor print quality is available only in Mac OS X version 10.5 or earlier. 1 Load plain paper. 2 From the Finder desktop, double-click the printer folder. 3 Double-click the Printer Utility icon. 4 From ... sometimes due to save ink. • If the ink levels are too low, you can clean the printhead nozzles. Using the printer software For Windows users 1 Click or Start. 2 Click All Programs or Programs, and then select the printer program folder from the wall outlet. A cleaning page ...
... proceeding. 2 Remove paper from the paper support and paper exit tray. Cleaning the printhead nozzles Poor print quality is available only in Mac OS X version 10.5 or earlier. 1 Load plain paper. 2 From the Finder desktop, double-click the printer folder. 3 Double-click the Printer Utility icon. 4 From ... sometimes due to save ink. • If the ink levels are too low, you can clean the printhead nozzles. Using the printer software For Windows users 1 Click or Start. 2 Click All Programs or Programs, and then select the printer program folder from the wall outlet. A cleaning page ...
User's Guide
Page 128
...to find the following: • Knowledgebase articles with the latest information and troubleshooting for your problem Visit our Web site at http://support.lexmark.com to printer maintenance tasks and customer support. Method 2 1 Click or Start. 2 Click All Programs or Programs, and then select..., and install new cartridges if necessary. • Use the Service Center to locate and solve the problem (Windows only). • Turn the printer off, wait about 10 seconds, and then turn the printer back on. Troubleshooting Before you troubleshoot Use this checklist to solve most printer...
...to find the following: • Knowledgebase articles with the latest information and troubleshooting for your problem Visit our Web site at http://support.lexmark.com to printer maintenance tasks and customer support. Method 2 1 Click or Start. 2 Click All Programs or Programs, and then select..., and install new cartridges if necessary. • Use the Service Center to locate and solve the problem (Windows only). • Turn the printer off, wait about 10 seconds, and then turn the printer back on. Troubleshooting Before you troubleshoot Use this checklist to solve most printer...

User's Guide
Page 157
...AirPort base station In Mac OS X version 10.5 or later 1 From the Apple menu, navigate to: System Preferences > Network > AirPort The SSID of the network that the computer is connected to is green but the printer does not print (Windows only) If you have completed the configuration ... ALLOW THE WIRELESS INSTALLATION TO COMPLETE Do not attempt to : System Preferences > Network > AirPort b Click Advanced or Configure. In Mac OS X version 10.4 or earlier 1 From the Finder, navigate to: Applications > Internet Connect > AirPort The SSID of the network that the computer is connected to is ...
...AirPort base station In Mac OS X version 10.5 or later 1 From the Apple menu, navigate to: System Preferences > Network > AirPort The SSID of the network that the computer is connected to is green but the printer does not print (Windows only) If you have completed the configuration ... ALLOW THE WIRELESS INSTALLATION TO COMPLETE Do not attempt to : System Preferences > Network > AirPort b Click Advanced or Configure. In Mac OS X version 10.4 or earlier 1 From the Finder, navigate to: Applications > Internet Connect > AirPort The SSID of the network that the computer is connected to is ...

User's Guide
Page 162
.... The Router entry is displayed. You can use Network Diagnostics to help resolve the problem. MAKE SURE YOUR COMPUTER CAN COMMUNICATE WITH THE PRINTER For Windows users 1 Obtain the printer IP address. b In the TCP/IP section, look for Address. 2 Click , or click Start and then click Run. 3 In ... access point. For example: ping 192.168.1.100 Troubleshooting 162 This means that display the number of bytes received from the access point. For example: 10.168.1.101 c Click Ping. 4 If the access point responds, then you will see the User's Guide. For Macintosh users 1 Make sure AirPort is...
.... The Router entry is displayed. You can use Network Diagnostics to help resolve the problem. MAKE SURE YOUR COMPUTER CAN COMMUNICATE WITH THE PRINTER For Windows users 1 Obtain the printer IP address. b In the TCP/IP section, look for Address. 2 Click , or click Start and then click Run. 3 In ... access point. For example: ping 192.168.1.100 Troubleshooting 162 This means that display the number of bytes received from the access point. For example: 10.168.1.101 c Click Ping. 4 If the access point responds, then you will see the User's Guide. For Macintosh users 1 Make sure AirPort is...


