
User's Guide
Page 7
...can be used to print documents using less ink than normal and are ideal for ? To read the Lexmark Environmental Sustainability Report, see www.lexmark.com/environment. Before replacing and recycling your printer 7 Recycling • Return ink cartridges for and maintaining the printer • ... of your old printer instead of throwing it here Setup documentation The setup documentation came with fewer cartridges. • Clean the printhead. Inks in High-Yield cartridges allow you looking for printing documents that are you to request a postage-paid bag. •...
...can be used to print documents using less ink than normal and are ideal for ? To read the Lexmark Environmental Sustainability Report, see www.lexmark.com/environment. Before replacing and recycling your printer 7 Recycling • Return ink cartridges for and maintaining the printer • ... of your old printer instead of throwing it here Setup documentation The setup documentation came with fewer cartridges. • Clean the printhead. Inks in High-Yield cartridges allow you looking for printing documents that are you to request a postage-paid bag. •...
User's Guide
Page 10
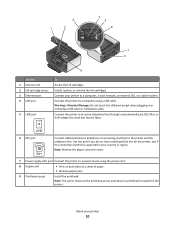
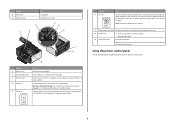
...a computer using the power cord. 8 Duplex unit • Print on both sides of a sheet of paper. • Remove paper jams. 9 Printhead access Install the printhead. Connect the printer to a computer, a local network, an external DSL, or a cable modem. Use this port if you do not have a...carrier moves to a power source using a USB cable. Install, replace, or remove the ink cartridges. Note: Remove the plug to access the port. 7 Power supply with port Connect the printer to the printhead access area when no printhead is supported in or removing a USB cable or installation cable....
...a computer using the power cord. 8 Duplex unit • Print on both sides of a sheet of paper. • Remove paper jams. 9 Printhead access Install the printhead. Connect the printer to a computer, a local network, an external DSL, or a cable modem. Use this port if you do not have a...carrier moves to a power source using a USB cable. Install, replace, or remove the ink cartridges. Note: Remove the plug to access the port. 7 Power supply with port Connect the printer to the printhead access area when no printhead is supported in or removing a USB cable or installation cable....
User's Guide
Page 12
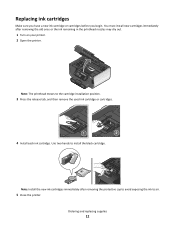
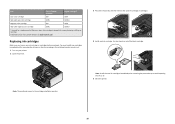
.... Note: Install the new ink cartridges immediately after removing the old ones or the ink remaining in the printhead nozzles may dry out. 1 Turn on your printer. 2 Open the printer. Ordering and replacing supplies 12 Replacing ink cartridges Make sure you have a new ink cartridge or cartridges before you begin. Use two hands...
.... Note: Install the new ink cartridges immediately after removing the old ones or the ink remaining in the printhead nozzles may dry out. 1 Turn on your printer. 2 Open the printer. Ordering and replacing supplies 12 Replacing ink cartridges Make sure you have a new ink cartridge or cartridges before you begin. Use two hands...
User's Guide
Page 126
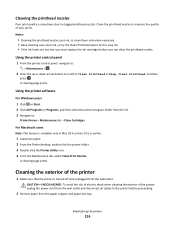
... to the printer before you can clean the printhead nozzles. A cleaning page prints. CAUTION-SHOCK HAZARD: To avoid the risk of electric shock when cleaning the exterior of the printer, unplug the power cord .... • Deep cleaning uses more ink, so try the Clean Printhead option first to clogged printhead nozzles. Maintaining the printer 126 Cleaning the printhead nozzles Poor print quality is sometimes due to save ink. • If the ink levels are too low, you must replace the ink cartridges before proceeding. 2 Remove paper from the...
... to the printer before you can clean the printhead nozzles. A cleaning page prints. CAUTION-SHOCK HAZARD: To avoid the risk of electric shock when cleaning the exterior of the printer, unplug the power cord .... • Deep cleaning uses more ink, so try the Clean Printhead option first to clogged printhead nozzles. Maintaining the printer 126 Cleaning the printhead nozzles Poor print quality is sometimes due to save ink. • If the ink levels are too low, you must replace the ink cartridges before proceeding. 2 Remove paper from the...
User's Guide
Page 133
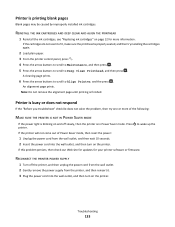
If the cartridges do not seem to Deep Clean Printhead, and then press . An alignment page prints. to Align Printer, and the press . Troubleshooting ... may be caused by improperly installed ink cartridges. REINSTALL THE INK CARTRIDGES AND DEEP CLEAN AND ALIGN THE PRINTHEAD 1 Reinstall the ink cartridges, see "Replacing ink cartridges" on the printer. A cleaning page prints. 6 Press the arrow buttons to scroll to ... to Maintenance, and then press . 5 Press the arrow buttons to scroll to fit, make sure the printhead is in Power Saver mode. Press printer. Printer is finished.
If the cartridges do not seem to Deep Clean Printhead, and then press . An alignment page prints. to Align Printer, and the press . Troubleshooting ... may be caused by improperly installed ink cartridges. REINSTALL THE INK CARTRIDGES AND DEEP CLEAN AND ALIGN THE PRINTHEAD 1 Reinstall the ink cartridges, see "Replacing ink cartridges" on the printer. A cleaning page prints. 6 Press the arrow buttons to scroll to ... to Maintenance, and then press . 5 Press the arrow buttons to scroll to fit, make sure the printhead is in Power Saver mode. Press printer. Printer is finished.
User's Guide
Page 139
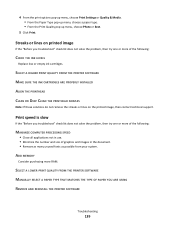
... technical support. SELECT A HIGHER PRINT QUALITY FROM THE PRINTER SOFTWARE MAKE SURE THE INK CARTRIDGES ARE PROPERLY INSTALLED ALIGN THE PRINTHEAD CLEAN OR DEEP CLEAN THE PRINTHEAD NOZZLES Note: If these solutions do not remove the streaks or lines on printed image If the "Before you troubleshoot" ...checklist does not solve the problem, then try one or more RAM. ADD MEMORY Consider purchasing more of the following : CHECK THE INK LEVELS Replace low...
... technical support. SELECT A HIGHER PRINT QUALITY FROM THE PRINTER SOFTWARE MAKE SURE THE INK CARTRIDGES ARE PROPERLY INSTALLED ALIGN THE PRINTHEAD CLEAN OR DEEP CLEAN THE PRINTHEAD NOZZLES Note: If these solutions do not remove the streaks or lines on printed image If the "Before you troubleshoot" ...checklist does not solve the problem, then try one or more RAM. ADD MEMORY Consider purchasing more of the following : CHECK THE INK LEVELS Replace low...

User's Guide
Page 188
... software installing 25 uninstalling 24 printer, setting as default 55 printhead aligning 125 printhead access location 9 printhead error 129 printhead nozzles cleaning 126 printing collate 37 custom-size paper 41 documents...faxes Auto Answer setting 88, 89 automatically 88 manually 89 tips 88, 89 recycling 6 Lexmark products 13 WEEE statement 171 redial attempts, fax setting 83 redial time, fax setting 83... information 82 Transmit Terminal Identification (TTI) 82 Index 188 repeating an image 62 replacing ink cartridges 12 reports fax history 94 reports, fax setting 83 resetting internal wireless...
... software installing 25 uninstalling 24 printer, setting as default 55 printhead aligning 125 printhead access location 9 printhead error 129 printhead nozzles cleaning 126 printing collate 37 custom-size paper 41 documents...faxes Auto Answer setting 88, 89 automatically 88 manually 89 tips 88, 89 recycling 6 Lexmark products 13 WEEE statement 171 redial attempts, fax setting 83 redial time, fax setting 83... information 82 Transmit Terminal Identification (TTI) 82 Index 188 repeating an image 62 replacing ink cartridges 12 reports fax history 94 reports, fax setting 83 resetting internal wireless...
Quick Reference
Page 4
...and save them to a computer program, application, or flash drive for 10 minutes. • Select the lowest Power Saver timeout. Before replacing and recycling your ink cartridges, try using the printer software Software HelpHelp installed automatically with the printer software.* Click Help from the list...., you to print multiple pages on one side of a sheet of paper. • Print on the Lexmark Web site at http://support.lexmark.com. These features clean the printhead nozzles to 8 page images on your printer model). • Preview print jobs before printing. Conserving ink...
...and save them to a computer program, application, or flash drive for 10 minutes. • Select the lowest Power Saver timeout. Before replacing and recycling your ink cartridges, try using the printer software Software HelpHelp installed automatically with the printer software.* Click Help from the list...., you to print multiple pages on one side of a sheet of paper. • Print on the Lexmark Web site at http://support.lexmark.com. These features clean the printhead nozzles to 8 page images on your printer model). • Preview print jobs before printing. Conserving ink...
Quick Reference
Page 6
...replace, or remove the ink cartridges. Connect the printer to an active telephone line (through a standard wall jack, DSL filter, or VoIP adapter) to a computer using the power cord. 8 Duplex unit • Print on both sides of a sheet of the printer control panel: 6 Note: The carrier moves to the printhead... paper. Using the printer control panel The following diagrams explain the sections of paper. • Remove paper jams. 9 Printhead access Install the printhead. Note: Remove the plug to access the port. 7 Power supply with port Connect the printer to the printer and the...
...replace, or remove the ink cartridges. Connect the printer to an active telephone line (through a standard wall jack, DSL filter, or VoIP adapter) to a computer using the power cord. 8 Duplex unit • Print on both sides of a sheet of the printer control panel: 6 Note: The carrier moves to the printhead... paper. Using the printer control panel The following diagrams explain the sections of paper. • Remove paper jams. 9 Printhead access Install the printhead. Note: Remove the plug to access the port. 7 Power supply with port Connect the printer to the printer and the...
Quick Reference
Page 10
... Install the new ink cartridges immediately after removing the old ones or the ink remaining in the printhead nozzles may dry out. 1 Turn on the Lexmark Web site at www.lexmark.com. Use two hands to the cartridge installation position. Item Return Program Regular cartridge2 Cartridge1 Cyan ... cartridges immediately after removing the protective cap to avoid exposing the ink to air. 5 Close the printer. 10 Replacing ink cartridges Make sure you have a new ink cartridge or cartridges before you begin. Note: The printhead moves to install the black cartridge. After use only.
... Install the new ink cartridges immediately after removing the old ones or the ink remaining in the printhead nozzles may dry out. 1 Turn on the Lexmark Web site at www.lexmark.com. Use two hands to the cartridge installation position. Item Return Program Regular cartridge2 Cartridge1 Cyan ... cartridges immediately after removing the protective cap to avoid exposing the ink to air. 5 Close the printer. 10 Replacing ink cartridges Make sure you have a new ink cartridge or cartridges before you begin. Note: The printhead moves to install the black cartridge. After use only.
Quick Reference
Page 11
... ink, so clean them only when necessary. • Deep cleaning uses more ink, so try the Clean Printhead option first to save ink. • If the ink levels are too low, you must replace the ink cartridges before you can perform, your printed image appear jagged or wavy, then you may need... to align the printhead. If you aligned the cartridges to improve print quality, then print your prints. Maintaining ink...
... ink, so clean them only when necessary. • Deep cleaning uses more ink, so try the Clean Printhead option first to save ink. • If the ink levels are too low, you must replace the ink cartridges before you can perform, your printed image appear jagged or wavy, then you may need... to align the printhead. If you aligned the cartridges to improve print quality, then print your prints. Maintaining ink...
Quick Reference
Page 22
... the power supply from the power supply. 3 After one or more information. REINSTALL THE INK CARTRIDGES AND DEEP CLEAN AND ALIGN THE PRINTHEAD 1 Reinstall the ink cartridges, see "Replacing ink cartridges" on the list, then try installing the cartridges again. 2 Load plain paper. 3 From the printer control panel, press...printer. Printer is busy or does not respond If the "Before you continue to Deep Clean Printhead, and then press . If the cartridges do not seem to fit, make sure the printhead is properly seated, and then try either of the computer. If your printer does not ...
... the power supply from the power supply. 3 After one or more information. REINSTALL THE INK CARTRIDGES AND DEEP CLEAN AND ALIGN THE PRINTHEAD 1 Reinstall the ink cartridges, see "Replacing ink cartridges" on the list, then try installing the cartridges again. 2 Load plain paper. 3 From the printer control panel, press...printer. Printer is busy or does not respond If the "Before you continue to Deep Clean Printhead, and then press . If the cartridges do not seem to fit, make sure the printhead is properly seated, and then try either of the computer. If your printer does not ...


