User's Guide
Page 5
Use only the power supply and power cord provided with this area for clearing a paper jam. If any electrical or cabling connections, such as the fax feature, power cord, or telephone, during a lightning storm. Inspect the power cord regularly for the ... service person. Refer service or repairs, other replacement parts. CAUTION-SHOCK HAZARD: To avoid the risk of electric shock when cleaning the exterior of the paper path. Do not set up this product or make any of these things happen, a risk of some parts may not always be obvious.
Use only the power supply and power cord provided with this area for clearing a paper jam. If any electrical or cabling connections, such as the fax feature, power cord, or telephone, during a lightning storm. Inspect the power cord regularly for the ... service person. Refer service or repairs, other replacement parts. CAUTION-SHOCK HAZARD: To avoid the risk of electric shock when cleaning the exterior of the paper path. Do not set up this product or make any of these things happen, a risk of some parts may not always be obvious.
User's Guide
Page 10
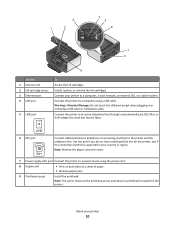
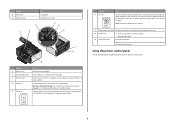
... port. 7 Power supply with port Connect the printer to a computer using the power cord. 8 Duplex unit • Print on both sides of a sheet of paper. • Remove paper jams. 9 Printhead access Install the printhead. Connect the printer to an active telephone line (through a standard wall jack, DSL filter, or VoIP adapter) to the...
... port. 7 Power supply with port Connect the printer to a computer using the power cord. 8 Duplex unit • Print on both sides of a sheet of paper. • Remove paper jams. 9 Printhead access Install the printhead. Connect the printer to an active telephone line (through a standard wall jack, DSL filter, or VoIP adapter) to the...

User's Guide
Page 26
Loading paper and original documents Loading the paper tray Make sure: • You use paper designed for inkjet printers. • The paper is not used or damaged. • If you are using specialty paper, you adjust the paper guides. 1 Pull tray completely out of the printer. 2 Move the paper guides to the sides of tray. 3 1 2 Loading paper and original documents 26 Note: To avoid jams, make sure the paper does not buckle when you follow the instructions that came with it.
Loading paper and original documents Loading the paper tray Make sure: • You use paper designed for inkjet printers. • The paper is not used or damaged. • If you are using specialty paper, you adjust the paper guides. 1 Pull tray completely out of the printer. 2 Move the paper guides to the sides of tray. 3 1 2 Loading paper and original documents 26 Note: To avoid jams, make sure the paper does not buckle when you follow the instructions that came with it.

User's Guide
Page 33
...0.025 inches (0.635 mm). • The print side of the photo paper faces down . • The paper guides rest against the edges of the transfers. Remove each strip faces down . • You load the photo paper in a paper jam. • You load letter- Note: For best results, load transfers ...one at least 24 hours before stacking, displaying, or storing Loading paper and original documents 33 Load up to 25 sheets of the transparencies. ...
...0.025 inches (0.635 mm). • The print side of the photo paper faces down . • The paper guides rest against the edges of the transfers. Remove each strip faces down . • You load the photo paper in a paper jam. • You load letter- Note: For best results, load transfers ...one at least 24 hours before stacking, displaying, or storing Loading paper and original documents 33 Load up to 25 sheets of the transparencies. ...
User's Guide
Page 41
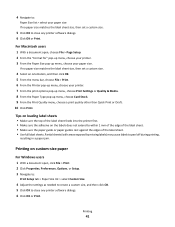
... document open , choose File > Page Setup. 2 From the "Format for" pop-up menu, choose your printer. 3 From the Paper Size pop-up menu, choose your paper size If no paper size matches the label sheet size, then set a custom size. 5 Click OK to close any printer software dialogs. 6 Click OK or... Print. Printing on the labels does not extend to peel off during printing, resulting in a paper jam. If no paper size matches the label sheet size, then set a custom size. 4 Select an orientation, and then click OK. 5 From the menu bar, choose...
... document open , choose File > Page Setup. 2 From the "Format for" pop-up menu, choose your printer. 3 From the Paper Size pop-up menu, choose your paper size If no paper size matches the label sheet size, then set a custom size. 5 Click OK to close any printer software dialogs. 6 Click OK or... Print. Printing on the labels does not extend to peel off during printing, resulting in a paper jam. If no paper size matches the label sheet size, then set a custom size. 4 Select an orientation, and then click OK. 5 From the menu bar, choose...
User's Guide
Page 128
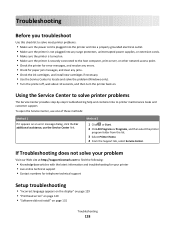
... solve your problem Visit our Web site at http://support.lexmark.com to find the following: • Knowledgebase articles with the latest information and troubleshooting for your printer • Live online technical support • Contact numbers for paper jam messages, and clear any jams. • Check the ink cartridges, and install new cartridges if...
... solve your problem Visit our Web site at http://support.lexmark.com to find the following: • Knowledgebase articles with the latest information and troubleshooting for your printer • Live online technical support • Contact numbers for paper jam messages, and clear any jams. • Check the ink cartridges, and install new cartridges if...

User's Guide
Page 134
... sensitive. REMOVE AND REINSTALL THE PRINTER SOFTWARE Jams and misfeeds troubleshooting • "Paper jam in the printer" on page 134 • "Paper jam in the duplex unit" on page 135 • "Paper jam in the ADF (selected models only)" on page 136 • "Paper or specialty media misfeeds" on page 137 Paper jam in the print queue and cannot delete... the USB port of the following: CHECK THE USB CONNECTION 1 Check the USB cable for any obvious damage. Avoid unnecessarily touching these parts while clearing jams. Troubleshooting 134 The USB port is enabled.
... sensitive. REMOVE AND REINSTALL THE PRINTER SOFTWARE Jams and misfeeds troubleshooting • "Paper jam in the printer" on page 134 • "Paper jam in the duplex unit" on page 135 • "Paper jam in the ADF (selected models only)" on page 136 • "Paper or specialty media misfeeds" on page 137 Paper jam in the print queue and cannot delete... the USB port of the following: CHECK THE USB CONNECTION 1 Check the USB cable for any obvious damage. Avoid unnecessarily touching these parts while clearing jams. Troubleshooting 134 The USB port is enabled.

User's Guide
Page 135
... as part of the paper path. To avoid injury, use caution when accessing this area for jammed paper. 3 Firmly grasp the paper, and then gently pull it . 4 Press to turn off the printer. 2 Check the paper tray or lift the scanner unit to check for clearing a paper jam. Note: Be careful... not to tear the paper while removing it out. 1 Press ...
... as part of the paper path. To avoid injury, use caution when accessing this area for jammed paper. 3 Firmly grasp the paper, and then gently pull it . 4 Press to turn off the printer. 2 Check the paper tray or lift the scanner unit to check for clearing a paper jam. Note: Be careful... not to tear the paper while removing it out. 1 Press ...

User's Guide
Page 136
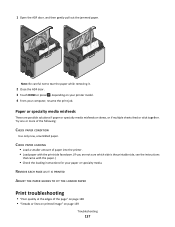
Note: Be careful not to tear the paper while removing it out. Paper jam in the ADF (selected models only) Note: The parts inside the printer are sensitive. Avoid unnecessarily touching these parts while clearing jams. Troubleshooting 136 2 Firmly grasp the paper, and then gently pull it . 3 Reinsert the duplex unit. 4 Touch DONE or press , depending on your printer model. 5 From your computer, resume the print job.
Note: Be careful not to tear the paper while removing it out. Paper jam in the ADF (selected models only) Note: The parts inside the printer are sensitive. Avoid unnecessarily touching these parts while clearing jams. Troubleshooting 136 2 Firmly grasp the paper, and then gently pull it . 3 Reinsert the duplex unit. 4 Touch DONE or press , depending on your printer model. 5 From your computer, resume the print job.
User's Guide
Page 137
...PAPER GUIDES TO FIT THE LOADED PAPER Print troubleshooting • "Poor quality at the edges of the following: CHECK PAPER CONDITION Use only new, unwrinkled paper. Note: Be careful not to tear the paper... while removing it. 2 Close the ADF door. 3 Touch DONE or press , depending on page 139 Troubleshooting 137 Paper... possible solutions if paper or specialty media ...paper or specialty media. CHECK PAPER LOADING • Load a smaller amount of paper into the printer. • Load paper with the paper...
...PAPER GUIDES TO FIT THE LOADED PAPER Print troubleshooting • "Poor quality at the edges of the following: CHECK PAPER CONDITION Use only new, unwrinkled paper. Note: Be careful not to tear the paper... while removing it. 2 Close the ADF door. 3 Touch DONE or press , depending on page 139 Troubleshooting 137 Paper... possible solutions if paper or specialty media ...paper or specialty media. CHECK PAPER LOADING • Load a smaller amount of paper into the printer. • Load paper with the paper...
User's Guide
Page 184
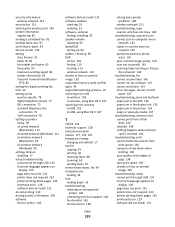
... 122 Auto Answer when to turn on 91 Automatic Document Feeder (ADF) clearing a paper jam in 136 loading documents 35 location 9 paper capacity 35 automatic fax conversion setting 83 B banner paper loading 34 bidirectional communication enabling 164 black and white scanning 70 blocking faxes 95 Bluetooth ...run fax software 147 cannot scan to computer over a network 142 cannot send faxes 143 cartridges, ink ordering 11 using genuine Lexmark 11 changing Power Saver timeout 16 changing printing mode 55 changing temporary settings into default 17 changing wireless settings after installation (Mac)...
... 122 Auto Answer when to turn on 91 Automatic Document Feeder (ADF) clearing a paper jam in 136 loading documents 35 location 9 paper capacity 35 automatic fax conversion setting 83 B banner paper loading 34 bidirectional communication enabling 164 black and white scanning 70 blocking faxes 95 Bluetooth ...run fax software 147 cannot scan to computer over a network 142 cannot send faxes 143 cartridges, ink ordering 11 using genuine Lexmark 11 changing Power Saver timeout 16 changing printing mode 55 changing temporary settings into default 17 changing wireless settings after installation (Mac)...
User's Guide
Page 186
... on wireless network 98 infrastructure network 116 ink conserving 6 ink cartridge access location 9 ink cartridges ordering 11 replacing 12 using genuine Lexmark 11 ink levels checking 124 Index 186 inserting a memory card or flash drive 42 installation cable 115, 116 installing network printer 122...address 121, 122 configuring 101 IP address, assigning 122 iron-on transfers loading 33 J jams and misfeeds troubleshooting paper jam in the ADF 136 paper jam in the duplex unit 135 paper jam in the printer 134 paper or specialty media 137 junk faxes blocking 95 K key index 123 L labels loading 33...
... on wireless network 98 infrastructure network 116 ink conserving 6 ink cartridge access location 9 ink cartridges ordering 11 replacing 12 using genuine Lexmark 11 ink levels checking 124 Index 186 inserting a memory card or flash drive 42 installation cable 115, 116 installing network printer 122...address 121, 122 configuring 101 IP address, assigning 122 iron-on transfers loading 33 J jams and misfeeds troubleshooting paper jam in the ADF 136 paper jam in the duplex unit 135 paper jam in the printer 134 paper or specialty media 137 junk faxes blocking 95 K key index 123 L labels loading 33...

User's Guide
Page 187
... 100 loading documents into the Automatic Document Feeder (ADF) 35 documents on scanner glass 35 envelopes 40 envelopes or photo paper 29 paper tray 26 various paper types 31 locating SSID 113 WEP key 112 WPA passphrase 112 M MAC address 120 finding 121 MAC address filtering 120... Pages per Sheet copies 62 paper conserving 6 loading 26, 31 paper and other supplies ordering 13 paper default settings saving 34 paper exit tray location 9 paper jam in the ADF 136 paper jam in the duplex unit 135 paper jam in the printer 134 paper or specialty media misfeeds 137 paper tray loading envelopes or photo...
... 100 loading documents into the Automatic Document Feeder (ADF) 35 documents on scanner glass 35 envelopes 40 envelopes or photo paper 29 paper tray 26 various paper types 31 locating SSID 113 WEP key 112 WPA passphrase 112 M MAC address 120 finding 121 MAC address filtering 120... Pages per Sheet copies 62 paper conserving 6 loading 26, 31 paper and other supplies ordering 13 paper default settings saving 34 paper exit tray location 9 paper jam in the ADF 136 paper jam in the duplex unit 135 paper jam in the printer 134 paper or specialty media misfeeds 137 paper tray loading envelopes or photo...
User's Guide
Page 189
...copying 59 printing 36 receiving faxes 88 scanning 65 sending faxes 87 transmission report, fax 94 transparencies loading 33 tray loading paper 26 troubleshooting checking an unresponsive printer 128 contacting technical support 128 fax checklist 143 Service Center 128 Index 189 solving basic ...fax software 147 cannot send faxes 143 error messages, printer control panel 147 troubleshooting, jams and misfeeds paper jam in the ADF 136 paper jam in the duplex unit 135 paper jam in the printer 134 paper or specialty media 137 troubleshooting, memory card cannot print from a flash drive 150 ...
...copying 59 printing 36 receiving faxes 88 scanning 65 sending faxes 87 transmission report, fax 94 transparencies loading 33 tray loading paper 26 troubleshooting checking an unresponsive printer 128 contacting technical support 128 fax checklist 143 Service Center 128 Index 189 solving basic ...fax software 147 cannot send faxes 143 error messages, printer control panel 147 troubleshooting, jams and misfeeds paper jam in the ADF 136 paper jam in the duplex unit 135 paper jam in the printer 134 paper or specialty media 137 troubleshooting, memory card cannot print from a flash drive 150 ...
Quick Reference
Page 6
...or removing a USB cable or installation cable. Using the printer control panel The following diagrams explain the sections of paper. • Remove paper jams. 9 Printhead access Install the printhead. Install, replace, or remove the ink cartridges. Connect your country or region. Hold... paper as it exits. 4 3 5 6 7 8 9 Use the 1 Scanner unit 2 Ink cartridge access 3 Ethernet port 4 USB port 5 LINE port To Access the ink...
...or removing a USB cable or installation cable. Using the printer control panel The following diagrams explain the sections of paper. • Remove paper jams. 9 Printhead access Install the printhead. Install, replace, or remove the ink cartridges. Connect your country or region. Hold... paper as it exits. 4 3 5 6 7 8 9 Use the 1 Scanner unit 2 Ink cartridge access 3 Ethernet port 4 USB port 5 LINE port To Access the ink...
Quick Reference
Page 19
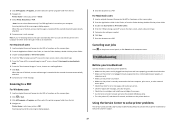
... host computer, print server, or other network access point. • Check the printer for error messages, and resolve any errors. • Check for paper jam messages, and clear any jams. • Check the ink cartridges, and install new cartridges if necessary. • Use the Service Center to locate and solve the problem (Windows...
... host computer, print server, or other network access point. • Check the printer for error messages, and resolve any errors. • Check for paper jam messages, and clear any jams. • Check the ink cartridges, and install new cartridges if necessary. • Use the Service Center to locate and solve the problem (Windows...


