User's Guide
Page 1
Z700 Series Color Jetprinter™ P700 Series Photo Jetprinter™ User's Guide for Windows • Setup troubleshooting A checklist to find solutions to common setup problems. • Printer overview Learn about the printer parts and the printer software. • Printing ideas How to print several projects on various types of paper. • Maintenance Caring for your cartridges and ordering supplies. • General troubleshooting Error messages, print quality problems, paper jams, and much more. January 2003 www.lexmark.com
Z700 Series Color Jetprinter™ P700 Series Photo Jetprinter™ User's Guide for Windows • Setup troubleshooting A checklist to find solutions to common setup problems. • Printer overview Learn about the printer parts and the printer software. • Printing ideas How to print several projects on various types of paper. • Maintenance Caring for your cartridges and ordering supplies. • General troubleshooting Error messages, print quality problems, paper jams, and much more. January 2003 www.lexmark.com

User's Guide
Page 21
..., see page 41. 4 Click OK. c From the Paper Size menu, select the correct size. Step 1: Load the envelopes Note: Do not use envelopes with holes, windows, deep embossing, metal clasps, string ties, or folding bars. • Load the envelopes vertically against the right side of the envelopes. Borderless if you . •...
..., see page 41. 4 Click OK. c From the Paper Size menu, select the correct size. Step 1: Load the envelopes Note: Do not use envelopes with holes, windows, deep embossing, metal clasps, string ties, or folding bars. • Load the envelopes vertically against the right side of the envelopes. Borderless if you . •...
User's Guide
Page 53
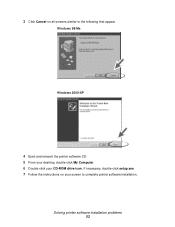
Windows 98/Me Windows 2000/XP 4 Eject and reinsert the printer software CD. 5 From your desktop, double-click My Computer. 6 Double-click your screen to the following that appear. Solving printer software installation problems 53 3 Click Cancel on your CD-ROM drive icon. If necessary, double-click setup.exe. 7 Follow the instructions on all screens similar to complete printer software installation.
Windows 98/Me Windows 2000/XP 4 Eject and reinsert the printer software CD. 5 From your desktop, double-click My Computer. 6 Double-click your screen to the following that appear. Solving printer software installation problems 53 3 Click Cancel on your CD-ROM drive icon. If necessary, double-click setup.exe. 7 Follow the instructions on all screens similar to complete printer software installation.

User's Guide
Page 57
...first see the troubleshooting checklist on page 51, and then: Check the printer status: Windows 98/Me/2000 Windows XP 1 Click Start Settings Printers. 2 From the Printers folder, double-click the Lexmark Z700-P700 Series printer icon. 3 From the Printer menu, make sure: • Set as...sure there is a check next to the Lexmark Z700-P700 Series printer icon (indicating that Pause Printing is not selected. • Check the printer port: Windows 98/Me Windows 2000 Windows XP 1 Click Start Settings Printers. 2 Right-click the Lexmark Z700-P700 Series printer icon, and then click Properties...
...first see the troubleshooting checklist on page 51, and then: Check the printer status: Windows 98/Me/2000 Windows XP 1 Click Start Settings Printers. 2 From the Printers folder, double-click the Lexmark Z700-P700 Series printer icon. 3 From the Printer menu, make sure: • Set as...sure there is a check next to the Lexmark Z700-P700 Series printer icon (indicating that Pause Printing is not selected. • Check the printer port: Windows 98/Me Windows 2000 Windows XP 1 Click Start Settings Printers. 2 Right-click the Lexmark Z700-P700 Series printer icon, and then click Properties...
User's Guide
Page 58
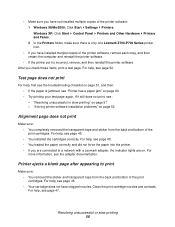
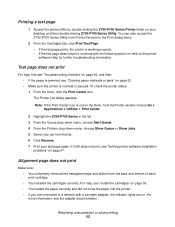
...the printer software, remove each copy, and then restart the computer and reinstall the printer software. • If the printer port is only one Lexmark Z700-P700 Series printer icon. • If you check these items, print a test page. Test page does not print For help , see "Printer ... unsuccessful or slow printing 58 For help , see page 47. For more information, see page 45. • You installed the cartridges correctly. Windows XP: Click Start Control Panel Printers and Other Hardware Printers and Faxes. 2 In the Printers folder, make sure there is incorrect, remove, and...
...the printer software, remove each copy, and then restart the computer and reinstall the printer software. • If the printer port is only one Lexmark Z700-P700 Series printer icon. • If you check these items, print a test page. Test page does not print For help , see "Printer ... unsuccessful or slow printing 58 For help , see page 47. For more information, see page 45. • You installed the cartridges correctly. Windows XP: Click Start Control Panel Printers and Other Hardware Printers and Faxes. 2 In the Printers folder, make sure there is incorrect, remove, and...
User's Guide
Page 67
... sheet of sharing information. label. manual alignment. A printer software option used for printing text documents. See Lexmark adapter. The software that connects your computer. Treated paper designed for printing photographs and highly detailed graphic images.... A group of the paper. peripheral device. A printer software option used for photographs. natural color. photo paper. Lexmark adapter. mirror. For example, Windows 98 or Macintosh OS X. Page orientation in which text runs parallel with the long edge of computers, printers, or...
... sheet of sharing information. label. manual alignment. A printer software option used for printing text documents. See Lexmark adapter. The software that connects your computer. Treated paper designed for printing photographs and highly detailed graphic images.... A group of the paper. peripheral device. A printer software option used for photographs. natural color. photo paper. Lexmark adapter. mirror. For example, Windows 98 or Macintosh OS X. Page orientation in which text runs parallel with the long edge of computers, printers, or...

User's Guide
Page 72
... not printing 57 printer software installation 52 slow printing 59 software 52 solving print quality problems 60 specialty paper 63 test page 52 uninstalling software (Windows) 58 unsuccessful or slow printing 57 t-shirt transfers 34 two-sided printing 17 U USB cable ordering 50 72
... not printing 57 printer software installation 52 slow printing 59 software 52 solving print quality problems 60 specialty paper 63 test page 52 uninstalling software (Windows) 58 unsuccessful or slow printing 57 t-shirt transfers 34 two-sided printing 17 U USB cable ordering 50 72
User's Guide for Mac OS X
Page 23
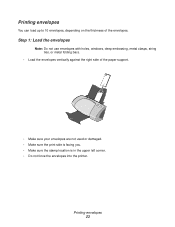
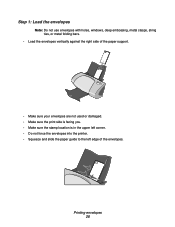
Printing envelopes You can load up to 10 envelopes, depending on the thickness of the paper support. • Make sure your envelopes are not used or damaged. • Make sure the print side is facing you. • Make sure the stamp location is in the upper left corner. • Do not force the envelopes into the printer. Step 1: Load the envelopes Note: Do not use envelopes with holes, windows, deep embossing, metal clasps, string ties, or metal folding bars. • Load the envelopes vertically against the right side of the envelopes. Printing envelopes 23
Printing envelopes You can load up to 10 envelopes, depending on the thickness of the paper support. • Make sure your envelopes are not used or damaged. • Make sure the print side is facing you. • Make sure the stamp location is in the upper left corner. • Do not force the envelopes into the printer. Step 1: Load the envelopes Note: Do not use envelopes with holes, windows, deep embossing, metal clasps, string ties, or metal folding bars. • Load the envelopes vertically against the right side of the envelopes. Printing envelopes 23

User's Guide for Mac OS X
Page 46
... is not on the Dock, from the Finder window choose Go Applications Utilities Print Center. 2 Make sure that your printer is set as the default printer: 1 From the Dock, click the Print Center icon. You can also access the Z700-P700 Series Utility from any external devices. 2 Connect ...as the current printer: 1 With your document open software programs. 2 Remove the printer software CD. a Open the printer utility by double-clicking the Z700-P700 Series Printer folder on page 52. When I insert the printer software CD, nothing happens 1 Close all open , choose File Page Setup. 2 From ...
... is not on the Dock, from the Finder window choose Go Applications Utilities Print Center. 2 Make sure that your printer is set as the default printer: 1 From the Dock, click the Print Center icon. You can also access the Z700-P700 Series Utility from any external devices. 2 Connect ...as the current printer: 1 With your document open software programs. 2 Remove the printer software CD. a Open the printer utility by double-clicking the Z700-P700 Series Printer folder on page 52. When I insert the printer software CD, nothing happens 1 Close all open , choose File Page Setup. 2 From ...

User's Guide for Mac OS X
Page 51
... printer cable is securely attached at both ends. Resolving unsuccessful or slow printing The following topics can help , refer to a network, make sure the Lexmark adapter is on and all indicator lights are on the Dock, from the list. 6 Click Resume. • The printer is set the printer as... Printer is plugged in, but does not print Make sure: • The printer is on the Dock, from the Finder window choose Go Applications Utilities Print Center. 2 Highlight the Z700-P700 Series in the list. If the paper is jammed, see "Clearing paper misfeeds or jams" on page 53. • ...
... printer cable is securely attached at both ends. Resolving unsuccessful or slow printing The following topics can help , refer to a network, make sure the Lexmark adapter is on and all indicator lights are on the Dock, from the list. 6 Click Resume. • The printer is set the printer as... Printer is plugged in, but does not print Make sure: • The printer is on the Dock, from the Finder window choose Go Applications Utilities Print Center. 2 Highlight the Z700-P700 Series in the list. If the paper is jammed, see "Clearing paper misfeeds or jams" on page 53. • ...
User's Guide for Mac OS X
Page 52
... page does not print Make sure: • You completely removed the transparent tape and sticker from the Finder window choose Go Applications Utilities Print Center. 2 Highlight the Z700-P700 Series in the Print dialog menu. 2 From the Cartridges tab, click Print Test Page. • If the... is working properly. • If the test page does not print, continue with the following section or refer to a network with a Lexmark adapter, the indicator lights are connected to the printer software Help for further troubleshooting information. Printing a test page 1 Access the printer utility by...
... page does not print Make sure: • You completely removed the transparent tape and sticker from the Finder window choose Go Applications Utilities Print Center. 2 Highlight the Z700-P700 Series in the Print dialog menu. 2 From the Cartridges tab, click Print Test Page. • If the... is working properly. • If the test page does not print, continue with the following section or refer to a network with a Lexmark adapter, the indicator lights are connected to the printer software Help for further troubleshooting information. Printing a test page 1 Access the printer utility by...
User's Guide for Mac OS X
Page 54
... the printer and cannot be removed: 1 Turn the printer off. 2 Turn the printer back on the Dock, from the Finder window choose Go Applications Utilities Print Center. 2 Make sure that the Z700-P700 Series is highlighted in the list. 3 From the Queue drop-down menu, choose Start Queue, if available. 4 From the...
... the printer and cannot be removed: 1 Turn the printer off. 2 Turn the printer back on the Dock, from the Finder window choose Go Applications Utilities Print Center. 2 Make sure that the Z700-P700 Series is highlighted in the list. 3 From the Queue drop-down menu, choose Start Queue, if available. 4 From the...
User's Guide for Mac OS X
Page 56
... Bottom Minimum setting: • 6.35 mm (0.25 in "Improving print quality" on the Dock, from the Finder window choose Go Applications Utilities Print Center. 2 Make sure that the Lexmark printer is the default printer. • Clean the print cartridge nozzles and contacts. Solving print quality problems 56 Printed... Dock, click the Print Center icon. The Printer List dialog appears. Print quality is poor at the edges • Make sure that the Z700-P700 Series is highlighted in .) recommended for black print jobs • 19 mm (0.75 in the list. 3 From the Queue drop-down menu,...
... Bottom Minimum setting: • 6.35 mm (0.25 in "Improving print quality" on the Dock, from the Finder window choose Go Applications Utilities Print Center. 2 Make sure that the Lexmark printer is the default printer. • Clean the print cartridge nozzles and contacts. Solving print quality problems 56 Printed... Dock, click the Print Center icon. The Printer List dialog appears. Print quality is poor at the edges • Make sure that the Z700-P700 Series is highlighted in .) recommended for black print jobs • 19 mm (0.75 in the list. 3 From the Queue drop-down menu,...
User's Guide for Mac OS X
Page 62
... A group of computers, printers, or other for reports or documents with the short edge of sharing information. See Lexmark adapter. For example, Windows 98 or Macintosh OS X. Any external device connected to each other peripheral devices connected to and controlled by a computer.... A printer made available on . network adapter. Page orientation in which text runs parallel with the long edge of a page. Lexmark adapter. A printer software feature that lets you select print cartridge alignment values. For example, select 4-up . network printer. operating system....
... A group of computers, printers, or other for reports or documents with the short edge of sharing information. See Lexmark adapter. For example, Windows 98 or Macintosh OS X. Any external device connected to each other peripheral devices connected to and controlled by a computer.... A printer made available on . network adapter. Page orientation in which text runs parallel with the long edge of a page. Lexmark adapter. A printer software feature that lets you select print cartridge alignment values. For example, select 4-up . network printer. operating system....
User's Guide for Mac OS 9
Page 26
Printing envelopes 26 Step 1: Load the envelopes Note: Do not use envelopes with holes, windows, deep embossing, metal clasps, string ties, or metal folding bars. • Load the envelopes vertically against the right side of the paper support. • Make sure your envelopes are not used or damaged. • Make sure the print side is facing you. • Make sure the stamp location is in the upper left corner. • Do not force the envelopes into the printer. • Squeeze and slide the paper guide to the left edge of the envelopes.
Printing envelopes 26 Step 1: Load the envelopes Note: Do not use envelopes with holes, windows, deep embossing, metal clasps, string ties, or metal folding bars. • Load the envelopes vertically against the right side of the paper support. • Make sure your envelopes are not used or damaged. • Make sure the print side is facing you. • Make sure the stamp location is in the upper left corner. • Do not force the envelopes into the printer. • Squeeze and slide the paper guide to the left edge of the envelopes.
User's Guide for Mac OS 9
Page 75
...location of a specific computer on a single sheet of a document on the Internet. network adapter. A printer made available on . Lexmark adapter. margin. operating system. A feature that lets you reverse an image before printing. landscape orientation. A printer software option that lets.... Any computer directly connected to each other peripheral devices connected to the Internet must have an IP address. label. For example, Windows 98, Macintosh OS 9, or Macintosh OS X. handout. A device used for the purpose of paper. network. Glossary 75 driver....
...location of a specific computer on a single sheet of a document on the Internet. network adapter. A printer made available on . Lexmark adapter. margin. operating system. A feature that lets you reverse an image before printing. landscape orientation. A printer software option that lets.... Any computer directly connected to each other peripheral devices connected to the Internet must have an IP address. label. For example, Windows 98, Macintosh OS 9, or Macintosh OS X. handout. A device used for the purpose of paper. network. Glossary 75 driver....

Photo Guide
Page 21
An editing window appears over the photo. 3 Resize the crop area. • Move your cursor to the frame of the editing window, and then click and drag the frame to resize it. • Click Ratios on the editing window, and then select from the available size ratios. 4 Click OK. 5 Click File Print to print the photo. 6 Click Print. Cropping photos 1 Double-click a photo thumbnail. Removing red-eye 1 Double-click a photo thumbnail. The photo opens in the Photo Editor. 2 Click Image Size, and then click Crop. The photo opens in the Photo Editor. 21
An editing window appears over the photo. 3 Resize the crop area. • Move your cursor to the frame of the editing window, and then click and drag the frame to resize it. • Click Ratios on the editing window, and then select from the available size ratios. 4 Click OK. 5 Click File Print to print the photo. 6 Click Print. Cropping photos 1 Double-click a photo thumbnail. Removing red-eye 1 Double-click a photo thumbnail. The photo opens in the Photo Editor. 2 Click Image Size, and then click Crop. The photo opens in the Photo Editor. 21
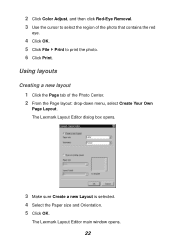
Photo Guide
Page 22
The Lexmark Layout Editor main window opens. 22 The Lexmark Layout Editor dialog box opens. 3 Make sure Create a new Layout is selected. 4 Select the Paper size and Orientation. 5 Click OK. 2 Click Color Adjust, and then click Red-Eye Removal. 3 Use the cursor to select the region of the Photo Center. 2 From the Page layout: drop-down menu, select Create Your Own Page Layout. Using layouts Creating a new layout 1 Click the Page tab of the photo that contains the red eye. 4 Click OK. 5 Click File Print to print the photo. 6 Click Print.
The Lexmark Layout Editor main window opens. 22 The Lexmark Layout Editor dialog box opens. 3 Make sure Create a new Layout is selected. 4 Select the Paper size and Orientation. 5 Click OK. 2 Click Color Adjust, and then click Red-Eye Removal. 3 Use the cursor to select the region of the Photo Center. 2 From the Page layout: drop-down menu, select Create Your Own Page Layout. Using layouts Creating a new layout 1 Click the Page tab of the photo that contains the red eye. 4 Click OK. 5 Click File Print to print the photo. 6 Click Print.

Photo Guide
Page 23
... the Page Layout: drop-down menu. c Click OK. 8 Close the Layout Editor main window. 9 Click Page Layout and scroll to appear. a Click Save. Use the alignment toolbar to help you want them to your new layout. The Lexmark Layout Editor dialog box opens. 3 Select Open an Existing Layout. 23 Modifying an existing...
... the Page Layout: drop-down menu. c Click OK. 8 Close the Layout Editor main window. 9 Click Page Layout and scroll to appear. a Click Save. Use the alignment toolbar to help you want them to your new layout. The Lexmark Layout Editor dialog box opens. 3 Select Open an Existing Layout. 23 Modifying an existing...
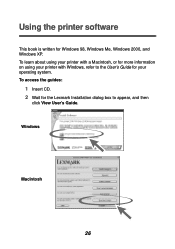
Photo Guide
Page 26
Using the printer software This book is written for your printer with Windows, refer to appear, and then click View User's Guide. Windows Macintosh 26 To learn about using your printer with a Macintosh, or for more information on using your operating system. To access the guides: 1 Insert CD. 2 Wait for the Lexmark Installation dialog box to the User's Guide for Windows 98, Windows Me, Windows 2000, and Windows XP.
Using the printer software This book is written for your printer with Windows, refer to appear, and then click View User's Guide. Windows Macintosh 26 To learn about using your printer with a Macintosh, or for more information on using your operating system. To access the guides: 1 Insert CD. 2 Wait for the Lexmark Installation dialog box to the User's Guide for Windows 98, Windows Me, Windows 2000, and Windows XP.

