User's Guide (7.1 MB)
Page 4
... Updated Drivers and Utilities 47 Online Services 47 Automated FAX System 48 Using Your Printer Using the Operator Panel and Menus 51 Power Indicator Light 52 Operator Panel Buttons 53 Printer Messages 54 Using the Operator Panel to Change Printer Settings 55 Example of Printing the Menu Settings 57 Operator Panel Menus 58 Overview of Printer Menus 60 Paper Menu 61 Finishing Menu 71 Tests Menu 78 Job Menu 82 Quality Menu 85 Setup Menu 87 PCL Emul Menu 95 PostScript Menu 100 Parallel Menu 101 Serial Menu 105 Network Menu 110 Infrared Menu...
... Updated Drivers and Utilities 47 Online Services 47 Automated FAX System 48 Using Your Printer Using the Operator Panel and Menus 51 Power Indicator Light 52 Operator Panel Buttons 53 Printer Messages 54 Using the Operator Panel to Change Printer Settings 55 Example of Printing the Menu Settings 57 Operator Panel Menus 58 Overview of Printer Menus 60 Paper Menu 61 Finishing Menu 71 Tests Menu 78 Job Menu 82 Quality Menu 85 Setup Menu 87 PCL Emul Menu 95 PostScript Menu 100 Parallel Menu 101 Serial Menu 105 Network Menu 110 Infrared Menu...
User's Guide (7.1 MB)
Page 40
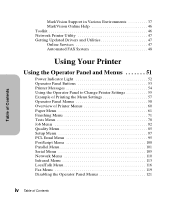
Note: Paper is loaded into all the way in trays for any other drawers you have installed previously. Note: If you have purchased any other options, install them now. 24 Setting Up Your Printer Setting Up Your Printer Getting Started 7 Slide the paper tray all trays in the same manner as the 250-sheet input tray. 9 Insert the trays into place. 8 Load paper in until it snaps into the matching support units.
Note: Paper is loaded into all the way in trays for any other drawers you have installed previously. Note: If you have purchased any other options, install them now. 24 Setting Up Your Printer Setting Up Your Printer Getting Started 7 Slide the paper tray all trays in the same manner as the 250-sheet input tray. 9 Insert the trays into place. 8 Load paper in until it snaps into the matching support units.

User's Guide (7.1 MB)
Page 45
... status message appears on the display. The message, Printing Menu Settings, is shown on the display and remains on the second line. 5 Press Select to show the list of installed options. However, if an error message appears, see TESTS MENU. 4 Press Select to select Print Menus. You can use this page to verify that all the printer options are properly installed and the printer settings are set to the Ready status message when the page or pages finish printing. 29 Setting...
... status message appears on the display. The message, Printing Menu Settings, is shown on the display and remains on the second line. 5 Press Select to show the list of installed options. However, if an error message appears, see TESTS MENU. 4 Press Select to select Print Menus. You can use this page to verify that all the printer options are properly installed and the printer settings are set to the Ready status message when the page or pages finish printing. 29 Setting...
User's Guide (7.1 MB)
Page 52
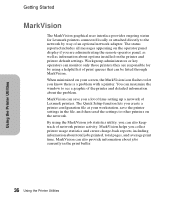
... of time setting up a network of an optional network adapter. The status reported includes all messages appearing on the printer and printer default settings. MarkVision helps you can be listed through MarkVision. By using a helpful list of the printer and detailed information about options installed on the operator panel display if you are responsible for Lexmark printers connected locally or attached directly to see a graphic of print queues that can also keep track of network printer...
... of time setting up a network of an optional network adapter. The status reported includes all messages appearing on the printer and printer default settings. MarkVision helps you can be listed through MarkVision. By using a helpful list of the printer and detailed information about options installed on the operator panel display if you are responsible for Lexmark printers connected locally or attached directly to see a graphic of print queues that can also keep track of network printer...
User's Guide (7.1 MB)
Page 106
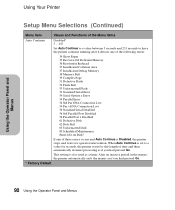
... Page 51 Defective Flash 52 Flash Full 53 Unformatted Flash 54 Standard Serial Error 54 Serial Option x Error 54 Parallel Error 54 Std Par ENA Connection Lost 54 Par x ENA Connection Lost 56 Standard Serial Disabled 56 Std Parallel Port Disabled 56 Parallel Port x Disabled 61 Defective Disk 62 Disk Full 63 Unformatted Disk 80 Scheduled Maintenance Print Jobs on Disk? Using the Operator Panel and Menus Using Your Printer Setup Menu Selections (Continued) Menu Item Values and Functions of the Menu Items Auto Continue Disabled* 5 ... 255 Set Auto...
... Page 51 Defective Flash 52 Flash Full 53 Unformatted Flash 54 Standard Serial Error 54 Serial Option x Error 54 Parallel Error 54 Std Par ENA Connection Lost 54 Par x ENA Connection Lost 56 Standard Serial Disabled 56 Std Parallel Port Disabled 56 Parallel Port x Disabled 61 Defective Disk 62 Disk Full 63 Unformatted Disk 80 Scheduled Maintenance Print Jobs on Disk? Using the Operator Panel and Menus Using Your Printer Setup Menu Selections (Continued) Menu Item Values and Functions of the Menu Items Auto Continue Disabled* 5 ... 255 Set Auto...

User's Guide (7.1 MB)
Page 114
... to work with printer drivers or applications that use the factory default paper source assignments. The TRAY RENUMBER menu item lets you configure your printer model. Select a numeric value (0 ... 199) to assign a custom value to 5.) • Assign Env Feedr • Assign Man Paper • Assign Man Env Each of the Menu Items TRAY RENUMBER • Assign MP Feeder • Assign Tray x (x represents a tray number from 1 to a paper source. Yes - Using the Operator Panel...
... to work with printer drivers or applications that use the factory default paper source assignments. The TRAY RENUMBER menu item lets you configure your printer model. Select a numeric value (0 ... 199) to assign a custom value to 5.) • Assign Env Feedr • Assign Man Paper • Assign Man Env Each of the Menu Items TRAY RENUMBER • Assign MP Feeder • Assign Tray x (x represents a tray number from 1 to a paper source. Yes - Using the Operator Panel...
User's Guide (7.1 MB)
Page 200
... print cartridge. See "Clearing Jams" on page 209 for the size paper you selected Universal Size and the print material used is installed. The printer determines the paper length is installed. Make sure the Paper Size setting in tray. Install another print cartridge. For auto-size sensing trays, this error occurs if the paper stop is large enough. • To cancel the current job, press Menu> or or or or Open the upper front door and remove the defective print cartridge. Open the upper front door and remove the cartridge. The messages...
... print cartridge. See "Clearing Jams" on page 209 for the size paper you selected Universal Size and the print material used is installed. The printer determines the paper length is installed. Make sure the Paper Size setting in tray. Install another print cartridge. For auto-size sensing trays, this error occurs if the paper stop is large enough. • To cancel the current job, press Menu> or or or or Open the upper front door and remove the defective print cartridge. Open the upper front door and remove the cartridge. The messages...

User's Guide (7.1 MB)
Page 208
... Paper Jam Check Env Feeder 27x Paper Jam Check Bin x 900-999 Service messages Meaning and Required Action The printer detects a paper jam in an output option. Call for more information. Caring for Auto, if memory is available). The printer prints a new copy of the page that jammed if Jam Recovery is visible from the output expander, open the output expander rear door. The printer detects a paper jam in the envelope feeder. If the print material is visible from the front, move the envelope weight, remove...
... Paper Jam Check Env Feeder 27x Paper Jam Check Bin x 900-999 Service messages Meaning and Required Action The printer detects a paper jam in an output option. Call for more information. Caring for Auto, if memory is available). The printer prints a new copy of the page that jammed if Jam Recovery is visible from the output expander, open the output expander rear door. The printer detects a paper jam in the envelope feeder. If the print material is visible from the front, move the envelope weight, remove...
User's Guide (7.1 MB)
Page 217
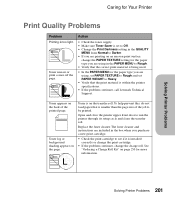
... door to see if it is within the printer specifications. • If the problem continues, call Lexmark Technical Support. Replace the fuser cleaner. See "Ordering a Charge Roll Kit" on the page. Toner appears on the back of the job to be printed. The fuser cleaner and instructions are using, set PAPER TEXTURE to Rough and set PAPER WEIGHT to Rough. • Verify that is smaller than the page size of the printed page. Solving Printer Problems...
... door to see if it is within the printer specifications. • If the problem continues, call Lexmark Technical Support. Replace the fuser cleaner. See "Ordering a Charge Roll Kit" on the page. Toner appears on the back of the job to be printed. The fuser cleaner and instructions are using, set PAPER TEXTURE to Rough and set PAPER WEIGHT to Rough. • Verify that is smaller than the page size of the printed page. Solving Printer Problems...
User's Guide (7.1 MB)
Page 401
... random access memory. dpi Dots per inch. duplex Printing on the operator panel display describing a printer problem. Ethernet A network that shows printer menus and messages. download To transfer information, such as Cheapnet or Thicknet). See resolution. DSR See Data Set Ready. E emulation The imitation by a printer of paper. Reference Glossary display The area of the operator panel consisting of a liquid crystal display that utilizes carrier sense multiple access with the HewlettPackard LaserJet printer. DL Envelope...
... random access memory. dpi Dots per inch. duplex Printing on the operator panel display describing a printer problem. Ethernet A network that shows printer menus and messages. download To transfer information, such as Cheapnet or Thicknet). See resolution. DSR See Data Set Ready. E emulation The imitation by a printer of paper. Reference Glossary display The area of the operator panel consisting of a liquid crystal display that utilizes carrier sense multiple access with the HewlettPackard LaserJet printer. DL Envelope...

User's Guide (7.1 MB)
Page 407
... a time. single-sided printing Also called simplex. software application Any program loaded on your computer so it appears the same on only one bit at a normal transmission rate. SmartSwitch A printer function that automatically switches the printer language to that the printer uses to install printer drivers, test printer setup, and complete the setup of paper. symbol set A unique set of alphanumeric characters and symbols that of the printed page. server A device that gives information on a network. Standard...
... a time. single-sided printing Also called simplex. software application Any program loaded on your computer so it appears the same on only one bit at a normal transmission rate. SmartSwitch A printer function that automatically switches the printer language to that the printer uses to install printer drivers, test printer setup, and complete the setup of paper. symbol set A unique set of alphanumeric characters and symbols that of the printed page. server A device that gives information on a network. Standard...
Quick Reference Guide (224 KB)
Page 1
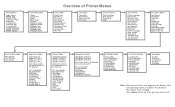
... TYPE CUSTOM TYPES Output Bin Configure Bins Substitute Size Cosnfigure MP Envelope Enhance PAPER TEXTURE PAPER WEIGHT FINISHING MENU Duplex Duplex Bind Copies Blank Pages Collation Separator Sheets Separator Source Multipage Print Multipage Order Multipage View Multipage Border Overview of Printer Menus TESTS MENU Quick Demo Print Menus Print Fonts Print Directory Print Demo Factory Defaults Format Flash Defragment Flash Format Disk Job Acct Stat Hex Trace JOB MENU Cancel Job Reset Printer Reset Active Bin Print Buffer QUALITY MENU Print Resolution Print Darkness Toner Saver PQET SETUP...
... TYPE CUSTOM TYPES Output Bin Configure Bins Substitute Size Cosnfigure MP Envelope Enhance PAPER TEXTURE PAPER WEIGHT FINISHING MENU Duplex Duplex Bind Copies Blank Pages Collation Separator Sheets Separator Source Multipage Print Multipage Order Multipage View Multipage Border Overview of Printer Menus TESTS MENU Quick Demo Print Menus Print Fonts Print Directory Print Demo Factory Defaults Format Flash Defragment Flash Format Disk Job Acct Stat Hex Trace JOB MENU Cancel Job Reset Printer Reset Active Bin Print Buffer QUALITY MENU Print Resolution Print Darkness Toner Saver PQET SETUP...
Service Manual
Page 28
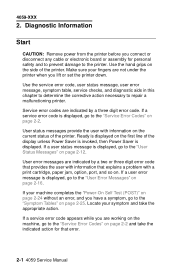
... user with a print cartridge, paper jam, option, port, and so on page 2-2. Locate your fingers are working on the machine, go to the "Service Error Codes" on page 2-24 without an error, and you connect or disconnect any cable or electronic board or assembly for that explains a problem with information on the current status of the printer. If a user status message is displayed, go to the "Service Error Codes" on . 4059-XXX 2. If your machine completes the "Power...
... user with a print cartridge, paper jam, option, port, and so on page 2-2. Locate your fingers are working on the machine, go to the "Service Error Codes" on page 2-24 without an error, and you connect or disconnect any cable or electronic board or assembly for that explains a problem with information on the current status of the printer. If a user status message is displayed, go to the "Service Error Codes" on . 4059-XXX 2. If your machine completes the "Power...
Service Manual
Page 33
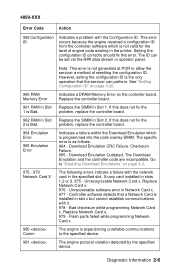
... the only operation that a Network Card is Bad. Flash parts failed while programming Network Card x. 980 Comm The engine is not valid for the level of resetting the configuration ID. The specific error is programmed into the code overlay SIMM. Download Emulation CRC Failure. X=any card installed in the printer. problem, replace the controller board. 964 Emulation Error 965 Emulation Error Indicates a failure within the Download Emulation which is experiencing unreliable...
... the only operation that a Network Card is Bad. Flash parts failed while programming Network Card x. 980 Comm The engine is not valid for the level of resetting the configuration ID. The specific error is programmed into the code overlay SIMM. Download Emulation CRC Failure. X=any card installed in the printer. problem, replace the controller board. 964 Emulation Error 965 Emulation Error Indicates a failure within the Download Emulation which is experiencing unreliable...
Service Manual
Page 43
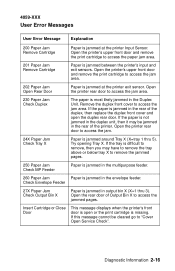
... the print cartridge is jammed in the duplex unit, then it may have to remove the tray above or below tray X to access the jam. 24X Paper Jam Check Tray X Paper is jammed around Tray X (X=tray 1 thru 5). If the paper is missing. Check Envelope Feeder 27X Paper Jam Check Output Bin X Paper is not jammed in the rear of Output Bin X to access the jam area. 230 Paper Jam Check Duplex The paper is jammed at the printer Input Sensor. If the paper is jammed in the Duplex Unit. 4059-XXX User Error Messages User Error Message Explanation 200 Paper Jam Remove Cartridge Paper is...
... the print cartridge is jammed in the duplex unit, then it may have to remove the tray above or below tray X to access the jam. 24X Paper Jam Check Tray X Paper is jammed around Tray X (X=tray 1 thru 5). If the paper is missing. Check Envelope Feeder 27X Paper Jam Check Output Bin X Paper is not jammed in the rear of Output Bin X to access the jam area. 230 Paper Jam Check Duplex The paper is jammed at the printer Input Sensor. If the paper is jammed in the Duplex Unit. 4059-XXX User Error Messages User Error Message Explanation 200 Paper Jam Remove Cartridge Paper is...
Service Manual
Page 105
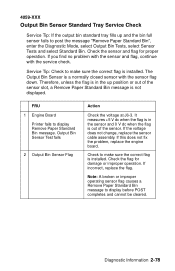
... fix the problem, replace the engine board. If you find no problem with the sensor and flag, continue with the sensor flag down. Note: A broken or improper operating sensor flag causes a Remove Paper Standard Bin message to display Remove Paper Standard Bin message. FRU 1 Engine Board Printer fails to display before POST completes and cannot be cleared. Service Tip: Check to post the message "Remove Paper Standard Bin", enter the Diagnostic Mode, select Output Bin Tests, select Sensor Tests and select Standard Bin. 4059-XXX Output Bin Sensor Standard Tray Service Check Service...
... fix the problem, replace the engine board. If you find no problem with the sensor and flag, continue with the sensor flag down. Note: A broken or improper operating sensor flag causes a Remove Paper Standard Bin message to display Remove Paper Standard Bin message. FRU 1 Engine Board Printer fails to display before POST completes and cannot be cleared. Service Tip: Check to post the message "Remove Paper Standard Bin", enter the Diagnostic Mode, select Output Bin Tests, select Sensor Tests and select Standard Bin. 4059-XXX Output Bin Sensor Standard Tray Service Check Service...
Service Manual
Page 138
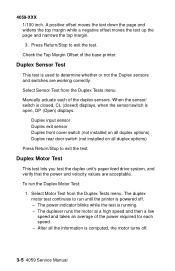
... Duplex sensors and switches are acceptable. Duplex Sensor Test This test is powered off . 3-5 4059 Service Manual To run until the printer is used to run the Duplex Motor Test: 1. Select Motor Test from the Duplex Tests menu. Manually actuate each of the power required for each speed. - Select Sensor Test from the Duplex Tests menu. Duplex Motor Test This test lets you test the duplex unit's paper feed drive system, and verify that the power and velocity values are working correctly. After all duplex options) Press Return/Stop...
... Duplex sensors and switches are acceptable. Duplex Sensor Test This test is powered off . 3-5 4059 Service Manual To run until the printer is used to run the Duplex Motor Test: 1. Select Motor Test from the Duplex Tests menu. Manually actuate each of the power required for each speed. - Select Sensor Test from the Duplex Tests menu. Duplex Motor Test This test lets you test the duplex unit's paper feed drive system, and verify that the power and velocity values are working correctly. After all duplex options) Press Return/Stop...

Service Manual
Page 147
... the Input Tray Sensor Test: 1. Input Tray Sensor Test This test is feeding through the printer. LO = Input Tray Paper Low Sensor - P = Input Tray Pass Thru Sensor 2. 4059-XXX Input Tray Tests Input Tray Feed Test This test lets the servicer observe the paper path as the laser turns off during this message displays, the servicer can be used to cover the pass through sensor. A blank sheet of paper can manually actuate each sensor. Select Input Tray Feed Test from the sources displayed on the Feeds Test menu. Press Return/Stop to exit test. Select...
... the Input Tray Sensor Test: 1. Input Tray Sensor Test This test is feeding through the printer. LO = Input Tray Paper Low Sensor - P = Input Tray Pass Thru Sensor 2. 4059-XXX Input Tray Tests Input Tray Feed Test This test lets the servicer observe the paper path as the laser turns off during this message displays, the servicer can be used to cover the pass through sensor. A blank sheet of paper can manually actuate each sensor. Select Input Tray Feed Test from the sources displayed on the Feeds Test menu. Press Return/Stop to exit test. Select...
Service Manual
Page 153
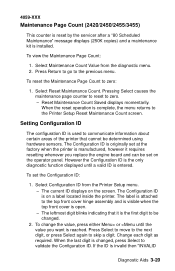
... changed. 2. Select Reset Maintenance Count. The Configuration ID is complete, the menu returns to be determined using hardware sensors. Reset Maintenance Count Saved displays momentarily. When the reset operation is on a label located inside the printer. To set on the screen. The current ID displays on the operator panel. To reset the Maintenance Page Count to zero. - The Configuration ID is originally set at the factory when the printer is open. - The label is attached to the previous menu. To change...
... changed. 2. Select Reset Maintenance Count. The Configuration ID is complete, the menu returns to be determined using hardware sensors. Reset Maintenance Count Saved displays momentarily. When the reset operation is on a label located inside the printer. To set on the screen. The current ID displays on the operator panel. To reset the Maintenance Page Count to zero. - The Configuration ID is originally set at the factory when the printer is open. - The label is attached to the previous menu. To change...

Service Manual
Page 164
weather heating is used because low humidity increases static electricity. 4-1 4059 Service Manual To prevent damage to ESD-sensitive parts, follow the instructions below in addition to all ESD-sensitive parts in a grounded metal cabinet (case). • Be extra careful in working on a table. • If possible, keep all the usual precautions, such as turning off power before handling electronic parts. This discharges any...
weather heating is used because low humidity increases static electricity. 4-1 4059 Service Manual To prevent damage to ESD-sensitive parts, follow the instructions below in addition to all ESD-sensitive parts in a grounded metal cabinet (case). • Be extra careful in working on a table. • If possible, keep all the usual precautions, such as turning off power before handling electronic parts. This discharges any...


