
Printer Languages and Interfaces Technical Reference
Page 62
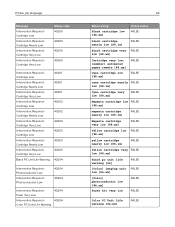
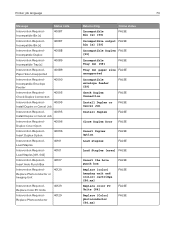
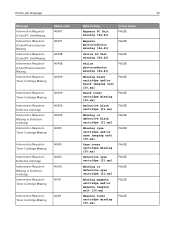
...Low Intervention Required Cartridge Very Low Intervention Required Cartridge Low Intervention Required Cartridge Nearly Low Intervention Required Cartridge Very Low Black PC Unit Life Warning 40201 40201 40201 40202 40202 40202 40203 40203 40203 40204 Intervention Required Photoconductor Low Intervention Required Photoconductor Low 40204 ... FALSE [88.xx] yellow cartridge nearly low [88.1x] FALSE Yellow cartridge very FALSE low [88.xx] Black pc unit life warning [84] [Color] imaging unit low [84.xx] FALSE FALSE [Color] photoconductor low [84.xx] Fuser kit very low FALSE FALSE Color PC...
...Low Intervention Required Cartridge Very Low Intervention Required Cartridge Low Intervention Required Cartridge Nearly Low Intervention Required Cartridge Very Low Black PC Unit Life Warning 40201 40201 40201 40202 40202 40202 40203 40203 40203 40204 Intervention Required Photoconductor Low Intervention Required Photoconductor Low 40204 ... FALSE [88.xx] yellow cartridge nearly low [88.1x] FALSE Yellow cartridge very FALSE low [88.xx] Black pc unit life warning [84] [Color] imaging unit low [84.xx] FALSE FALSE [Color] photoconductor low [84.xx] Fuser kit very low FALSE FALSE Color PC...
Printer Languages and Interfaces Technical Reference
Page 63
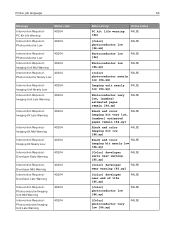
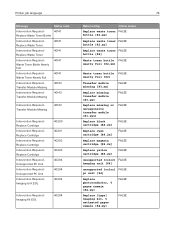
... Low 40204 Intervention Required Developer Early Warning 40204 Intervention Required Developer Mid Warning Intervention Required Developer Late Warning 40204 40204 Intervention Required Photoconductor/Imaging Unit Mid Warning Intervention Required Photoconductor/Imaging Unit Late Warning 40204 40204 63 Return string PC kit life warning [84] Online status FALSE [Color] photoconductor low [84.xx] Photoconductor low...
... Low 40204 Intervention Required Developer Early Warning 40204 Intervention Required Developer Mid Warning Intervention Required Developer Late Warning 40204 40204 Intervention Required Photoconductor/Imaging Unit Mid Warning Intervention Required Photoconductor/Imaging Unit Late Warning 40204 40204 63 Return string PC kit life warning [84] Online status FALSE [Color] photoconductor low [84.xx] Photoconductor low...
Printer Languages and Interfaces Technical Reference
Page 69
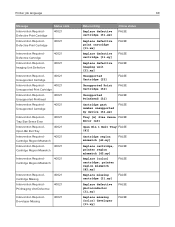
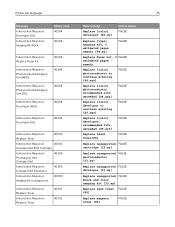
...Cartridge Intervention Required Defective Print Cartridge Status code 40021 40021 Intervention Required Defective Cartridge Intervention Required Imaging Unit Defective 40021 40021 Intervention Required Unsupported Cartridge 40021 Intervention Required - 40021 Unsupported Print Cartridge ...40021 Cartridge Region Mismatch Intervention Required - 40021 Cartridge Region Mismatch Intervention Required Cartridge Missing Intervention Required PC/Imaging Unit Defective 40021 40021 Intervention Required Developer Missing 40021 Return string Replace defective cartridge [31.xx] Online ...
...Cartridge Intervention Required Defective Print Cartridge Status code 40021 40021 Intervention Required Defective Cartridge Intervention Required Imaging Unit Defective 40021 40021 Intervention Required Unsupported Cartridge 40021 Intervention Required - 40021 Unsupported Print Cartridge ...40021 Cartridge Region Mismatch Intervention Required - 40021 Cartridge Region Mismatch Intervention Required Cartridge Missing Intervention Required PC/Imaging Unit Defective 40021 40021 Intervention Required Developer Missing 40021 Return string Replace defective cartridge [31.xx] Online ...
Printer Languages and Interfaces Technical Reference
Page 70
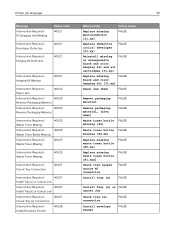
Printer job language 70 Message Intervention Required PC/Imaging Unit Missing Intervention Required Developer Defective Intervention Required Imaging Kit Defective Status code 40021 40021 40021 Intervention Required Imaging Kit Missing 40021 Intervention Required Paper Jam 40022 Intervention Required - 40025 Remove ... [color] developer [31.xy] FALSE Reinstall missing or unresponsive black and color imaging kit and all cartridges [31.xy] FALSE Replace missing FALSE black and color imaging kit [31.xy] Paper Jam [2xx] FALSE Remove packaging material Remove packaging material...
Printer job language 70 Message Intervention Required PC/Imaging Unit Missing Intervention Required Developer Defective Intervention Required Imaging Kit Defective Status code 40021 40021 40021 Intervention Required Imaging Kit Missing 40021 Intervention Required Paper Jam 40022 Intervention Required - 40025 Remove ... [color] developer [31.xy] FALSE Reinstall missing or unresponsive black and color imaging kit and all cartridges [31.xy] FALSE Replace missing FALSE black and color imaging kit [31.xy] Paper Jam [2xx] FALSE Remove packaging material Remove packaging material...
Printer Languages and Interfaces Technical Reference
Page 73
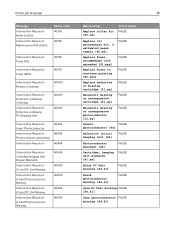
...Staples [G11, G12] 40101 Intervention Required Insert Hole Punch Box 40107 Intervention Required - 40129 Replace Photoconductor or Imaging Unit Intervention Required Replace Color PC Units Intervention Required Replace Photoconductor 40129 40129 Return string Incompatible Bin [x] [59] Online status FALSE Incompatible output FALSE ... Load staples FALSE FALSE Load Staples [area] FALSE Insert the hole punch box Replace [color] imaging unit and [color] cartridge [84.xx] Replace color PC Units [84] Replace [Color] photoconductor [84.xx] FALSE FALSE FALSE FALSE Printer job language 73...
...Staples [G11, G12] 40101 Intervention Required Insert Hole Punch Box 40107 Intervention Required - 40129 Replace Photoconductor or Imaging Unit Intervention Required Replace Color PC Units Intervention Required Replace Photoconductor 40129 40129 Return string Incompatible Bin [x] [59] Online status FALSE Incompatible output FALSE ... Load staples FALSE FALSE Load Staples [area] FALSE Insert the hole punch box Replace [color] imaging unit and [color] cartridge [84.xx] Replace color PC Units [84] Replace [Color] photoconductor [84.xx] FALSE FALSE FALSE FALSE Printer job language 73...
Printer Languages and Interfaces Technical Reference
Page 74
...Required Replace Cartridge Intervention Required Replace Cartridge Intervention Required Unsupported PC Unit Intervention Required Unsupported PC Unit Intervention Required Imaging Unit EOL 40200 40201 40202 40203 40204 40204 40204 Intervention Required Imaging Kit EOL 40204 Return string Online status Replace waste toner ... [88.2x] FALSE Replace yellow cartridge [88.2x] FALSE unsupported [color] FALSE imaging unit [84] unsupported [color] FALSE pc unit [84] Replace photoconductor, 0 pages remain [84.xy] Replace [type] imaging kit, 0 estimated pages remain [84.xy] FALSE FALSE
...Required Replace Cartridge Intervention Required Replace Cartridge Intervention Required Unsupported PC Unit Intervention Required Unsupported PC Unit Intervention Required Imaging Unit EOL 40200 40201 40202 40203 40204 40204 40204 Intervention Required Imaging Kit EOL 40204 Return string Online status Replace waste toner ... [88.2x] FALSE Replace yellow cartridge [88.2x] FALSE unsupported [color] FALSE imaging unit [84] unsupported [color] FALSE pc unit [84] Replace photoconductor, 0 pages remain [84.xy] Replace [type] imaging kit, 0 estimated pages remain [84.xy] FALSE FALSE
Printer Languages and Interfaces Technical Reference
Page 75
... [88] Replace magenta toner [88] FALSE Printer job language 75 Message Intervention Required Developer EOL Intervention Required Imaging Kit 4 EOL Status code 40204 40204 Intervention Required Replace Fuser Kit 40204 Intervention Required - Photoconductor/Imaging Unit EOL 40204 Intervention Required Developer AEOL 40204 Intervention Required Developer EOL 40204 Intervention Required Replace Toner 40300 Intervention...
... [88] Replace magenta toner [88] FALSE Printer job language 75 Message Intervention Required Developer EOL Intervention Required Imaging Kit 4 EOL Status code 40204 40204 Intervention Required Replace Fuser Kit 40204 Intervention Required - Photoconductor/Imaging Unit EOL 40204 Intervention Required Developer AEOL 40204 Intervention Required Developer EOL 40204 Intervention Required Replace Toner 40300 Intervention...
Printer Languages and Interfaces Technical Reference
Page 78
... Defective or Missing Cartridge Intervention Required Defective or Missing PC/Imaging Unit 40400 40400 Intervention Required Insert Photoconductor Intervention Required Photoconductor Abnormal Intervention Required - 40404 40404 40404 Intervention Required ...Cartridge/Imaging Unit Region Mismatch Intervention Required [Color] PC Unit Missing Intervention Required [Color] Photoconductor Missing Intervention Required [Color] PC Unit Missing Intervention Required [Color] Photoconductor Missing 40404 40405 40405 40406...
... Defective or Missing Cartridge Intervention Required Defective or Missing PC/Imaging Unit 40400 40400 Intervention Required Insert Photoconductor Intervention Required Photoconductor Abnormal Intervention Required - 40404 40404 40404 Intervention Required ...Cartridge/Imaging Unit Region Mismatch Intervention Required [Color] PC Unit Missing Intervention Required [Color] Photoconductor Missing Intervention Required [Color] PC Unit Missing Intervention Required [Color] Photoconductor Missing 40404 40405 40405 40406...
Printer Languages and Interfaces Technical Reference
Page 79
... Intervention Required Toner Cartridge Missing 40411 Return string Magenta PC Unit missing [84.41] Magenta photoconductor missing [84.41] Yellow PC Unit missing [84.41] Yellow photoconductor missing [84.41] Missing black cartridge and/or black imaging unit [30.xx] Black toner cartridge missing [30.xx] Defective... black cartridge [31.xx] Missing or defective black cartridge [31.xx] Missing cyan cartridge and/or cyan imaging unit [30.xx] Cyan toner cartridge missing [30.xx] Defective cyan cartridge [31.xx] Missing or defective cyan cartridge [31.xx] Missing ...
... Intervention Required Toner Cartridge Missing 40411 Return string Magenta PC Unit missing [84.41] Magenta photoconductor missing [84.41] Yellow PC Unit missing [84.41] Yellow photoconductor missing [84.41] Missing black cartridge and/or black imaging unit [30.xx] Black toner cartridge missing [30.xx] Defective... black cartridge [31.xx] Missing or defective black cartridge [31.xx] Missing cyan cartridge and/or cyan imaging unit [30.xx] Cyan toner cartridge missing [30.xx] Defective cyan cartridge [31.xx] Missing or defective cyan cartridge [31.xx] Missing ...

Printer Languages and Interfaces Technical Reference
Page 80
... Tray [x] Return string Defective magenta cartridge [31.xx] Online status FALSE Missing or defective magenta cartridge [31.xx] FALSE Missing yellow cartridge and/or yellow imaging unit [30.xx] FALSE Yellow toner cartridge missing [30.xx] FALSE Defective yellow cartridge [31.xx] FALSE Missing or defective yellow cartridge [31.xx] FALSE Fuser...
... Tray [x] Return string Defective magenta cartridge [31.xx] Online status FALSE Missing or defective magenta cartridge [31.xx] FALSE Missing yellow cartridge and/or yellow imaging unit [30.xx] FALSE Yellow toner cartridge missing [30.xx] FALSE Defective yellow cartridge [31.xx] FALSE Missing or defective yellow cartridge [31.xx] FALSE Fuser...

Lexmark MS32x 42x 52x 62x series Disassembly of Waste Electrical and Electronic Equipment
Page 2
... 1 - 250 Sheet Tray 1 - 550 Sheet Tray 1 - Disassembly tools Item #2 Phillips screwdriver, magnetic Wire cutter E-clip puller or small flat-head screwdriver Standard slotted head screwdriver Imaging unit 16 - Toner cartridge 1 - MS62x series For details, see Annex D 3. 2.
... 1 - 250 Sheet Tray 1 - 550 Sheet Tray 1 - Disassembly tools Item #2 Phillips screwdriver, magnetic Wire cutter E-clip puller or small flat-head screwdriver Standard slotted head screwdriver Imaging unit 16 - Toner cartridge 1 - MS62x series For details, see Annex D 3. 2.

Lexmark MS32x 42x 52x 62x series Disassembly of Waste Electrical and Electronic Equipment
Page 4
MS32x, MS42x, MS52x, MS62x Series Location Toner Cartridge Imaging Unit Doc No.: Rev. 01 Page 4 of 18
MS32x, MS42x, MS52x, MS62x Series Location Toner Cartridge Imaging Unit Doc No.: Rev. 01 Page 4 of 18

Users Guide PDF
Page 31
... Set the printer to a value indicates the factory default setting. Supply Usage And Counters Clear Supply Usage History Reset Black Cartridge Counter Reset Black Imaging Unit Counter Reset Maintenance Counter Reset the supply usage history or the supply page counters after replacing the toner cartridge and... imaging unit. Note: For MP Feeder to appear, set Configure MP to Cassette from the Paper menu. or envelope-related change prompts. Device Operations ...
... Set the printer to a value indicates the factory default setting. Supply Usage And Counters Clear Supply Usage History Reset Black Cartridge Counter Reset Black Imaging Unit Counter Reset Maintenance Counter Reset the supply usage history or the supply page counters after replacing the toner cartridge and... imaging unit. Note: For MP Feeder to appear, set Configure MP to Cassette from the Paper menu. or envelope-related change prompts. Device Operations ...
Users Guide PDF
Page 68
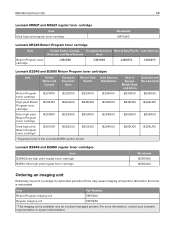
...imaging unit 56F0Z00 Regular imaging unit 56F0ZA0 * This imaging unit is exhausted. For more information, contact your Lexmark representative or system administrator. Maintaining the printer 68 Lexmark MS521 and MS621 regular toner cartridge Item Ultra high yield regular toner cartridge Worldwide 56F0UA0 Lexmark M1246 Return Program toner cartridge Item United... Latin America Distribution Rest of time may cause imaging unit parts to fail before the toner is available only for contract‑managed printers. Lexmark B2546 and B2650 regular toner cartridges Item B2546 Extra...
...imaging unit 56F0Z00 Regular imaging unit 56F0ZA0 * This imaging unit is exhausted. For more information, contact your Lexmark representative or system administrator. Maintaining the printer 68 Lexmark MS521 and MS621 regular toner cartridge Item Ultra high yield regular toner cartridge Worldwide 56F0UA0 Lexmark M1246 Return Program toner cartridge Item United... Latin America Distribution Rest of time may cause imaging unit parts to fail before the toner is available only for contract‑managed printers. Lexmark B2546 and B2650 regular toner cartridges Item B2546 Extra...
Users Guide PDF
Page 69
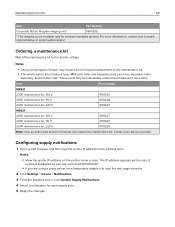
Contact your Lexmark representative or system administrator. Notes: • Using certain types of paper ...Item Part number MS521 200K maintenance kit, 100 V 41X1230 200K maintenance kit, 110 V 41X1228 200K maintenance kit, 220 V 41X1229 MS621 200K maintenance kit, 100 V 41X1227 200K maintenance kit, 110 V 41X1225 200K maintenance kit, 220 V 41X1226 Note: Only an ...printer home screen. Maintaining the printer 69 Item Part Number Corporate Return Program imaging unit* 56F0Z0E * This imaging unit is available only for each supply item. 5 Apply the changes.
Contact your Lexmark representative or system administrator. Notes: • Using certain types of paper ...Item Part number MS521 200K maintenance kit, 100 V 41X1230 200K maintenance kit, 110 V 41X1228 200K maintenance kit, 220 V 41X1229 MS621 200K maintenance kit, 100 V 41X1227 200K maintenance kit, 110 V 41X1225 200K maintenance kit, 220 V 41X1226 Note: Only an ...printer home screen. Maintaining the printer 69 Item Part Number Corporate Return Program imaging unit* 56F0Z0E * This imaging unit is available only for each supply item. 5 Apply the changes.

Users Guide PDF
Page 72
Maintaining the printer 72 Replacing the imaging unit 1 Open door A. 2 Remove the toner cartridge. 3 Remove the used imaging unit.
Maintaining the printer 72 Replacing the imaging unit 1 Open door A. 2 Remove the toner cartridge. 3 Remove the used imaging unit.
Users Guide PDF
Page 73
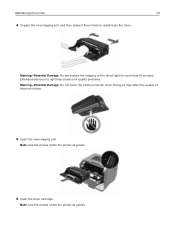
Note: Use the arrows inside the printer as guides. 6 Insert the toner cartridge. Extended exposure to light may affect the quality of future print jobs. 5 Insert the new imaging unit. Doing so may cause print quality problems. Warning-Potential Damage: Do not touch the photoconductor drum. Note: Use the arrows inside the printer as guides. Warning-Potential Damage: Do not expose the imaging unit to redistribute the toner. Maintaining the printer 73 4 Unpack the new imaging unit, and then shake it three times to direct light for more than 10 minutes.
Note: Use the arrows inside the printer as guides. 6 Insert the toner cartridge. Extended exposure to light may affect the quality of future print jobs. 5 Insert the new imaging unit. Doing so may cause print quality problems. Warning-Potential Damage: Do not touch the photoconductor drum. Note: Use the arrows inside the printer as guides. Warning-Potential Damage: Do not expose the imaging unit to redistribute the toner. Maintaining the printer 73 4 Unpack the new imaging unit, and then shake it three times to direct light for more than 10 minutes.

Users Guide PDF
Page 87
Doing so may cause print quality problems. Warning-Potential Damage: Do not touch the photoconductor drum. CAUTION-HOT SURFACE: The inside of injury from a hot component, allow the surface to cool before touching it. Extended exposure to direct light for more than 10 minutes. Clearing jams 87 4 Remove the imaging unit. Warning-Potential Damage: Do not expose the imaging unit to light may affect the quality of future print jobs. 5 Remove the jammed paper. To reduce the risk of the printer might be hot. Note: Make sure that all paper fragments are removed.
Doing so may cause print quality problems. Warning-Potential Damage: Do not touch the photoconductor drum. CAUTION-HOT SURFACE: The inside of injury from a hot component, allow the surface to cool before touching it. Extended exposure to direct light for more than 10 minutes. Clearing jams 87 4 Remove the imaging unit. Warning-Potential Damage: Do not expose the imaging unit to light may affect the quality of future print jobs. 5 Remove the jammed paper. To reduce the risk of the printer might be hot. Note: Make sure that all paper fragments are removed.

Users Guide PDF
Page 88
Clearing jams 88 6 Insert the imaging unit. Note: Use the arrows inside the printer as guides. 7 Insert the toner cartridge. Note: Use the arrows inside the printer as guides.
Clearing jams 88 6 Insert the imaging unit. Note: Use the arrows inside the printer as guides. 7 Insert the toner cartridge. Note: Use the arrows inside the printer as guides.

Users Guide PDF
Page 101
...minutes. Note: Make sure that is left on the imaging unit. 1 Remove the toner cartridge, and then remove the imaging unit. a From the control panel, navigate to step 2. Note: If the cartridge is using a genuine and supported Lexmark toner cartridge. a Remove any packing material that the ... Print the document. support. Doing so may cause print quality problems. Warning-Potential Damage: Do not touch the photoconductor drum under the imaging unit. No The problem is solved. The problem is not bent or out of the toner cartridge, and replace if necessary. Step 3 ...
...minutes. Note: Make sure that is left on the imaging unit. 1 Remove the toner cartridge, and then remove the imaging unit. a From the control panel, navigate to step 2. Note: If the cartridge is using a genuine and supported Lexmark toner cartridge. a Remove any packing material that the ... Print the document. support. Doing so may cause print quality problems. Warning-Potential Damage: Do not touch the photoconductor drum under the imaging unit. No The problem is solved. The problem is not bent or out of the toner cartridge, and replace if necessary. Step 3 ...


