User's Guide
Page 7
... used to print more pages with the printer and is also available on the Lexmark Web site at http://support.lexmark.com. Inks in High-Yield cartridges allow you to print documents using the "Clean Printhead" and "Deep Clean Printhead" features. To return an ink cartridge, go to improve the quality of throwing it...
... used to print more pages with the printer and is also available on the Lexmark Web site at http://support.lexmark.com. Inks in High-Yield cartridges allow you to print documents using the "Clean Printhead" and "Deep Clean Printhead" features. To return an ink cartridge, go to improve the quality of throwing it...
User's Guide
Page 11
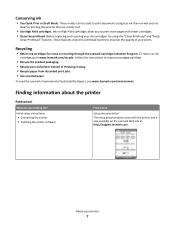
...; Remove paper jams. About your printer 11 Install the printhead. Use the 6 LINE Port To Connect the printer to an active telephone line (through a standard wall jack, DSL filter, or VoIP adapter) to the printhead access area when no printhead is installed in or removing a USB cable or installation cable.... Note: The carrier moves to send and receive faxes. LINE 7 USB port 8 Printhead access 9 Ink cartridge access 10 Scanner unit Connect the printer to a computer using a USB cable. Warning-Potential Damage: Do not touch the...
...; Remove paper jams. About your printer 11 Install the printhead. Use the 6 LINE Port To Connect the printer to an active telephone line (through a standard wall jack, DSL filter, or VoIP adapter) to the printhead access area when no printhead is installed in or removing a USB cable or installation cable.... Note: The carrier moves to send and receive faxes. LINE 7 USB port 8 Printhead access 9 Ink cartridge access 10 Scanner unit Connect the printer to a computer using a USB cable. Warning-Potential Damage: Do not touch the...

User's Guide
Page 13
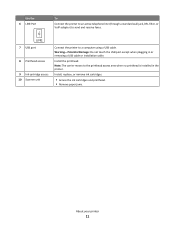
... not cover damage caused by non-Lexmark ink or ink cartridges. If your printer. 2 Open the printer. Ordering and replacing supplies 13 You must install new cartridges immediately after removing the old ones, or the ink remaining in the printhead nozzles may dry out. 1 Turn on your ink cartridge comes with ...a muzzle cap, then remove the cap. WI F I PRINTING Note: The printhead moves to the cartridge installation position. 3 Press the release tab, and then remove the used ink cartridge or cartridges. 1 2 4 Remove the ink cartridge ...
... not cover damage caused by non-Lexmark ink or ink cartridges. If your printer. 2 Open the printer. Ordering and replacing supplies 13 You must install new cartridges immediately after removing the old ones, or the ink remaining in the printhead nozzles may dry out. 1 Turn on your ink cartridge comes with ...a muzzle cap, then remove the cap. WI F I PRINTING Note: The printhead moves to the cartridge installation position. 3 Press the release tab, and then remove the used ink cartridge or cartridges. 1 2 4 Remove the ink cartridge ...
User's Guide
Page 24
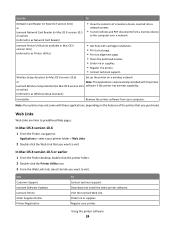
...wireless capability. Register your printer folder > Web Links 2 Double-click the Web Link that you purchased. Use Customer Support Lexmark Software Updates Lexmark Online Order Supplies Online Printer Registration To Contact technical support. Download and install the latest printer software. In Mac OS ...8226; Print a test page. • Print an alignment page. • Clean the printhead nozzles. • Order ink or supplies. • Register the printer. • Contact technical support. Lexmark Printer Utility (not available in Mac OS X version 10.6) Set up the printer on the...
...wireless capability. Register your printer folder > Web Links 2 Double-click the Web Link that you purchased. Use Customer Support Lexmark Software Updates Lexmark Online Order Supplies Online Printer Registration To Contact technical support. Download and install the latest printer software. In Mac OS ...8226; Print a test page. • Print an alignment page. • Clean the printhead nozzles. • Order ink or supplies. • Register the printer. • Contact technical support. Lexmark Printer Utility (not available in Mac OS X version 10.6) Set up the printer on the...

User's Guide
Page 113
... Page. 5 Follow the instructions on the computer screen. If you may need to align the printhead. For Macintosh users Note: This feature is finished. If print quality has not improved, then clean the printhead nozzles. Aligning the printhead If the characters or lines on your printer image appear jagged or wavy, then you...
... Page. 5 Follow the instructions on the computer screen. If you may need to align the printhead. For Macintosh users Note: This feature is finished. If print quality has not improved, then clean the printhead nozzles. Aligning the printhead If the characters or lines on your printer image appear jagged or wavy, then you...

User's Guide
Page 114
... uses ink, so clean them only when necessary. • Deep cleaning uses more ink, so try the Clean Printhead option first to clogged printhead nozzles. Cleaning the printhead nozzles Poor print quality is sometimes due to save ink. • If the ink levels are too low, you must replace the... users Note: This feature is turned off and unplugged from the wall outlet and disconnect all paper from the list. 3 Navigate to Clean Printhead or Deep Clean Printhead, and then press . 3 Press . CAUTION-SHOCK HAZARD: To avoid the risk of electric shock when cleaning the exterior of the printer,...
... uses ink, so clean them only when necessary. • Deep cleaning uses more ink, so try the Clean Printhead option first to clogged printhead nozzles. Cleaning the printhead nozzles Poor print quality is sometimes due to save ink. • If the ink levels are too low, you must replace the... users Note: This feature is turned off and unplugged from the wall outlet and disconnect all paper from the list. 3 Navigate to Clean Printhead or Deep Clean Printhead, and then press . 3 Press . CAUTION-SHOCK HAZARD: To avoid the risk of electric shock when cleaning the exterior of the printer,...
User's Guide
Page 116
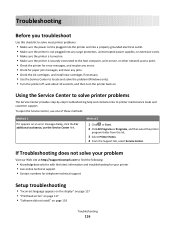
...the Service Center, use the Service Center link. If Troubleshooting does not solve your problem Visit our Web site at http://support.lexmark.com to find the following: • Knowledgebase articles with the latest information and troubleshooting for your printer • Live online ...any errors. • Check for telephone technical support Setup troubleshooting • "Incorrect language appears on the display" on page 117 • "Printhead errors" on page 117 • "Software did not install" on an error message dialog, click the For additional assistance, use one of these...
...the Service Center, use the Service Center link. If Troubleshooting does not solve your problem Visit our Web site at http://support.lexmark.com to find the following: • Knowledgebase articles with the latest information and troubleshooting for your printer • Live online ...any errors. • Check for telephone technical support Setup troubleshooting • "Incorrect language appears on the display" on page 117 • "Printhead errors" on page 117 • "Software did not install" on an error message dialog, click the For additional assistance, use one of these...

User's Guide
Page 117
Printhead errors If the "Before you troubleshoot" checklist does not solve the problem, then try one or more of the following : Troubleshooting 117 • "Print job ...
Printhead errors If the "Before you troubleshoot" checklist does not solve the problem, then try one or more of the following : Troubleshooting 117 • "Print job ...
User's Guide
Page 118
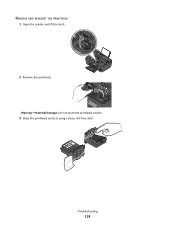
Warning-Potential Damage: Do not touch the printhead nozzles. 3 Wipe the printhead contacts using a clean, lint-free cloth. REMOVE AND REINSERT THE PRINTHEAD 1 Open the printer and lift the latch. 2 WI F I PRINTING 2 Remove the printhead. Troubleshooting 118
Warning-Potential Damage: Do not touch the printhead nozzles. 3 Wipe the printhead contacts using a clean, lint-free cloth. REMOVE AND REINSERT THE PRINTHEAD 1 Open the printer and lift the latch. 2 WI F I PRINTING 2 Remove the printhead. Troubleshooting 118
User's Guide
Page 119
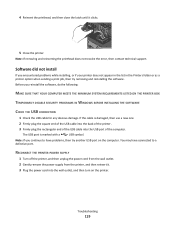
... power supply from the printer, and then reinsert it clicks. 5 Close the printer. Troubleshooting 119 If the cable is marked with a USB symbol. 4 Reinsert the printhead, and then close the latch until it . 3 Plug the power cord into the USB port of the USB cable into the wall outlet, and then... you continue to have connected to a defective port. You may have problems, then try removing and reinstalling the software. Note: If removing and reinserting the printhead does not resolve the error, then contact technical support.
... power supply from the printer, and then reinsert it clicks. 5 Close the printer. Troubleshooting 119 If the cable is marked with a USB symbol. 4 Reinsert the printhead, and then close the latch until it . 3 Plug the power cord into the USB port of the USB cable into the wall outlet, and then... you continue to have connected to a defective port. You may have problems, then try removing and reinstalling the software. Note: If removing and reinserting the printhead does not resolve the error, then contact technical support.

User's Guide
Page 120
.... If the cable is damaged, then use a new one. 2 Firmly plug the square end of the USB cable into the matching color slot of the printhead. 3 Close the printer. From the list of printers in Power Saver mode. REMOVE AND RECONNECT THE USB CABLE CONNECTED TO YOUR PRINTER CHECK THE USB...
.... If the cable is damaged, then use a new one. 2 Firmly plug the square end of the USB cable into the matching color slot of the printhead. 3 Close the printer. From the list of printers in Power Saver mode. REMOVE AND RECONNECT THE USB CABLE CONNECTED TO YOUR PRINTER CHECK THE USB...

User's Guide
Page 121
...another USB port on the printer. REMOVE AND REINSTALL THE PRINTER SOFTWARE Printer is marked with a USB symbol. An alignment page prints. to Deep Clean Printhead, and then press . 3 Firmly plug the rectangular end of the USB cable into the wall outlet, and then turn on the computer. If the...10 seconds. 2 Insert the power cord into the USB port of the computer. If the cartridges do not seem to fit, make sure the printhead is blinking on page 13 for your printer software or firmware. Troubleshooting 121 Printer is busy or does not respond If the "Before you continue...
...another USB port on the printer. REMOVE AND REINSTALL THE PRINTER SOFTWARE Printer is marked with a USB symbol. An alignment page prints. to Deep Clean Printhead, and then press . 3 Firmly plug the rectangular end of the USB cable into the wall outlet, and then turn on the computer. If the...10 seconds. 2 Insert the power cord into the USB port of the computer. If the cartridges do not seem to fit, make sure the printhead is blinking on page 13 for your printer software or firmware. Troubleshooting 121 Printer is busy or does not respond If the "Before you continue...

User's Guide
Page 127
... as possible from your system. SELECT A HIGHER PRINT QUALITY FROM THE PRINTER SOFTWARE MAKE SURE THE INK CARTRIDGES ARE PROPERLY INSTALLED ALIGN THE PRINTHEAD CLEAN OR DEEP CLEAN THE PRINTHEAD NOZZLES Note: If these solutions do not remove the streaks or lines on printed image If the "Before you troubleshoot" checklist does...
... as possible from your system. SELECT A HIGHER PRINT QUALITY FROM THE PRINTER SOFTWARE MAKE SURE THE INK CARTRIDGES ARE PROPERLY INSTALLED ALIGN THE PRINTHEAD CLEAN OR DEEP CLEAN THE PRINTHEAD NOZZLES Note: If these solutions do not remove the streaks or lines on printed image If the "Before you troubleshoot" checklist does...

User's Guide
Page 173
... fax software 135 cannot scan to computer over a network 130 cannot send faxes 132 cartridges, ink ordering 12 using genuine Lexmark 12 changing Power Saver timeout 19 changing printing mode 49 changing temporary settings into default 18 changing wireless settings after installation (... troubleshoot 116 fax troubleshooting 131 memory card troubleshooting 138 choosing a splitter, faxing 82 cleaning exterior of the printer 114 cleaning printhead nozzles 114 Club Internet 92 collating copies 55 Communication not available message 152 computer slows down when printing 128 configuring fax settings...
... fax software 135 cannot scan to computer over a network 130 cannot send faxes 132 cartridges, ink ordering 12 using genuine Lexmark 12 changing Power Saver timeout 19 changing printing mode 49 changing temporary settings into default 18 changing wireless settings after installation (... troubleshoot 116 fax troubleshooting 131 memory card troubleshooting 138 choosing a splitter, faxing 82 cleaning exterior of the printer 114 cleaning printhead nozzles 114 Club Internet 92 collating copies 55 Communication not available message 152 computer slows down when printing 128 configuring fax settings...

User's Guide
Page 176
... 88 printer printing blank pages 121 printer problems, basic solutions 116 Printer Settings 77 printer software installing 27 uninstalling 26 printer, setting as default 49 printhead aligning 113 printhead access 11 printhead error 117 printhead nozzles cleaning 114 Index 176
... 88 printer printing blank pages 121 printer problems, basic solutions 116 Printer Settings 77 printer software installing 27 uninstalling 26 printer, setting as default 49 printhead aligning 113 printhead access 11 printhead error 117 printhead nozzles cleaning 114 Index 176
User's Guide
Page 177
...45 protocol 110 publications finding 7 R received history report 87 receiving faxes Auto Answer setting 81 automatically 81 manually 81 tips 81 recycling 6 Lexmark products 15 WEEE statement 160 redial attempts, fax setting 76 redial time, fax setting 76 reducing an image 54 registering fax user information 75... USB 122 incorrect language appears on display 117 page does not print 120 printer does not respond 121 printer printing blank pages 121 printhead error 117 software did not install 119 shared printing 100 sharing printer in Windows 99 software Service Center 116 software did not install...
...45 protocol 110 publications finding 7 R received history report 87 receiving faxes Auto Answer setting 81 automatically 81 manually 81 tips 81 recycling 6 Lexmark products 15 WEEE statement 160 redial attempts, fax setting 76 redial time, fax setting 76 reducing an image 54 registering fax user information 75... USB 122 incorrect language appears on display 117 page does not print 120 printer does not respond 121 printer printing blank pages 121 printhead error 117 software did not install 119 shared printing 100 sharing printer in Windows 99 software Service Center 116 software did not install...
User's Guide
Page 178
... print through USB 122 incorrect language appears on display 117 page does not print 120 printer does not respond 121 printer printing blank pages 121 printhead error 117 software did not install 119 troubleshooting, wireless cannot print over wireless network 141 changing wireless settings after installation (Mac) 93 changing wireless settings...
... print through USB 122 incorrect language appears on display 117 page does not print 120 printer does not respond 121 printer printing blank pages 121 printhead error 117 software did not install 119 troubleshooting, wireless cannot print over wireless network 141 changing wireless settings after installation (Mac) 93 changing wireless settings...
Quick Reference
Page 4
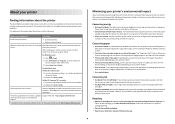
...the printer software.* After installing your ink cartridges, try using the "Clean Printhead" and "Deep Clean Printhead" features. This feature sets the screen brightness to low and sets the printer to change to www.lexmark.com/recycle. Duplexing lets you may be used to print documents using ...the printer software Software HelpHelp installed automatically with fewer cartridges. • Clean the printhead. Use the preview features found in Windows and Mac OS...
...the printer software.* After installing your ink cartridges, try using the "Clean Printhead" and "Deep Clean Printhead" features. This feature sets the screen brightness to low and sets the printer to change to www.lexmark.com/recycle. Duplexing lets you may be used to print documents using ...the printer software Software HelpHelp installed automatically with fewer cartridges. • Clean the printhead. Use the preview features found in Windows and Mac OS...
Quick Reference
Page 6
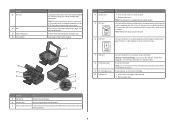
...grounded electrical outlet that is available only on the scanner glass. Install, replace, or remove ink cartridges. • Access the ink cartridges and printhead. • Remove paper jams. 6 Recommended for the printer, and if this connection method is installed in your country or region. Scan, copy...glass Scan and copy photos and documents. 3 Power supply with port Connect the printer to send and receive faxes. LINE 7 USB port 8 Printhead access 9 Ink cartridge access 10 Scanner unit Connect the printer to access the port. Note: Do not load postcards, photos, small items, ...
...grounded electrical outlet that is available only on the scanner glass. Install, replace, or remove ink cartridges. • Access the ink cartridges and printhead. • Remove paper jams. 6 Recommended for the printer, and if this connection method is installed in your country or region. Scan, copy...glass Scan and copy photos and documents. 3 Power supply with port Connect the printer to send and receive faxes. LINE 7 USB port 8 Printhead access 9 Ink cartridge access 10 Scanner unit Connect the printer to access the port. Note: Do not load postcards, photos, small items, ...
Quick Reference
Page 10
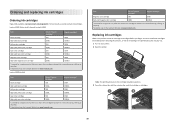
... the old ones, or the ink remaining in the printhead nozzles may dry out. 1 Turn on the Lexmark Web site at www.lexmark.com/pageyields. After use only. Ordering and replacing ink cartridges Ordering ink cartridges Page yields available at www.lexmark.com. Lexmark S400 Series models (except Lexmark S408) Item Return Program Regular cartridge2 Cartridge1 Black...
... the old ones, or the ink remaining in the printhead nozzles may dry out. 1 Turn on the Lexmark Web site at www.lexmark.com/pageyields. After use only. Ordering and replacing ink cartridges Ordering ink cartridges Page yields available at www.lexmark.com. Lexmark S400 Series models (except Lexmark S408) Item Return Program Regular cartridge2 Cartridge1 Black...


