User Manual
Page 8
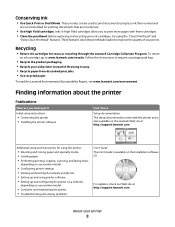
...; Caring for ? Recycling • Return ink cartridges for printing documents that are you to print documents using the "Clean Printhead" and "Deep Clean Printhead" features. Finding information about the printer Publications What are mostly text. • Use High Yield cartridges. These modes can ...your old printer instead of your printer 8 For updates, check our Web site at http://support.lexmark.com. About your prints. These features clean the printhead nozzles to www.lexmark.com/recycle. Conserving ink • Use Quick Print or Draft Mode. To return an ink cartridge...
...; Caring for ? Recycling • Return ink cartridges for printing documents that are you to print documents using the "Clean Printhead" and "Deep Clean Printhead" features. Finding information about the printer Publications What are mostly text. • Use High Yield cartridges. These modes can ...your old printer instead of your printer 8 For updates, check our Web site at http://support.lexmark.com. About your prints. These features clean the printhead nozzles to www.lexmark.com/recycle. Conserving ink • Use Quick Print or Draft Mode. To return an ink cartridge...
User Manual
Page 11
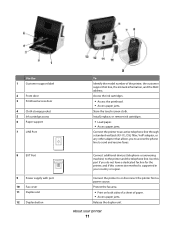
Access the ink cartridges. • Access the printhead. • Access paper jams. Store the touch-screen cloth. Install, replace, or remove ink cartridges. • Load paper. • Access paper jams. Connect the printer ... the MAC address. About your country or region. Connect the printer to the printer and the telephone line. Use the 1 Customer support label 2 Front door 3 Printhead access door 4 Cloth storage pocket 5 Ink cartridge access 6 Paper support 7 LINE Port 8 EXT Port 9 Power supply with port 10 Fax cover 11 Duplex unit 12...
Access the ink cartridges. • Access the printhead. • Access paper jams. Store the touch-screen cloth. Install, replace, or remove ink cartridges. • Load paper. • Access paper jams. Connect the printer ... the MAC address. About your country or region. Connect the printer to the printer and the telephone line. Use the 1 Customer support label 2 Front door 3 Printhead access door 4 Cloth storage pocket 5 Ink cartridge access 6 Paper support 7 LINE Port 8 EXT Port 9 Power supply with port 10 Fax cover 11 Duplex unit 12...
User Manual
Page 14
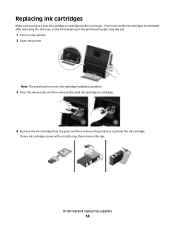
... may dry out. 1 Turn on your ink cartridge comes with a muzzle cap, then remove the cap. Note: The printhead moves to the cartridge installation position. 3 Press the release tab, and then remove the used ink cartridge or cartridges. 4 Remove the ink cartridge from the ...
... may dry out. 1 Turn on your ink cartridge comes with a muzzle cap, then remove the cap. Note: The printhead moves to the cartridge installation position. 3 Press the release tab, and then remove the used ink cartridge or cartridges. 4 Remove the ink cartridge from the ...
User Manual
Page 125
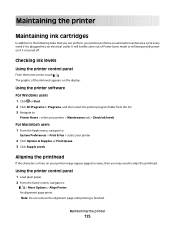
Aligning the printhead If the characters or lines on your printer image appear jagged or wavy, then you may need to the following tasks that you can perform, ... automatic maintenance cycle every week if it is turned off. Maintaining the printer 125 Maintaining the printer Maintaining ink cartridges In addition to align the printhead. Using the printer software For Windows users 1 Click or Start. 2 Click All Programs or Programs, and then select the printer program folder from the list...
Aligning the printhead If the characters or lines on your printer image appear jagged or wavy, then you may need to the following tasks that you can perform, ... automatic maintenance cycle every week if it is turned off. Maintaining the printer 125 Maintaining the printer Maintaining ink cartridges In addition to align the printhead. Using the printer software For Windows users 1 Click or Start. 2 Click All Programs or Programs, and then select the printer program folder from the list...
User Manual
Page 126
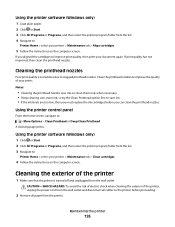
... > Maintenance tab > Align cartridges 5 Follow the instructions on the computer screen. Cleaning the printhead nozzles Poor print quality is turned off and unplugged from the wall outlet. Clean the printhead nozzles to improve the quality of the printer, unplug the power cord from the wall outlet ...you aligned the cartridges to improve print quality, then print your prints. If you can clean the printhead nozzles. If print quality has not improved, then clean the printhead nozzles. Maintaining the printer 126 CAUTION-SHOCK HAZARD: To avoid the risk of electric shock when cleaning...
... > Maintenance tab > Align cartridges 5 Follow the instructions on the computer screen. Cleaning the printhead nozzles Poor print quality is turned off and unplugged from the wall outlet. Clean the printhead nozzles to improve the quality of the printer, unplug the power cord from the wall outlet ...you aligned the cartridges to improve print quality, then print your prints. If you can clean the printhead nozzles. If print quality has not improved, then clean the printhead nozzles. Maintaining the printer 126 CAUTION-SHOCK HAZARD: To avoid the risk of electric shock when cleaning...
User Manual
Page 128
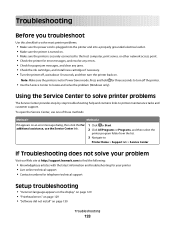
... • Live online technical support • Contact numbers for telephone technical support Setup troubleshooting • "Incorrect language appears on the display" on page 129 • "Printhead errors" on page 129 • "Software did not install" on . Troubleshooting Before you troubleshoot Use this checklist to solve most printer problems: • Make sure... from the list. 3 Navigate to: Printer Home > Support tab > Service Center If Troubleshooting does not solve your problem Visit our Web site at http://support.lexmark.com to printer maintenance tasks and customer support.
... • Live online technical support • Contact numbers for telephone technical support Setup troubleshooting • "Incorrect language appears on the display" on page 129 • "Printhead errors" on page 129 • "Software did not install" on . Troubleshooting Before you troubleshoot Use this checklist to solve most printer problems: • Make sure... from the list. 3 Navigate to: Printer Home > Support tab > Service Center If Troubleshooting does not solve your problem Visit our Web site at http://support.lexmark.com to printer maintenance tasks and customer support.
User Manual
Page 129
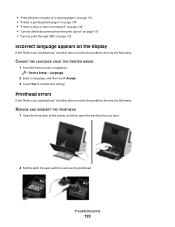
..." checklist does not solve the problem, then try the following : REMOVE AND REINSERT THE PRINTHEAD 1 Open the front door of the printer, and then open the printhead access door. 2 Pull the latch forward, and then remove the printhead. Printhead errors If the "Before you troubleshoot" checklist does not solve the problem, then try the...
..." checklist does not solve the problem, then try the following : REMOVE AND REINSERT THE PRINTHEAD 1 Open the front door of the printer, and then open the printhead access door. 2 Pull the latch forward, and then remove the printhead. Printhead errors If the "Before you troubleshoot" checklist does not solve the problem, then try the...
User Manual
Page 130
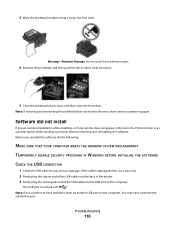
... then push the latch until it clicks into the USB port of the USB cable into place. 5 Close the printhead access door, and then close the front door. Software did not install If you encountered problems while installing, or if your printer does not appear ... CHECK THE USB CONNECTION 1 Check the USB cable for any obvious damage. You may have problems, then try removing and reinstalling the software. 3 Wipe the printhead contacts using a clean, lint-free cloth. The USB port is damaged, then use a new one. 2 Firmly plug the square end of the USB cable into...
... then push the latch until it clicks into the USB port of the USB cable into place. 5 Close the printhead access door, and then close the front door. Software did not install If you encountered problems while installing, or if your printer does not appear ... CHECK THE USB CONNECTION 1 Check the USB cable for any obvious damage. You may have problems, then try removing and reinstalling the software. 3 Wipe the printhead contacts using a clean, lint-free cloth. The USB port is damaged, then use a new one. 2 Firmly plug the square end of the USB cable into...
User Manual
Page 132
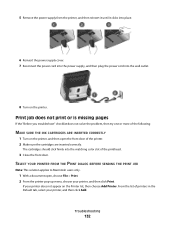
... the power supply cover. 7 Reconnect the power cord into the power supply, and then plug the power cord into the matching color slot of the printhead. 3 Close the front door. Troubleshooting 132 Print job does not print or is missing pages If the "Before you troubleshoot" checklist does not solve the...
... the power supply cover. 7 Reconnect the power cord into the power supply, and then plug the power cord into the matching color slot of the printhead. 3 Close the front door. Troubleshooting 132 Print job does not print or is missing pages If the "Before you troubleshoot" checklist does not solve the...
User Manual
Page 134
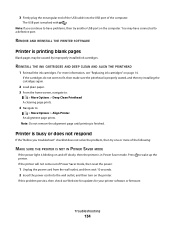
... have connected to have problems, then try another USB port on the printer. If the cartridges do not seem to fit, then make sure the printhead is busy or does not respond If the "Before you continue to a defective port. You may be caused by improperly installed ink cartridges. Note: Do..." checklist does not solve the problem, then try installing the cartridges again. 2 Load plain paper. 3 From the home screen, navigate to: > More Options > Deep Clean Printhead A cleaning page prints. 4 Navigate to wake up the printer. REINSTALL THE INK CARTRIDGES AND DEEP CLEAN AND ALIGN THE...
... have connected to have problems, then try another USB port on the printer. If the cartridges do not seem to fit, then make sure the printhead is busy or does not respond If the "Before you continue to a defective port. You may be caused by improperly installed ink cartridges. Note: Do..." checklist does not solve the problem, then try installing the cartridges again. 2 Load plain paper. 3 From the home screen, navigate to: > More Options > Deep Clean Printhead A cleaning page prints. 4 Navigate to wake up the printer. REINSTALL THE INK CARTRIDGES AND DEEP CLEAN AND ALIGN THE...
User Manual
Page 137
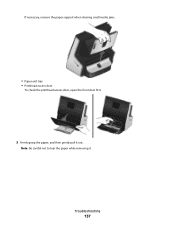
Troubleshooting 137 Note: Be careful not to tear the paper while removing it out. If necessary, remove the paper support when clearing small media jams. • Paper exit tray • Printhead access door To check the printhead access door, open the front door first. 3 Firmly grasp the paper, and then gently pull it .
Troubleshooting 137 Note: Be careful not to tear the paper while removing it out. If necessary, remove the paper support when clearing small media jams. • Paper exit tray • Printhead access door To check the printhead access door, open the front door first. 3 Firmly grasp the paper, and then gently pull it .
User Manual
Page 138
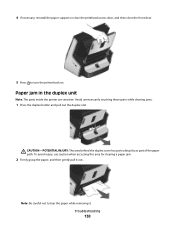
... back on. Paper jam in the duplex unit Note: The parts inside the printer are sensitive. 4 If necessary, reinstall the paper support or close the printhead access door, and then close the front door. 5 Press to tear the paper while removing it out.
... back on. Paper jam in the duplex unit Note: The parts inside the printer are sensitive. 4 If necessary, reinstall the paper support or close the printhead access door, and then close the front door. 5 Press to tear the paper while removing it out.
User Manual
Page 141
.... • Minimize the number and size of graphics and images in the document. MAKE SURE THE INK CARTRIDGES ARE PROPERLY INSTALLED ALIGN THE PRINTHEAD CLEAN OR DEEP CLEAN THE PRINTHEAD NOZZLES Note: If these solutions do not remove the streaks or lines on . 2 Wait one minute for the printer and computer to...
.... • Minimize the number and size of graphics and images in the document. MAKE SURE THE INK CARTRIDGES ARE PROPERLY INSTALLED ALIGN THE PRINTHEAD CLEAN OR DEEP CLEAN THE PRINTHEAD NOZZLES Note: If these solutions do not remove the streaks or lines on . 2 Wait one minute for the printer and computer to...
User Manual
Page 190
... cannot scan to computer over a network 144 cannot send e-mail 145 cannot send faxes 146 cartridges, ink ordering 13 using genuine Lexmark 13 changing default printing mode 51 changing page order 35 changing Power Saver timeout 21 changing print order 35 changing printing mode 52... you troubleshoot 128 fax troubleshooting 146 memory card troubleshooting 152 choosing a splitter, faxing 93 cleaning exterior of the printer 126 cleaning printhead nozzles 126 cleaning the printer control panel 127 Club Internet 102 collating copies 58 Communication not available message 167 computer slows down when...
... cannot scan to computer over a network 144 cannot send e-mail 145 cannot send faxes 146 cartridges, ink ordering 13 using genuine Lexmark 13 changing default printing mode 51 changing page order 35 changing Power Saver timeout 21 changing print order 35 changing printing mode 52... you troubleshoot 128 fax troubleshooting 146 memory card troubleshooting 152 choosing a splitter, faxing 93 cleaning exterior of the printer 126 cleaning printhead nozzles 126 cleaning the printer control panel 127 Club Internet 102 collating copies 58 Communication not available message 167 computer slows down when...
User Manual
Page 194
... Setup Wizard 87 printer software installing 27 uninstalling 26 printer solutions 122 printer, setting as default 50 printhead aligning 125 printhead access door location 11 printhead error 129 printhead nozzles cleaning 126 printing collate 35 custom-size paper 44 documents 34 documents from memory card or flash... finding 8 R received history report 97 receiving faxes Auto Answer setting 92 automatically 92 manually 92 tips 92 Index 194 recycling 7 Lexmark products 16 WEEE statement 174 redial attempts setting 86 redial time setting 86 reducing an image 57 repeating an image 58 replacing ink...
... Setup Wizard 87 printer software installing 27 uninstalling 26 printer solutions 122 printer, setting as default 50 printhead aligning 125 printhead access door location 11 printhead error 129 printhead nozzles cleaning 126 printing collate 35 custom-size paper 44 documents 34 documents from memory card or flash... finding 8 R received history report 97 receiving faxes Auto Answer setting 92 automatically 92 manually 92 tips 92 Index 194 recycling 7 Lexmark products 16 WEEE statement 174 redial attempts setting 86 redial time setting 86 reducing an image 57 repeating an image 58 replacing ink...

User Manual
Page 195
... print through USB 135 incorrect language appears on display 129 page does not print 132 printer does not respond 134 printer printing blank pages 134 printhead error 129 software did not install 130 shared printing 110 sharing printer in the printer 136 paper or specialty media 139 troubleshooting, memory card cannot...
... print through USB 135 incorrect language appears on display 129 page does not print 132 printer does not respond 134 printer printing blank pages 134 printhead error 129 software did not install 130 shared printing 110 sharing printer in the printer 136 paper or specialty media 139 troubleshooting, memory card cannot...

User Manual
Page 196
... print through USB 135 incorrect language appears on display 129 page does not print 132 printer does not respond 134 printer printing blank pages 134 printhead error 129 software did not install 130 troubleshooting, wireless cannot print over wireless network 155 changing wireless settings after installation (Mac) 103 changing wireless settings...
... print through USB 135 incorrect language appears on display 129 page does not print 132 printer does not respond 134 printer printing blank pages 134 printhead error 129 software did not install 130 troubleshooting, wireless cannot print over wireless network 155 changing wireless settings after installation (Mac) 103 changing wireless settings...
Quick Reference Guide
Page 8
...; Select the lowest Power Saver timeout. The Pages per Sheet feature allows you to print documents using the "Clean Printhead" and "Deep Clean Printhead" features. Use the preview features found in High Yield cartridges allow you print on one side of the paper manually...later. • Print more pages with your printer works for the following printer models: • LexmarK S815 • Lexmark S816 About your printer model). • Scan and save them to www.lexmark.com/recycle. Conserving paper • Activate Eco-Mode. You can scan documents or photographs and save...
...; Select the lowest Power Saver timeout. The Pages per Sheet feature allows you to print documents using the "Clean Printhead" and "Deep Clean Printhead" features. Use the preview features found in High Yield cartridges allow you print on one side of the paper manually...later. • Print more pages with your printer works for the following printer models: • LexmarK S815 • Lexmark S816 About your printer model). • Scan and save them to www.lexmark.com/recycle. Conserving paper • Activate Eco-Mode. You can scan documents or photographs and save...

Quick Reference Guide
Page 14
About your ink cartridge comes with a twist cap, then twist and remove the cap. 15 Open the printer. Behind the printhead access door, you will find the touch-screen cloth and the customer support label, which identifies the model number of the printer, the customer support hot line, the ink cartridge information, and the MAC address. 16 Unpack the cartridges. If your printer 14
About your ink cartridge comes with a twist cap, then twist and remove the cap. 15 Open the printer. Behind the printhead access door, you will find the touch-screen cloth and the customer support label, which identifies the model number of the printer, the customer support hot line, the ink cartridge information, and the MAC address. 16 Unpack the cartridges. If your printer 14
Quick Reference Guide
Page 17
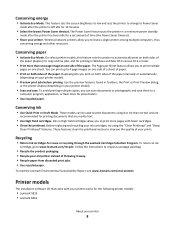
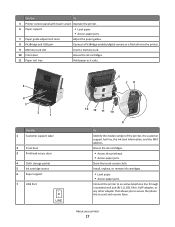
Access the ink cartridges. • Access the printhead. • Access paper jams. Store the touch-screen cloth. Install, replace, or remove ink cartridges. • Load paper. • Access paper jams. Connect the printer ... a memory card. 10 Front door Access the ink cartridges. 11 Paper exit tray Hold paper as it exits. 5 4 3 2 1 Use the 1 Customer support label 2 Front door 3 Printhead access door 4 Cloth storage pocket 5 Ink cartridge access 6 Paper support 7 LINE Port LINE 6 78 13 12 11 10 9 To Identify the model number of the...
Access the ink cartridges. • Access the printhead. • Access paper jams. Store the touch-screen cloth. Install, replace, or remove ink cartridges. • Load paper. • Access paper jams. Connect the printer ... a memory card. 10 Front door Access the ink cartridges. 11 Paper exit tray Hold paper as it exits. 5 4 3 2 1 Use the 1 Customer support label 2 Front door 3 Printhead access door 4 Cloth storage pocket 5 Ink cartridge access 6 Paper support 7 LINE Port LINE 6 78 13 12 11 10 9 To Identify the model number of the...


