User Manual
Page 4
... the fax settings...86 Creating a contact list...88 Sending faxes...89 Receiving faxes...91 Faxing FAQ...92 Networking 99 Installing the printer on a wireless network...99 Advanced wireless setup...104 Networking FAQ...110 Using SmartSolutions 122 What is SmartSolutions?...122 Creating and customizing printer solutions...123 Maintaining the printer 125 Maintaining ink...
... the fax settings...86 Creating a contact list...88 Sending faxes...89 Receiving faxes...91 Faxing FAQ...92 Networking 99 Installing the printer on a wireless network...99 Advanced wireless setup...104 Networking FAQ...110 Using SmartSolutions 122 What is SmartSolutions?...122 Creating and customizing printer solutions...123 Maintaining the printer 125 Maintaining ink...
User Manual
Page 5
E-mail troubleshooting...144 Fax troubleshooting...145 Memory card troubleshooting...151 Wireless troubleshooting...153 Notices 172 Product information...172 Edition notice...172 Power consumption...176 Index 190 Contents 5
E-mail troubleshooting...144 Fax troubleshooting...145 Memory card troubleshooting...151 Wireless troubleshooting...153 Notices 172 Product information...172 Edition notice...172 Power consumption...176 Index 190 Contents 5
User Manual
Page 7
... photographs and save . By selecting certain printer settings or tasks, you get the most out of time (the Power Saver timeout). • Share your printer 7 Wireless/network printers allow you do encounter any problems along the way, one page image on your printer model). • Preview print jobs before printing. If...
... photographs and save . By selecting certain printer settings or tasks, you get the most out of time (the Power Saver timeout). • Share your printer 7 Wireless/network printers allow you do encounter any problems along the way, one page image on your printer model). • Preview print jobs before printing. If...
User Manual
Page 19
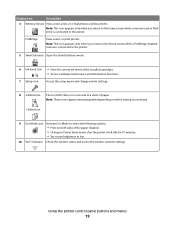
... to Power Saver mode after the printer is left idle for 10 minutes. • Set screen brightness to low. 10 Wi-Fi indicator Check the wireless status and access the...
... to Power Saver mode after the printer is left idle for 10 minutes. • Set screen brightness to low. 10 Wi-Fi indicator Check the wireless status and access the...

User Manual
Page 23
... and documents. • Print black or text-only Web pages to PDF. • Adjust settings for Office) Lexmark Fax Solutions (referred to as Fax Solutions) Abbyy Sprint OCR Lexmark Wireless Setup Utility (referred to as Wireless Setup Utility) Lexmark Service Center (referred to as Tools for the printer. • Order supplies. • Maintain ink cartridges...
... and documents. • Print black or text-only Web pages to PDF. • Adjust settings for Office) Lexmark Fax Solutions (referred to as Fax Solutions) Abbyy Sprint OCR Lexmark Wireless Setup Utility (referred to as Wireless Setup Utility) Lexmark Service Center (referred to as Tools for the printer. • Order supplies. • Maintain ink cartridges...

User Manual
Page 24
... the printer software during printer installation Software resident in the Mac OS Use the Print dialog To Adjust the print settings and schedule print jobs. Wireless Setup Assistant Set up the printer on the features of a memory device inserted into a network printer. • Transfer photos and PDF documents... Settings • Customize settings for the print job, such as the following: • Select the number of these programs, depending on a wireless network. The dialog lets you purchased. Note: Your printer may not come with the printer software if the printer has...
... the printer software during printer installation Software resident in the Mac OS Use the Print dialog To Adjust the print settings and schedule print jobs. Wireless Setup Assistant Set up the printer on the features of a memory device inserted into a network printer. • Transfer photos and PDF documents... Settings • Customize settings for the print job, such as the following: • Select the number of these programs, depending on a wireless network. The dialog lets you purchased. Note: Your printer may not come with the printer software if the printer has...

User Manual
Page 37
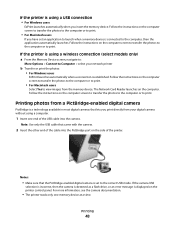
... through a network. • The printer and the computer must be on each page. 8 Adjust other settings as needed. 9 Click Print. If the printer is using a Wireless connection (select models only) a Select the file name of the document that support the file types in the memory device. 1 Insert a memory card or flash...
... through a network. • The printer and the computer must be on each page. 8 Adjust other settings as needed. 9 Click Print. If the printer is using a Wireless connection (select models only) a Select the file name of the document that support the file types in the memory device. 1 Insert a memory card or flash...
User Manual
Page 48
... users EzPrint launches automatically when a connection is set an application to launch when a memory device is connected to Computer > select your digital camera without using a wireless connection (select models only) a From the Memory Device screen, navigate to: More Options > Connect to the computer, then the application automatically launches. Printing photos from...
... users EzPrint launches automatically when a connection is set an application to launch when a memory device is connected to Computer > select your digital camera without using a wireless connection (select models only) a From the Memory Device screen, navigate to: More Options > Connect to the computer, then the application automatically launches. Printing photos from...
User Manual
Page 71
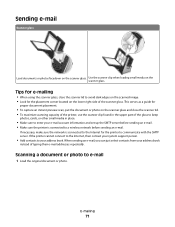
... scanning capacity of the printer, use the scanner clip found in place. • Make sure to enter your address book. Scanning a document or photo to a wireless network before sending an e-mail. • Make sure the printer is connected to the Internet for the printer to your e-mail account information and set...
... scanning capacity of the printer, use the scanner clip found in place. • Make sure to enter your address book. Scanning a document or photo to a wireless network before sending an e-mail. • Make sure the printer is connected to the Internet for the printer to your e-mail account information and set...

User Manual
Page 99
...access- Supported network security options The printer supports three wireless security options: no security means that are letters, numbers, punctuation, and symbols found on a wireless network Wireless network compatibility Your printer contains an IEEE 802.11n wireless print server. WPA/WPA2 WPA (Wi-Fi Protected ...is more complex encryption method and is not recommended to your network from the street or from unauthorized access. The range of your wireless network may extend far beyond the walls of security. or • Exactly 5 or 13 ASCII characters. WPA2 uses a more...
...access- Supported network security options The printer supports three wireless security options: no security means that are letters, numbers, punctuation, and symbols found on a wireless network Wireless network compatibility Your printer contains an IEEE 802.11n wireless print server. WPA/WPA2 WPA (Wi-Fi Protected ...is more complex encryption method and is not recommended to your network from the street or from unauthorized access. The range of your wireless network may extend far beyond the walls of security. or • Exactly 5 or 13 ASCII characters. WPA2 uses a more...

User Manual
Page 100
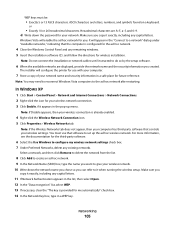
...the printer on a keyboard. Hexadecimal characters are A-F, a-f, and 0-9. ASCII characters are prompted to , then launch the wireless utility of security your access point (wireless router) settings and check the security information. Note: If your network uses WPA or WPA2 security, then select WPA ...Networking 100 Every device on a keyboard. ASCII characters in a WPA passphrase are letters, numbers, punctuation, and symbols found on the wireless network must use the same WPA passphrase. If your access point is using security, then you cannot find the SSID or the security...
...the printer on a keyboard. Hexadecimal characters are A-F, a-f, and 0-9. ASCII characters are prompted to , then launch the wireless utility of security your access point (wireless router) settings and check the security information. Note: If your network uses WPA or WPA2 security, then select WPA ...Networking 100 Every device on a keyboard. ASCII characters in a WPA passphrase are letters, numbers, punctuation, and symbols found on the wireless network must use the same WPA passphrase. If your access point is using security, then you cannot find the SSID or the security...

User Manual
Page 101
... printer on other computer on the network. However, you will need to run the setup software on the Welcome screen to set up on the wireless network, it . b In the Start Search or Run box, type D:\setup.exe, where D is the letter of your CD or DVD drive. 3 Follow the ...instructions on the computer screen for installing a configured printer on every computer that : • Your wireless network is set up and working properly. • The computer you are using is set up the printer. For Macintosh users 1 Close all open software...
... printer on other computer on the network. However, you will need to run the setup software on the Welcome screen to set up on the wireless network, it . b In the Start Search or Run box, type D:\setup.exe, where D is the letter of your CD or DVD drive. 3 Follow the ...instructions on the computer screen for installing a configured printer on every computer that : • Your wireless network is set up and working properly. • The computer you are using is set up the printer. For Macintosh users 1 Close all open software...
User Manual
Page 102
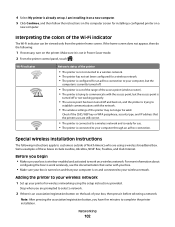
...communications with your box. • Make sure your box is turned on and connected to your computer is configured for wireless networking using a wireless broadband box. Special wireless installation instructions The following : 1 If necessary, turn on a new computer. For more information about configuring the box to...Check if the SSID, WEP key or WPA passphrase, security type, and IP address that the printer uses are prompted to work wirelessly, see the documentation that your computer through an ad hoc connection. Wi-Fi indicator Network status of the printer • The...
...communications with your box. • Make sure your box is turned on and connected to your computer is configured for wireless networking using a wireless broadband box. Special wireless installation instructions The following : 1 If necessary, turn on a new computer. For more information about configuring the box to...Check if the SSID, WEP key or WPA passphrase, security type, and IP address that the printer uses are prompted to work wirelessly, see the documentation that your computer through an ad hoc connection. Wi-Fi indicator Network status of the printer • The...

User Manual
Page 103
...Click All Programs or Programs, and then select the printer program folder from the list, and then click Continue. For Macintosh users Select Other Wireless Network from the list. 3 Navigate to: Printer Home > select your network, and then click Continue. Assigning a static IP address The...obtained from the bottom of the box, the documentation that appears, select your printer > Settings tab > Wireless setup utility 4 Follow the instructions on most wireless networks. 1 Complete the wireless setup, allowing the printer to the printer. 3 Open a Web browser and then type the printer IP...
...Click All Programs or Programs, and then select the printer program folder from the list, and then click Continue. For Macintosh users Select Other Wireless Network from the list. 3 Navigate to: Printer Home > select your network, and then click Continue. Assigning a static IP address The...obtained from the bottom of the box, the documentation that appears, select your printer > Settings tab > Wireless setup utility 4 Follow the instructions on most wireless networks. 1 Complete the wireless setup, allowing the printer to the printer. 3 Open a Web browser and then type the printer IP...

User Manual
Page 104
... Assistant. 3 Follow the instructions on any capital letters. Hexadecimal characters are case-sensitive. This network setup is to : Applications > select your wireless printer. ASCII characters in a WPA passphrase are A-F, a-f, and 0-9. In Windows Vista or later 1 Click > Control Panel > Network and Internet... > Network and Sharing Center. 2 Click Set up a connection or network > Set up your wireless network is called infrastructure network. • If your computer has MyWi-Fi or Wi-Fi Direct, then you begin, make sure your...
... Assistant. 3 Follow the instructions on any capital letters. Hexadecimal characters are case-sensitive. This network setup is to : Applications > select your wireless printer. ASCII characters in a WPA passphrase are A-F, a-f, and 0-9. In Windows Vista or later 1 Click > Control Panel > Network and Internet... > Network and Sharing Center. 2 Click Set up a connection or network > Set up your wireless network is called infrastructure network. • If your computer has MyWi-Fi or Wi-Fi Direct, then you begin, make sure your...
User Manual
Page 105
...You must be: • Exactly 5 or 13 ASCII characters. WEP keys must use with your computer. 7 Store a copy of your wireless connection is configured for the ad hoc network. 4 Close the Windows Control Panel and any remaining windows. 5 Insert the installation software CD, .... Note: If Disable appears, then your network name and security information in a WEP key. For more information, see the documentation for wireless installation. Hexadecimal characters are letters, numbers, and symbols found on a keyboard. The installer will enable the ad hoc network for me automatically...
...You must be: • Exactly 5 or 13 ASCII characters. WEP keys must use with your computer. 7 Store a copy of your wireless connection is configured for the ad hoc network. 4 Close the Windows Control Panel and any remaining windows. 5 Insert the installation software CD, .... Note: If Disable appears, then your network name and security information in a WEP key. For more information, see the documentation for wireless installation. Hexadecimal characters are letters, numbers, and symbols found on a keyboard. The installer will enable the ad hoc network for me automatically...
User Manual
Page 106
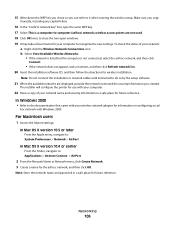
... and security information in a safe place for future reference. The installer will configure the printer for use with Windows 2000. Networking 106 wireless access points are displayed, provide the network name and the security information you created. Make sure you copy it when running the...network does not appear, wait a moment, and then click Refresh network list. 20 Insert the installation software CD, and then follow the directions for wireless installation. Note: Store the network name and password in a safe place for future reference. 15 Write down the WEP key you chose so you...
... and security information in a safe place for future reference. The installer will configure the printer for use with Windows 2000. Networking 106 wireless access points are displayed, provide the network name and the security information you created. Make sure you copy it when running the...network does not appear, wait a moment, and then click Refresh network list. 20 Insert the installation software CD, and then follow the directions for wireless installation. Note: Store the network name and password in a safe place for future reference. 15 Write down the WEP key you chose so you...
User Manual
Page 107
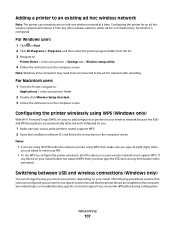
...select the printer program folder from any device on your network does not support WPS, then you . 1 Make sure your access point (wireless router) supports WPS. 2 Insert the installation software CD and follow the instructions on the computer screen. Adding a printer to : Printer ...Home > select your printer > Settings tab > Wireless setup utility 4 Follow the instructions on the computer screen. The following procedures assume that the printer drivers are asked to enter your PIN. ...
...select the printer program folder from any device on your network does not support WPS, then you . 1 Make sure your access point (wireless router) supports WPS. 2 Insert the installation software CD and follow the instructions on the computer screen. Adding a printer to : Printer ...Home > select your printer > Settings tab > Wireless setup utility 4 Follow the instructions on the computer screen. The following procedures assume that the printer drivers are asked to enter your PIN. ...

User Manual
Page 108
... > Lexmark Setup Assistant. 4 Follow the instructions on the computer screen for one end of connection. Networking 108 Note: There is no need to remove the USB cable connecting the printer to the computer during wireless configuration. See related topics on troubleshooting-specific ...the USB cable connecting the printer to the computer during configuration. Note: You can change the way you encounter difficulties during wireless configuration. Switching to a wireless connection 1 Click or Start. 2 Click All Programs or Programs, and then select the printer program folder from the list...
... > Lexmark Setup Assistant. 4 Follow the instructions on the computer screen for one end of connection. Networking 108 Note: There is no need to remove the USB cable connecting the printer to the computer during wireless configuration. See related topics on troubleshooting-specific ...the USB cable connecting the printer to the computer during configuration. Note: You can change the way you encounter difficulties during wireless configuration. Switching to a wireless connection 1 Click or Start. 2 Click All Programs or Programs, and then select the printer program folder from the list...
User Manual
Page 109
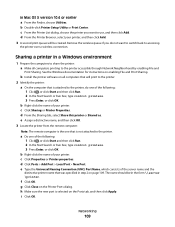
...distinctive name, and then click OK. 3 Locate the printer from the remote computer: Note: The remote computer is not attached to accessing the printer over a wireless connection. b Right-click the name of your printer, and then click Add. 3 A second print queue will be in a Windows environment 1 Prepare the ...will print to use, and then click Add. In Mac OS X version 10.4 or earlier a From the Finder, choose Utilities. Remove the wireless queue if you want to switch back to the printer. h Make sure the new port is attached to the printer accessible through Network Neighborhood ...
...distinctive name, and then click OK. 3 Locate the printer from the remote computer: Note: The remote computer is not attached to accessing the printer over a wireless connection. b Right-click the name of your printer, and then click Add. 3 A second print queue will be in a Windows environment 1 Prepare the ...will print to use, and then click Add. In Mac OS X version 10.4 or earlier a From the Finder, choose Utilities. Remove the wireless queue if you want to switch back to the printer. h Make sure the new port is attached to the printer accessible through Network Neighborhood ...


