
Quick Reference
Page 12
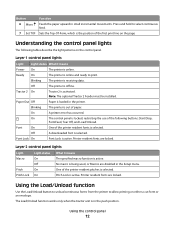
... Tractor 2 Feeder must be installed. Font Lock On Font Lock is selected. Layer 2 control panel lights Light Light status What it means Power On The printer is in the Setup menu. One of the following tables describe the light patterns on either a cut form or an envelope. Using the Load/Unload function Use the Load/Unload button to unload continuous forms from the printer to print. Using the control panel 12 Blinking Off The printer is being used, or...
... Tractor 2 Feeder must be installed. Font Lock On Font Lock is selected. Layer 2 control panel lights Light Light status What it means Power On The printer is in the Setup menu. One of the following tables describe the light patterns on either a cut form or an envelope. Using the Load/Unload function Use the Load/Unload button to unload continuous forms from the printer to print. Using the control panel 12 Blinking Off The printer is being used, or...
User Guide
Page 3
Main menu...49 Main menu options...49 Forms Macro options...50 Data options ...51 Control options ...52 Emulation options...54 Interface options...54 Maintaining the printer 56 Ordering supplies...56 Removing the ribbon cartridge...56 Cleaning the printer...56 Recycling Lexmark products...57 Administrative support 58 Restoring the factory default settings...58 Supporting IPSec...59 Supporting SNMPv3...59 Using 802.1x authentication...60 Contents 3 Loading a cut form or envelope manually ...36 Aligning the left margin...
Main menu...49 Main menu options...49 Forms Macro options...50 Data options ...51 Control options ...52 Emulation options...54 Interface options...54 Maintaining the printer 56 Ordering supplies...56 Removing the ribbon cartridge...56 Cleaning the printer...56 Recycling Lexmark products...57 Administrative support 58 Restoring the factory default settings...58 Supporting IPSec...59 Supporting SNMPv3...59 Using 802.1x authentication...60 Contents 3 Loading a cut form or envelope manually ...36 Aligning the left margin...
User Guide
Page 58
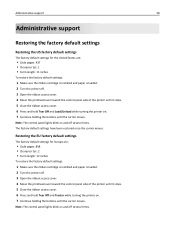
... control panel lights blink on and off several times. Administrative support 58 Administrative support Restoring the factory default settings Restoring the US factory default settings The factory default settings for Europe are : • Code pages: 437 • Character Set: 1 • Form length: 11 inches To restore the factory default settings: 1 Make sure the ribbon cartridge is installed and paper is loaded. 2 Turn the printer off. 3 Open the ribbon access cover. 4 Move the printhead over toward the control panel side of the printer until it stops. 5 Close the ribbon access...
... control panel lights blink on and off several times. Administrative support 58 Administrative support Restoring the factory default settings Restoring the US factory default settings The factory default settings for Europe are : • Code pages: 437 • Character Set: 1 • Form length: 11 inches To restore the factory default settings: 1 Make sure the ribbon cartridge is installed and paper is loaded. 2 Turn the printer off. 3 Open the ribbon access cover. 4 Move the printhead over toward the control panel side of the printer until it stops. 5 Close the ribbon access...
User Guide
Page 62
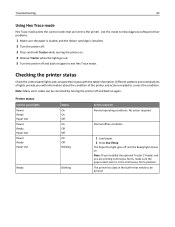
... turning the printer on. 4 Release Tractor when the lights go out. 5 Turn the printer off and back on again. Note: If you installed the optional Tractor 2 Feeder and you with the table information. Use this mode to help diagnose software/driver problems. 1 Make sure the paper is loaded, and the ribbon cartridge is in the buffer that are sent to the printer. Note: Many error codes can be printed. Normal offline condition 1 Load paper...
... turning the printer on. 4 Release Tractor when the lights go out. 5 Turn the printer off and back on again. Note: If you installed the optional Tractor 2 Feeder and you with the table information. Use this mode to help diagnose software/driver problems. 1 Make sure the paper is loaded, and the ribbon cartridge is in the buffer that are sent to the printer. Note: Many error codes can be printed. Normal offline condition 1 Load paper...

User Guide
Page 66
... set for the paper thickness being used. • Make sure the ribbon cartridge is correctly installed and securely snapped onto the carrier. • Adjust the ribbon density control knob. • Replace the ribbon cartridge if it is present, these are using Windows, use the Windows Forms Printer 2500 Series driver available from the Lexmark Web site at the new Top‑Of‑Form position until the printer beeps and the light blinks. 3 Open the control panel to access...
... set for the paper thickness being used. • Make sure the ribbon cartridge is correctly installed and securely snapped onto the carrier. • Adjust the ribbon density control knob. • Replace the ribbon cartridge if it is present, these are using Windows, use the Windows Forms Printer 2500 Series driver available from the Lexmark Web site at the new Top‑Of‑Form position until the printer beeps and the light blinks. 3 Open the control panel to access...
User Guide
Page 72
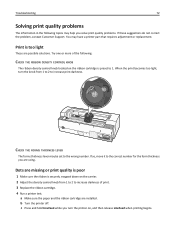
... Support. CHECK THE FORMS THICKNESS LEVER The forms thickness lever may help you are using. Dots are missing or print quality is poor 1 Make sure the ribbon is too light These are installed. a Make sure the paper and the ribbon cartridge are possible solutions. If so, move it to 1. Try one or more of print. 3 Replace the ribbon cartridge. 4 Run a printer test. You may have a printer part that requires adjustment or replacement. b Turn...
... Support. CHECK THE FORMS THICKNESS LEVER The forms thickness lever may help you are using. Dots are missing or print quality is poor 1 Make sure the ribbon is too light These are installed. a Make sure the paper and the ribbon cartridge are possible solutions. If so, move it to 1. Try one or more of print. 3 Replace the ribbon cartridge. 4 Run a printer test. You may have a printer part that requires adjustment or replacement. b Turn...
User Guide
Page 80
... with Lexmark user's guides, manuals, instructions or guidance -Unsuitable physical or operating environment -Maintenance by anyone other than Lexmark or a Lexmark authorized servicer -Operation of a product beyond repair, or if the product is not free of failures caused by a Lexmark warranty, technical support may be required to the Remarketer or the Lexmark designated location. Warranty service does not include repair of all print cartridges, programs, data, and removable storage media (unless directed otherwise by Lexmark TO...
... with Lexmark user's guides, manuals, instructions or guidance -Unsuitable physical or operating environment -Maintenance by anyone other than Lexmark or a Lexmark authorized servicer -Operation of a product beyond repair, or if the product is not free of failures caused by a Lexmark warranty, technical support may be required to the Remarketer or the Lexmark designated location. Warranty service does not include repair of all print cartridges, programs, data, and removable storage media (unless directed otherwise by Lexmark TO...
User Guide
Page 82
... and misfeeds troubleshooting paper is jammed in the printer 68 L left margin aligning 38 lights control panel 18 Load/Unload function using 19 loading continuous forms 25 cut form or envelope 36 locking control panel 19 M Main menu options 49 menu settings changing 48 N network setup page 13 noise emission levels 77 notices 76, 77, 78, 79 O offline setting printer 19 Okidata MICROLINE emulation mode using 15 online setting printer 19 ordering supplies 56 P paper advancing 19 paper feed troubleshooting Auto Sheet Feeder feeds multiple sheets 71 Auto Sheet Feeder positions paper incorrectly 71...
... and misfeeds troubleshooting paper is jammed in the printer 68 L left margin aligning 38 lights control panel 18 Load/Unload function using 19 loading continuous forms 25 cut form or envelope 36 locking control panel 19 M Main menu options 49 menu settings changing 48 N network setup page 13 noise emission levels 77 notices 76, 77, 78, 79 O offline setting printer 19 Okidata MICROLINE emulation mode using 15 online setting printer 19 ordering supplies 56 P paper advancing 19 paper feed troubleshooting Auto Sheet Feeder feeds multiple sheets 71 Auto Sheet Feeder positions paper incorrectly 71...
Card Stock & Label Guide
Page 11
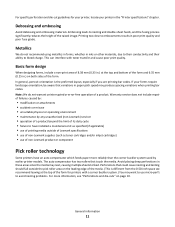
... for printers with toner transfer and cause poor print quality. Printing too close to have installed a maintenance kit as toner cartridges and/or inkjet cartridges) • use of the form. Avoid placing deep perforations in inks or other materials, due to their conductivity and their ability to avoid nesting problems. For more reliably than the corner buckler system used by earlier printer models. The auto compensator has two rollers...
... for printers with toner transfer and cause poor print quality. Printing too close to have installed a maintenance kit as toner cartridges and/or inkjet cartridges) • use of the form. Avoid placing deep perforations in inks or other materials, due to their conductivity and their ability to avoid nesting problems. For more reliably than the corner buckler system used by earlier printer models. The auto compensator has two rollers...
Card Stock & Label Guide
Page 39
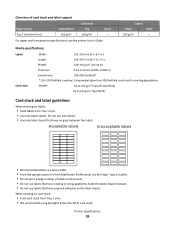
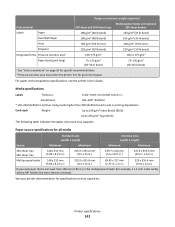
...; Feed card stock from Tray 1 only. • Use only paper labels. Media specifications Labels Card stock Width: 105-216 mm (4.1-8.5 in.) Length: 220-297 mm (8.7-11.7 in.) Weight: 120-163 g/m2 (32-43 lb) Thickness: 0.13-0.20 mm (0.005-0.008 in printing degradation. For paper and transparency specifications, see the printer User's Guide. Do not use labels that have exposed adhesive on the label sheets. Overview...
...; Feed card stock from Tray 1 only. • Use only paper labels. Media specifications Labels Card stock Width: 105-216 mm (4.1-8.5 in.) Length: 220-297 mm (8.7-11.7 in.) Weight: 120-163 g/m2 (32-43 lb) Thickness: 0.13-0.20 mm (0.005-0.008 in printing degradation. For paper and transparency specifications, see the printer User's Guide. Do not use labels that have exposed adhesive on the label sheets. Overview...
Card Stock & Label Guide
Page 50
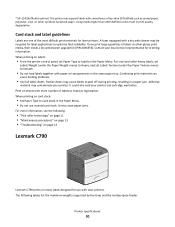
... service representative for laser printers. For vinyl and other glossy print media, then install a dry web cleaner upgrade kit (P/N 40X1856). Combining print materials can cause feeding problems. • Use full label sheets. It could result in the same paper tray. When printing on labels: • From the printer control panel, set Labels Texture (under the Paper Texture menu) to Smooth. • Do not load labels together with smoothness of labels to improve registration. Printer specifications...
... service representative for laser printers. For vinyl and other glossy print media, then install a dry web cleaner upgrade kit (P/N 40X1856). Combining print materials can cause feeding problems. • Use full label sheets. It could result in the same paper tray. When printing on labels: • From the printer control panel, set Labels Texture (under the Paper Texture menu) to Smooth. • Do not load labels together with smoothness of labels to improve registration. Printer specifications...

Card Stock & Label Guide
Page 70
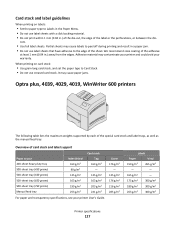
... to occasional use. Cover - - The Lexmark T430 supports stocks from print media sources that are not supported may damage your printer. The following tables list the maximum weights supported by Tray 1 and the multipurpose feeder. Overview of card stock support Paper source Index Bristol Tag Tray 1 - - Warning-Potential Damage: Feeding labels from 60-163 g/m2 (16-43 lb). Printer specifications 70 Limit label printing to 30 sheets of dual-web or integrated...
... to occasional use. Cover - - The Lexmark T430 supports stocks from print media sources that are not supported may damage your printer. The following tables list the maximum weights supported by Tray 1 and the multipurpose feeder. Overview of card stock support Paper source Index Bristol Tag Tray 1 - - Warning-Potential Damage: Feeding labels from 60-163 g/m2 (16-43 lb). Printer specifications 70 Limit label printing to 30 sheets of dual-web or integrated...
Card Stock & Label Guide
Page 127
... table lists the maximum weights supported by each of the label or the perforations, or between the die- It may contaminate your printer and could void your printer User's Guide. Card stock and label guidelines When printing on card stock: • Use grain long card stock, and set the paper type to Card Stock. • Do not use creased card stock. cuts. • Use full label sheets. When printing on...
... table lists the maximum weights supported by each of the label or the perforations, or between the die- It may contaminate your printer and could void your printer User's Guide. Card stock and label guidelines When printing on card stock: • Use grain long card stock, and set the paper type to Card Stock. • Do not use creased card stock. cuts. • Use full label sheets. When printing on...
Card Stock & Label Guide
Page 139
... leading edge to feed paper; To reliably feed lightweight plain paper and some lightweight labels, use the standard 250-sheet input tray that comes with adhesive, and could void your printer. The optional 500-sheet drawer should be used . • Remove a 3-mm (0.125-in .) away from edges. Tray specifications Source Multipurpose feeder 250-sheet label tray Print media Labels Card stock Labels Capacity 30 labels 10 sheets card stock 100 labels...
... leading edge to feed paper; To reliably feed lightweight plain paper and some lightweight labels, use the standard 250-sheet input tray that comes with adhesive, and could void your printer. The optional 500-sheet drawer should be used . • Remove a 3-mm (0.125-in .) away from edges. Tray specifications Source Multipurpose feeder 250-sheet label tray Print media Labels Card stock Labels Capacity 30 labels 10 sheets card stock 100 labels...
Card Stock & Label Guide
Page 142
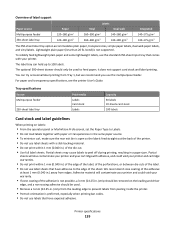
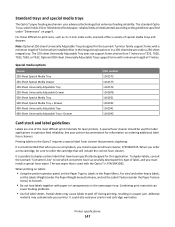
...If you load paper that is optimal. Using media higher than 148 mm (5.83 in.) in the multipurpose feeder (for specifications on page 16 for specific recommendations. 2 Pressure-sensitive area must enter the printer first for all media Source 250-sheet tray 500-sheet tray Standard sizes (width... x 355.6 mm (8.5 in . See your printer documentation for example, 3 x 5-inch index cards), set the MP Feeder Size menu item to 203 g/m2 Tag (100 lb) The following table indicates the paper sizes each tray supports. Multipurpose feeder and optional 250-sheet drawer 163 g/m2 (43 lb bond) 163...
...If you load paper that is optimal. Using media higher than 148 mm (5.83 in.) in the multipurpose feeder (for specifications on page 16 for specific recommendations. 2 Pressure-sensitive area must enter the printer first for all media Source 250-sheet tray 500-sheet tray Standard sizes (width... x 355.6 mm (8.5 in . See your printer documentation for example, 3 x 5-inch index cards), set the MP Feeder Size menu item to 203 g/m2 Tag (100 lb) The following table indicates the paper sizes each tray supports. Multipurpose feeder and optional 250-sheet drawer 163 g/m2 (43 lb bond) 163...
Card Stock & Label Guide
Page 147
... duplexing. It is possible to -print sizes, such as 3 x 5-inch index cards, Lexmark offers a variety of label, and you must install a special fuser wiper. To duplex labels, consult the Lexmark "Converter Lists" to see which holds 250 or 500 sheets of the most difficult print materials for information on labels: • Using the printer operator panel, set the Labels Texture (under the Paper Weight menu) to Heavy, and set the Paper Type...
... duplexing. It is possible to -print sizes, such as 3 x 5-inch index cards, Lexmark offers a variety of label, and you must install a special fuser wiper. To duplex labels, consult the Lexmark "Converter Lists" to see which holds 250 or 500 sheets of the most difficult print materials for information on labels: • Using the printer operator panel, set the Labels Texture (under the Paper Weight menu) to Heavy, and set the Paper Type...
Print Drivers for UNIX and LINUX Systems
Page 3
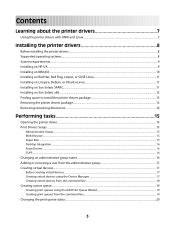
... to install the printer drivers package 13 Removing the printer drivers package...13 Removing remaining directories...14 Performing tasks 15 Opening the printer driver...15 Print Drivers Setup...15 Administrative Group...15 Web Browser...15 Paper Size ...15 Desktop Integration...16 Asian Drivers...16 CUPS ...16 Changing an administrative group name...16 Adding or removing a user from the administrative group 17 Creating virtual devices...17 Before creating virtual devices ...17 Creating virtual devices using...
... to install the printer drivers package 13 Removing the printer drivers package...13 Removing remaining directories...14 Performing tasks 15 Opening the printer driver...15 Print Drivers Setup...15 Administrative Group...15 Web Browser...15 Paper Size ...15 Desktop Integration...16 Asian Drivers...16 CUPS ...16 Changing an administrative group name...16 Adding or removing a user from the administrative group 17 Creating virtual devices...17 Before creating virtual devices ...17 Creating virtual devices using...

Print Drivers for UNIX and LINUX Systems
Page 11
... by typing the following on page 13. 3 Download the printer drivers package (print-drivers-linux-glibc2-x86.rpm) from the Lexmark Web site at http://www.lexmark.com/drivers. 4 Install the package file: # rpm -ivh /tmp/print-drivers-linux-glibc2-x86.rpm 5 Run the following setup script to complete the installation: # /usr/local/lexmark/setup.lexprint Note: Your specific printer driver may not be included in the standard package. Check the Software and Documentation CD...
... by typing the following on page 13. 3 Download the printer drivers package (print-drivers-linux-glibc2-x86.rpm) from the Lexmark Web site at http://www.lexmark.com/drivers. 4 Install the package file: # rpm -ivh /tmp/print-drivers-linux-glibc2-x86.rpm 5 Run the following setup script to complete the installation: # /usr/local/lexmark/setup.lexprint Note: Your specific printer driver may not be included in the standard package. Check the Software and Documentation CD...
Tech Notes
Page 2
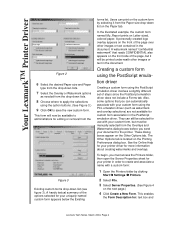
...; Settings à Printers. 2 Select File. 3 Select Server Properties. (See Figure 4 on the front of the options selected for your document to the printer. Creating a custom form using the PostScript emulation driver involves a slightly different set of the page, but it from the Figure 3 Existing custom forms drop-down list (see figure 3). These dialog boxes appear on Letter-sized, colored paper. This enables the Form Description for use with a custom form: 1 Open...
...; Settings à Printers. 2 Select File. 3 Select Server Properties. (See Figure 4 on the front of the options selected for your document to the printer. Creating a custom form using the PostScript emulation driver involves a slightly different set of the page, but it from the Figure 3 Existing custom forms drop-down list (see figure 3). These dialog boxes appear on Letter-sized, colored paper. This enables the Form Description for use with a custom form: 1 Open...
Technical Reference
Page 63
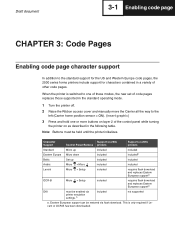
Note: Buttons must be enabled via flash download. Eastern European support can be held until the printer initializes. Draft document 3-1 Enabling code page CHAPTER 3: Code Pages Enabling code page character support In addition to the standard support for the US and Western Europe code pages, the 2500 series forms printers include support for characters contained in a variety of the control panel while turning the printer on as described in the standard operating mode. 1 Turn the printer off. 2 Raise the Ribbon access cover and manually move...
Note: Buttons must be enabled via flash download. Eastern European support can be held until the printer initializes. Draft document 3-1 Enabling code page CHAPTER 3: Code Pages Enabling code page character support In addition to the standard support for the US and Western Europe code pages, the 2500 series forms printers include support for characters contained in a variety of the control panel while turning the printer on as described in the standard operating mode. 1 Turn the printer off. 2 Raise the Ribbon access cover and manually move...


