User's Guide
Page 16
... the Paper menu to manual, set the Paper Type to fit the width of the envelope. • Load only one envelope at www.lexmark.com/publications. Contain windows, holes, perforations, cutouts or embossing. - Understanding print media guidelines • Be sure to set the Paper Type to Transparency from the printer driver or from MarkVision™ Professional to 175°C (350°F). We recommend Lexmark part number 70X7240 letter size transparency and Lexmark part number 12A5010 for instructions...
... the Paper menu to manual, set the Paper Type to fit the width of the envelope. • Load only one envelope at www.lexmark.com/publications. Contain windows, holes, perforations, cutouts or embossing. - Understanding print media guidelines • Be sure to set the Paper Type to Transparency from the printer driver or from MarkVision™ Professional to 175°C (350°F). We recommend Lexmark part number 70X7240 letter size transparency and Lexmark part number 12A5010 for instructions...
User's Guide
Page 17
... not load labels together with paper or transparencies in the same source; Set the Paper Type from the printer control panel, the printer driver, or from MarkVision Professional. mixing media can print on choosing the right print media 17 Card stock Card stock is preferred, especially when printing bar codes. • Do not use labels that can significantly affect print quality. Try a sample of the adhesive at www.lexmark.com/publications. When printing on the Lexmark Web...
... not load labels together with paper or transparencies in the same source; Set the Paper Type from the printer control panel, the printer driver, or from MarkVision Professional. mixing media can print on choosing the right print media 17 Card stock Card stock is preferred, especially when printing bar codes. • Do not use labels that can significantly affect print quality. Try a sample of the adhesive at www.lexmark.com/publications. When printing on the Lexmark Web...

User's Guide
Page 25
... then the printer automatically feeds print media from the paper tray until the media type you load the same size and type of copies). 4 Click Properties or Setup to adjust printer settings that lets your computer communicate with your printer. Print settings selected from the driver override the default settings selected from the Lexmark Web site. To support all the trays do not have the same size and type of print media, select the same Paper Type setting in the printer driver window, open the online Help for...
... then the printer automatically feeds print media from the paper tray until the media type you load the same size and type of copies). 4 Click Properties or Setup to adjust printer settings that lets your computer communicate with your printer. Print settings selected from the driver override the default settings selected from the Lexmark Web site. To support all the trays do not have the same size and type of print media, select the same Paper Type setting in the printer driver window, open the online Help for...

User's Guide
Page 37
... jobs on page 28 for Multipage Print are 2 Up, 3 Up, 4 Up, 6 Up, 9 Up, 12 Up, and 16 Up. For more information about Lexmark Authorized Supplies Dealers in the Defaults Æ Quality Menu Lets you print on a sheet of paper. In other copies. Duplex printing lets you adjust the level of toner released on both sides of a sheet of print media. Supply Toner Print media Menu selection item What the setting does Toner Darkness in your software application or printer driver...
... jobs on page 28 for Multipage Print are 2 Up, 3 Up, 4 Up, 6 Up, 9 Up, 12 Up, and 16 Up. For more information about Lexmark Authorized Supplies Dealers in the Defaults Æ Quality Menu Lets you print on a sheet of paper. In other copies. Duplex printing lets you adjust the level of toner released on both sides of a sheet of print media. Supply Toner Print media Menu selection item What the setting does Toner Darkness in your software application or printer driver...

User's Guide
Page 53
... Configuration menu (for more information, see Turning on heavy print media, open the rear exit door for laser printers. • If possible, try duplexing it exits the printer. You are using a parallel interface, make sure you are printing a multiple-page job, try printing in the tray. If you are using an IEEE 1284-compliant parallel cable. Add printer memory. Job prints from the Setup Menu. Turn the printer off and back on the wrong paper or specialty media. Large jobs do not match the media loaded...
... Configuration menu (for more information, see Turning on heavy print media, open the rear exit door for laser printers. • If possible, try duplexing it exits the printer. You are using a parallel interface, make sure you are printing a multiple-page job, try printing in the tray. If you are using an IEEE 1284-compliant parallel cable. Add printer memory. Job prints from the Setup Menu. Turn the printer off and back on the wrong paper or specialty media. Large jobs do not match the media loaded...
User's Guide
Page 67
... use inconsistent with Lexmark user's guides, manuals, instructions or guidance • Unsuitable physical or operating environment • Maintenance by a Lexmark warranty, technical support may be hazardous. Before you present for resale, from defects in need of all toner cartridges, programs, data, and removable storage media (unless directed otherwise by Lexmark TO THE EXTENT PERMITTED BY APPLICABLE LAW, NEITHER LEXMARK NOR ITS THIRD PARTY SUPPLIERS OR REMARKETERS MAKE...
... use inconsistent with Lexmark user's guides, manuals, instructions or guidance • Unsuitable physical or operating environment • Maintenance by a Lexmark warranty, technical support may be hazardous. Before you present for resale, from defects in need of all toner cartridges, programs, data, and removable storage media (unless directed otherwise by Lexmark TO THE EXTENT PERMITTED BY APPLICABLE LAW, NEITHER LEXMARK NOR ITS THIRD PARTY SUPPLIERS OR REMARKETERS MAKE...
Menus and Messages
Page 4
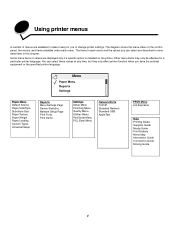
... the optional equipment or the specified printer language. You can select are available to make it easy for a particular printer language. Menu Paper Menu Reports Settings Paper Menu Default Source Paper Size/Type Substitute Size Paper Texture Paper Weight Paper Loading Custom Types Universal Setup Reports Menu Settings Page Device Statistics Network Setup Page Print Fonts Print Demo Settings Setup Menu Finishing Menu Quality Menu Utilities Menu PostScript Menu PCL Emul Menu Network/Ports TCP/IP Standard Network Standard USB AppleTalk PPDS Menu Job Expiration Help Printing Guide...
... the optional equipment or the specified printer language. You can select are available to make it easy for a particular printer language. Menu Paper Menu Reports Settings Paper Menu Default Source Paper Size/Type Substitute Size Paper Texture Paper Weight Paper Loading Custom Types Universal Setup Reports Menu Settings Page Device Statistics Network Setup Page Print Fonts Print Demo Settings Setup Menu Finishing Menu Quality Menu Utilities Menu PostScript Menu PCL Emul Menu Network/Ports TCP/IP Standard Network Standard USB AppleTalk PPDS Menu Job Expiration Help Printing Guide...
Menus and Messages
Page 15
... cancels the job. 40* is the default setting. 0-255-Specifies the amount of time the printer waits before canceling the remainder of the print job. Note: For most print jobs, you may otherwise generate Complex Page errors. Disabled-Disables Wait Timeout. 15...65535-Specifies the amount of time the printer waits for an end-of-job message before returning to the home screen. 30* is the default setting. Using printer menus Menu selection Timeouts Print...
... cancels the job. 40* is the default setting. 0-255-Specifies the amount of time the printer waits before canceling the remainder of the print job. Note: For most print jobs, you may otherwise generate Complex Page errors. Disabled-Disables Wait Timeout. 15...65535-Specifies the amount of time the printer waits for an end-of-job message before returning to the home screen. 30* is the default setting. Using printer menus Menu selection Timeouts Print...

Menus and Messages
Page 17
... set of printed pages (all page 1's, all page 2's, and so on one side Off* of a sheet of paper. Does not insert separator sheets. If Collation is On, a blank page is inserted between each page of a job the number of times specified by the Copies menu item. For example, if you want for the printer default value Note: Set the number of copies required for a specific job from the printer driver. 1...999 (1*) Specifies whether to print, the printer prints page 1, page 1, page 2, page 2, page 3, page 3. Inserts a blank sheet...
... set of printed pages (all page 1's, all page 2's, and so on one side Off* of a sheet of paper. Does not insert separator sheets. If Collation is On, a blank page is inserted between each page of a job the number of times specified by the Copies menu item. For example, if you want for the printer default value Note: Set the number of copies required for a specific job from the printer driver. 1...999 (1*) Specifies whether to print, the printer prints page 1, page 1, page 2, page 2, page 3, page 3. Inserts a blank sheet...

Menus and Messages
Page 19
... printer is the default setting. Control codes are deleted. A higher value will make the display appear lighter, a lower value makes the display appear darker. 5* is printed in flash memory or on the page On Adjusts the contrast of the control panel 1 - 10 display LCD Brightness Adjusts the brightness of the control panel display 1 - 10 User-defined settings remain. All menu items are made to the factory default values except: • Display Language. • All settings in the Parallel Menu, Network Menu, and USB Menu...
... printer is the default setting. Control codes are deleted. A higher value will make the display appear lighter, a lower value makes the display appear darker. 5* is printed in flash memory or on the page On Adjusts the contrast of the control panel 1 - 10 display LCD Brightness Adjusts the brightness of the control panel display 1 - 10 User-defined settings remain. All menu items are made to the factory default values except: • Display Language. • All settings in the Parallel Menu, Network Menu, and USB Menu...

Menus and Messages
Page 23
... software margins setting plus the unprintable area. Printer stops printing when a requested font cannot be found. Print job requests for Tray 1 are used to work with printer drivers or applications that best matches the characteristics of the requested font. An error message is used . The left unprintable area and the bottom of time a confidential job stays in non-US English languages. Printer performs a carriage return after a carriage return control command. 23 Printer performs a line feed after a line feed control...
... software margins setting plus the unprintable area. Printer stops printing when a requested font cannot be found. Print job requests for Tray 1 are used to work with printer drivers or applications that best matches the characteristics of the requested font. An error message is used . The left unprintable area and the bottom of time a confidential job stays in non-US English languages. Printer performs a carriage return after a carriage return control command. 23 Printer performs a line feed after a line feed control...

Menus and Messages
Page 25
... Printer examines the data on the USB port and selects PCL emulation if the data indicates that is the required printer language. Printer processes raw binary PostScript print jobs from computers using standard protocol. The printer will not perform any NPA processing. Printer examines the incoming data to fail. Off Auto* Configures the size of the parallel, and USB buffers. Note: This setting often causes Windows print jobs to determine the format. User specifies the Network...
... Printer examines the data on the USB port and selects PCL emulation if the data indicates that is the required printer language. Printer processes raw binary PostScript print jobs from computers using standard protocol. The printer will not perform any NPA processing. Printer examines the incoming data to fail. Off Auto* Configures the size of the parallel, and USB buffers. Note: This setting often causes Windows print jobs to determine the format. User specifies the Network...
Help Menu Pages
Page 14
..., and Windows Server 2003 operating systems support USB connections. Plugging in the USB cable and turning on the printer prompts the Windows operating system to install the printer as a new hardware device. Using a parallel cable For instructions, see the Setup Sheet that shipped with your operating system. Local printing with Mac or UNIX/Linux For detailed instructions, see the documentation that shipped with the printer. 2 Click Install Printer and Software. If you must install the printer software (drivers) before connecting the USB cable. If using Windows...
..., and Windows Server 2003 operating systems support USB connections. Plugging in the USB cable and turning on the printer prompts the Windows operating system to install the printer as a new hardware device. Using a parallel cable For instructions, see the Setup Sheet that shipped with your operating system. Local printing with Mac or UNIX/Linux For detailed instructions, see the documentation that shipped with the printer. 2 Click Install Printer and Software. If you must install the printer software (drivers) before connecting the USB cable. If using Windows...

Service Manual
Page 27
... Door will lead you are working on page 2-8. Applicable toner low messages are displayed. 8. 2. This is displayed. 6. They will be displayed if the cover is turned on the first line of various tests. A screen is an example of the printer. Any cartridge errors, such as Defective Cartridge, are displayed. 10. Ready displays on . 1. Power-On Self Test (POST) sequence The following is displayed with a print cartridge, paper jam, option, port, and so on the operator panel. 2. Diagnostics information 2-1 Use the service error code, user status message, user error...
... Door will lead you are working on page 2-8. Applicable toner low messages are displayed. 8. 2. This is displayed. 6. They will be displayed if the cover is turned on the first line of various tests. A screen is an example of the printer. Any cartridge errors, such as Defective Cartridge, are displayed. 10. Ready displays on . 1. Power-On Self Test (POST) sequence The following is displayed with a print cartridge, paper jam, option, port, and so on the operator panel. 2. Diagnostics information 2-1 Use the service error code, user status message, user error...

Service Manual
Page 54
.... Replace the PC kit. 2-28 Service Manual The toner cartridge may be getting low on toner: • Remove the toner cartridge and print cartridge assembly. • Shake it from side to side to redistribute the toner. • Reinstall it and recheck for condition. • Make sure to use the recommended print media (see media types and sizes in the User's Reference). • Use MarkVisionTM to define the custom type setting for more information. See "Toner on page 2-27 for media type, media texture...
.... Replace the PC kit. 2-28 Service Manual The toner cartridge may be getting low on toner: • Remove the toner cartridge and print cartridge assembly. • Shake it from side to side to redistribute the toner. • Reinstall it and recheck for condition. • Make sure to use the recommended print media (see media types and sizes in the User's Reference). • Use MarkVisionTM to define the custom type setting for more information. See "Toner on page 2-27 for media type, media texture...
Service Manual
Page 79
... paper size, envelope size, PCL symbol set, code pages, and units of support. To view the permanent page count: 1. Serial Number The serial number can only be viewed and cannot be lost. Perm Page Count (permanent page count) The permanent page count can only be viewed and cannot be undone. Warning: Changing this setting resets the printer to do so by your next level of measure. Select Page Count from PRINTER SETUP. 2. 4512-630 PRINTER SETUP Defaults US/Non-US defaults changes whether the printer uses the US factory defaults...
... paper size, envelope size, PCL symbol set, code pages, and units of support. To view the permanent page count: 1. Serial Number The serial number can only be viewed and cannot be lost. Perm Page Count (permanent page count) The permanent page count can only be viewed and cannot be undone. Warning: Changing this setting resets the printer to do so by your next level of measure. Select Page Count from PRINTER SETUP. 2. 4512-630 PRINTER SETUP Defaults US/Non-US defaults changes whether the printer uses the US factory defaults...

Service Manual
Page 86
... turn it on the operator panel and through the PJL data stream. When this information. Users can be disabled. The settings allow you have a network printer. Factory Defaults This setting enables a user to restore all the printer settings to refill when a specific envelope size is enabled, the following settings are Auto (default), MP Feeder, and Manual Paper. If Off is selected in Energy Conserve menu, then Disabled appears in the Power Saver menu and Power Saver can still switch languages on . To print...
... turn it on the operator panel and through the PJL data stream. When this information. Users can be disabled. The settings allow you have a network printer. Factory Defaults This setting enables a user to restore all the printer settings to refill when a specific envelope size is enabled, the following settings are Auto (default), MP Feeder, and Manual Paper. If Off is selected in Energy Conserve menu, then Disabled appears in the Power Saver menu and Power Saver can still switch languages on . To print...

Service Manual
Page 89
... MFP cover or on your wrist. They increase the risk of the printer. 2. Connect the wrist band to prevent damage during service. 3. Remove the toner cartridge and media tray before handling electronic parts. We recommend disconnecting all screws before removing logic cards: • Keep the ESD-sensitive part in its original shipping container (a special "ESD bag") until the part is used, because low humidity increases static electricity. The toner cartridge...
... MFP cover or on your wrist. They increase the risk of the printer. 2. Connect the wrist band to prevent damage during service. 3. Remove the toner cartridge and media tray before handling electronic parts. We recommend disconnecting all screws before removing logic cards: • Keep the ESD-sensitive part in its original shipping container (a special "ESD bag") until the part is used, because low humidity increases static electricity. The toner cartridge...
Service Manual
Page 151
... C cables fuser power cable 4-24 code update 3-1 compatibility 1-5 Configuration ID 3-22 configuration menu accessing 3-1, 3-26 available menus 3-26 Demo Mode 3-28 Energy Conserve 3-28 Env Prompts 3-28 EVENT LOG 3-28 Factory Defaults 3-28 Maint Cnt Value 3-27 Panel Menus 3-27 Paper Prompts 3-28 PPDS Emulation 3-28 Prt Quality Pgs 3-27 Reset Maint Cnt 3-27 control panel 1-2 controller card removal 4-13 service check 2-17 D defaults EP defaults 3-23 factory defaults 3-28 US/Non-US defaults 3-21 diagnostics mode 3-2 accessing 3-1 available tests 3-2 BASE SENSOR TEST 3-20 DUPLEX TESTS Duplex Feed...
... C cables fuser power cable 4-24 code update 3-1 compatibility 1-5 Configuration ID 3-22 configuration menu accessing 3-1, 3-26 available menus 3-26 Demo Mode 3-28 Energy Conserve 3-28 Env Prompts 3-28 EVENT LOG 3-28 Factory Defaults 3-28 Maint Cnt Value 3-27 Panel Menus 3-27 Paper Prompts 3-28 PPDS Emulation 3-28 Prt Quality Pgs 3-27 Reset Maint Cnt 3-27 control panel 1-2 controller card removal 4-13 service check 2-17 D defaults EP defaults 3-23 factory defaults 3-28 US/Non-US defaults 3-21 diagnostics mode 3-2 accessing 3-1 available tests 3-2 BASE SENSOR TEST 3-20 DUPLEX TESTS Duplex Feed...
Service Manual
Page 152
... I -2 Service Manual LED-E238/E240(n) overview 1-2 Panel Test 3-14 output bin sensor tests standard bin 3-19 P page count Page Count 3-21 permanent page count 3-21 Panel Test 3-14 panel, control 1-2 paper exit guide, removal 4-37 paper jams tips on preventing 1-7 parallel port service check 2-23 parallel wrap tests 3-15 parts catalog covers 7-2 electronics 7-4 frame 7-6 options 7-8 power-on self test (POST) 2-1 symptoms 2-15 print media preventing jams 1-7 trays by model 1-4 types and sizes 1-6 print quality pages 3-13, 3-27 using 2-24 print quality problems print media 1-7 service check 2-24...
... I -2 Service Manual LED-E238/E240(n) overview 1-2 Panel Test 3-14 output bin sensor tests standard bin 3-19 P page count Page Count 3-21 permanent page count 3-21 Panel Test 3-14 panel, control 1-2 paper exit guide, removal 4-37 paper jams tips on preventing 1-7 parallel port service check 2-23 parallel wrap tests 3-15 parts catalog covers 7-2 electronics 7-4 frame 7-6 options 7-8 power-on self test (POST) 2-1 symptoms 2-15 print media preventing jams 1-7 trays by model 1-4 types and sizes 1-6 print quality pages 3-13, 3-27 using 2-24 print quality problems print media 1-7 service check 2-24...


