User's Guide
Page 5
... default Power Saver Timeout is 30 minutes for such item. Lexmark E340, E342n This limited warranty applies to in this statement as fuser units, transfer belts, and paper feed items)###, if any, and any other than Lexmark or a Lexmark authorized servicer • Operation of a product beyond repair, or...to you if the product you transfer this product to another user, warranty service under the terms of this product does not function as toners and inks), software, or interfaces not furnished by a third party of products, supplies or parts • Products, supplies, parts, materials...
... default Power Saver Timeout is 30 minutes for such item. Lexmark E340, E342n This limited warranty applies to in this statement as fuser units, transfer belts, and paper feed items)###, if any, and any other than Lexmark or a Lexmark authorized servicer • Operation of a product beyond repair, or...to you if the product you transfer this product to another user, warranty service under the terms of this product does not function as toners and inks), software, or interfaces not furnished by a third party of products, supplies or parts • Products, supplies, parts, materials...
User's Guide
Page 10
... 92 Storing supplies ...93 How to conserve supplies 93 How to know when you need new supplies 94 Checking the toner and photoconductor levels 94 How to change a toner cartridge 95 Recycling Lexmark products 98 How to change a photoconductor kit 99 Chapter 12: Administration 102 Disabling the operator panel menus 102 Enabling the...
... 92 Storing supplies ...93 How to conserve supplies 93 How to know when you need new supplies 94 Checking the toner and photoconductor levels 94 How to change a toner cartridge 95 Recycling Lexmark products 98 How to change a photoconductor kit 99 Chapter 12: Administration 102 Disabling the operator panel menus 102 Enabling the...
User's Guide
Page 14
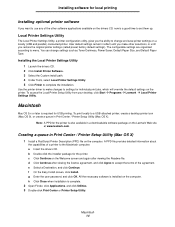
... 3 Double-click Print Center or Printer Setup Utility. To access the Local Printer Setup Utility from your desktop, click Start Æ Programs Æ Lexmark Æ Local Printer Settings Utility. a Insert the drivers CD. Installing software for local printing Installing optional printer software If you want to use any of... the other selections, or until you the ability to change settings such as Toner Darkness, Power Saver, Default Paper Size, and Default Paper Type. User default settings remain in Print Center / Printer Setup Utility (Mac OS...
... 3 Double-click Print Center or Printer Setup Utility. To access the Local Printer Setup Utility from your desktop, click Start Æ Programs Æ Lexmark Æ Local Printer Settings Utility. a Insert the drivers CD. Installing software for local printing Installing optional printer software If you want to use any of... the other selections, or until you the ability to change settings such as Toner Darkness, Power Saver, Default Paper Size, and Default Paper Type. User default settings remain in Print Center / Printer Setup Utility (Mac OS...
User's Guide
Page 25
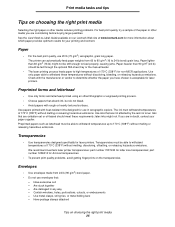
...Transparencies must be stiff enough to feed properly, causing jams. Paper heavier than 60 g/m2 (16 lb) might not. Are damaged in toner. Paper lighter than 90 g/m2 (24 lb) should meet these temperatures without melting, discoloring, offsetting, or releasing hazardous emissions. Preprinted forms ...copiers. part number 12A5010 for A4 size transparencies. • To prevent print quality problems, avoid getting fingerprints on our Lexmark Web site at www.lexmark.com for more information about which paper provides optimum results for non-MICR applications. Paper • For the best print...
...Transparencies must be stiff enough to feed properly, causing jams. Paper heavier than 60 g/m2 (16 lb) might not. Are damaged in toner. Paper lighter than 90 g/m2 (24 lb) should meet these temperatures without melting, discoloring, offsetting, or releasing hazardous emissions. Preprinted forms ...copiers. part number 12A5010 for A4 size transparencies. • To prevent print quality problems, avoid getting fingerprints on our Lexmark Web site at www.lexmark.com for more information about which paper provides optimum results for non-MICR applications. Paper • For the best print...
User's Guide
Page 58
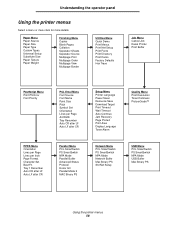
...PS Setup Menu Printer Language Power Saver Resource Save Download Target Print Timeout Wait Timeout Auto Continue Jam Recovery Page Protect Print Area Display Language Toner Alarm Network Menu PCL SmartSwitch PS SmartSwitch NPA Mode Network Buffer Mac Binary PS Std Net Setup Quality Menu Print Resolution... Toner Darkness PictureGrade™ USB Menu PCL SmartSwitch PS SmartSwitch NPA Mode USB Buffer Mac Binary PS Using the printer menus 58 Understanding the operator ...
...PS Setup Menu Printer Language Power Saver Resource Save Download Target Print Timeout Wait Timeout Auto Continue Jam Recovery Page Protect Print Area Display Language Toner Alarm Network Menu PCL SmartSwitch PS SmartSwitch NPA Mode Network Buffer Mac Binary PS Std Net Setup Quality Menu Print Resolution... Toner Darkness PictureGrade™ USB Menu PCL SmartSwitch PS SmartSwitch NPA Mode USB Buffer Mac Binary PS Using the printer menus 58 Understanding the operator ...

User's Guide
Page 62
... Width =3.00-14.17 in. (8.5 in.*) =76-360 mm (216 mm*) Portrait Height =3.00-14.17 in. (14 in a specific source and ensure that the toner adheres properly to the printed page. 1 Select a paper type. Off Statement/A5 Printer prompts the user to 14 characters. All Listed* Substitutes Letter/A4 and...
... Width =3.00-14.17 in. (8.5 in.*) =76-360 mm (216 mm*) Portrait Height =3.00-14.17 in. (14 in a specific source and ensure that the toner adheres properly to the printed page. 1 Select a paper type. Off Statement/A5 Printer prompts the user to 14 characters. All Listed* Substitutes Letter/A4 and...

User's Guide
Page 67
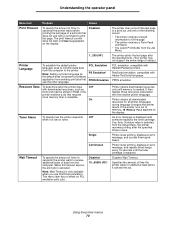
...67 To select printed output resolution. Note: Values marked by an asterisk (*) are the factory default settings. To lighten or darken text images, or conserve toner. Select a lower value for very bold text. Select a value less than 7 to change printer settings affecting the quality of printed characters and images. ...10 (8*) Uses modified screening parameters to improve print quality of grayscale printing. Understanding the operator panel Quality Menu Use the Quality Menu to conserve toner. Select a higher value for bolder line widths or darker grayscale images.
...67 To select printed output resolution. Note: Values marked by an asterisk (*) are the factory default settings. To lighten or darken text images, or conserve toner. Select a lower value for very bold text. Select a value less than 7 to change printer settings affecting the quality of printed characters and images. ...10 (8*) Uses modified screening parameters to improve print quality of grayscale printing. Understanding the operator panel Quality Menu Use the Quality Menu to conserve toner. Select a higher value for bolder line widths or darker grayscale images.
User's Guide
Page 70
...the other language. Printer retains all downloaded resources for additional data before printing the last page of memory, 38 Memory Full appears on toner. Note: Wait Timeout is available. Disabled 15...65535 (40*) Disables Wait Timeout. Using the printer menus 70 If an Auto Continue...specify the amount of time (in seconds) the printer waits before it is replaced. On Printer retains downloaded resources only until the toner cartridge is low on the display. PCL Emulation PS Emulation* PPDS Emulation PCL emulation, compatible with Adobe PostScript language. If the ...
...the other language. Printer retains all downloaded resources for additional data before printing the last page of memory, 38 Memory Full appears on toner. Note: Wait Timeout is available. Disabled 15...65535 (40*) Disables Wait Timeout. Using the printer menus 70 If an Auto Continue...specify the amount of time (in seconds) the printer waits before it is replaced. On Printer retains downloaded resources only until the toner cartridge is low on the display. PCL Emulation PS Emulation* PPDS Emulation PCL emulation, compatible with Adobe PostScript language. If the ...
User's Guide
Page 80
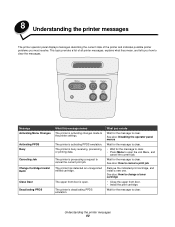
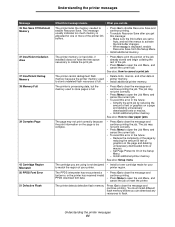
... how to clear the messages. See also: How to the printer settings. Understanding the printer messages 80 The printer is activating changes made to change a toner cartridge • Close the upper front door. • Install the print cartridge. See also: How to cancel the current print job. The printer is deactivating...
... how to clear the messages. See also: How to the printer settings. Understanding the printer messages 80 The printer is activating changes made to change a toner cartridge • Close the upper front door. • Install the print cartridge. See also: How to cancel the current print job. The printer is deactivating...

User's Guide
Page 83
...in the Setup Menu. - See also: How to clear paper jams 31 Missing or Defective Cart. See also: Restoring factory default settings Toner Low The print cartridge is resetting to print the contents of print media can do not replace the cartridge, you may experience print quality ... one. Understanding the printer messages Message What this message means What you can be loaded? See also: Using the operator panel to change a toner cartridge 34 Short Paper The printer has determined that prompted the message. • Make sure the Paper Size setting in the printer memory are...
...in the Setup Menu. - See also: How to clear paper jams 31 Missing or Defective Cart. See also: Restoring factory default settings Toner Low The print cartridge is resetting to print the contents of print media can do not replace the cartridge, you may experience print quality ... one. Understanding the printer messages Message What this message means What you can be loaded? See also: Using the operator panel to change a toner cartridge 34 Short Paper The printer has determined that prompted the message. • Make sure the Paper Size setting in the printer memory are...
User's Guide
Page 84
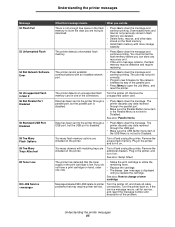
... also: Setup menu The cartridge you get this error in the Setup Menu. - This message usually indicates too much memory is not designed • Install a toner cartridge made for one or more of the job. • Press Menu to On in the future: -
... also: Setup menu The cartridge you get this error in the Setup Menu. - This message usually indicates too much memory is not designed • Install a toner cartridge made for one or more of the job. • Press Menu to On in the future: -
User's Guide
Page 85
...any resources on it. • If the error message remains, the flash memory may require printer service. See also: How to change a toner cartridge Messages labeled 900-999 relate to open the Job Menu, and reset the printer. The printer cannot establish communications with more storage capacity. ...the service message recurs, call for the network interface by way of the parallel port. • Press Menu to printer problems that the toner supply in the print cartridge is not enough free space in the printer, and turn it on . Turn off and unplug the printer. ...
...any resources on it. • If the error message remains, the flash memory may require printer service. See also: How to change a toner cartridge Messages labeled 900-999 relate to open the Job Menu, and reset the printer. The printer cannot establish communications with more storage capacity. ...the service message recurs, call for the network interface by way of the parallel port. • Press Menu to printer problems that the toner supply in the print cartridge is not enough free space in the printer, and turn it on . Turn off and unplug the printer. ...
User's Guide
Page 92
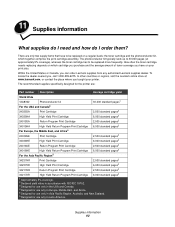
... Canada, you bought your print jobs. Supplies information 92 In other countries or regions, visit the Lexmark online store at approximately 5% coverage), whereas the toner cartridge has to be replaced on your printer. How often the toner cartridge needs replacing depends on which together comprise the print cartridge assembly. To locate the dealer...
... Canada, you bought your print jobs. Supplies information 92 In other countries or regions, visit the Lexmark online store at approximately 5% coverage), whereas the toner cartridge has to be replaced on your printer. How often the toner cartridge needs replacing depends on which together comprise the print cartridge assembly. To locate the dealer...
User's Guide
Page 93
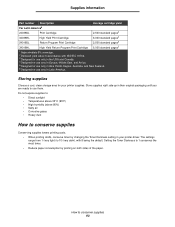
... original packaging until you are ready to use only in Latin America. How to 1 conserves the most toner. • Reduce paper consumption by changing the Toner Darkness setting in your printer supplies. Do not expose supplies to: • Direct sunlight • Temperatures... The settings range from 1 (very light) to conserve supplies Conserving supplies lowers printing costs. • When printing drafts, conserve toner by printing on both sides of the paper. Supplies information Part number Description Average cartridge yield For Latin America6 24038SL Print Cartridge 2,...
... original packaging until you are ready to use only in Latin America. How to 1 conserves the most toner. • Reduce paper consumption by changing the Toner Darkness setting in your printer supplies. Do not expose supplies to: • Direct sunlight • Temperatures... The settings range from 1 (very light) to conserve supplies Conserving supplies lowers printing costs. • When printing drafts, conserve toner by printing on both sides of the paper. Supplies information Part number Description Average cartridge yield For Latin America6 24038SL Print Cartridge 2,...
User's Guide
Page 94
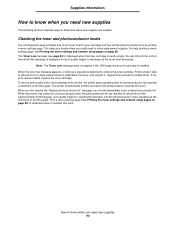
...and front to back several times to order replacement supplies. If the print remains faded, replace the toner cartridge. The printer automatically notifies you experience faded print, remove the toner cartridge. Supplies information How to know when you need new supplies 94 This helps you decide when ... Printing the menu settings and network setup pages on page 89) to determine when new supplies are needed. Repeat this point. When the toner low message appears, or when you before the photoconductor reaches this message is by printing a menu settings page. How to know when you...
...and front to back several times to order replacement supplies. If the print remains faded, replace the toner cartridge. The printer automatically notifies you experience faded print, remove the toner cartridge. Supplies information How to know when you need new supplies 94 This helps you decide when ... Printing the menu settings and network setup pages on page 89) to determine when new supplies are needed. Repeat this point. When the toner low message appears, or when you before the photoconductor reaches this message is by printing a menu settings page. How to know when you...
User's Guide
Page 95
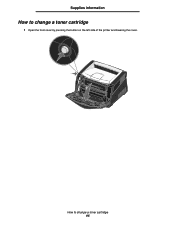
How to change a toner cartridge 95 Supplies information How to change a toner cartridge 1 Open the front cover by pressing the button on the left side of the printer and lowering the cover.
How to change a toner cartridge 95 Supplies information How to change a toner cartridge 1 Open the front cover by pressing the button on the left side of the printer and lowering the cover.

User's Guide
Page 96
a b 3 Unpack the new toner cartridge. Supplies information 2 Remove the toner cartridge: a Press the button on page 98 for recycling. How to distribute the toner. Note: You can use the packing material from the new cartridge to ship the old cartridge back to Lexmark for more information. 4 Firmly shake the cartridge in all directions to change a toner cartridge 96 See Recycling Lexmark products on the base of the print cartridge assembly. b Pull the toner cartridge up and out using the handle.
a b 3 Unpack the new toner cartridge. Supplies information 2 Remove the toner cartridge: a Press the button on page 98 for recycling. How to distribute the toner. Note: You can use the packing material from the new cartridge to ship the old cartridge back to Lexmark for more information. 4 Firmly shake the cartridge in all directions to change a toner cartridge 96 See Recycling Lexmark products on the base of the print cartridge assembly. b Pull the toner cartridge up and out using the handle.
User's Guide
Page 97
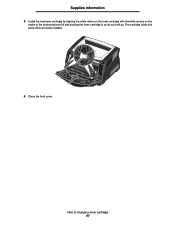
The cartridge clicks into place when correctly installed. 6 Close the front cover. Supplies information 5 Install the new toner cartridge by aligning the white rollers on the toner cartridge with the white arrows on the tracks of the photoconductor kit and pushing the toner cartridge in as far as it will go. How to change a toner cartridge 97
The cartridge clicks into place when correctly installed. 6 Close the front cover. Supplies information 5 Install the new toner cartridge by aligning the white rollers on the toner cartridge with the white arrows on the tracks of the photoconductor kit and pushing the toner cartridge in as far as it will go. How to change a toner cartridge 97

User's Guide
Page 99
How to direct light for an extended period of the printer and lowering the cover. Supplies information How to change a photoconductor kit Warning: When replacing a photoconductor kit, do not leave the toner cartridge or the new photoconductor kit exposed to change a photoconductor kit 99 Extended light exposure can cause print quality problems. 1 Open the front cover by pressing the button on the left side of time.
How to direct light for an extended period of the printer and lowering the cover. Supplies information How to change a photoconductor kit Warning: When replacing a photoconductor kit, do not leave the toner cartridge or the new photoconductor kit exposed to change a photoconductor kit 99 Extended light exposure can cause print quality problems. 1 Open the front cover by pressing the button on the left side of time.
User's Guide
Page 100
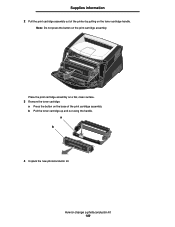
b Pull the toner cartridge up and out using the handle. a b 4 Unpack the new photoconductor kit. Note: Do not press the button on the base of the printer by pulling on the toner cartridge handle. How to change a photoconductor kit 100 Place the print cartridge assembly on a flat, clean surface. 3 Remove the toner cartridge: a Press the button on the print cartridge assembly. Supplies information 2 Pull the print cartridge assembly out of the print cartridge assembly.
b Pull the toner cartridge up and out using the handle. a b 4 Unpack the new photoconductor kit. Note: Do not press the button on the base of the printer by pulling on the toner cartridge handle. How to change a photoconductor kit 100 Place the print cartridge assembly on a flat, clean surface. 3 Remove the toner cartridge: a Press the button on the print cartridge assembly. Supplies information 2 Pull the print cartridge assembly out of the print cartridge assembly.


