
User's Guide
Page 8
... ...26 Card stock ...27 Tips on storing print media and supplies 27 Storing paper ...27 Storing supplies ...27 Tips on preventing jams 28 How to load the 250-sheet and 550-sheet trays 29 Extending the ...tray for legal or folio size paper 32 How to load the manual feeder 33 How to use the rear exit 33 How to clear paper jams 35 Chapter 5: Printing tasks 38 How to manually... feed a print job 38 How to print on both sides of the paper (manual duplex 40 How to print multiple...
... ...26 Card stock ...27 Tips on storing print media and supplies 27 Storing paper ...27 Storing supplies ...27 Tips on preventing jams 28 How to load the 250-sheet and 550-sheet trays 29 Extending the ...tray for legal or folio size paper 32 How to load the manual feeder 33 How to use the rear exit 33 How to clear paper jams 35 Chapter 5: Printing tasks 38 How to manually... feed a print job 38 How to print on both sides of the paper (manual duplex 40 How to print multiple...
User's Guide
Page 24
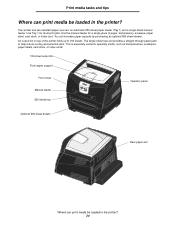
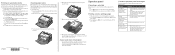
... piece of the printer holds up to help reduce curling and potential jams. This is especially useful for specialty media, such as transparencies, envelopes, paper labels, card stock, or index cards. 150-sheet output bin Front paper support Front cover Manual feeder 250-sheet tray Operator panel Optional 550...optional 550-sheet drawer. The single-sheet rear exit provides a straight-through paper path to 150 sheets. Use the manual feeder for most print jobs. An output bin on top of paper, transparency, envelope, paper label, card stock, or index card. Print media tasks and tips Where...
... piece of the printer holds up to help reduce curling and potential jams. This is especially useful for specialty media, such as transparencies, envelopes, paper labels, card stock, or index cards. 150-sheet output bin Front paper support Front cover Manual feeder 250-sheet tray Operator panel Optional 550...optional 550-sheet drawer. The single-sheet rear exit provides a straight-through paper path to 150 sheets. Use the manual feeder for most print jobs. An output bin on top of paper, transparency, envelope, paper label, card stock, or index card. Print media tasks and tips Where...
User's Guide
Page 25
See the Card Stock & Label Guide available on our Lexmark Web site at www.lexmark.com for more information about which paper provides optimum results for your paper supplier. Paper lighter than 90 g/m2 (24 lb) should meet these temperatures without melting or releasing hazardous emissions. If you are ...envelopes made from 60 to 90 g/m2 (16 to feed properly, causing jams. Paper heavier than 60 g/m2 (16 lb) might not. Have excessive curl - The printer can automatically feed paper weights from 24 lb (90 g/m2) bond paper. • Do not use 20 lb (75 g/m2) xerographic, grain ...
See the Card Stock & Label Guide available on our Lexmark Web site at www.lexmark.com for more information about which paper provides optimum results for your paper supplier. Paper lighter than 90 g/m2 (24 lb) should meet these temperatures without melting or releasing hazardous emissions. If you are ...envelopes made from 60 to 90 g/m2 (16 to feed properly, causing jams. Paper heavier than 60 g/m2 (16 lb) might not. Have excessive curl - The printer can automatically feed paper weights from 24 lb (90 g/m2) bond paper. • Do not use 20 lb (75 g/m2) xerographic, grain ...
User's Guide
Page 27
... Choose a cool, clean storage area for your printer supplies. Store supplies right side up in their original packaging until you store individual packages of paper out of 76 x 127 mm (3 x 5 in an environment where the temperature is approximately 21°C (70°F) and the relative humidity...media tasks and tips Card stock • Preprinting, perforation, and creasing can significantly affect the print quality and cause media handling or jamming problems. • Avoid using card stock that may release hazardous emissions when heated. • Do not use them. Preprinting introduces ...
... Choose a cool, clean storage area for your printer supplies. Store supplies right side up in their original packaging until you store individual packages of paper out of 76 x 127 mm (3 x 5 in an environment where the temperature is approximately 21°C (70°F) and the relative humidity...media tasks and tips Card stock • Preprinting, perforation, and creasing can significantly affect the print quality and cause media handling or jamming problems. • Avoid using card stock that may release hazardous emissions when heated. • Do not use them. Preprinting introduces ...

User's Guide
Page 28
...or embossments - Have metal clasps, string ties, or metal folding bars - Have any way - Tips on our Lexmark Web site at www.lexmark.com for more information about which paper provides optimum results for your printing environment. • If you load it. • Do not exceed the ...: - Print media tasks and tips Tips on preventing jams You can help you avoid paper jams: • Do not load wrinkled, creased, or damp paper. • Never mix media types within a tray. • Flex, fan, and straighten paper before you need detailed information before purchasing large quantities of...
...or embossments - Have metal clasps, string ties, or metal folding bars - Have any way - Tips on our Lexmark Web site at www.lexmark.com for more information about which paper provides optimum results for your printing environment. • If you load it. • Do not exceed the ...: - Print media tasks and tips Tips on preventing jams You can help you avoid paper jams: • Do not load wrinkled, creased, or damp paper. • Never mix media types within a tray. • Flex, fan, and straighten paper before you need detailed information before purchasing large quantities of...

User's Guide
Page 30
Print media tasks and tips 3 Load the paper in the tray with the print side facing down . Note: Load letterhead paper with the logo should be placed at the front of the tray. How to load the 250-sheet and 550-sheet trays 30 The top edge of paper. Make sure the paper is below the max fill line on the side guides. Overloading may cause jams. 4 Slide the two side guides and the back guide until they fit snugly against the stack of the sheet with the design side facing down .
Print media tasks and tips 3 Load the paper in the tray with the print side facing down . Note: Load letterhead paper with the logo should be placed at the front of the tray. How to load the 250-sheet and 550-sheet trays 30 The top edge of paper. Make sure the paper is below the max fill line on the side guides. Overloading may cause jams. 4 Slide the two side guides and the back guide until they fit snugly against the stack of the sheet with the design side facing down .
User's Guide
Page 33
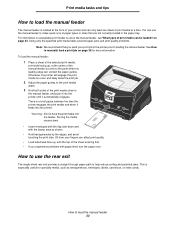
...labels, card stock, or index cards. How to use the rear exit The single-sheet rear exit provides a straight-through paper path to help reduce curling and potential jams. This is especially useful for more information. on page 38 for specialty media, such as shown. • Hold transparencies.... • Load letterhead face-up , at a time. You can use in the paper tray. See How to load the manual feeder 33 Using only the specified print media helps prevent paper jams and print quality problems. Note: We recommend that are not currently loaded in the manual feeder...
...labels, card stock, or index cards. How to use the rear exit The single-sheet rear exit provides a straight-through paper path to help reduce curling and potential jams. This is especially useful for more information. on page 38 for specialty media, such as shown. • Hold transparencies.... • Load letterhead face-up , at a time. You can use in the paper tray. See How to load the manual feeder 33 Using only the specified print media helps prevent paper jams and print quality problems. Note: We recommend that are not currently loaded in the manual feeder...

User's Guide
Page 35
Print media tasks and tips How to clear paper jams By carefully selecting print media and loading it properly, you should be able to clear paper jams 35 To clear a paper jam: 1 If you must remove all jammed print media from a tray, remove the tray, and then remove any jams. How to avoid most jams. Note: To clear the Paper Jam error message, you are feeding paper from the entire paper path, and then press Go.
Print media tasks and tips How to clear paper jams By carefully selecting print media and loading it properly, you should be able to clear paper jams 35 To clear a paper jam: 1 If you must remove all jammed print media from a tray, remove the tray, and then remove any jams. How to avoid most jams. Note: To clear the Paper Jam error message, you are feeding paper from the entire paper path, and then press Go.
User's Guide
Page 36
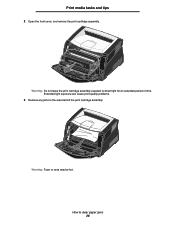
Extended light exposure can cause print quality problems. 3 Remove any jams in the area behind the print cartridge assembly. Warning: Fuser or area may be hot. Warning: Do not leave the print cartridge assembly exposed to clear paper jams 36 How to direct light for an extended period of time. Print media tasks and tips 2 Open the front cover, and remove the print cartridge assembly.
Extended light exposure can cause print quality problems. 3 Remove any jams in the area behind the print cartridge assembly. Warning: Fuser or area may be hot. Warning: Do not leave the print cartridge assembly exposed to clear paper jams 36 How to direct light for an extended period of time. Print media tasks and tips 2 Open the front cover, and remove the print cartridge assembly.
User's Guide
Page 37
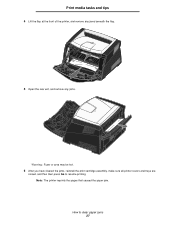
How to resume printing. Note: The printer reprints the pages that caused the paper jam. Print media tasks and tips 4 Lift the flap at the front of the printer, and remove any jams beneath the flap. 5 Open the rear exit, and remove any jams. Warning: Fuser or area may be hot. 6 After you have cleared the jams, reinstall the print cartridge assembly, make sure all printer covers and trays are closed, and then then press Go to clear paper jams 37
How to resume printing. Note: The printer reprints the pages that caused the paper jam. Print media tasks and tips 4 Lift the flap at the front of the printer, and remove any jams beneath the flap. 5 Open the rear exit, and remove any jams. Warning: Fuser or area may be hot. 6 After you have cleared the jams, reinstall the print cartridge assembly, make sure all printer covers and trays are closed, and then then press Go to clear paper jams 37
User's Guide
Page 55
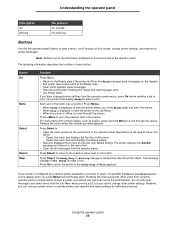
... state if the printer is offline, to the Ready state. • Clear some operator panel messages. • Resume printing after loading print media and clearing paper jams. • Exit Power Saver. Press Menu>: • When Ready is displayed, to take the printer to the Job Menu. • When the printer is offline...
... state if the printer is offline, to the Ready state. • Clear some operator panel messages. • Resume printing after loading print media and clearing paper jams. • Exit Power Saver. Press Menu>: • When Ready is displayed, to take the printer to the Job Menu. • When the printer is offline...
User's Guide
Page 58
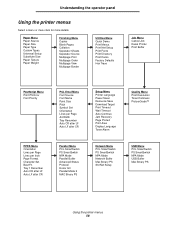
Paper Menu Paper Source Paper Size Paper Type Custom Types Universal Setup Substitute Size Paper Texture Paper Weight Finishing Menu Copies Blank Pages Collation Separator Sheets Separator Source Multipage Print Multipage Order Multipage View Multipage Border Utilities Menu Quick Demo... Honor Init Parallel Mode 2 MAC Binary PS Setup Menu Printer Language Power Saver Resource Save Download Target Print Timeout Wait Timeout Auto Continue Jam Recovery Page Protect Print Area Display Language Toner Alarm Network Menu PCL SmartSwitch PS SmartSwitch NPA Mode Network Buffer Mac Binary PS Std Net ...
Paper Menu Paper Source Paper Size Paper Type Custom Types Universal Setup Substitute Size Paper Texture Paper Weight Finishing Menu Copies Blank Pages Collation Separator Sheets Separator Source Multipage Print Multipage Order Multipage View Multipage Border Utilities Menu Quick Demo... Honor Init Parallel Mode 2 MAC Binary PS Setup Menu Printer Language Power Saver Resource Save Download Target Print Timeout Wait Timeout Auto Continue Jam Recovery Page Protect Print Area Display Language Toner Alarm Network Menu PCL SmartSwitch PS SmartSwitch NPA Mode Network Buffer Mac Binary PS Std Net ...

User's Guide
Page 83
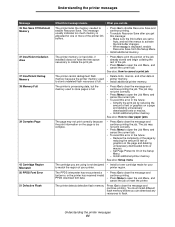
... continue printing. Understanding the printer messages 83 See also: How to cancel a print job 2 Paper Jam The printer detects a jam. If MP Feeder Size is set to Universal, make sure your paper is restoring the factory default printer settings. See also: Using the operator panel to open the... Job Menu, and cancel the current job. See also: How to clear paper jams 31 Missing or Defective Cart. The print cartridge is missing or is installed. Understanding the printer messages Message What this message means What...
... continue printing. Understanding the printer messages 83 See also: How to cancel a print job 2 Paper Jam The printer detects a jam. If MP Feeder Size is set to Universal, make sure your paper is restoring the factory default printer settings. See also: Using the operator panel to open the... Job Menu, and cancel the current job. See also: How to clear paper jams 31 Missing or Defective Cart. The print cartridge is missing or is installed. Understanding the printer messages Message What this message means What...
User's Guide
Page 84
... the print information on the page is full. • Press Go to clear the message and continue printing the job. See also: How to clear paper jams The page may not print correctly. • Press Menu to open the Job Menu, and cancel the current job. When Ready is allocated for your...
... the print information on the page is full. • Press Go to clear the message and continue printing the job. See also: How to clear paper jams The page may not print correctly. • Press Menu to open the Job Menu, and cancel the current job. When Ready is allocated for your...
User's Guide
Page 104
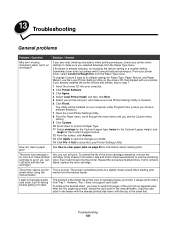
.... Can I 'm having trouble getting it from the manual feeder. Yes, you have another cartridge to clear paper jams on page 35 for information about clearing jams. The toner low message is on your computer under Program Files (unless you chose a different directory). 7 ... 5 Select your printer. manual feeder. 13 Troubleshooting General problems Problem / Question Solution / Answer Why am I missing characters when I clear a paper jam? If you already installed the printer drivers and utilities, skip to a rougher setting. If Envelope is normal. If you see the Custom menu ...
.... Can I 'm having trouble getting it from the manual feeder. Yes, you have another cartridge to clear paper jams on page 35 for information about clearing jams. The toner low message is on your computer under Program Files (unless you chose a different directory). 7 ... 5 Select your printer. manual feeder. 13 Troubleshooting General problems Problem / Question Solution / Answer Why am I missing characters when I clear a paper jam? If you already installed the printer drivers and utilities, skip to a rougher setting. If Envelope is normal. If you see the Custom menu ...

User's Guide
Page 112
...77 parallel 75 USB 79 C Cancel Job (Job Menu) 65 canceling a print job 47 card stock 27 cleaning the printhead lens 109 clearing paper jams 35 Collation (Finishing Menu) 63 collation, enabling 63 complex page errors 69 configuration menus Network MAC Binary PS 86 NPA Mode 86 Set Card...88 Reset Photoconductor Counter 88 Copies (Finishing Menu) 63 copies, specifying number 63 current menu settings 89 with menu settings page 89 Custom Types (Paper Menu) 59 D disabling operator panel menus 102 Display Language (Setup Menu) 68 Download Target (Setup Menu) 68 downloaded resources printing 65 resource ...
...77 parallel 75 USB 79 C Cancel Job (Job Menu) 65 canceling a print job 47 card stock 27 cleaning the printhead lens 109 clearing paper jams 35 Collation (Finishing Menu) 63 collation, enabling 63 complex page errors 69 configuration menus Network MAC Binary PS 86 NPA Mode 86 Set Card...88 Reset Photoconductor Counter 88 Copies (Finishing Menu) 63 copies, specifying number 63 current menu settings 89 with menu settings page 89 Custom Types (Paper Menu) 59 D disabling operator panel menus 102 Display Language (Setup Menu) 68 Download Target (Setup Menu) 68 downloaded resources printing 65 resource ...
User's Guide
Page 113
... light 54 interfaces network 76, 86 parallel 75, 87 USB 78, 88 IP address setting 18, 90 verifying 19, 90 Index J Jam Recovery (Setup Menu) 68 jams 35 messages 80 See paper jams job canceling 65 Job Menu 65 Cancel Job 65 Print Buffer 66 Reset Printer 66 L labels 26 legal 32 letterhead 25...
... light 54 interfaces network 76, 86 parallel 75, 87 USB 78, 88 IP address setting 18, 90 verifying 19, 90 Index J Jam Recovery (Setup Menu) 68 jams 35 messages 80 See paper jams job canceling 65 Job Menu 65 Cancel Job 65 Print Buffer 66 Reset Printer 66 L labels 26 legal 32 letterhead 25...
User's Guide
Page 114
... printing menu settings page 89 selecting 55 menu items 55 numerical values 55 Setup 87 USB 88 Utilities 88 messages 80 2 Paper Jam 83 32 Unsupported Print Cartridge 83 34 Short Paper 83 35 Res Save Off Deficient Memory 84 37 Insufficient Collation Area 84 37 Insufficient Defrag Memory 84 38 Memory Full...
... printing menu settings page 89 selecting 55 menu items 55 numerical values 55 Setup 87 USB 88 Utilities 88 messages 80 2 Paper Jam 83 32 Unsupported Print Cartridge 83 34 Short Paper 83 35 Res Save Off Deficient Memory 84 37 Insufficient Collation Area 84 37 Insufficient Defrag Memory 84 38 Memory Full...

User's Guide
Page 115
...) 69 paper 25 choosing 25 jams 35 loading 29, 33 storing 27 paper jams reprinting jammed pages 68 Paper Menu 59 Custom Types 59 Paper Size 59 Paper Source 60 Paper Texture 60 Paper Type 61 Paper Weight 62 Substitute Size 62 Universal Setup 62 Paper Size (Paper Menu) 59 Paper Source (Paper Menu) 60 Paper Texture (Paper Menu) 60 Paper Type (Paper Menu) 61 Paper Weight (Paper Menu) 62 paper, specifying...
...) 69 paper 25 choosing 25 jams 35 loading 29, 33 storing 27 paper jams reprinting jammed pages 68 Paper Menu 59 Custom Types 59 Paper Size 59 Paper Source 60 Paper Texture 60 Paper Type 61 Paper Weight 62 Substitute Size 62 Universal Setup 62 Paper Size (Paper Menu) 59 Paper Source (Paper Menu) 60 Paper Texture (Paper Menu) 60 Paper Type (Paper Menu) 61 Paper Weight (Paper Menu) 62 paper, specifying...
Quick Reference
Page 2
... the flap at the front of the printer, and remove any jams beneath the flap. 5 Open the rear exit, and remove any jams. Operator panel Canceling a print job If the job you are feeding paper from another printer driver. © 2005 Lexmark International, Inc., All rights reserved. P/N 28S1837 E.C. 28S013 *28S1837... and release Menu until you see Utilities Menu, and then press Select. 3 Press and release Menu until you clear the entire paper path when a paper jam occurs. Not Ready The printer is discarding the current print job. • Wait for the tray you need more detailed list of...
... the flap at the front of the printer, and remove any jams beneath the flap. 5 Open the rear exit, and remove any jams. Operator panel Canceling a print job If the job you are feeding paper from another printer driver. © 2005 Lexmark International, Inc., All rights reserved. P/N 28S1837 E.C. 28S013 *28S1837... and release Menu until you see Utilities Menu, and then press Select. 3 Press and release Menu until you clear the entire paper path when a paper jam occurs. Not Ready The printer is discarding the current print job. • Wait for the tray you need more detailed list of...


