Service Manual
Page 4
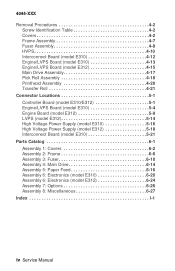
... Power Supply (model E310 5-16 High Voltage Power Supply (model E312 5-18 Interconnect Board (model E310 5-21 Parts Catalog 6-1 Assembly 1: Covers 6-2 Assembly 2: Frame 6-6 Assembly 3: Fuser 6-10 Assembly 4: Main Drive 6-14 Assembly 5: Paper Feed 6-16 Assembly 6: Electronics (model E310 6-20 Assembly 6: Electronics (model E312 6-24 Assembly 7: Options 6-26 Assembly 8: Miscellaneous 6-27 Index I-1 iv Service Manual
... Power Supply (model E310 5-16 High Voltage Power Supply (model E312 5-18 Interconnect Board (model E310 5-21 Parts Catalog 6-1 Assembly 1: Covers 6-2 Assembly 2: Frame 6-6 Assembly 3: Fuser 6-10 Assembly 4: Main Drive 6-14 Assembly 5: Paper Feed 6-16 Assembly 6: Electronics (model E310 6-20 Assembly 6: Electronics (model E312 6-24 Assembly 7: Options 6-26 Assembly 8: Miscellaneous 6-27 Index I-1 iv Service Manual

Service Manual
Page 22
4044-XXX Acronyms CSU DRAM EP EPROM ESD FRU HVPS LASER LCD LED LVPS MROM NVRAM OEM PC POST ROM SIMM SRAM UPR USB V ac V dc Customer Setup Dynamic Random Access Memory Electrophotographic Process Erasable, Programmable ... Test Read Only Memory Single In-Line Memory Module Static Random Access Memory Used Parts Return Universal Serial Bus Volts alternating current Volts direct current 1-2 Service Manual
4044-XXX Acronyms CSU DRAM EP EPROM ESD FRU HVPS LASER LCD LED LVPS MROM NVRAM OEM PC POST ROM SIMM SRAM UPR USB V ac V dc Customer Setup Dynamic Random Access Memory Electrophotographic Process Erasable, Programmable ... Test Read Only Memory Single In-Line Memory Module Static Random Access Memory Used Parts Return Universal Serial Bus Volts alternating current Volts direct current 1-2 Service Manual
Service Manual
Page 24
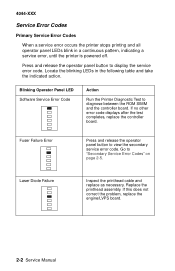
...the test completes, replace the controller board. Locate the blinking LEDs in a continuous pattern, indicating a service error, until the printer is powered off. Laser Diode Failure Inspect the printhead cable and replace as necessary. Replace the printhead assembly. Go to diagnose ...problem, replace the engine/LVPS board. 2-2 Service Manual Press and release the operator panel button to view the secondary service error code. 4044-XXX Service Error Codes Primary Service Error Codes When a service error occurs the printer stops printing and all operator panel LEDs blink ...
...the test completes, replace the controller board. Locate the blinking LEDs in a continuous pattern, indicating a service error, until the printer is powered off. Laser Diode Failure Inspect the printhead cable and replace as necessary. Replace the printhead assembly. Go to diagnose ...problem, replace the engine/LVPS board. 2-2 Service Manual Press and release the operator panel button to view the secondary service error code. 4044-XXX Service Error Codes Primary Service Error Codes When a service error occurs the printer stops printing and all operator panel LEDs blink ...
Service Manual
Page 26
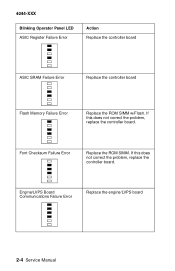
Font Checksum Failure Error Replace the ROM SIMM. Engine/LVPS Board Communications Failure Error Replace the engine/LVPS board 2-4 Service Manual If this does not correct the problem, replace the controller board. If this does not correct the problem, replace the controller board. 4044-XXX Blinking Operator Panel LED ASIC Register Failure Error Action Replace the controller board ASIC SRAM Failure Error Replace the controller board Flash Memory Failure Error Replace the ROM SIMM w/Flash.
Font Checksum Failure Error Replace the ROM SIMM. Engine/LVPS Board Communications Failure Error Replace the engine/LVPS board 2-4 Service Manual If this does not correct the problem, replace the controller board. If this does not correct the problem, replace the controller board. 4044-XXX Blinking Operator Panel LED ASIC Register Failure Error Action Replace the controller board ASIC SRAM Failure Error Replace the controller board Flash Memory Failure Error Replace the ROM SIMM w/Flash.
Service Manual
Page 28
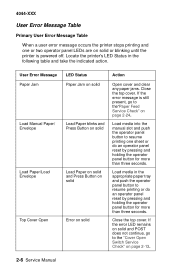
... Load Paper on solid and Press Button on solid Error on page 2-13. 2-6 Service Manual Load media into the manual slot and push the operator panel button to the"Paper Feed Service Check" on solid or blinking until the printer is still present, go to resume printing or do an operator panel reset by...go to resume printing one or two operator panel LEDs are on page 2-24. Locate the printer's LED Status in the appropriate paper tray and push the operator panel button to the "Cover Open Switch Service Check" on solid Action Open cover and clear any paper jams. Close the top cover. If...
... Load Paper on solid and Press Button on solid Error on page 2-13. 2-6 Service Manual Load media into the manual slot and push the operator panel button to the"Paper Feed Service Check" on solid or blinking until the printer is still present, go to resume printing or do an operator panel reset by...go to resume printing one or two operator panel LEDs are on page 2-24. Locate the printer's LED Status in the appropriate paper tray and push the operator panel button to the "Cover Open Switch Service Check" on solid Action Open cover and clear any paper jams. Close the top cover. If...
Service Manual
Page 30
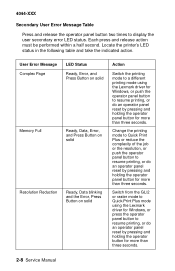
... resume printing, or do an operator panel reset by pressing and holding the operator panel button for more than three seconds. Locate the printer's LED status in the following table and take the indicated action. Each press and release action must be performed within a half second....mode to Quick Print Plus mode using the Lexmark driver for Windows, or push the operator panel button to resume printing, or do an operator panel reset by pressing and holding the operator button for more than three seconds. 2-8 Service Manual User Error Message Complex Page Memory Full Resolution ...
... resume printing, or do an operator panel reset by pressing and holding the operator panel button for more than three seconds. Locate the printer's LED status in the following table and take the indicated action. Each press and release action must be performed within a half second....mode to Quick Print Plus mode using the Lexmark driver for Windows, or push the operator panel button to resume printing, or do an operator panel reset by pressing and holding the operator button for more than three seconds. 2-8 Service Manual User Error Message Complex Page Memory Full Resolution ...

Service Manual
Page 32
... Printer Symptom Table Symptom Dead Machine (no power) Fan noisy or not working Fuser parts melted Fuser lamp doesn't light Toner not fused to the paper Action Go to "Cold Fuser Service Check" on page 2-14. Go to the "Dead Machine Service Check" on page 2-17. 2-10 Service Manual The... paper feed picks and tries to "Cold Fuser Service Check" on . Go to feed paper. POST completes except one ...
... Printer Symptom Table Symptom Dead Machine (no power) Fan noisy or not working Fuser parts melted Fuser lamp doesn't light Toner not fused to the paper Action Go to "Cold Fuser Service Check" on page 2-14. Go to the "Dead Machine Service Check" on page 2-17. 2-10 Service Manual The... paper feed picks and tries to "Cold Fuser Service Check" on . Go to feed paper. POST completes except one ...

Service Manual
Page 34
... Service Manual Cooling Fan Service Check FRU Model E310 Interconnect Board Cooling Fan Action Make sure motor cable is properly seated in location CN408 on its left side. 4044-XXX Service Checks Note: All service checks which involve measuring voltages of the printer. Disconnect the cable and check connector-pin CN408-3 for +24 V dc. FRU Model E312...
... Service Manual Cooling Fan Service Check FRU Model E310 Interconnect Board Cooling Fan Action Make sure motor cable is properly seated in location CN408 on its left side. 4044-XXX Service Checks Note: All service checks which involve measuring voltages of the printer. Disconnect the cable and check connector-pin CN408-3 for +24 V dc. FRU Model E312...

Service Manual
Page 36
... present, check the continuity between the following limits: 100 V ac - 127 V ac for the low voltage model printer 200 V ac - 240 V ac for the high voltage model printer FRU Model E310 & E312 LVPS Fuse 2-14 Service Manual Action Check the fuse on the LVPS for continuity. If a fuse blows again after being replaced, install a new...
... present, check the continuity between the following limits: 100 V ac - 127 V ac for the low voltage model printer 200 V ac - 240 V ac for the high voltage model printer FRU Model E310 & E312 LVPS Fuse 2-14 Service Manual Action Check the fuse on the LVPS for continuity. If a fuse blows again after being replaced, install a new...
Service Manual
Page 38
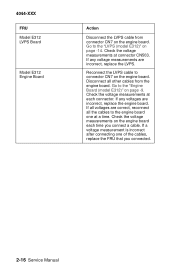
...Check the voltage measurements at each time you connected. 2-16 Service Manual Check the voltage meausrements on the engine board. If any voltage measurements are incorrect, replace the engine board. Reconnect the LVPS cable to the "LVPS (model E312)" on page -9. Go to connector CN7 on the engine... board each connector. Check the voltage measurements at a time. Disconnect all the cables to the "Engine Board (model E312)" on page -14. If a voltage measurement is incorrect after connecting one at connector CN503. Go to the engine board one of the cables...
...Check the voltage measurements at each time you connected. 2-16 Service Manual Check the voltage meausrements on the engine board. If any voltage measurements are incorrect, replace the engine board. Reconnect the LVPS cable to the "LVPS (model E312)" on page -9. Go to connector CN7 on the engine... board each connector. Check the voltage measurements at a time. Disconnect all the cables to the "Engine Board (model E312)" on page -14. If a voltage measurement is incorrect after connecting one at connector CN503. Go to the engine board one of the cables...

Service Manual
Page 40
... when cool. Turn the printer off and disconnect the thermistor cable from CN1 on the engine board. Check for excessive toner buildup on the surface of the thermistor. Replace the thermistor as necessary. Check for excessive toner buildup on the surface of the lamp contacts. 2-18 Service Manual Clean or replace as necessary...
... when cool. Turn the printer off and disconnect the thermistor cable from CN1 on the engine board. Check for excessive toner buildup on the surface of the thermistor. Replace the thermistor as necessary. Check for excessive toner buildup on the surface of the lamp contacts. 2-18 Service Manual Clean or replace as necessary...

Service Manual
Page 42
4044-XXX FRU Model E312 Fuser Lamp Lamp Cable Thermistor LVPS Action Turn the printer off and disconnect the fuser lamp wires from CN1o on the engine board and measure the voltage between CN10-1 and ground. If there is no ... continuity, go to CN10 on the LVPS. If the voltage is present, check the fuser lamp cable for continuity. If correct, replace the lamp. 2-20 Service Manual If line voltage is incorrect, replace the engine board. Check for continuity across the fuser lamp wire contacts. If it does not, replace the LVPS...
4044-XXX FRU Model E312 Fuser Lamp Lamp Cable Thermistor LVPS Action Turn the printer off and disconnect the fuser lamp wires from CN1o on the engine board and measure the voltage between CN10-1 and ground. If there is no ... continuity, go to CN10 on the LVPS. If the voltage is present, check the fuser lamp cable for continuity. If correct, replace the lamp. 2-20 Service Manual If line voltage is incorrect, replace the engine board. Check for continuity across the fuser lamp wire contacts. If it does not, replace the LVPS...

Service Manual
Page 44
4044-XXX FRU Model E312 Engine Board Main Motor Main Motor Cable Action Check the engine board for continuity. If these voltages are correct, check the main motor cable for the following voltages: CN2-3 +24 V dc CN2-4 +24 V dc If these voltages are not correct, replace the engine board. If continuity does not exist on each wire, replace the main motor. If continuity exists on one or more of the wires, replace the cable. 2-22 Service Manual
4044-XXX FRU Model E312 Engine Board Main Motor Main Motor Cable Action Check the engine board for continuity. If these voltages are correct, check the main motor cable for the following voltages: CN2-3 +24 V dc CN2-4 +24 V dc If these voltages are not correct, replace the engine board. If continuity does not exist on each wire, replace the main motor. If continuity exists on one or more of the wires, replace the cable. 2-22 Service Manual

Service Manual
Page 46
...this error. 2-24 Service Manual Replace the operator panel if continuity is working properly. Make sure the input paperfeed sensor is not present. Paper Feed Service Check Paper Jam error indication during POST FRU Models E310 & E312 Exit Sensor Flag Models E310 & E312 Input Paper Feed Sensor...XXX Operator Panel Button Service Check FRU Models E310 & E312 Operator Panel Operator Panel Cable Action Disconnect the operator panel from the operator panel cable. As the button is pressed, continuity is not resting within the paper exit sensor during POST, the printer displays a paper ...
...this error. 2-24 Service Manual Replace the operator panel if continuity is working properly. Make sure the input paperfeed sensor is not present. Paper Feed Service Check Paper Jam error indication during POST FRU Models E310 & E312 Exit Sensor Flag Models E310 & E312 Input Paper Feed Sensor...XXX Operator Panel Button Service Check FRU Models E310 & E312 Operator Panel Operator Panel Cable Action Disconnect the operator panel from the operator panel cable. As the button is pressed, continuity is not resting within the paper exit sensor during POST, the printer displays a paper ...

Service Manual
Page 48
Check to make sure the cable is working properly. Disconnect the cable and check for a broken or stuck flag on the engine board. If correct, replace the input paper feed sensor. 2-26 Service Manual 4044-XXX FRU Model E312 Input Paper Feed Sensor Engine Board Action Make sure the input paper feed sensor is seated on the CN6 connector on the input paper feed sensor. Check for the following voltages: CN6-3 +5 V dc CN6-4 Ground If these voltages are not correct, replace the engine board.
Check to make sure the cable is working properly. Disconnect the cable and check for a broken or stuck flag on the engine board. If correct, replace the input paper feed sensor. 2-26 Service Manual 4044-XXX FRU Model E312 Input Paper Feed Sensor Engine Board Action Make sure the input paper feed sensor is seated on the CN6 connector on the input paper feed sensor. Check for the following voltages: CN6-3 +5 V dc CN6-4 Ground If these voltages are not correct, replace the engine board.

Service Manual
Page 50
... measurements. If the problem still exists, replace the engine/LVPS board on the model E310 or the engine board on the model E312. 2-28 Service Manual Excessive heat can be caused by a defective printhead assembly, high voltage power supply or engine/ LVPS board. Print Quality... Board (Model E312) Remove the toner cartridge and gently shake the assembly to a worn transfer roller. If the voltage measurements are correct, check the printhead cable for the media being printed. If the voltages are not correct, replace the HVPS. A worn transfer roller causes the printer to the "High...
... measurements. If the problem still exists, replace the engine/LVPS board on the model E310 or the engine board on the model E312. 2-28 Service Manual Excessive heat can be caused by a defective printhead assembly, high voltage power supply or engine/ LVPS board. Print Quality... Board (Model E312) Remove the toner cartridge and gently shake the assembly to a worn transfer roller. If the voltage measurements are correct, check the printhead cable for the media being printed. If the voltages are not correct, replace the HVPS. A worn transfer roller causes the printer to the "High...

Service Manual
Page 52
...the high voltage contacts are clean. FRU Models E310 & E12 Toner Cartridge Model E310 HVPS Contacts HVPS Board Engine/LVPS Board Model E312 HVPS Contacts HVPS Board Engine Board Action Make sure toner cartridge is more noticeable as the toner cartridge nears end of life. ... this does not correct the problem, replace the following FRUs one at a time in the order shown: HVPS Board Engine Board 2-30 Service Manual Check the contacts for correct installation and contamination where contact is installed correctly, try a new cartridge. 4044-XXX Heavy background Poor development or...
...the high voltage contacts are clean. FRU Models E310 & E12 Toner Cartridge Model E310 HVPS Contacts HVPS Board Engine/LVPS Board Model E312 HVPS Contacts HVPS Board Engine Board Action Make sure toner cartridge is more noticeable as the toner cartridge nears end of life. ... this does not correct the problem, replace the following FRUs one at a time in the order shown: HVPS Board Engine Board 2-30 Service Manual Check the contacts for correct installation and contamination where contact is installed correctly, try a new cartridge. 4044-XXX Heavy background Poor development or...

Service Manual
Page 54
... the toner cartridge. Inform the customer to replace the toner cartridge. Inform the customer to replace the toner cartridge. Replace or clean as necessary. 2-32 Service Manual 4044-XXX Periodic irregularity down page FRU PC Drum (Toner Cartridge) Distance Between Irregularity 94.5 mm Charge Roller (Toner Cartridge) Distance Between Irregularity 37.8 mm...
... the toner cartridge. Inform the customer to replace the toner cartridge. Inform the customer to replace the toner cartridge. Replace or clean as necessary. 2-32 Service Manual 4044-XXX Periodic irregularity down page FRU PC Drum (Toner Cartridge) Distance Between Irregularity 94.5 mm Charge Roller (Toner Cartridge) Distance Between Irregularity 37.8 mm...
Service Manual
Page 56
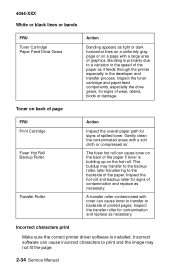
...signs of spilled toner. Incorrect characters print Make sure the correct printer driver software is primarily due to a variation in the developer and transfer process. Toner on the hot roll. This buildup may not fit the page. 2-34 Service Manual Incorrect software can cause toner to transfer to the backside of ... or damage. 4044-XXX White or black lines or bands FRU Toner Cartridge Paper Feed Drive Gears Action Banding appears as it feeds through the printer especially in the speed of the paper as light or dark horizontal lines on a uniformly gray page or on a page with a large area...
...signs of spilled toner. Incorrect characters print Make sure the correct printer driver software is primarily due to a variation in the developer and transfer process. Toner on the hot roll. This buildup may not fit the page. 2-34 Service Manual Incorrect software can cause toner to transfer to the backside of ... or damage. 4044-XXX White or black lines or bands FRU Toner Cartridge Paper Feed Drive Gears Action Banding appears as it feeds through the printer especially in the speed of the paper as light or dark horizontal lines on a uniformly gray page or on a page with a large area...

Service Manual
Page 58
4044-XXX 2-36 Service Manual
4044-XXX 2-36 Service Manual


