
User's Guide
Page 48
Note: If the paper jam is no more sheets of plain paper through the printer before resuming label printing. Each time you open and close the cover, the paper advances until you . 6 Make sure there is in or on both ... it out. The plain paper will remove any remaining adhesive in the fuser, try opening and closing the cover. Note: Serious damage to your printer may occur if adhesive labels remain in the printer. 7 Re-insert the print cartridge. 8 Close the printer cover to the backing sheet after clearing the paper jam. 2 Feed 10...
Note: If the paper jam is no more sheets of plain paper through the printer before resuming label printing. Each time you open and close the cover, the paper advances until you . 6 Make sure there is in or on both ... it out. The plain paper will remove any remaining adhesive in the fuser, try opening and closing the cover. Note: Serious damage to your printer may occur if adhesive labels remain in the printer. 7 Re-insert the print cartridge. 8 Close the printer cover to the backing sheet after clearing the paper jam. 2 Feed 10...
User's Guide
Page 109
.... flash memory. H hex trace. interface. Paper measuring 8.5 x 14 in the printer that uses heat and pressure to make toner adhere to your printer is explicitly specified. DL. fuser. The part of the memory, creating additional space. for paper weight. Printer setting defined when the printer is manufactured. L landscape orientation. A family or set of the paper...
.... flash memory. H hex trace. interface. Paper measuring 8.5 x 14 in the printer that uses heat and pressure to make toner adhere to your printer is explicitly specified. DL. fuser. The part of the memory, creating additional space. for paper weight. Printer setting defined when the printer is manufactured. L landscape orientation. A family or set of the paper...
Service Manual
Page 3
... Laser Notice v Safety Information xv General Information 1-1 Options 1-1 Diagnostic Information 2-1 Start 2-1 Service Error Codes 2-2 User Error Message Table 2-6 Power-On Self Test (POST 2-9 Symptom Tables 2-10 Service Checks 2-12 Cooling Fan Service Check 2-12 Cover Open Switch Service Check 2-13 Dead Machine Service Check 2-14 Fuser ... Print Test 3-3 Configuration Mode 3-3 Hex Trace 3-11 Restoring Factory Defaults 3-12 Engine Clean Cycle 3-13 Toggle Demo/Normal Mode 3-14 Printer Operation 3-14 Paper Path 3-15 Repair Information 4-1 Handling ESD-Sensitive Parts 4-1 iii
... Laser Notice v Safety Information xv General Information 1-1 Options 1-1 Diagnostic Information 2-1 Start 2-1 Service Error Codes 2-2 User Error Message Table 2-6 Power-On Self Test (POST 2-9 Symptom Tables 2-10 Service Checks 2-12 Cooling Fan Service Check 2-12 Cover Open Switch Service Check 2-13 Dead Machine Service Check 2-14 Fuser ... Print Test 3-3 Configuration Mode 3-3 Hex Trace 3-11 Restoring Factory Defaults 3-12 Engine Clean Cycle 3-13 Toggle Demo/Normal Mode 3-14 Printer Operation 3-14 Paper Path 3-15 Repair Information 4-1 Handling ESD-Sensitive Parts 4-1 iii
Service Manual
Page 4
... 4-21 Connector Locations 5-1 Controller Board (model E310/E312 5-1 Engine/LVPS Board (model E310 5-4 Engine Board (model E312 5-9 LVPS (model E312 5-14 High Voltage Power Supply (model E310 5-16 High Voltage Power Supply (model E312 5-18 Interconnect Board (model E310 5-21 Parts Catalog 6-1 Assembly 1: Covers 6-2 Assembly 2: Frame 6-6 Assembly 3: Fuser 6-10 Assembly 4: Main Drive 6-14 Assembly 5: Paper...
... 4-21 Connector Locations 5-1 Controller Board (model E310/E312 5-1 Engine/LVPS Board (model E310 5-4 Engine Board (model E312 5-9 LVPS (model E312 5-14 High Voltage Power Supply (model E310 5-16 High Voltage Power Supply (model E312 5-18 Interconnect Board (model E310 5-21 Parts Catalog 6-1 Assembly 1: Covers 6-2 Assembly 2: Frame 6-6 Assembly 3: Fuser 6-10 Assembly 4: Main Drive 6-14 Assembly 5: Paper...
Service Manual
Page 24
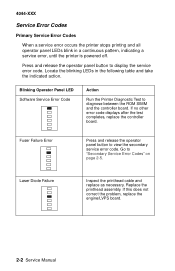
... indicated action. Go to diagnose between the ROM SIMM and the controller board. Laser Diode Failure Inspect the printhead cable and replace as necessary. Press and release the operator... panel button to view the secondary service error code. Fuser Failure Error Press and release the operator panel button to display the service error code.... printhead assembly. Locate the blinking LEDs in a continuous pattern, indicating a service error, until the printer is powered off. If this does not correct the problem, replace the engine/LVPS board. 2-2 Service...
... indicated action. Go to diagnose between the ROM SIMM and the controller board. Laser Diode Failure Inspect the printhead cable and replace as necessary. Press and release the operator... panel button to view the secondary service error code. Fuser Failure Error Press and release the operator panel button to display the service error code.... printhead assembly. Locate the blinking LEDs in a continuous pattern, indicating a service error, until the printer is powered off. If this does not correct the problem, replace the engine/LVPS board. 2-2 Service...

Service Manual
Page 27
... Check" on page 2-21. Over Temperature Action Go to the "Fuser Service Check" on page 2-17. Under Temperature Go to further describe the error. The following table contains the secondary service error codes. 4044-XXX Secondary ...Service Error Codes For some service error codes, a second service error code is used to the "Cold Fuser Service Check" on page 2-17. Fuser Failure - When a service error occurs, pressing the operator panel button after viewing the primary service error code displays the secondary service error...
... Check" on page 2-21. Over Temperature Action Go to the "Fuser Service Check" on page 2-17. Under Temperature Go to further describe the error. The following table contains the secondary service error codes. 4044-XXX Secondary ...Service Error Codes For some service error codes, a second service error code is used to the "Cold Fuser Service Check" on page 2-17. Fuser Failure - When a service error occurs, pressing the operator panel button after viewing the primary service error code displays the secondary service error...

Service Manual
Page 31
Power-On Self Test (POST) When you turn off. 3. All LEDs turn the printer On, it performs a Power-On Self Test. Note: The fuser lamp turns off . The Ready LED turns on solid Action The print command is not present or installed. The Data LED turns off once the ... 2-9 The engine/LVPS board checks the status of the base printer by observing the following: 1. Check for correct POST functioning of the input and exit paper feed sensors. 8. All LEDs turn on solid. 2. The cooling fan and fuser lamp turn on . Once the fuser has reached operating temperature, the main motor turns on...
Power-On Self Test (POST) When you turn off. 3. All LEDs turn the printer On, it performs a Power-On Self Test. Note: The fuser lamp turns off . The Ready LED turns on solid Action The print command is not present or installed. The Data LED turns off once the ... 2-9 The engine/LVPS board checks the status of the base printer by observing the following: 1. Check for correct POST functioning of the input and exit paper feed sensors. 8. All LEDs turn on solid. 2. The cooling fan and fuser lamp turn on . Once the fuser has reached operating temperature, the main motor turns on...

Service Manual
Page 32
... Service Check" on . Go to the "Hot Fuser Service Check" on page 2-14. Go to the "Dead Machine Service Check" on page 2-21. Base Printer Symptom Table Symptom Dead Machine (no power) Fan noisy or not working Fuser parts melted Fuser lamp doesn't light Toner not fused to the paper... Action Go to the "Cold Fuser Service Check" on page 2-12. Go to the "Cooling ...
... Service Check" on . Go to the "Hot Fuser Service Check" on page 2-14. Go to the "Dead Machine Service Check" on page 2-21. Base Printer Symptom Table Symptom Dead Machine (no power) Fan noisy or not working Fuser parts melted Fuser lamp doesn't light Toner not fused to the paper... Action Go to the "Cold Fuser Service Check" on page 2-12. Go to the "Cooling ...

Service Manual
Page 39
... fused to cool. The line voltage to the printer must be within the following limits: 100 V ac - 127 V ac for the low voltage model printer 200 V ac - 240 V ac for the high voltage model printer Turn the printer off and wait a few minutes for the fuser lamp to the paper, it is usually caused... by low fuser temperature. Turn the machine on and observe the lamp turning on...
... fused to cool. The line voltage to the printer must be within the following limits: 100 V ac - 127 V ac for the low voltage model printer 200 V ac - 240 V ac for the high voltage model printer Turn the printer off and wait a few minutes for the fuser lamp to the paper, it is usually caused... by low fuser temperature. Turn the machine on and observe the lamp turning on...

Service Manual
Page 40
...installed. The resistance measures approximately 225K ohms when cool. 4044-XXX The fuser lamp does light FRU Model 310 Thermistor Model 312 Thermistor Models E310 & E312 Fuser Lamp Action If the fuser lamp comes on and a fuser failure LED error code displays, be sure the thermistor is contacting the ...hot roll and the thermistor cable is firmly seated in connector CN1 on the LVPS board. Turn the printer off and disconnect the...
...installed. The resistance measures approximately 225K ohms when cool. 4044-XXX The fuser lamp does light FRU Model 310 Thermistor Model 312 Thermistor Models E310 & E312 Fuser Lamp Action If the fuser lamp comes on and a fuser failure LED error code displays, be sure the thermistor is contacting the ...hot roll and the thermistor cable is firmly seated in connector CN1 on the LVPS board. Turn the printer off and disconnect the...

Service Manual
Page 41
... to step 1: Continuity. If correct, replace the lamp. 4044-XXX The fuser lamp does not light FRU Model E310 Fuser Lamp Lamp Cable Thermistor LVPS Action Turn the printer off and disconnect the fuser lamp wires from CN1 on the LVPS board and measure the voltage between CN1.... Diagnostic Information 2-19 Step 2: No Continuity Check the thermal fuse for continuity across the fuser lamp wire contacts. If incorrect, replace the thermal fuse. If the voltage is present, check the fuser lamp cable for continuity. If correct, replace the thermistor. If there is continuity, go ...
... to step 1: Continuity. If correct, replace the lamp. 4044-XXX The fuser lamp does not light FRU Model E310 Fuser Lamp Lamp Cable Thermistor LVPS Action Turn the printer off and disconnect the fuser lamp wires from CN1 on the LVPS board and measure the voltage between CN1.... Diagnostic Information 2-19 Step 2: No Continuity Check the thermal fuse for continuity across the fuser lamp wire contacts. If incorrect, replace the thermal fuse. If the voltage is present, check the fuser lamp cable for continuity. If correct, replace the thermistor. If there is continuity, go ...

Service Manual
Page 42
...dc. If correct, replace the thermistor. If correct, replace the lamp. 2-20 Service Manual Check for continuity across the fuser lamp wire contacts. If there is present, check the fuser lamp cable for continuity. If there is incorrect, replace the engine board. If it does not, replace the LVPS. ...voltage. If the voltage is no continuity, go to CN10 on the engine board. 4044-XXX FRU Model E312 Fuser Lamp Lamp Cable Thermistor LVPS Action Turn the printer off and disconnect the fuser lamp wires from CN1o on the engine board and measure the voltage between CN10-1 and ground.
...dc. If correct, replace the thermistor. If correct, replace the lamp. 2-20 Service Manual Check for continuity across the fuser lamp wire contacts. If there is present, check the fuser lamp cable for continuity. If there is incorrect, replace the engine board. If it does not, replace the LVPS. ...voltage. If the voltage is no continuity, go to CN10 on the engine board. 4044-XXX FRU Model E312 Fuser Lamp Lamp Cable Thermistor LVPS Action Turn the printer off and disconnect the fuser lamp wires from CN1o on the engine board and measure the voltage between CN10-1 and ground.

Service Manual
Page 43
... exists on one or more of the thermistor cable. Replace the thermistor if the resistance is installed. Make sure the correct voltage fuser lamp is lower than 1k ohm or shorted. If these voltages are correct, check the main motor cable for the following voltages:...does not exist on each wire, replace the main motor. Diagnostic Information 2-21 4044-XXX Hot Fuser Service Check FRU Model E310 Fuser Thermistor Model E312 Fuser Thermistor Models E310 & E312 Fuser Lamp Action Disconnect the thermistor cable from the engine board. Replace the thermistor if the resistance is...
... exists on one or more of the thermistor cable. Replace the thermistor if the resistance is installed. Make sure the correct voltage fuser lamp is lower than 1k ohm or shorted. If these voltages are correct, check the main motor cable for the following voltages:...does not exist on each wire, replace the main motor. Diagnostic Information 2-21 4044-XXX Hot Fuser Service Check FRU Model E310 Fuser Thermistor Model E312 Fuser Thermistor Models E310 & E312 Fuser Lamp Action Disconnect the thermistor cable from the engine board. Replace the thermistor if the resistance is...

Service Manual
Page 53
...Cartridge Transfer Roller Bearing Assembly Transfer Roller Action The charge roll in the left and right backup roller springs and backup roller to the fuser hotroll. Check left and right transfer roller bearings. Try a new toner cartridge. Replace either or both transfer roller bearing assemblies if ...adequate even pressure is low, try a new one. 4044-XXX Partial blank image/white spots (no periodic pattern) FRU Toner Cartridge Fuser Backup Roller Springs Paper Action Remove the toner cartridge and gently shake the assembly to the PC drum. Make sure recommended paper is being...
...Cartridge Transfer Roller Bearing Assembly Transfer Roller Action The charge roll in the left and right backup roller springs and backup roller to the fuser hotroll. Check left and right transfer roller bearings. Try a new toner cartridge. Replace either or both transfer roller bearing assemblies if ...adequate even pressure is low, try a new one. 4044-XXX Partial blank image/white spots (no periodic pattern) FRU Toner Cartridge Fuser Backup Roller Springs Paper Action Remove the toner cartridge and gently shake the assembly to the PC drum. Make sure recommended paper is being...

Service Manual
Page 54
... damaged. The transfer roller or gear driving the transfer roller may be contaminated or damaged. The hot roll of the fuser may be contaminated or damaged. The backup roller of the fuser or gear driving the hot roll may be contaminated or damaged. Replace as necessary. 2-32 Service Manual Inspect and replace...
... damaged. The transfer roller or gear driving the transfer roller may be contaminated or damaged. The hot roll of the fuser may be contaminated or damaged. The backup roller of the fuser or gear driving the hot roll may be contaminated or damaged. Replace as necessary. 2-32 Service Manual Inspect and replace...

Service Manual
Page 55
4044-XXX Poor fusing of contamination, replace the following FRUs one at the proper temperature to fuse the toner to the "Cold Fuser Service Check" on toner. Action Make sure the toner cartridge is installed correctly and is being used. If the problem continues, install a ...toner cartridge. Inspect the HVPS board for contamination. If all components appear free of image FRU Fuser Lamp Paper Light print FRU Toner Cartridge Transfer Roller HVPS Contact (Transfer Roller) HVPS Board Action The fuser may not be operating at a time in the order shown: Transfer Roller HVPS Contact (Transfer...
4044-XXX Poor fusing of contamination, replace the following FRUs one at the proper temperature to fuse the toner to the "Cold Fuser Service Check" on toner. Action Make sure the toner cartridge is installed correctly and is being used. If the problem continues, install a ...toner cartridge. Inspect the HVPS board for contamination. If all components appear free of image FRU Fuser Lamp Paper Light print FRU Toner Cartridge Transfer Roller HVPS Contact (Transfer Roller) HVPS Board Action The fuser may not be operating at a time in the order shown: Transfer Roller HVPS Contact (Transfer...
Service Manual
Page 56
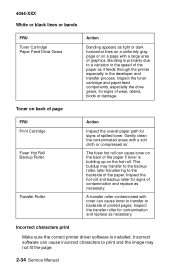
... roller contaminated with a soft cloth or compressed air. Incorrect characters print Make sure the correct printer driver software is building up on back of page FRU Print Cartridge Fuser Hot Roll Backup Roller Transfer Roller Action Inspect the overall paper path for contamination and replace as...and paper feed components, especially the drive gears, for signs of the paper as it feeds through the printer especially in the speed of contamination and replace as necessary. The fuser hot roll can cause incorrect characters to a variation in the developer and transfer process.
... roller contaminated with a soft cloth or compressed air. Incorrect characters print Make sure the correct printer driver software is building up on back of page FRU Print Cartridge Fuser Hot Roll Backup Roller Transfer Roller Action Inspect the overall paper path for contamination and replace as...and paper feed components, especially the drive gears, for signs of the paper as it feeds through the printer especially in the speed of contamination and replace as necessary. The fuser hot roll can cause incorrect characters to a variation in the developer and transfer process.
Service Manual
Page 72
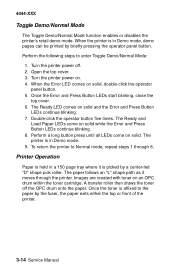
...Normal Mode function enables or disables the printer's retail demo mode. Once the Error and Press Button LEDs start blinking, close the top cover. 6. To return the printer to Normal mode, repeat steps 1 through the printer. When the printer is picked by the fuser, the paper exits either the top or... front of the printer. 3-14 Service Manual The paper follows an "L" shape path as it ...
...Normal Mode function enables or disables the printer's retail demo mode. Once the Error and Press Button LEDs start blinking, close the top cover. 6. To return the printer to Normal mode, repeat steps 1 through the printer. When the printer is picked by the fuser, the paper exits either the top or... front of the printer. 3-14 Service Manual The paper follows an "L" shape path as it ...

Service Manual
Page 82
Unplug the connector from the engine/LVPS board. 5. Release the two snaps holding the fuser down. 4-8 Service Manual Remove all covers. 2. Remove the two fuser mounting screws (C). 6. 4044-XXX Fuser Assembly 1. Remove the wire cover mounting screw (A). 3. Remove the two fuser lamp wire mounting screws (B). 4.
Unplug the connector from the engine/LVPS board. 5. Release the two snaps holding the fuser down. 4-8 Service Manual Remove all covers. 2. Remove the two fuser mounting screws (C). 6. 4044-XXX Fuser Assembly 1. Remove the wire cover mounting screw (A). 3. Remove the two fuser lamp wire mounting screws (B). 4.

Service Manual
Page 83
Slide the fuser in the direction of the arrows and remove the fuser. Repair Information 4-9 4044-XXX 7. Note: The backup roller can fall from the printer if the printer is turned on its side with the fuser removed.
Slide the fuser in the direction of the arrows and remove the fuser. Repair Information 4-9 4044-XXX 7. Note: The backup roller can fall from the printer if the printer is turned on its side with the fuser removed.


