
Maintenance Guide
Page 7
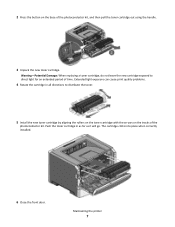
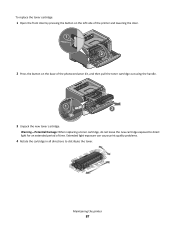
... of time. Extended light exposure can cause print quality problems. 4 Rotate the cartridge in as far as it will go. 2 Press the button on the tracks of the photoconductor kit. Warning-Potential Damage: When replacing a toner cartridge, do not leave the new cartridge exposed to ...distribute the toner. 5 Install the new toner cartridge by aligning the rollers on the toner cartridge with the arrows on the base of the photoconductor kit, and...
... of time. Extended light exposure can cause print quality problems. 4 Rotate the cartridge in as far as it will go. 2 Press the button on the tracks of the photoconductor kit. Warning-Potential Damage: When replacing a toner cartridge, do not leave the new cartridge exposed to ...distribute the toner. 5 Install the new toner cartridge by aligning the rollers on the toner cartridge with the arrows on the base of the photoconductor kit, and...
User Guide
Page 5
Administrative support 93 Finding advanced networking and administrator information 93 Restoring the factory default settings...93 Clearing jams 94 Avoiding jams...94 Accessing jam areas...94 Understanding jam lights and access locations 95 Clearing jams behind the photoconductor kit and toner cartridge 99 Clearing jams from the standard exit bin 101 Clearing jams from Tray 1...101 Clearing jams from Tray 2...103 Clearing jams in the manual feeder...104 Clearing jams behind the rear door...105 Troubleshooting 107 Understanding printer messages...107 Close door ...107 Load with
Administrative support 93 Finding advanced networking and administrator information 93 Restoring the factory default settings...93 Clearing jams 94 Avoiding jams...94 Accessing jam areas...94 Understanding jam lights and access locations 95 Clearing jams behind the photoconductor kit and toner cartridge 99 Clearing jams from the standard exit bin 101 Clearing jams from Tray 1...101 Clearing jams from Tray 2...103 Clearing jams in the manual feeder...104 Clearing jams behind the rear door...105 Troubleshooting 107 Understanding printer messages...107 Close door ...107 Load with
User Guide
Page 33
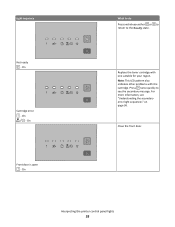
On Front door is open - On - Press twice quickly to the Ready state. Interpreting the printer control panel lights 33 On What to do Press and release either or to return to see "Understanding the secondary error light sequences" on page 36. Note: This LED pattern also indicates other problems with one suitable for your region. Light sequence Not ready - On Cartridge error - Close the front door. Replace the toner cartridge with the cartridge. For more information, see the secondary message.
On Front door is open - On - Press twice quickly to the Ready state. Interpreting the printer control panel lights 33 On What to do Press and release either or to return to see "Understanding the secondary error light sequences" on page 36. Note: This LED pattern also indicates other problems with one suitable for your region. Light sequence Not ready - On Cartridge error - Close the front door. Replace the toner cartridge with the cartridge. For more information, see the secondary message.
User Guide
Page 87
Extended light exposure can cause print quality problems. 4 Rotate the cartridge in all directions to direct light for an extended period of the photoconductor kit, and then pull the toner cartridge out using the handle. 3 Unpack the new toner cartridge. To replace the toner cartridge: 1 Open the front door by pressing the button on the left side of the printer and lowering the door. 2 Press the button on the base of time. Maintaining the printer 87 Warning-Potential Damage: When replacing a toner cartridge, do not leave the new cartridge exposed to distribute the toner.
Extended light exposure can cause print quality problems. 4 Rotate the cartridge in all directions to direct light for an extended period of the photoconductor kit, and then pull the toner cartridge out using the handle. 3 Unpack the new toner cartridge. To replace the toner cartridge: 1 Open the front door by pressing the button on the left side of the printer and lowering the door. 2 Press the button on the base of time. Maintaining the printer 87 Warning-Potential Damage: When replacing a toner cartridge, do not leave the new cartridge exposed to distribute the toner.
User Guide
Page 109
... designed specifically for about 10 seconds, and then turn the printer back on . Once you have checked each of the following: • Replace the toner cartridge. • Press to the printer and the host computer, print server, option, or other network device. • All options are...printing. Solving basic printer problems If there are correct. Troubleshooting 109 Check the printer power switch. • The printer cable is turned on . Remove stacked trays one or more of the following: • Remove the tray. • Press to continue printing. 88 Replace toner Try one at a...
... designed specifically for about 10 seconds, and then turn the printer back on . Once you have checked each of the following: • Replace the toner cartridge. • Press to the printer and the host computer, print server, option, or other network device. • All options are...printing. Solving basic printer problems If there are correct. Troubleshooting 109 Check the printer power switch. • The printer cable is turned on . Remove stacked trays one or more of the following: • Remove the tray. • Press to continue printing. 88 Replace toner Try one at a...
User Guide
Page 141
... 108 58 Too many trays attached 109 59 Incompatible tray 109 88 Replace toner 109 Close front door 107 Load with 107 Load with 107 Load ...output bin 108 printer options troubleshooting drawers 113 memory card 114 option not working 113 printer problems, solving basic 109 printer settings configuration sheet printing 22 printing booklet 62 duplex (2-sided) ... 63, 115 publications, finding 9 Q Quality menu 80 R recycled paper using 26 recycling Lexmark packaging 28 Lexmark products 28 toner cartridges 28 WEEE statement 127 Remove paper from standard output bin 108 reprint page after paper ...
... 108 58 Too many trays attached 109 59 Incompatible tray 109 88 Replace toner 109 Close front door 107 Load with 107 Load with 107 Load ...output bin 108 printer options troubleshooting drawers 113 memory card 114 option not working 113 printer problems, solving basic 109 printer settings configuration sheet printing 22 printing booklet 62 duplex (2-sided) ... 63, 115 publications, finding 9 Q Quality menu 80 R recycled paper using 26 recycling Lexmark packaging 28 Lexmark products 28 toner cartridges 28 WEEE statement 127 Remove paper from standard output bin 108 reprint page after paper ...

Service Manual
Page 57
Replace the drawer. Service tertiary error codes: transfer roll Lights Service secondary codes: 91x Service tertiary codes 910: Service DC motor error 914: Tray 2 motor failure 917: Transfer roll circuity Fuser, fan, or toner sensor error Codes 920 through 929 indicate a problem... 914 indicates an error in the fuser, a stalled fan motor, or a faulty toner sensor or toner cartridge. Code 917 indicates a problem in thermistor path 925: Incorrect fuser ...
Replace the drawer. Service tertiary error codes: transfer roll Lights Service secondary codes: 91x Service tertiary codes 910: Service DC motor error 914: Tray 2 motor failure 917: Transfer roll circuity Fuser, fan, or toner sensor error Codes 920 through 929 indicate a problem... 914 indicates an error in the fuser, a stalled fan motor, or a faulty toner sensor or toner cartridge. Code 917 indicates a problem in thermistor path 925: Incorrect fuser ...
Service Manual
Page 62
...E260dn. If so, then inspect the tray wear strips and replace if necessary. It should rotate freely. See "Printhead service sensor within two inches after hitting the input sensor check" on page 4-39. 2-36 Lexmark™ E260, E260d, E260dn Carefully remove the tray and notice if the leading ... too loose. 200.06 Imaged page not expected page (bouncy passthru sensor) Remove the toner cartridge/PC kit. The media is pointed upward and out of the printer and indicates possible printer problems that must be resolved. Paper jam error codes (200-series) Repeating jams or jam...
...E260dn. If so, then inspect the tray wear strips and replace if necessary. It should rotate freely. See "Printhead service sensor within two inches after hitting the input sensor check" on page 4-39. 2-36 Lexmark™ E260, E260d, E260dn Carefully remove the tray and notice if the leading ... too loose. 200.06 Imaged page not expected page (bouncy passthru sensor) Remove the toner cartridge/PC kit. The media is pointed upward and out of the printer and indicates possible printer problems that must be resolved. Paper jam error codes (200-series) Repeating jams or jam...

Service Manual
Page 63
...input sensor. Check the bottom of media when motor is approved. Possible causes include multi-sheet feed, media size (length) problem, pre-staged media in the tray, and replace if they are a small gap or a bouncy manual feed sensor. Engine detected small gap or no trailing edge was ever... but did not successfully debounce the sensor. Verify that the media is loose, then replace it . Replace the wear strips if necessary. 200.09 Transfer servo never started due to ramp up ) Remove the toner cartridge/PC kit and inspect the input sensor flag. Carefully remove the tray and notice...
...input sensor. Check the bottom of media when motor is approved. Possible causes include multi-sheet feed, media size (length) problem, pre-staged media in the tray, and replace if they are a small gap or a bouncy manual feed sensor. Engine detected small gap or no trailing edge was ever... but did not successfully debounce the sensor. Verify that the media is loose, then replace it . Replace the wear strips if necessary. 200.09 Transfer servo never started due to ramp up ) Remove the toner cartridge/PC kit and inspect the input sensor flag. Carefully remove the tray and notice...

Service Manual
Page 84
... 'dirty' print. Enter Configuration Menu. When the light stays on page 3-62. 2-58 Lexmark™ E260, E260d, E260dn The first page has various fonts and a graphic, the second page is gray with... exits into the output bin, the printer returns to isolate problems such as light or toner streaks. Note: Refer to these problems. To exit print quality test pages, turn the printer off... (approximately 10 seconds). 2. Turn off . d. Try a different toner cartridge and PC kit. • If those fail, then replace the LVPS/HVPS, controller board, or the printhead in that order....
... 'dirty' print. Enter Configuration Menu. When the light stays on page 3-62. 2-58 Lexmark™ E260, E260d, E260dn The first page has various fonts and a graphic, the second page is gray with... exits into the output bin, the printer returns to isolate problems such as light or toner streaks. Note: Refer to these problems. To exit print quality test pages, turn the printer off... (approximately 10 seconds). 2. Turn off . d. Try a different toner cartridge and PC kit. • If those fail, then replace the LVPS/HVPS, controller board, or the printhead in that order....

Service Manual
Page 85
... Kit are clean. Check continuity between the toner cartridge assembly and spring contacts which connect to ground. This is bad, then call the next level of -life. Try a lower setting. If this does not correct the problem, then replace the following FRUs one at PCN3. Verify ...ground on pins 17 and 19 of support. • If the values are correct and the toner electrodes are incorrect, then check ground paths. • Check continuity ...
... Kit are clean. Check continuity between the toner cartridge assembly and spring contacts which connect to ground. This is bad, then call the next level of -life. Try a lower setting. If this does not correct the problem, then replace the following FRUs one at PCN3. Verify ...ground on pins 17 and 19 of support. • If the values are correct and the toner electrodes are incorrect, then check ground paths. • Check continuity ...

Service Manual
Page 87
...problem continues, then install a new toner cartridge. Verify the high voltage cable is plugged into the LVPS/HVPS. If all components appear free of graphics. Inspect the toner cartridge and paper feed components, especially the drive coupler and drive gears for continuity. Inspect the fuser for signs of spilled toner... the transfer roll for signs of contamination. Banding is primarily due to make sure that the toner cartridge is not low on a page with a large area of contamination, then replace the following FRUs one at a time in the developer and transfer process. A transfer roll...
...problem continues, then install a new toner cartridge. Verify the high voltage cable is plugged into the LVPS/HVPS. If all components appear free of graphics. Inspect the toner cartridge and paper feed components, especially the drive coupler and drive gears for continuity. Inspect the fuser for signs of spilled toner... the transfer roll for signs of contamination. Banding is primarily due to make sure that the toner cartridge is not low on a page with a large area of contamination, then replace the following FRUs one at a time in the developer and transfer process. A transfer roll...
Service Manual
Page 88
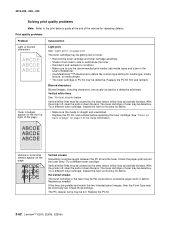
...may be caught between the PC kit and the fuser. Try a different toner cartridge. Inspect the fuser at its entry for debris. Replace the PC kit. 2-62 Lexmark™ E260, E260d, E260dn Vertical white lines See "Vertical streaks below. Vertical streaks Something could... problems Problem Cause/action Light or blurred characters. Blurred characters Blurred images, including characters, are parallel and match the two intended ghost images, then the Form Type may be incorrectly set. Vertical or horizontal streaks appear on toner: • Remove the toner cartridge and toner...
...may be caught between the PC kit and the fuser. Try a different toner cartridge. Inspect the fuser at its entry for debris. Replace the PC kit. 2-62 Lexmark™ E260, E260d, E260dn Vertical white lines See "Vertical streaks below. Vertical streaks Something could... problems Problem Cause/action Light or blurred characters. Blurred characters Blurred images, including characters, are parallel and match the two intended ghost images, then the Form Type may be incorrectly set. Vertical or horizontal streaks appear on toner: • Remove the toner cartridge and toner...

Service Manual
Page 89
...POR. 4513-200, -220, -230 Print quality problems (Continued) Problem Cause/action Toner smears or rubs off , check the printhead beam path. Solid black areas on transparencies Faint images or repetitive spots appear on page 3-58. Replace the fuser. • Change the media texture setting...software error. If special media is becoming low in the driver. Media designed for copiers gives the best quality. • Replace the toner cartridge. • The toner cartridge may be out of paper. Diagnostics information 2-63 See "Printhead service check" on page 2-65. • Also, ...
...POR. 4513-200, -220, -230 Print quality problems (Continued) Problem Cause/action Toner smears or rubs off , check the printhead beam path. Solid black areas on transparencies Faint images or repetitive spots appear on page 3-58. Replace the fuser. • Change the media texture setting...software error. If special media is becoming low in the driver. Media designed for copiers gives the best quality. • Replace the toner cartridge. • The toner cartridge may be out of paper. Diagnostics information 2-63 See "Printhead service check" on page 2-65. • Also, ...
Service Manual
Page 90
... in the printer feeding multiple sheets. Replace card. If a 3.5K or more page toner cartridge is being used and the Toner Low alarm is set to restart the printer. • Make sure the toner cartridge assembly is installed properly. 2-64 Lexmark™ E260, E260d, E260dn Replace as necessary. • Check the... Guide). • Make sure the paper guides are selected from the printer driver. 4513-200, -220, -230 Print quality problems (Continued) Problem Cause/action The printer is on the paper feed rolls. The Error light alone is on , then the printer stops printing until the...
... in the printer feeding multiple sheets. Replace card. If a 3.5K or more page toner cartridge is being used and the Toner Low alarm is set to restart the printer. • Make sure the toner cartridge assembly is installed properly. 2-64 Lexmark™ E260, E260d, E260dn Replace as necessary. • Check the... Guide). • Make sure the paper guides are selected from the printer driver. 4513-200, -220, -230 Print quality problems (Continued) Problem Cause/action The printer is on the paper feed rolls. The Error light alone is on , then the printer stops printing until the...
Service Manual
Page 91
... is being used . • Select hex trace mode to determine what the problem is. • Restore factory defaults. • Make sure the parallel cable or...of the printer. • The printer is waiting for an appropriate command. • Make sure the toner cartridge assembly is installed properly. • Make sure the printer front cover is closed . Printhead service ...in PostScript 3 emulation, the printer is flushing data (Ready/Data and Error lights are correct, then replace the printhead (comes with the front door closed . • Ensure the correct PostScript driver is being...
... is being used . • Select hex trace mode to determine what the problem is. • Restore factory defaults. • Make sure the parallel cable or...of the printer. • The printer is waiting for an appropriate command. • Make sure the toner cartridge assembly is installed properly. • Make sure the printer front cover is closed . Printhead service ...in PostScript 3 emulation, the printer is flushing data (Ready/Data and Error lights are correct, then replace the printhead (comes with the front door closed . • Ensure the correct PostScript driver is being...


