

Quick Reference
Page 5
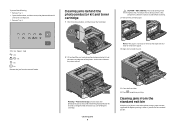
... light sequence for the light to access each jam. On • Do not load the manual feeder while the printer is the unit housing the toner cartridge and photoconductor kit. 2 Standard exit bin 3 Front door 4 Manual feeder door 5 Standard 250-sheet tray (Tray 1) 6 Optional tray (Tray...On - Clearing jams Avoiding jams The following : • Remove Tray 1. • Open the front door, and then remove the photoconductor kit and toner cartridge unit. 201.yy Paper jam - Wait for how to come on . • Push all printer cables are attached correctly. For more information,...
... light sequence for the light to access each jam. On • Do not load the manual feeder while the printer is the unit housing the toner cartridge and photoconductor kit. 2 Standard exit bin 3 Front door 4 Manual feeder door 5 Standard 250-sheet tray (Tray 1) 6 Optional tray (Tray...On - Clearing jams Avoiding jams The following : • Remove Tray 1. • Open the front door, and then remove the photoconductor kit and toner cartridge unit. 201.yy Paper jam - Wait for how to come on . • Push all printer cables are attached correctly. For more information,...
Quick Reference
Page 7
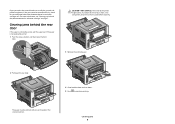
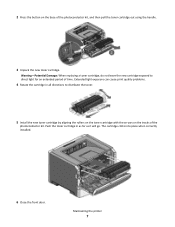
... paper. 4 Align and reinstall the unit. On - Clearing jams from the manual feeder. 2 Lift and pull the unit containing the photoconductor kit and the toner cartridge out of the following: • Remove Tray 1. • Open the front door, and then remove the photoconductor kit and...unit. • Remove Tray 2. A sheet is not easy to remove, then open the rear door to continue printing. Clearing jams behind the photoconductor kit and toner cartridge 1 Push the release button, and then lower the front door. Use the cartridge handle whenever you are holding the cartridge. Set the unit aside...
... paper. 4 Align and reinstall the unit. On - Clearing jams from the manual feeder. 2 Lift and pull the unit containing the photoconductor kit and the toner cartridge out of the following: • Remove Tray 1. • Open the front door, and then remove the photoconductor kit and...unit. • Remove Tray 2. A sheet is not easy to remove, then open the rear door to continue printing. Clearing jams behind the photoconductor kit and toner cartridge 1 Push the release button, and then lower the front door. Use the cartridge handle whenever you are holding the cartridge. Set the unit aside...
Quick Reference
Page 9
...printer, pull the paper out. Clearing jams 9 If the jam cannot be removed this way, check for jammed paper behind the photoconductor kit and toner cartridge" on page 7. To reduce the risk of the printer might be grasped and pulled straight out. For more information, see "Clearing jams behind... the photoconductor kit and toner cartridge unit. Clearing jams behind the rear door If the paper is not exiting the printer: 1 Push the release button, and then lower ...
...printer, pull the paper out. Clearing jams 9 If the jam cannot be removed this way, check for jammed paper behind the photoconductor kit and toner cartridge" on page 7. To reduce the risk of the printer might be grasped and pulled straight out. For more information, see "Clearing jams behind... the photoconductor kit and toner cartridge unit. Clearing jams behind the rear door If the paper is not exiting the printer: 1 Push the release button, and then lower ...
Maintenance Guide
Page 2
Contents Maintaining the printer 3 Cleaning the exterior of the printer...3 Storing supplies...3 Conserving supplies...3 Checking the status of supplies...4 Checking the status of supplies from a network computer 4 Ordering supplies...5 Ordering toner cartridges ...5 Ordering a photoconductor kit ...5 Replacing supplies...6 Replacing the toner cartridge ...6 Replacing the photoconductor kit ...8 Recycling Lexmark products...11 Moving the printer...11 Before moving the printer ...11 Moving the printer to another location...11 Shipping the printer ...11 Contents 2
Contents Maintaining the printer 3 Cleaning the exterior of the printer...3 Storing supplies...3 Conserving supplies...3 Checking the status of supplies...4 Checking the status of supplies from a network computer 4 Ordering supplies...5 Ordering toner cartridges ...5 Ordering a photoconductor kit ...5 Replacing supplies...6 Replacing the toner cartridge ...6 Replacing the photoconductor kit ...8 Recycling Lexmark products...11 Moving the printer...11 Before moving the printer ...11 Moving the printer to another location...11 Shipping the printer ...11 Contents 2
Maintenance Guide
Page 3
...% • Salty air • Corrosive gases • Heavy dust Conserving supplies Conserving supplies using the printer menus There are some settings you conserve toner and paper. CAUTION-SHOCK HAZARD: To avoid the risk of electric shock when cleaning the exterior of the printer. Warning-Potential Damage: Do not use...
...% • Salty air • Corrosive gases • Heavy dust Conserving supplies Conserving supplies using the printer menus There are some settings you conserve toner and paper. CAUTION-SHOCK HAZARD: To avoid the risk of electric shock when cleaning the exterior of the printer. Warning-Potential Damage: Do not use...

Maintenance Guide
Page 4
..., and 16‑Up. Note: If you print on one side of paper or specialty media. images on both sides of a sheet of toner the Toner Darkness setting. Supply Toner Paper or specialty media Path to print several copies, you can adjust Lets you adjust the level of Duplex. paper Conserving supplies when...
..., and 16‑Up. Note: If you print on one side of paper or specialty media. images on both sides of a sheet of toner the Toner Darkness setting. Supply Toner Paper or specialty media Path to print several copies, you can adjust Lets you adjust the level of Duplex. paper Conserving supplies when...

Maintenance Guide
Page 5
... photoconductor kit by printing a network setup page. Part name Regular cartridge Lexmark Return Program Cartridge For the US and Canada Toner cartridge E260A21A E260A11A For Europe, the Middle East, and Africa Toner cartridge E260A21E E260A11E For the Asia Pacific Region, including Australia, New Zealand... are indicated. Ordering supplies To order supplies in the U.S., contact Lexmark at www.lexmark.comor contact the place where you may be able to extend the life of the toner cartridge: 1 Remove the toner cartridge. 2 Firmly shake the cartridge side‑to‑side ...
... photoconductor kit by printing a network setup page. Part name Regular cartridge Lexmark Return Program Cartridge For the US and Canada Toner cartridge E260A21A E260A11A For Europe, the Middle East, and Africa Toner cartridge E260A21E E260A11E For the Asia Pacific Region, including Australia, New Zealand... are indicated. Ordering supplies To order supplies in the U.S., contact Lexmark at www.lexmark.comor contact the place where you may be able to extend the life of the toner cartridge: 1 Remove the toner cartridge. 2 Firmly shake the cartridge side‑to‑side ...

Maintenance Guide
Page 6
...shaking the cartridge no longer improves the print quality, replace the toner cartridge. To replace the toner cartridge: 1 Open the front door by printing a menu settings page. Note: You can check to redistribute the toner, and then reinsert it and continue printing. Part name Photoconductor kit... Replacing supplies Replacing the toner cartridge Light sequence Toner is low Part number E260X22G • ‑ On • ‑ On When the "Toner is left in your cartridge by pressing the button on the left side...
...shaking the cartridge no longer improves the print quality, replace the toner cartridge. To replace the toner cartridge: 1 Open the front door by printing a menu settings page. Note: You can check to redistribute the toner, and then reinsert it and continue printing. Part name Photoconductor kit... Replacing supplies Replacing the toner cartridge Light sequence Toner is low Part number E260X22G • ‑ On • ‑ On When the "Toner is left in your cartridge by pressing the button on the left side...
Maintenance Guide
Page 7
...will go. Maintaining the printer 7 Warning-Potential Damage: When replacing a toner cartridge, do not leave the new cartridge exposed to distribute the toner. 5 Install the new toner cartridge by aligning the rollers on the toner cartridge with the arrows on the base of the photoconductor kit, and... then pull the toner cartridge out using the handle. 3 Unpack the new toner cartridge. The cartridge clicks ...
...will go. Maintaining the printer 7 Warning-Potential Damage: When replacing a toner cartridge, do not leave the new cartridge exposed to distribute the toner. 5 Install the new toner cartridge by aligning the rollers on the toner cartridge with the arrows on the base of the photoconductor kit, and... then pull the toner cartridge out using the handle. 3 Unpack the new toner cartridge. The cartridge clicks ...

Maintenance Guide
Page 9
...: 1 Open the front door by pressing the button on the left side of the printer and lowering the front door. 2 Pull the photoconductor kit and toner cartridge together as a unit out of the printer by pulling on the base of future print jobs. Note: The photoconductor kit and... toner cartridge form a unit. Warning-Potential Damage: Be careful not to touch the photoconductor drum. Doing so may affect the print quality of the photoconductor kit. ...
...: 1 Open the front door by pressing the button on the left side of the printer and lowering the front door. 2 Pull the photoconductor kit and toner cartridge together as a unit out of the printer by pulling on the base of future print jobs. Note: The photoconductor kit and... toner cartridge form a unit. Warning-Potential Damage: Be careful not to touch the photoconductor drum. Doing so may affect the print quality of the photoconductor kit. ...

Maintenance Guide
Page 10
... into the printer by aligning the rollers on the guides of the unit with the arrows in the printer. Maintaining the printer 10 Push the toner cartridge in until it will go. 7 After you replace the photoconductor kit, reset the photoconductor counter. Warning-Potential Damage: Resetting the photoconductor counter without replacing... front door. Push the unit as far as it clicks into place. 6 Install the unit into the photoconductor kit by aligning the arrows on the toner cartridge with the new photoconductor kit.
... into the printer by aligning the rollers on the guides of the unit with the arrows in the printer. Maintaining the printer 10 Push the toner cartridge in until it will go. 7 After you replace the photoconductor kit, reset the photoconductor counter. Warning-Potential Damage: Resetting the photoconductor counter without replacing... front door. Push the unit as far as it clicks into place. 6 Install the unit into the photoconductor kit by aligning the arrows on the toner cartridge with the new photoconductor kit.

User Guide
Page 2
... driver 24 Minimizing your printer's environmental impact 26 Saving paper and toner...26 Using recycled paper and other office papers 26 Conserving supplies ...26 Saving energy...27 Adjusting Power Saver ...27 Recycling...27 Recycling Lexmark products ...28 Recycling Lexmark packaging...28 Returning Lexmark cartridges for the printer...10 Printer configurations...11 Understanding the printer...
... driver 24 Minimizing your printer's environmental impact 26 Saving paper and toner...26 Using recycled paper and other office papers 26 Conserving supplies ...26 Saving energy...27 Adjusting Power Saver ...27 Recycling...27 Recycling Lexmark products ...28 Recycling Lexmark packaging...28 Returning Lexmark cartridges for the printer...10 Printer configurations...11 Understanding the printer...

User Guide
Page 4
......84 Checking the status of supplies...84 Checking the status of supplies from a network computer 84 Ordering supplies...85 Ordering toner cartridges ...85 Ordering a photoconductor kit ...86 Replacing supplies...86 Replacing the toner cartridge ...86 Replacing the photoconductor kit ...88 Moving the printer...91 Before moving the printer ...91 Moving the printer...
......84 Checking the status of supplies...84 Checking the status of supplies from a network computer 84 Ordering supplies...85 Ordering toner cartridges ...85 Ordering a photoconductor kit ...86 Replacing supplies...86 Replacing the toner cartridge ...86 Replacing the photoconductor kit ...88 Moving the printer...91 Before moving the printer ...91 Moving the printer...
User Guide
Page 5
Administrative support 93 Finding advanced networking and administrator information 93 Restoring the factory default settings...93 Clearing jams 94 Avoiding jams...94 Accessing jam areas...94 Understanding jam lights and access locations 95 Clearing jams behind the photoconductor kit and toner cartridge 99 Clearing jams from the standard exit bin 101 Clearing jams from Tray 1...101 Clearing jams from Tray 2...103 Clearing jams in the manual feeder...104 Clearing jams behind the rear door...105 Troubleshooting 107 Understanding printer messages...107 Close door ...107 Load with
Administrative support 93 Finding advanced networking and administrator information 93 Restoring the factory default settings...93 Clearing jams 94 Avoiding jams...94 Accessing jam areas...94 Understanding jam lights and access locations 95 Clearing jams behind the photoconductor kit and toner cartridge 99 Clearing jams from the standard exit bin 101 Clearing jams from Tray 1...101 Clearing jams from Tray 2...103 Clearing jams in the manual feeder...104 Clearing jams behind the rear door...105 Troubleshooting 107 Understanding printer messages...107 Close door ...107 Load with

User Guide
Page 6
... Incorrect margins...118 Paper curl...118 Print is too dark ...118 Print is too light...119 Skewed print...120 Toner fog or background shading appears on the page 120 Toner rubs off ...120 Toner specks ...121 Transparency print quality is poor...121 Streaked horizontal lines ...121 Streaked vertical lines...122 Solid black or...
... Incorrect margins...118 Paper curl...118 Print is too dark ...118 Print is too light...119 Skewed print...120 Toner fog or background shading appears on the page 120 Toner rubs off ...120 Toner specks ...121 Transparency print quality is poor...121 Streaked horizontal lines ...121 Streaked vertical lines...122 Solid black or...
User Guide
Page 15
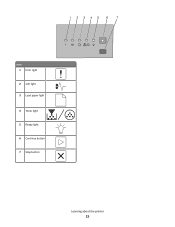
Item 1 Error light 2 Jam light 3 Load paper light 4 Toner light 5 Ready light 6 Continue button 7 Stop button Learning about the printer 15
Item 1 Error light 2 Jam light 3 Load paper light 4 Toner light 5 Ready light 6 Continue button 7 Stop button Learning about the printer 15

User Guide
Page 26
..., using these types of paper, consult your printer's impact even further. Saving paper and toner Using recycled paper and other office papers As an environmentally conscious company, Lexmark supports the use of today's recycled office papers, but generally the following property guidelines apply ... We design with recycled paper (20-100% post-consumer waste) and a variety of the Lexmark Web site at www.lexmark.com/environment • The Lexmark recycling program at www.lexmark.com/recycle By selecting certain printer settings or tasks, you may yield a greater environmental benefit....
..., using these types of paper, consult your printer's impact even further. Saving paper and toner Using recycled paper and other office papers As an environmentally conscious company, Lexmark supports the use of today's recycled office papers, but generally the following property guidelines apply ... We design with recycled paper (20-100% post-consumer waste) and a variety of the Lexmark Web site at www.lexmark.com/environment • The Lexmark recycling program at www.lexmark.com/recycle By selecting certain printer settings or tasks, you may yield a greater environmental benefit....

User Guide
Page 28
...used to return the cartridges are 100% recyclable where corrugated recycling facilities exist. Recycling Lexmark packaging Lexmark continually strives to Lexmark for reuse or recycling. When you return a cartridge to Lexmark, you want to recycle, and then select your country from the list. 3 Follow...-paid shipping label. Recycling Lexmark products To return Lexmark products to Lexmark for recycling: 1 Visit our Web site at www.lexmark.com/recycle. 2 Find the product type you can also: 1 Visit our Web site at www.lexmark.com/recycle. 2 From the Toner Cartridges section, select your ...
...used to return the cartridges are 100% recyclable where corrugated recycling facilities exist. Recycling Lexmark packaging Lexmark continually strives to Lexmark for reuse or recycling. When you return a cartridge to Lexmark, you want to recycle, and then select your country from the list. 3 Follow...-paid shipping label. Recycling Lexmark products To return Lexmark products to Lexmark for recycling: 1 Visit our Web site at www.lexmark.com/recycle. 2 Find the product type you can also: 1 Visit our Web site at www.lexmark.com/recycle. 2 From the Toner Cartridges section, select your ...

User Guide
Page 29
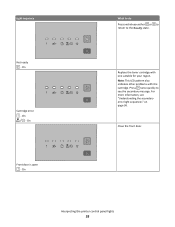
...or blinking slowly. If the lights are still blinking, then visit the Lexmark support Web site at http://support.lexmark.com. Blinking - Blinking - Blinking - Blinking - Service Error -... Blinking Interpreting the printer control panel lights 29 Blinking - The lights can be on . Interpreting the printer control panel lights Understanding the printer control panel light sequences Understanding the primary light sequences Printer control panel Lights and buttons 1 Error 2 Jam 3 Load paper 4 Toner...
...or blinking slowly. If the lights are still blinking, then visit the Lexmark support Web site at http://support.lexmark.com. Blinking - Blinking - Blinking - Blinking - Service Error -... Blinking Interpreting the printer control panel lights 29 Blinking - The lights can be on . Interpreting the printer control panel lights Understanding the printer control panel light sequences Understanding the primary light sequences Printer control panel Lights and buttons 1 Error 2 Jam 3 Load paper 4 Toner...
User Guide
Page 33
Press twice quickly to the Ready state. Close the front door. On Front door is open - Note: This LED pattern also indicates other problems with one suitable for your region. On - Interpreting the printer control panel lights 33 Replace the toner cartridge with the cartridge. On Cartridge error - On What to do Press and release either or to return to see "Understanding the secondary error light sequences" on page 36. For more information, see the secondary message. Light sequence Not ready -
Press twice quickly to the Ready state. Close the front door. On Front door is open - Note: This LED pattern also indicates other problems with one suitable for your region. On - Interpreting the printer control panel lights 33 Replace the toner cartridge with the cartridge. On Cartridge error - On What to do Press and release either or to return to see "Understanding the secondary error light sequences" on page 36. For more information, see the secondary message. Light sequence Not ready -


