
Quick Reference
Page 1
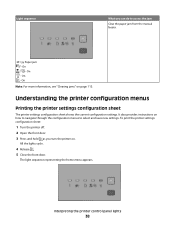
... be saved until you do one time. Note: If you reset factory default settings. Note: The Paper Size and Type settings will be set manually for each input source. 4 Select the paper size and paper type used most frequently from each input source. 5 Click Submit. Proper paper loading...tabs and slide the length guide backwards to access the Paper menu, depending on the printer control panel. and 550-sheet trays, and the manual feeder. It also includes information about setting the Paper Size and Paper Type. Access the Paper menu through the Printer Settings. Only one ...
... be saved until you do one time. Note: If you reset factory default settings. Note: The Paper Size and Type settings will be set manually for each input source. 4 Select the paper size and paper type used most frequently from each input source. 5 Click Submit. Proper paper loading...tabs and slide the length guide backwards to access the Paper menu, depending on the printer control panel. and 550-sheet trays, and the manual feeder. It also includes information about setting the Paper Size and Paper Type. Access the Paper menu through the Printer Settings. Only one ...
Quick Reference
Page 3
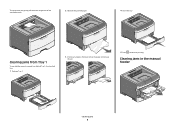
... jobs facedown. The paper stop also aids in the tray, change the Paper Type setting. You can use 2 When the light is located inside the manual feeder door of the printer and can contact the paper guides. 4 Adjust the paper guides to quickly print on paper types or sizes that are... not currently loaded in the tray. 1 Open the manual feeder door. 8 If a different type of the sheet entering first. • Load envelopes with the flap side down and with the top of paper was...
... jobs facedown. The paper stop also aids in the tray, change the Paper Type setting. You can use 2 When the light is located inside the manual feeder door of the printer and can contact the paper guides. 4 Adjust the paper guides to quickly print on paper types or sizes that are... not currently loaded in the tray. 1 Open the manual feeder door. 8 If a different type of the sheet entering first. • Load envelopes with the flap side down and with the top of paper was...
Quick Reference
Page 4
...into the feeder. 1 sheet of A6-size paper leading edge can be installed on the printer at a time. Do not force the paper into the manual 1 sheet of paper feeder only to the point where its 1 sheet of card stock 1 envelope Notes: • Do not leave the paper stop...sheets of paper 150 sheets of paper Note: Only one optional drawer may cause creases in Tray 1. The maximum amount of the trays and the manual feeder are printing on transparencies. Paper capacities The capacities of paper that can contact the 1 transparency paper guides. Load up to Notes Tray 2 ...
...into the feeder. 1 sheet of A6-size paper leading edge can be installed on the printer at a time. Do not force the paper into the manual 1 sheet of paper feeder only to the point where its 1 sheet of card stock 1 envelope Notes: • Do not leave the paper stop...sheets of paper 150 sheets of paper Note: Only one optional drawer may cause creases in Tray 1. The maximum amount of the trays and the manual feeder are printing on transparencies. Paper capacities The capacities of paper that can contact the 1 transparency paper guides. Load up to Notes Tray 2 ...

Quick Reference
Page 5
...may be removed: Load paper - Inside this door is the unit housing the toner cartridge and photoconductor kit. 2 Standard exit bin 3 Front door 4 Manual feeder door 5 Standard 250-sheet tray (Tray 1) 6 Optional tray (Tray 2) 7 Rear door Understanding jam lights and access locations The following illustration shows... the jam lights and messages and provides brief instructions for the light to access each jam. On • Do not load the manual feeder while the printer is printing. Wait for loading paper also signals that has been cut or trimmed by hand. • Do...
...may be removed: Load paper - Inside this door is the unit housing the toner cartridge and photoconductor kit. 2 Standard exit bin 3 Front door 4 Manual feeder door 5 Standard 250-sheet tray (Tray 1) 6 Optional tray (Tray 2) 7 Rear door Understanding jam lights and access locations The following illustration shows... the jam lights and messages and provides brief instructions for the light to access each jam. On • Do not load the manual feeder while the printer is printing. Wait for loading paper also signals that has been cut or trimmed by hand. • Do...
Quick Reference
Page 7
Try one of the printer. On - On Remove the jam from the manual feeder. 2 Lift and pull the unit containing the photoconductor kit and the toner cartridge out of the following: • Remove Tray 1. • Open the front ...
Try one of the printer. On - On Remove the jam from the manual feeder. 2 Lift and pull the unit containing the photoconductor kit and the toner cartridge out of the following: • Remove Tray 1. • Open the front ...
Quick Reference
Page 8
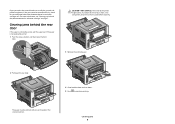
To remove the jam, gently pull the sheet straight out of the standard exit bin. 2 Remove the jammed paper. 4 Insert the tray. Clearing jams in or behind Tray 1, the standard tray: 1 Remove Tray 1. 3 If necessary, depress the lever to free the paper and remove the jam. 5 Press to continue printing. Clearing jams from Tray 1 To see whether paper is jammed in the manual feeder Clearing jams 8
To remove the jam, gently pull the sheet straight out of the standard exit bin. 2 Remove the jammed paper. 4 Insert the tray. Clearing jams in or behind Tray 1, the standard tray: 1 Remove Tray 1. 3 If necessary, depress the lever to free the paper and remove the jam. 5 Press to continue printing. Clearing jams from Tray 1 To see whether paper is jammed in the manual feeder Clearing jams 8
Quick Reference
Page 9
... the front and rear doors. 5 Press to continue printing. To reduce the risk of the printer might be jammed with one end caught in the manual feeder can usually be removed this way, check for jammed paper behind the photoconductor kit and toner cartridge unit. The paper may be hot. Clearing...
... the front and rear doors. 5 Press to continue printing. To reduce the risk of the printer might be jammed with one end caught in the manual feeder can usually be removed this way, check for jammed paper behind the photoconductor kit and toner cartridge unit. The paper may be hot. Clearing...
User Guide
Page 2
or 550-sheet tray...45 Using the manual feeder...46 Using the standard exit bin and paper stop...47 Paper capacities...47 Linking and unlinking trays...48 Linking trays...48 Unlinking trays...49 ...
or 550-sheet tray...45 Using the manual feeder...46 Using the standard exit bin and paper stop...47 Paper capacities...47 Linking and unlinking trays...48 Linking trays...48 Unlinking trays...49 ...
User Guide
Page 3
... and printing on both sides of the paper 58 Printing on both sides of the paper automatically...58 Printing on both sides of the paper manually...59 Printing specialty documents...60 Tips on using letterhead...60 Tips on using transparencies ...61 Tips on using envelopes...61 Tips on using labels...62...
... and printing on both sides of the paper 58 Printing on both sides of the paper automatically...58 Printing on both sides of the paper manually...59 Printing specialty documents...60 Tips on using letterhead...60 Tips on using transparencies ...61 Tips on using envelopes...61 Tips on using labels...62...
User Guide
Page 5
... toner cartridge 118 Clearing jams from the standard exit bin...120 Clearing jams from Tray 1...120 Clearing jams from Tray 2...122 Clearing jams in the manual feeder...123 Clearing jams behind the rear door...124 Troubleshooting 126 Solving basic printer problems...126 Solving printing problems...126 Jobs do not print...126...
... toner cartridge 118 Clearing jams from the standard exit bin...120 Clearing jams from Tray 1...120 Clearing jams from Tray 2...122 Clearing jams in the manual feeder...123 Clearing jams behind the rear door...124 Troubleshooting 126 Solving basic printer problems...126 Solving printing problems...126 Jobs do not print...126...

User Guide
Page 9
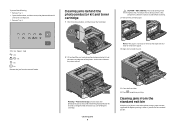
Printer configurations Basic model The following illustration shows the printer front with its basic features or parts: 1 Front door release button 2 Paper stop 3 Standard exit bin 4 Printer control panel 5 System board door 6 Standard 250-sheet tray (Tray 1) 7 Manual feeder door 8 Front door The following illustration shows the printer back with its basic features or parts: Learning about the printer 9
Printer configurations Basic model The following illustration shows the printer front with its basic features or parts: 1 Front door release button 2 Paper stop 3 Standard exit bin 4 Printer control panel 5 System board door 6 Standard 250-sheet tray (Tray 1) 7 Manual feeder door 8 Front door The following illustration shows the printer back with its basic features or parts: Learning about the printer 9
User Guide
Page 11
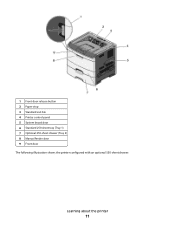
1 Front door release button 2 Paper stop 3 Standard exit bin 4 Printer control panel 5 System board door 6 Standard 250-sheet tray (Tray 1) 7 Optional 250-sheet drawer (Tray 2) 8 Manual feeder door 9 Front door The following illustration shows the printer configured with an optional 550-sheet drawer: Learning about the printer 11
1 Front door release button 2 Paper stop 3 Standard exit bin 4 Printer control panel 5 System board door 6 Standard 250-sheet tray (Tray 1) 7 Optional 250-sheet drawer (Tray 2) 8 Manual feeder door 9 Front door The following illustration shows the printer configured with an optional 550-sheet drawer: Learning about the printer 11
User Guide
Page 12
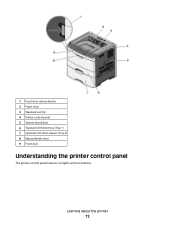
1 Front door release button 2 Paper stop 3 Standard exit bin 4 Printer control panel 5 System board door 6 Standard 250-sheet tray (Tray 1) 7 Optional 550-sheet drawer (Tray 2) 8 Manual feeder door 9 Front door Understanding the printer control panel The printer control panel features six lights and two buttons. Learning about the printer 12
1 Front door release button 2 Paper stop 3 Standard exit bin 4 Printer control panel 5 System board door 6 Standard 250-sheet tray (Tray 1) 7 Optional 550-sheet drawer (Tray 2) 8 Manual feeder door 9 Front door Understanding the printer control panel The printer control panel features six lights and two buttons. Learning about the printer 12
User Guide
Page 26
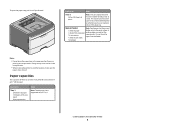
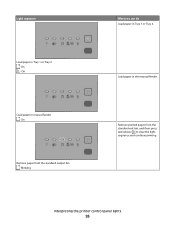
On - On Remove paper from the standard exit bin, and then press and release to clear the light sequence and continue printing. On Load paper in the manual feeder. Load paper in manual feeder - Interpreting the printer control panel lights 26 Remove printed pages from the standard output bin - Blinking What you can do Load paper in Tray 1 or Tray 2 - Light sequence Load paper in Tray 1 or Tray 2.
On - On Remove paper from the standard exit bin, and then press and release to clear the light sequence and continue printing. On Load paper in the manual feeder. Load paper in manual feeder - Interpreting the printer control panel lights 26 Remove printed pages from the standard output bin - Blinking What you can do Load paper in Tray 1 or Tray 2 - Light sequence Load paper in Tray 1 or Tray 2.
User Guide
Page 38
... "Clearing jams" on . It also provides instructions on how to navigate through the configuration menus to access the jam Clear the paper jam from the manual feeder. 251.yy Paper jam - On - To print the printer settings configuration sheet: 1 Turn the printer off. 2 Open the front door. 3 Press and hold as...
... "Clearing jams" on . It also provides instructions on how to navigate through the configuration menus to access the jam Clear the paper jam from the manual feeder. 251.yy Paper jam - On - To print the printer settings configuration sheet: 1 Turn the printer off. 2 Open the front door. 3 Press and hold as...
User Guide
Page 40
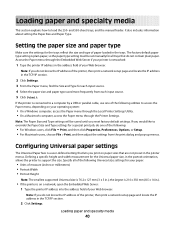
... is connected to a computer by a USB or parallel cable, use one of your Web browser. Note: The Paper Size and Type settings will be set manually for the trays reflect the size and type of paper loaded in the address field of the following: • For Windows users, click File Œ... media This section explains how to override the Paper Size and Type settings for each input source. 5 Click Submit. and 550-sheet trays, and the manual feeder. Access the Paper menu through the Printer Settings.
... is connected to a computer by a USB or parallel cable, use one of your Web browser. Note: The Paper Size and Type settings will be set manually for the trays reflect the size and type of paper loaded in the address field of the following: • For Windows users, click File Œ... media This section explains how to override the Paper Size and Type settings for each input source. 5 Click Submit. and 550-sheet trays, and the manual feeder. Access the Paper menu through the Printer Settings.
User Guide
Page 46
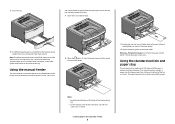
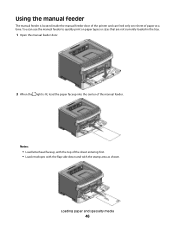
You can use the manual feeder to quickly print on paper types or sizes that are not currently loaded in the tray. 1 Open the manual feeder door. 2 When the light is located inside the manual feeder door of the printer and can feed only one sheet of paper at a time. Using the manual feeder The manual feeder is lit, load the paper faceup into the center of the manual feeder. Loading paper and specialty media 46 Notes: • Load letterhead faceup, with the top of the sheet entering first. • Load envelopes with the flap side down and with the stamp area as shown.
You can use the manual feeder to quickly print on paper types or sizes that are not currently loaded in the tray. 1 Open the manual feeder door. 2 When the light is located inside the manual feeder door of the printer and can feed only one sheet of paper at a time. Using the manual feeder The manual feeder is lit, load the paper faceup into the center of the manual feeder. Loading paper and specialty media 46 Notes: • Load letterhead faceup, with the top of the sheet entering first. • Load envelopes with the flap side down and with the stamp area as shown.
User Guide
Page 47
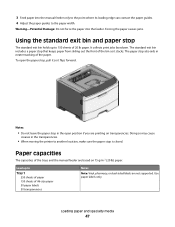
...the paper width. Notes: • Do not leave the paper stop that keeps paper from sliding out the front of the trays and the manual feeder are not supported. Doing so may cause creases in the open the paper stop is closed. Loading paper and specialty media 47 Paper capacities... flips forward. To open position if you are printing on 75 g/m 2 (20 lb) paper. Warning-Potential Damage: Do not force the paper into the manual feeder only to the point where its leading edge can contact the paper guides. 4 Adjust the paper guides to another location, make sure the paper...
...the paper width. Notes: • Do not leave the paper stop that keeps paper from sliding out the front of the trays and the manual feeder are not supported. Doing so may cause creases in the open the paper stop is closed. Loading paper and specialty media 47 Paper capacities... flips forward. To open position if you are printing on 75 g/m 2 (20 lb) paper. Warning-Potential Damage: Do not force the paper into the manual feeder only to the point where its leading edge can contact the paper guides. 4 Adjust the paper guides to another location, make sure the paper...
User Guide
Page 48
...48 Use paper labels only. To initiate tray linking from a networked printer, access the Embedded Web Server: 1 Type the printer IP address into the manual feeder only to the point where its leading edge can be set from a locally connected printer: • On a Windows computer, access the Paper ... have an optional 250- To initiate tray linking from the Paper menu. Load up to Tray 2 250 or 550 sheets of paper 50 paper labels Manual feeder 1 sheet of paper 1 sheet of A6-size paper 1 transparency 1 sheet of card stock 1 envelope Notes Notes: • Only one linked tray...
...48 Use paper labels only. To initiate tray linking from a networked printer, access the Embedded Web Server: 1 Type the printer IP address into the manual feeder only to the point where its leading edge can be set from a locally connected printer: • On a Windows computer, access the Paper ... have an optional 250- To initiate tray linking from the Paper menu. Load up to Tray 2 250 or 550 sheets of paper 50 paper labels Manual feeder 1 sheet of paper 1 sheet of A6-size paper 1 transparency 1 sheet of card stock 1 envelope Notes Notes: • Only one linked tray...
User Guide
Page 49
... as the settings of any other tray. - On a Macintosh computer, access the Paper menu through the Local Printer Settings Utility. Paper may not be set manually from the Paper Menu. • To unlink trays from a networked printer: 1 Access the Embedded Web Server by a USB or parallel cable, open the Embedded Web...
... as the settings of any other tray. - On a Macintosh computer, access the Paper menu through the Local Printer Settings Utility. Paper may not be set manually from the Paper Menu. • To unlink trays from a networked printer: 1 Access the Embedded Web Server by a USB or parallel cable, open the Embedded Web...


