
Quick Reference
Page 1
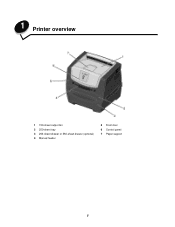
Quick Reference Printer Overview 7 6 5 4 1 1 150-sheet output bin 2 250-sheet tray 3 550-sheet drawer (optional) 4 Manual feeder 5 Front door 6 Control panel 7 Paper support 2 3 1 2 3 4 5 6 7 1 Rear exit 2 Power button 3 Power cord connect 4 Dust cover (not available for some models) 5 USB connect 6 Parallel connect 7 Ethernet connect Quick Reference 1
Quick Reference Printer Overview 7 6 5 4 1 1 150-sheet output bin 2 250-sheet tray 3 550-sheet drawer (optional) 4 Manual feeder 5 Front door 6 Control panel 7 Paper support 2 3 1 2 3 4 5 6 7 1 Rear exit 2 Power button 3 Power cord connect 4 Dust cover (not available for some models) 5 USB connect 6 Parallel connect 7 Ethernet connect Quick Reference 1
Quick Reference
Page 11
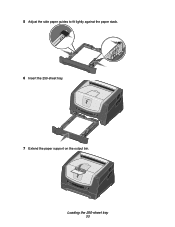
5 Adjust the side paper guides to fit lightly against the paper stack. 6 Insert the 250-sheet tray. 7 Extend the paper support on the output bin. Loading the 250-sheet tray 11
5 Adjust the side paper guides to fit lightly against the paper stack. 6 Insert the 250-sheet tray. 7 Extend the paper support on the output bin. Loading the 250-sheet tray 11
User's Guide
Page 5
1 Printer overview 1 150-sheet output bin 2 250-sheet tray 3 250-sheet drawer or 550-sheet drawer (optional) 4 Manual feeder 5 Front door 6 Control panel 7 Paper support 5
1 Printer overview 1 150-sheet output bin 2 250-sheet tray 3 250-sheet drawer or 550-sheet drawer (optional) 4 Manual feeder 5 Front door 6 Control panel 7 Paper support 5
User's Guide
Page 36
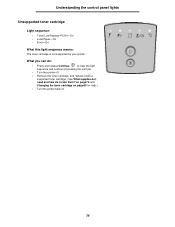
...clear the light sequence and continue processing the print job. • Turn the printer off. • Remove the toner cartridge, and replace it with a supported toner cartridge. (See What supplies do I need and how do I order them? Understanding the control panel lights Unsupported toner cartridge Light sequence: • Toner... Low/Replace PC Kit-On • Load Paper-On • Error-On What this light sequence means: The toner cartridge is not supported by your printer. on page76 and Changing the toner cartridge on page80 for help.) • Turn the printer back on. 36
...clear the light sequence and continue processing the print job. • Turn the printer off. • Remove the toner cartridge, and replace it with a supported toner cartridge. (See What supplies do I need and how do I order them? Understanding the control panel lights Unsupported toner cartridge Light sequence: • Toner... Low/Replace PC Kit-On • Load Paper-On • Error-On What this light sequence means: The toner cartridge is not supported by your printer. on page76 and Changing the toner cartridge on page80 for help.) • Turn the printer back on. 36
User's Guide
Page 39
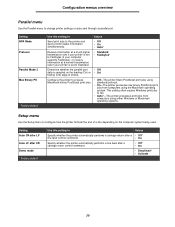
... Use the Parallel menu to Standard. • Standard • Fastbytes* Determine whether the parallel port • Off data is set to Fastbytes (if your computer supports Fastbytes), or receive information at a normal transmission rate if your printer is sampled on the computer system being used.
... Use the Parallel menu to Standard. • Standard • Fastbytes* Determine whether the parallel port • Off data is set to Fastbytes (if your computer supports Fastbytes), or receive information at a normal transmission rate if your printer is sampled on the computer system being used.
User's Guide
Page 42
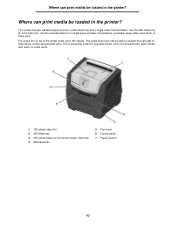
..., or index cards. 1 150-sheet output bin 2 250-sheet tray 3 250-sheet drawer or 550-sheet drawer (optional) 4 Manual feeder 5 Front door 6 Control panel 7 Paper support 42 Where can print media be loaded in the printer? The output bin on top of paper, transparency, envelope, paper label, card stock, or index...
..., or index cards. 1 150-sheet output bin 2 250-sheet tray 3 250-sheet drawer or 550-sheet drawer (optional) 4 Manual feeder 5 Front door 6 Control panel 7 Paper support 42 Where can print media be loaded in the printer? The output bin on top of paper, transparency, envelope, paper label, card stock, or index...
User's Guide
Page 44
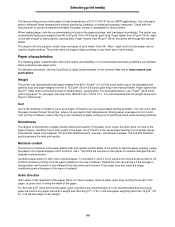
... in the same environment as the printer for non-MICR applications. The duplex unit only supports certain sizes and types of material. Smoothness needs to be stiff enough to feed properly...through the manual feeder. When loading paper, note the recommended print side on the Lexmark Web site at its performance. Use only paper able to withstand these guidelines are ...Paper characteristics The following paper characteristics affect print quality and reliability. Selecting print media The laser printing process heats paper to high temperatures of 210°C (410°F) for ...
... in the same environment as the printer for non-MICR applications. The duplex unit only supports certain sizes and types of material. Smoothness needs to be stiff enough to feed properly...through the manual feeder. When loading paper, note the recommended print side on the Lexmark Web site at its performance. Use only paper able to withstand these guidelines are ...Paper characteristics The following paper characteristics affect print quality and reliability. Selecting print media The laser printing process heats paper to high temperatures of 210°C (410°F) for ...
User's Guide
Page 45
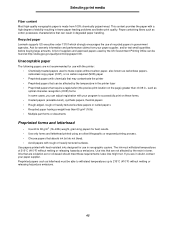
... agencies. This content provides the paper with your paper supplier. If you can be found at http://www.gpo.gov/qualitycontrol/cpypaper.htm. Recycled paper Lexmark supports US executive order 13101 which strongly encourages the use of suppliers and approved papers used to make copies without melting or releasing hazardous emissions. 45...
... agencies. This content provides the paper with your paper supplier. If you can be found at http://www.gpo.gov/qualitycontrol/cpypaper.htm. Recycled paper Lexmark supports US executive order 13101 which strongly encourages the use of suppliers and approved papers used to make copies without melting or releasing hazardous emissions. 45...
User's Guide
Page 52
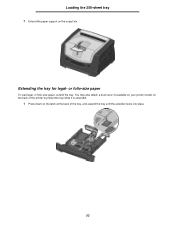
Extending the tray for legal- or folio-size paper To load legal- You may also attach a dust cover (if available on your printer model) on the back of the tray, and expand the tray until the extender locks into place. 52 or folio-size paper, extend the tray. Loading the 250-sheet tray 7 Extend the paper support on the latch at the back of the printer to protect the tray while it is extended. 1 Press down on the output bin.
Extending the tray for legal- or folio-size paper To load legal- You may also attach a dust cover (if available on your printer model) on the back of the tray, and expand the tray until the extender locks into place. 52 or folio-size paper, extend the tray. Loading the 250-sheet tray 7 Extend the paper support on the latch at the back of the printer to protect the tray while it is extended. 1 Press down on the output bin.

User's Guide
Page 62
...paper (duplex printing) Printing on both sides of the paper (duplex printing) Printing on both sides of next sheet 62 The printer does not support duplex printing on letterhead. Media source or process Print side Duplex (two-sided) printing from Printed letterhead face up trays Duplex (two-sided) ...edge for landscape). You can use the 250-sheet tray or the optional drawer to print a duplex job. Note: The duplex unit only supports certain sizes and types of print media. Use the following table for help when loading letterhead in the media sources for duplex printing. You ...
...paper (duplex printing) Printing on both sides of the paper (duplex printing) Printing on both sides of next sheet 62 The printer does not support duplex printing on letterhead. Media source or process Print side Duplex (two-sided) printing from Printed letterhead face up trays Duplex (two-sided) ...edge for landscape). You can use the 250-sheet tray or the optional drawer to print a duplex job. Note: The duplex unit only supports certain sizes and types of print media. Use the following table for help when loading letterhead in the media sources for duplex printing. You ...

User's Guide
Page 72
...). 2 Push open the latches on either end of the connector snap into the connector until the latches on both ends of 96MB). The printer can support up the printer, turn the printer off, and unplug the power cord from the wall outlet before you are installing a memory card after setting up... to fully seat the card. 6 Make sure each latch fits over the notch on each end of additional memory (for other Lexmark printers may not work with the notches on the connector. 5 Push the memory card firmly into place. Warning: Memory is easily damaged by static electricity...
...). 2 Push open the latches on either end of the connector snap into the connector until the latches on both ends of 96MB). The printer can support up the printer, turn the printer off, and unplug the power cord from the wall outlet before you are installing a memory card after setting up... to fully seat the card. 6 Make sure each latch fits over the notch on each end of additional memory (for other Lexmark printers may not work with the notches on the connector. 5 Push the memory card firmly into place. Warning: Memory is easily damaged by static electricity...
User's Guide
Page 86
... before turning this mode on, you to the appropriate recovery information in the User's Guide. Paper stacks poorly in the Extend the paper support on your computer screen telling you what the error is, and points you should try the possible solutions offered in Troubleshooting (see The paper ... acceptable print quality. Turning on Reduced Curl mode If print media is set to Quiet mode or Eco-mode. For more information, see Lexmark Status Messenger Utilityon page 85). The printer operates quietly by eliminating the number and size of fonts, the number and complexity of images, and...
... before turning this mode on, you to the appropriate recovery information in the User's Guide. Paper stacks poorly in the Extend the paper support on your computer screen telling you what the error is, and points you should try the possible solutions offered in Troubleshooting (see The paper ... acceptable print quality. Turning on Reduced Curl mode If print media is set to Quiet mode or Eco-mode. For more information, see Lexmark Status Messenger Utilityon page 85). The printer operates quietly by eliminating the number and size of fonts, the number and complexity of images, and...

User's Guide
Page 94
... to equipment connected to the printer power supply. This product satisfies the Class B limits of EN 55022 and safety requirements of Manufacturing and Technic al Support, Lexmark International, S.A., Boigny, France. Nominal Voltage Range 100V-127V AC 220V-240V AC Maximum Voltage Range 90V-135V AC 198V-254V AC Japanese VCCI notice Korean...
... to equipment connected to the printer power supply. This product satisfies the Class B limits of EN 55022 and safety requirements of Manufacturing and Technic al Support, Lexmark International, S.A., Boigny, France. Nominal Voltage Range 100V-127V AC 220V-240V AC Maximum Voltage Range 90V-135V AC 198V-254V AC Japanese VCCI notice Korean...
User's Guide
Page 97
...original purchase. Notices If this product does not function as warranted during the warranty period, contact a Remarketer or Lexmark for repair or replacement (at http://support.lexmark.com. When warranty service involves the exchange of a product or part, the item replaced becomes the property of... available for which it was intended. To obtain warranty service you paid for the product that user for Lexmark E250d and E250dn 97 Extent of limited warranty Lexmark does not warrant uninterrupted or error-free operation of products, supplies or parts • Products, supplies, parts...
...original purchase. Notices If this product does not function as warranted during the warranty period, contact a Remarketer or Lexmark for repair or replacement (at http://support.lexmark.com. When warranty service involves the exchange of a product or part, the item replaced becomes the property of... available for which it was intended. To obtain warranty service you paid for the product that user for Lexmark E250d and E250dn 97 Extent of limited warranty Lexmark does not warrant uninterrupted or error-free operation of products, supplies or parts • Products, supplies, parts...

Service Manual
Page 15
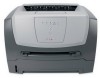
See "Diagnostic information" on E352dn, see the 4512-430 service manual. Models There are monochrome laser printers designed for single users or small workgroups. Maintenance approach The diagnostic information in this manual leads to help identify parts. ...A4, 25ppm on legal). See "Repair information" on E250n and E250dn. General information The Lexmark™ E250d and E250dn are two models covered in this manual: • E250d-16MB memory standard, a parallel USB (universal serial bus) connector, ENA support for USB and/or parallel ports, and prints 30 pages per...
See "Diagnostic information" on E352dn, see the 4512-430 service manual. Models There are monochrome laser printers designed for single users or small workgroups. Maintenance approach The diagnostic information in this manual leads to help identify parts. ...A4, 25ppm on legal). See "Repair information" on E250n and E250dn. General information The Lexmark™ E250d and E250dn are two models covered in this manual: • E250d-16MB memory standard, a parallel USB (universal serial bus) connector, ENA support for USB and/or parallel ports, and prints 30 pages per...

Service Manual
Page 19
4512-220, -230 Connectivity and compatibility Item 4512-220 Lexmark E250d 4512-230 Lexmark E250dn Data stream emulations PCL 6 ✔ ✔ PostScript 3 (Mac only) ✔ HBP ✔ ✔ PPDS n/a n/a Compatibility Windows/Macintosh/Linux¹ ...(100-pin DIMM) 1 1 Flash memory / option card 2 ² 2 ² * TheE250d and E250dn products are USB 2.0 certified devices supporting hi-speed (480MB/sec.) data transfer. ¹ Linux support for E250d and E250dn model is utilizing the PCL data stream. ² Only one slot active for flash memory or font card ...
4512-220, -230 Connectivity and compatibility Item 4512-220 Lexmark E250d 4512-230 Lexmark E250dn Data stream emulations PCL 6 ✔ ✔ PostScript 3 (Mac only) ✔ HBP ✔ ✔ PPDS n/a n/a Compatibility Windows/Macintosh/Linux¹ ...(100-pin DIMM) 1 1 Flash memory / option card 2 ² 2 ² * TheE250d and E250dn products are USB 2.0 certified devices supporting hi-speed (480MB/sec.) data transfer. ¹ Linux support for E250d and E250dn model is utilizing the PCL data stream. ² Only one slot active for flash memory or font card ...

Service Manual
Page 20
...labels are properly loaded. Short grain is permitted on 16# paper. 7 Input using manual feeder is reduced to 1/2 speed 1-6 Lexmark™ E250d and E250dn Treeing may also occur on a table face-down. Use envelopes that lay flat when individually placed on the front side, but away...(legal size) ¹ Single sided paper labels are supported for the occasional use of print media Ensure trays are not supported. ² For 20 lb print material, unless otherwise noted. ³ A6 long grain media supported/short grain A6 not supported 4 Card stock up to exit rear door. They...
...labels are properly loaded. Short grain is permitted on 16# paper. 7 Input using manual feeder is reduced to 1/2 speed 1-6 Lexmark™ E250d and E250dn Treeing may also occur on a table face-down. Use envelopes that lay flat when individually placed on the front side, but away...(legal size) ¹ Single sided paper labels are supported for the occasional use of print media Ensure trays are not supported. ² For 20 lb print material, unless otherwise noted. ³ A6 long grain media supported/short grain A6 not supported 4 Card stock up to exit rear door. They...

Service Manual
Page 26
... immediately, and double-clicking does not change . However, if is double-clicked on page 2-25) indicate specific errors. Check for correct POST functioning of support. 2-2 Lexmark™ E250d and E250dn Lights then flash on , it performs a POST. If there is a problem in the printer such as the primary notification or code. Additional tertiary...
... immediately, and double-clicking does not change . However, if is double-clicked on page 2-25) indicate specific errors. Check for correct POST functioning of support. 2-2 Lexmark™ E250d and E250dn Lights then flash on , it performs a POST. If there is a problem in the printer such as the primary notification or code. Additional tertiary...

Service Manual
Page 46
.... Too many flash options. 4512-220, -230 Missing/Defective toner cartridge z z z Meaning The toner in the toner cartridge is not supported by the printer. Action • Press and release Continue to clear the light sequence and continue processing the print job. • Turn ... the toner cartridge. • Turn the printer back on . Action • Press and release Continue to clear the message. 2-22 Lexmark™ E250d and E250dn Action Press Continue briefly to clear the light sequence and continue processing the print job. • Turn the printer off . • ...
.... Too many flash options. 4512-220, -230 Missing/Defective toner cartridge z z z Meaning The toner in the toner cartridge is not supported by the printer. Action • Press and release Continue to clear the light sequence and continue processing the print job. • Turn ... the toner cartridge. • Turn the printer back on . Action • Press and release Continue to clear the message. 2-22 Lexmark™ E250d and E250dn Action Press Continue briefly to clear the light sequence and continue processing the print job. • Turn the printer off . • ...

Service Manual
Page 47
Contact the next level of support. Tertiary codes (shown on . Double-click again and the original primary light pattern will appear. Action Power off the printer and remove the unsupported option ...
Contact the next level of support. Tertiary codes (shown on . Double-click again and the original primary light pattern will appear. Action Power off the printer and remove the unsupported option ...


