Quick Reference
Page 2
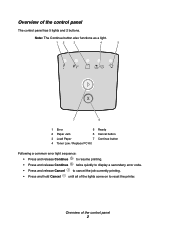
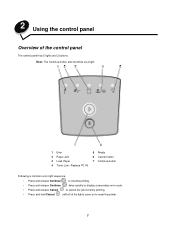
Overview of the lights come on to reset the printer. Note: The Continue button also functions as a light. 12 3 4 5 7 6 1 Error 5 Ready 2 Paper Jam 6 Cancel button 3 Load Paper 7 Continue button 4 Toner Low / Replace PC Kit Following a common error light sequence: • Press and release Continue to resume printing. • ...
Overview of the lights come on to reset the printer. Note: The Continue button also functions as a light. 12 3 4 5 7 6 1 Error 5 Ready 2 Paper Jam 6 Cancel button 3 Load Paper 7 Continue button 4 Toner Low / Replace PC Kit Following a common error light sequence: • Press and release Continue to resume printing. • ...
Quick Reference
Page 3
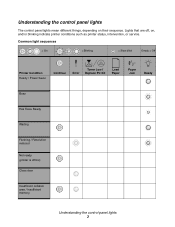
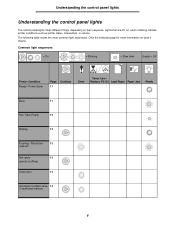
... service. Common light sequences = On = Blinking = Slow blink Empty = Off Printer Condition Ready / Power Saver Continue Toner Low / Error Replace PC Kit Load Paper Paper Jam Ready Busy Hex Trace Ready Waiting Flushing / Resolution reduced Not ready (printer is offline) Close door Insufficient collation area / Insufficient memory Understanding the control panel...
... service. Common light sequences = On = Blinking = Slow blink Empty = Off Printer Condition Ready / Power Saver Continue Toner Low / Error Replace PC Kit Load Paper Paper Jam Ready Busy Hex Trace Ready Waiting Flushing / Resolution reduced Not ready (printer is offline) Close door Insufficient collation area / Insufficient memory Understanding the control panel...

Quick Reference
Page 4
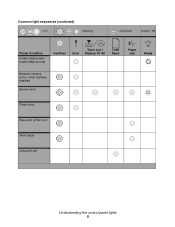
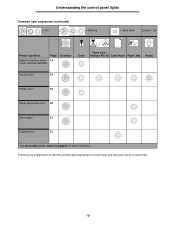
Common light sequences (continued) = On = Blinking = Slow blink Empty = Off Printer Condition Complex page Continue Toner Low / Error Replace PC Kit Load Paper Paper Jam Ready Cancel job/ Reset printer Load print media Load manual feeder Toner low Toner cartridge region mismatch Photoconductor kit life warning Replace photoconductor (printer hard stop) Programming engine code/ Programming system code Understanding the control panel lights 4
Common light sequences (continued) = On = Blinking = Slow blink Empty = Off Printer Condition Complex page Continue Toner Low / Error Replace PC Kit Load Paper Paper Jam Ready Cancel job/ Reset printer Load print media Load manual feeder Toner low Toner cartridge region mismatch Photoconductor kit life warning Replace photoconductor (printer hard stop) Programming engine code/ Programming system code Understanding the control panel lights 4
Quick Reference
Page 5
Common light sequences (continued) = On = Blinking = Slow blink Empty = Off Printer Condition Invalid engine code / Invalid network code Continue Toner Low / Error Replace PC Kit Load Paper Paper Jam Ready Network interface errors / Host interface disabled Service error Printer error Paper jam printer error Short paper Output bin full Understanding the control panel lights 5
Common light sequences (continued) = On = Blinking = Slow blink Empty = Off Printer Condition Invalid engine code / Invalid network code Continue Toner Low / Error Replace PC Kit Load Paper Paper Jam Ready Network interface errors / Host interface disabled Service error Printer error Paper jam printer error Short paper Output bin full Understanding the control panel lights 5

Quick Reference
Page 7
... • Alarm Control • Printer Language • Power Saver • Resource Save • Download Target • Print Timeout • Wait Timeout • Auto Continue • Jam Recovery • Page Protect • Print Area • Display Language • Toner Alarm PCL Emulation Settings • Orientation • Lines Per Page • A4 Width... settings using the Local Printer Settings Utility. If you selected the Custom install path from the computer software application, select Start Æ All Programs Æ Lexmark Æ Local Printer Settings Utility.
... • Alarm Control • Printer Language • Power Saver • Resource Save • Download Target • Print Timeout • Wait Timeout • Auto Continue • Jam Recovery • Page Protect • Print Area • Display Language • Toner Alarm PCL Emulation Settings • Orientation • Lines Per Page • A4 Width... settings using the Local Printer Settings Utility. If you selected the Custom install path from the computer software application, select Start Æ All Programs Æ Lexmark Æ Local Printer Settings Utility.

Quick Reference
Page 9
... standard paper sources: a 250-sheet tray and a single-sheet manual feeder. Loading the 250-sheet tray Follow these instructions to help reduce curling and potential jams. This is especially useful for a single piece of the tray. Where can increase paper capacity by purchasing an optional 550-sheet drawer.
... standard paper sources: a 250-sheet tray and a single-sheet manual feeder. Loading the 250-sheet tray Follow these instructions to help reduce curling and potential jams. This is especially useful for a single piece of the tray. Where can increase paper capacity by purchasing an optional 550-sheet drawer.
Quick Reference
Page 10
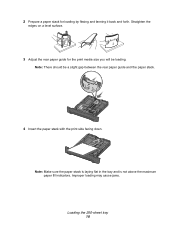
2 Prepare a paper stack for the print media size you will be a slight gap between the rear paper guide and the paper stack. 4 Insert the paper stack with the print side facing down. Note: There should be loading. Straighten the edges on a level surface. 3 Adjust the rear paper guide for loading by flexing and fanning it back and forth. Improper loading may cause jams. Loading the 250-sheet tray 10 Note: Make sure the paper stack is laying flat in the tray and is not above the maximum paper fill indicators.
2 Prepare a paper stack for the print media size you will be a slight gap between the rear paper guide and the paper stack. 4 Insert the paper stack with the print side facing down. Note: There should be loading. Straighten the edges on a level surface. 3 Adjust the rear paper guide for loading by flexing and fanning it back and forth. Improper loading may cause jams. Loading the 250-sheet tray 10 Note: Make sure the paper stack is laying flat in the tray and is not above the maximum paper fill indicators.
Quick Reference
Page 13
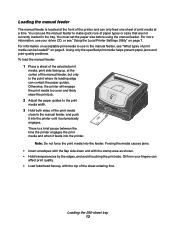
on page 7. Using only the specified print media helps prevent paper jams and print-quality problems. To load the manual feeder: 1 Place a sheet of the print media close to the point where its leading edge can affect ..., or see "Using the Local Printer Settings Utility" on page 8. You must set the paper size before using the manual feeder. Forcing the media causes jams. • Insert envelopes with the flap side down and with the top of paper types or sizes that are not currently loaded in the manual...
on page 7. Using only the specified print media helps prevent paper jams and print-quality problems. To load the manual feeder: 1 Place a sheet of the print media close to the point where its leading edge can affect ..., or see "Using the Local Printer Settings Utility" on page 8. You must set the paper size before using the manual feeder. Forcing the media causes jams. • Insert envelopes with the flap side down and with the top of paper types or sizes that are not currently loaded in the manual...

Quick Reference
Page 14
... from your computer. From a Windows computer 1 Click Start Æ Settings Æ Printers. 2 Double-click the printer you are using to help reduce curling and potential jams. This is sent to the output bin on the control panel while the job is open, all media is especially useful for specialty media, such...
... from your computer. From a Windows computer 1 Click Start Æ Settings Æ Printers. 2 Double-click the printer you are using to help reduce curling and potential jams. This is sent to the output bin on the control panel while the job is open, all media is especially useful for specialty media, such...

Quick Reference
Page 16
We recommend clearing the entire paper path when a paper jam occurs. 1 Remove all paper from the 150-sheet output bin. 2 If you are feeding paper from the 250-sheet tray, remove the tray. 3 Remove the jammed pages. Clearing jams When a paper jam occurs, the printer stops and the control panel Paper Jam and Continue lights come on. For more information, see the Software and Documentation CD that came with your printer. Clearing jams 16
We recommend clearing the entire paper path when a paper jam occurs. 1 Remove all paper from the 150-sheet output bin. 2 If you are feeding paper from the 250-sheet tray, remove the tray. 3 Remove the jammed pages. Clearing jams When a paper jam occurs, the printer stops and the control panel Paper Jam and Continue lights come on. For more information, see the Software and Documentation CD that came with your printer. Clearing jams 16
Quick Reference
Page 17
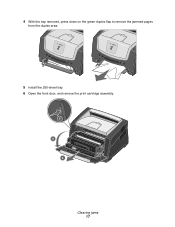
4 With the tray removed, press down on the green duplex flap to remove the jammed pages from the duplex area. 5 Install the 250-sheet tray. 6 Open the front door, and remove the print cartridge assembly. 1 2 3 Clearing jams 17
4 With the tray removed, press down on the green duplex flap to remove the jammed pages from the duplex area. 5 Install the 250-sheet tray. 6 Open the front door, and remove the print cartridge assembly. 1 2 3 Clearing jams 17
Quick Reference
Page 18
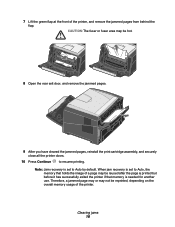
... is set to Auto, the memory that memory is set to resume printing. 7 Lift the green flap at the front of the printer. Therefore, a jammed page may or may not be reused after the page is printed but before it has successfully exited the printer if that holds the image ...of a page may be hot. 8 Open the rear exit door, and remove the jammed pages. 9 After you have cleared the jammed pages, reinstall the print cartridge assembly, and securely close all the printer doors. 10 Press Continue to Auto by default. When...
... is set to Auto, the memory that memory is set to resume printing. 7 Lift the green flap at the front of the printer. Therefore, a jammed page may or may not be reused after the page is printed but before it has successfully exited the printer if that holds the image ...of a page may be hot. 8 Open the rear exit door, and remove the jammed pages. 9 After you have cleared the jammed pages, reinstall the print cartridge assembly, and securely close all the printer doors. 10 Press Continue to Auto by default. When...
User's Guide
Page 3
or folio-size paper 52 Loading the manual feeder ...54 Using the rear exit ...55 Clearing jams ...56 Chapter 5: Printing tasks 60 Manually feeding a print job ...60 Printing on both sides of print media can be loaded? ...41 Where can print media ... tips 41 What types of the paper (duplex printing 62 Printing multiple page images on one page (N-upprinting 64 Printing a booklet ...65 Printing on preventing jams ...48 Loading the 250-sheet tray ...49 Extending the tray for legal-
or folio-size paper 52 Loading the manual feeder ...54 Using the rear exit ...55 Clearing jams ...56 Chapter 5: Printing tasks 60 Manually feeding a print job ...60 Printing on both sides of print media can be loaded? ...41 Where can print media ... tips 41 What types of the paper (duplex printing 62 Printing multiple page images on one page (N-upprinting 64 Printing a booklet ...65 Printing on preventing jams ...48 Loading the 250-sheet tray ...49 Extending the tray for legal-
User's Guide
Page 7
... hold Cancel until all of the control panel The control panel has 5 lights and 2 buttons. Note: The Continue button also functions as a light. 1 Error 2 Paper Jam 3 Load Paper 4 Toner Low / Replace PC Kit 5 Ready 6 Cancel button 7 Continue button Following a common error light sequence: • Press and release Continue to resume printing...
... hold Cancel until all of the control panel The control panel has 5 lights and 2 buttons. Note: The Continue button also functions as a light. 1 Error 2 Paper Jam 3 Load Paper 4 Toner Low / Replace PC Kit 5 Ready 6 Cancel button 7 Continue button Following a common error light sequence: • Press and release Continue to resume printing...
User's Guide
Page 8
... light sequences = On = Blinking = Slow blink Empty = Off Printer Condition Ready / Power Saver Page Continue 11 Error Toner Low / Replace PC Kit Load Paper Paper Jam Ready Busy 11 Hex Trace Ready 12 Waiting 12 Flushing / Resolution 13 reduced Not ready 13 (printer is offline) Close door 14 Insufficient collation area...
... light sequences = On = Blinking = Slow blink Empty = Off Printer Condition Ready / Power Saver Page Continue 11 Error Toner Low / Replace PC Kit Load Paper Paper Jam Ready Busy 11 Hex Trace Ready 12 Waiting 12 Flushing / Resolution 13 reduced Not ready 13 (printer is offline) Close door 14 Insufficient collation area...

User's Guide
Page 9
Understanding the control panel lights Common light sequences (continued) = On = Blinking = Slow blink Empty = Off Printer Condition Complex page Page Continue 14 Error Toner Low / Replace PC Kit Load Paper Paper Jam Ready Cancel job/ Reset printer 15 Load print media 15 Load manual feeder 16 Toner low 16 Toner cartridge region 17 mismatch Photoconductor kit life 17 warning Replace photoconductor 18 (printer hard stop) Programming engine 18 code/ Programming system code Invalid engine code / 19 Invalid network code 9
Understanding the control panel lights Common light sequences (continued) = On = Blinking = Slow blink Empty = Off Printer Condition Complex page Page Continue 14 Error Toner Low / Replace PC Kit Load Paper Paper Jam Ready Cancel job/ Reset printer 15 Load print media 15 Load manual feeder 16 Toner low 16 Toner cartridge region 17 mismatch Photoconductor kit life 17 warning Replace photoconductor 18 (printer hard stop) Programming engine 18 code/ Programming system code Invalid engine code / 19 Invalid network code 9
User's Guide
Page 10
Understanding the control panel lights Common light sequences (continued) = On = Blinking = Slow blink Empty = Off Printer Condition Page Network interface errors 19 / Host interface disabled Continue Error Toner Low / Replace PC Kit Load Paper Paper Jam Ready Service error 19 Printer error* 20 Paper jam printer error* 20 Short paper 21 Output bin full 21 *See Secondary error codes on page25 for more information. Following are explanations of what the primary light sequences or codes mean and what you can do to clear them. 10
Understanding the control panel lights Common light sequences (continued) = On = Blinking = Slow blink Empty = Off Printer Condition Page Network interface errors 19 / Host interface disabled Continue Error Toner Low / Replace PC Kit Load Paper Paper Jam Ready Service error 19 Printer error* 20 Paper jam printer error* 20 Short paper 21 Output bin full 21 *See Secondary error codes on page25 for more information. Following are explanations of what the primary light sequences or codes mean and what you can do to clear them. 10
User's Guide
Page 15
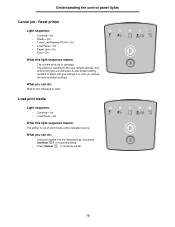
... Cancel job / Reset printer Light sequence: • Continue-On • Ready-On • Toner Low/Replace PC Kit-On • Load Paper-On • Paper Jam-On • Error-On What this light sequence means: The printer is resetting to the user default settings. Load print media Light sequence: • Continue...
... Cancel job / Reset printer Light sequence: • Continue-On • Ready-On • Toner Low/Replace PC Kit-On • Load Paper-On • Paper Jam-On • Error-On What this light sequence means: The printer is resetting to the user default settings. Load print media Light sequence: • Continue...

User's Guide
Page 19
... print correctly.) Service error Light sequence: • Continue-Blinking • Ready-Blinking • Toner Low/Replace PC Kit-Blinking • Load Paper-Blinking • Paper Jam-Blinking • Error-Blinking What this light sequence means: The printer cannot establish communication with the network. What you can do : Press Continue to the...
... print correctly.) Service error Light sequence: • Continue-Blinking • Ready-Blinking • Toner Low/Replace PC Kit-Blinking • Load Paper-Blinking • Paper Jam-Blinking • Error-Blinking What this light sequence means: The printer cannot establish communication with the network. What you can do : Press Continue to the...

User's Guide
Page 20
...error code. What you can do : • Press Continue twice quickly to see the secondary error code. Paper jam printer error Light sequence: • Continue-On • Paper Jam-On What this light sequence means: The printer has one of the following errors: • Memory is full, ...lost. • Short paper. See Secondary error codes on page25 for more information. • Press Continue to resume printing once all the jammed pages are cleared from the paper path. 20 See Secondary error codes on page25 for more information. • Press Continue to clear the ...
...error code. What you can do : • Press Continue twice quickly to see the secondary error code. Paper jam printer error Light sequence: • Continue-On • Paper Jam-On What this light sequence means: The printer has one of the following errors: • Memory is full, ...lost. • Short paper. See Secondary error codes on page25 for more information. • Press Continue to resume printing once all the jammed pages are cleared from the paper path. 20 See Secondary error codes on page25 for more information. • Press Continue to clear the ...


