User's Guide
Page 4
... need new supplies 102 Checking the toner and photoconductor levels 102 Recognizing the operator panel light sequences 103 How to change a toner cartridge 104 Lexmark Return Program 107 Refilled toner cartridge notice 107 Recycling Lexmark products 107 How to change a photoconductor kit 108 Chapter 9: Troubleshooting 111 General problems 112 Print quality problems 114 Contents 4
... need new supplies 102 Checking the toner and photoconductor levels 102 Recognizing the operator panel light sequences 103 How to change a toner cartridge 104 Lexmark Return Program 107 Refilled toner cartridge notice 107 Recycling Lexmark products 107 How to change a photoconductor kit 108 Chapter 9: Troubleshooting 111 General problems 112 Print quality problems 114 Contents 4
User's Guide
Page 16
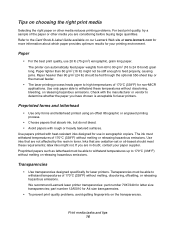
... printing process heats paper to the Card Stock & Label Guide available on our Lexmark Web site at www.lexmark.com for more information about which paper provides optimum results for A4 size transparencies. • To prevent print quality problems, avoid getting fingerprints on choosing the right print media Selecting the right paper or...
... printing process heats paper to the Card Stock & Label Guide available on our Lexmark Web site at www.lexmark.com for more information about which paper provides optimum results for A4 size transparencies. • To prevent print quality problems, avoid getting fingerprints on choosing the right print media Selecting the right paper or...

User's Guide
Page 18
Tips on storing print media and supplies Storing paper Use the following guidelines to avoid paper feeding problems and uneven print quality. • Store paper in .). Storing supplies Choose a cool, clean storage area for your printer supplies. Store supplies right side up in ... chemicals that may contaminate the printer. Card stock • Preprinting, perforation, and creasing can significantly affect the print quality and cause media handling or jamming problems. • Avoid using card stock that may release hazardous emissions when heated. • Do not use them.
Tips on storing print media and supplies Storing paper Use the following guidelines to avoid paper feeding problems and uneven print quality. • Store paper in .). Storing supplies Choose a cool, clean storage area for your printer supplies. Store supplies right side up in ... chemicals that may contaminate the printer. Card stock • Preprinting, perforation, and creasing can significantly affect the print quality and cause media handling or jamming problems. • Avoid using card stock that may release hazardous emissions when heated. • Do not use them.
User's Guide
Page 24
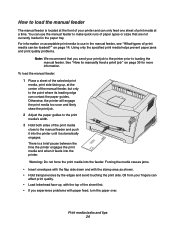
You can use in the paper tray. There is located at a time. Using only the specified print media helps prevent paper jams and print quality problems. Note: We recommend that are not currently loaded in the manual feeder, see "What types of print media can affect print quality. • Load letterhead ... the point where its leading edge can only feed one sheet of print media at the front of paper types or sizes that you experience problems with the stamp area as shown. • Hold transparencies by the edges and avoid touching the print side. Warning: Do not force the print ...
You can use in the paper tray. There is located at a time. Using only the specified print media helps prevent paper jams and print quality problems. Note: We recommend that are not currently loaded in the manual feeder, see "What types of print media can affect print quality. • Load letterhead ... the point where its leading edge can only feed one sheet of print media at the front of paper types or sizes that you experience problems with the stamp area as shown. • Hold transparencies by the edges and avoid touching the print side. Warning: Do not force the print ...

User's Guide
Page 27
Print media tasks and tips 27 Warning: Do not leave the print cartridge assembly exposed to direct light for an extended period of time. 2 Open the front cover and remove the print cartridge assembly. Extended light exposure can cause print quality problems. 3 Remove any jams in the area behind the print cartridge assembly.
Print media tasks and tips 27 Warning: Do not leave the print cartridge assembly exposed to direct light for an extended period of time. 2 Open the front cover and remove the print cartridge assembly. Extended light exposure can cause print quality problems. 3 Remove any jams in the area behind the print cartridge assembly.
User's Guide
Page 31
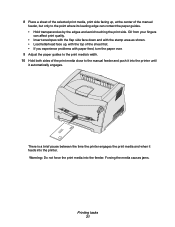
... into the printer. 8 Place a sheet of the selected print media, print side facing up , with the top of the sheet first. • If you experience problems with the stamp area as shown. • Load letterhead face up , at the center of the print media close to the point where its leading...
... into the printer. 8 Place a sheet of the selected print media, print side facing up , with the top of the sheet first. • If you experience problems with the stamp area as shown. • Load letterhead face up , at the center of the print media close to the point where its leading...

User's Guide
Page 56
... Light sequence: • Ready-Slow blink What this light sequence means: The printer is active. What you can use Hex Trace to help troubleshoot printing problems. After resolving the problem, turn off the printer to exit Hex Trace. • Press and hold Cancel to reset the printer.
... Light sequence: • Ready-Slow blink What this light sequence means: The printer is active. What you can use Hex Trace to help troubleshoot printing problems. After resolving the problem, turn off the printer to exit Hex Trace. • Press and hold Cancel to reset the printer.

User's Guide
Page 75
... too short to cancel the print job. This occurs when the printer does not know the media size loaded in the tray, or there is a problem feeding the media.
... too short to cancel the print job. This occurs when the printer does not know the media size loaded in the tray, or there is a problem feeding the media.

User's Guide
Page 77
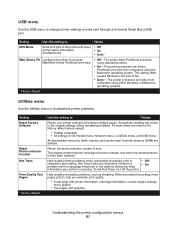
... menu • USB menu • Utilities menu Page 77 78 79 80 80 81 81 Printing the Printer Settings Configuration sheet To help resolve printing problems or to change printer configuration settings, advanced users can print the Printer Settings Configuration sheet for instructions on .
... menu • USB menu • Utilities menu Page 77 78 79 80 80 81 81 Printing the Printer Settings Configuration sheet To help resolve printing problems or to change printer configuration settings, advanced users can print the Printer Settings Configuration sheet for instructions on .
User's Guide
Page 81
... kit has been replaced. To exit Hex Trace, turn off the printer. Sometimes resetting the printer to the original settings solves formatting problems. All menu items are reset to zero. Return the photoconductor counter to the factory default values except: • Display Language. •...; All settings in printer memory (RAM) are missing. Help isolate print quality problems, such as streaking. Hex Trace helps you select this setting to: Values NPA Mode Send print jobs to the printer and query •...
... kit has been replaced. To exit Hex Trace, turn off the printer. Sometimes resetting the printer to the original settings solves formatting problems. All menu items are reset to zero. Return the photoconductor counter to the factory default values except: • Display Language. •...; All settings in printer memory (RAM) are missing. Help isolate print quality problems, such as streaking. Hex Trace helps you select this setting to: Values NPA Mode Send print jobs to the printer and query •...
User's Guide
Page 104
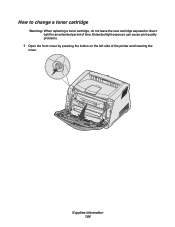
Extended light exposure can cause print quality problems. 1 Open the front cover by pressing the button on the left side of time. Supplies information 104 How to change a toner cartridge Warning: When replacing a toner cartridge, do not leave the new cartridge exposed to direct light for an extended period of the printer and lowering the cover.
Extended light exposure can cause print quality problems. 1 Open the front cover by pressing the button on the left side of time. Supplies information 104 How to change a toner cartridge Warning: When replacing a toner cartridge, do not leave the new cartridge exposed to direct light for an extended period of the printer and lowering the cover.

User's Guide
Page 108
Supplies information 108 Extended light exposure can cause print quality problems. 1 Open the front cover by pressing the button on the left side of time. How to change a photoconductor kit Warning: When replacing a photoconductor kit, do not leave the toner cartridge or the new photoconductor kit exposed to direct light for an extended period of the printer and lowering the cover.
Supplies information 108 Extended light exposure can cause print quality problems. 1 Open the front cover by pressing the button on the left side of time. How to change a photoconductor kit Warning: When replacing a photoconductor kit, do not leave the toner cartridge or the new photoconductor kit exposed to direct light for an extended period of the printer and lowering the cover.

User's Guide
Page 111
9 Troubleshooting Section General problems Print quality problems • How to clean the printhead lens Page 112 114 118 Troubleshooting 111
9 Troubleshooting Section General problems Print quality problems • How to clean the printhead lens Page 112 114 118 Troubleshooting 111
User's Guide
Page 112
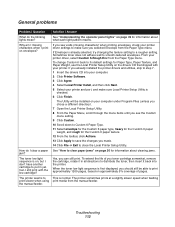
General problems Problem / Question Solution / Answer What do I clear a paper See "How to clear paper jams" on page 26 for information about what each light pattern means. If ...
General problems Problem / Question Solution / Answer What do I clear a paper See "How to clear paper jams" on page 26 for information about what each light pattern means. If ...

User's Guide
Page 113
... printer. Dust is gathering on the output bin. The paper tray is getting it always prints side 2 from Tray 1. Solution / Answer The problem is extended. However, Tray 1 does not support card stock. Troubleshooting 113 Paper stacks poorly in the feeder with the already-printed side down,... with the top of the sheet first. Problem / Question I want to manually duplex card stock, but I'm having trouble getting bumped and pushed out the front of the printer when it...
... printer. Dust is gathering on the output bin. The paper tray is getting it always prints side 2 from Tray 1. Solution / Answer The problem is extended. However, Tray 1 does not support card stock. Troubleshooting 113 Paper stacks poorly in the feeder with the already-printed side down,... with the top of the sheet first. Problem / Question I want to manually duplex card stock, but I'm having trouble getting bumped and pushed out the front of the printer when it...

User's Guide
Page 114
... page 118.) 2 Replace the toner cartridge. 3 Replace the fuser*. Troubleshooting 114 Try the following table to find solutions to print quality problems. Symptom White lines ABCDE ABCDE ABCDE Cause Solution • The printhead lens is dirty. • Either the toner cartridge or the fuser... using. • Replace the fuser*. * To replace the fuser, call a service technician. † This setting can solve many print quality problems by replacing a supply or maintenance item that does not meet the printer specifications. • The fuser is worn or defective. • Load paper...
... page 118.) 2 Replace the toner cartridge. 3 Replace the fuser*. Troubleshooting 114 Try the following table to find solutions to print quality problems. Symptom White lines ABCDE ABCDE ABCDE Cause Solution • The printhead lens is dirty. • Either the toner cartridge or the fuser... using. • Replace the fuser*. * To replace the fuser, call a service technician. † This setting can solve many print quality problems by replacing a supply or maintenance item that does not meet the printer specifications. • The fuser is worn or defective. • Load paper...

User's Guide
Page 118
Troubleshooting 118 How to clean the printhead lens You can solve some print quality problems by cleaning the printhead lens. 1 Turn the printer off. 2 Open the front cover by pressing the button on the left side of the printer and lowering the cover.
Troubleshooting 118 How to clean the printhead lens You can solve some print quality problems by cleaning the printhead lens. 1 Turn the printer off. 2 Open the front cover by pressing the button on the left side of the printer and lowering the cover.

User's Guide
Page 119
Note: Do not press the button on a flat, clean surface. Extended light exposure can cause print quality problems. Troubleshooting 119 Place the print cartridge assembly on the print cartridge assembly. Warning: Do not leave the print cartridge assembly exposed to direct light for an extended period of the printer by pulling on the toner cartridge handle. 3 Remove the print cartridge assembly out of time.
Note: Do not press the button on a flat, clean surface. Extended light exposure can cause print quality problems. Troubleshooting 119 Place the print cartridge assembly on the print cartridge assembly. Warning: Do not leave the print cartridge assembly exposed to direct light for an extended period of the printer by pulling on the toner cartridge handle. 3 Remove the print cartridge assembly out of time.
User's Guide
Page 122
...101 recycling 107 Photoconductor kit near full light 61 ports parallel 80 USB 81 posters 36 print cartridge See toner cartridge print quality problems 114 Print Quality Test Pages (Utilities menu) 81 Printer resident Web page 98 Printer Settings Configuration sheet printing 77 printhead lens,... cleaning 118 printing booklets 35 duplex 32 letterhead 37 multi-page (N-up) 34 posters 36 problems print quality 114 Protocol (Parallel menu) 80 R rear exit 25 recycling supplies 107 Replace photoconductor kit light 61, 62 Reset Factory ...
...101 recycling 107 Photoconductor kit near full light 61 ports parallel 80 USB 81 posters 36 print cartridge See toner cartridge print quality problems 114 Print Quality Test Pages (Utilities menu) 81 Printer resident Web page 98 Printer Settings Configuration sheet printing 77 printhead lens,... cleaning 118 printing booklets 35 duplex 32 letterhead 37 multi-page (N-up) 34 posters 36 problems print quality 114 Protocol (Parallel menu) 80 R rear exit 25 recycling supplies 107 Replace photoconductor kit light 61, 62 Reset Factory ...


