Quick Reference
Page 1
...the left side of require service. P/N 12N0573 E.C. 548073 12N0573 * 12N0573* © Lexmark International, Inc. Quick Reference Printer menu overview Color Menu Print Mode Color Correction Toner Darkness Manual Color Finishing Menu Duplex Duplex Bind Copies Blank Pages Collation Separator Sheets Separator Source...Coating Roll may encounter and the action you may be replaced to clear the message. • Install a new photodeveloper(s). For more toner cartridges. 2 Paper Jam A paper jam is too complex. • Press Go to clear the message and continue printing the job. Message...
...the left side of require service. P/N 12N0573 E.C. 548073 12N0573 * 12N0573* © Lexmark International, Inc. Quick Reference Printer menu overview Color Menu Print Mode Color Correction Toner Darkness Manual Color Finishing Menu Duplex Duplex Bind Copies Blank Pages Collation Separator Sheets Separator Source...Coating Roll may encounter and the action you may be replaced to clear the message. • Install a new photodeveloper(s). For more toner cartridges. 2 Paper Jam A paper jam is too complex. • Press Go to clear the message and continue printing the job. Message...
Setup Guide
Page 5
... tray labels 16 Install printer supplies 17 Opening the top cover 17 Installing the fuser oil coating roll 20 Installing the photodevelopers 22 Installing the toner cartridges 24 Attaching an adhesive operator panel overlay 27 Closing the top cover 27 Contents v
... tray labels 16 Install printer supplies 17 Opening the top cover 17 Installing the fuser oil coating roll 20 Installing the photodevelopers 22 Installing the toner cartridges 24 Attaching an adhesive operator panel overlay 27 Closing the top cover 27 Contents v
Setup Guide
Page 10
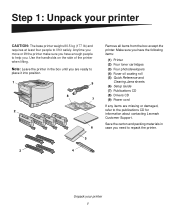
...The base printer weighs 80.5 kg (177 Ib) and requires at least four people to the publications CD for information about contacting Lexmark Customer Support. Note: Leave the printer in case you . Save the carton and packing materials in the box until you have ... when lifting. Step 1: Unpack your printer 1 Anytime you move or lift the printer make sure you have the following items: (1) Printer (2) Four toner cartridges (3) Four photodevelopers (4) Fuser oil coating roll (5) Quick Reference and Clearing Jams sheets (6) Setup Guide (7) Publications CD (8) Drivers CD (9) Power cord ...
...The base printer weighs 80.5 kg (177 Ib) and requires at least four people to the publications CD for information about contacting Lexmark Customer Support. Note: Leave the printer in case you . Save the carton and packing materials in the box until you have ... when lifting. Step 1: Unpack your printer 1 Anytime you move or lift the printer make sure you have the following items: (1) Printer (2) Four toner cartridges (3) Four photodevelopers (4) Fuser oil coating roll (5) Quick Reference and Clearing Jams sheets (6) Setup Guide (7) Publications CD (8) Drivers CD (9) Power cord ...
Setup Guide
Page 33
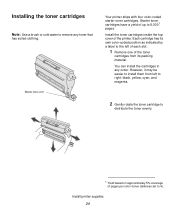
... left to right: black, yellow, cyan, and magenta. 2 Gently rotate the toner cartridge to distribute the toner evenly. 1 Yield based on approximately 5% coverage of pages per color (toner darkness set to 4). Waste toner arm Your printer ships with four color-coded starter toner cartridges. Install the toner cartridges inside the top cover of up to 8,0001 pages. Install printer...
... left to right: black, yellow, cyan, and magenta. 2 Gently rotate the toner cartridge to distribute the toner evenly. 1 Yield based on approximately 5% coverage of pages per color (toner darkness set to 4). Waste toner arm Your printer ships with four color-coded starter toner cartridges. Install the toner cartridges inside the top cover of up to 8,0001 pages. Install printer...
Setup Guide
Page 34
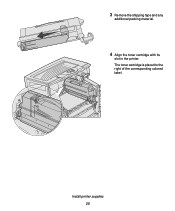
Install printer supplies 25 3 Remove the shipping tape and any additional packing material. 4 Align the toner cartridge with its slot in the printer. The toner cartridge is placed to the right of the corresponding colored label.
Install printer supplies 25 3 Remove the shipping tape and any additional packing material. 4 Align the toner cartridge with its slot in the printer. The toner cartridge is placed to the right of the corresponding colored label.
Setup Guide
Page 35
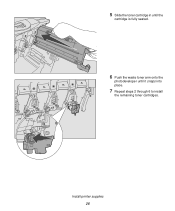
5 Slide the toner cartridge in until the cartridge is fully seated. 6 Push the waste toner arm onto the photodeveloper until it snaps into place. 7 Repeat steps 2 through 6 to install the remaining toner cartridges. Install printer supplies 26
5 Slide the toner cartridge in until the cartridge is fully seated. 6 Push the waste toner arm onto the photodeveloper until it snaps into place. 7 Repeat steps 2 through 6 to install the remaining toner cartridges. Install printer supplies 26

Setup Guide
Page 82
... the greater of its warranty period. You may only be available for a fee. In no longer covered by you advise Lexmark or a Remarketer of the possibility of other than Lexmark supplies (such as toner cartridges, inkjet cartridges, and ribbons) • Use of such damages. Free remote technical support is not liable for any claim by...
... the greater of its warranty period. You may only be available for a fee. In no longer covered by you advise Lexmark or a Remarketer of the possibility of other than Lexmark supplies (such as toner cartridges, inkjet cartridges, and ribbons) • Use of such damages. Free remote technical support is not liable for any claim by...
User's Reference
Page 5
Replacing a toner cartridge 165 Resetting the maintenance counter 170 Cleaning the LEDs 173 Closing the top cover 175 Opening the top cover 177 Removing the duplex unit 179 Removing the high capacity feeder 181 Removing the system board access cover 184 Locating memory and network options 185 Installing the system board access cover 185 Removing an optional drawer 187 Chapter 8: Troubleshooting 189 Calling for service 189 Index 192 v
Replacing a toner cartridge 165 Resetting the maintenance counter 170 Cleaning the LEDs 173 Closing the top cover 175 Opening the top cover 177 Removing the duplex unit 179 Removing the high capacity feeder 181 Removing the system board access cover 184 Locating memory and network options 185 Installing the system board access cover 185 Removing an optional drawer 187 Chapter 8: Troubleshooting 189 Calling for service 189 Index 192 v

User's Reference
Page 92
... an Auto Continue value is replaced. Printer stops printing, displays an error message, and repeats three beeps every 10 seconds until the toner cartridge is selected from the computer. When this page is to receive additional bytes of time the printer waits for the setting is Off....after the specified timeout value. Disables Wait Timeout. If an Auto Continue value is displayed until someone replaces the toner cartridge. This menu item has no effect on toner. An error message is out of this timeout expires, the print job is replaced. Printer stops printing, displays...
... an Auto Continue value is replaced. Printer stops printing, displays an error message, and repeats three beeps every 10 seconds until the toner cartridge is selected from the computer. When this page is to receive additional bytes of time the printer waits for the setting is Off....after the specified timeout value. Disables Wait Timeout. If an Auto Continue value is displayed until someone replaces the toner cartridge. This menu item has no effect on toner. An error message is out of this timeout expires, the print job is replaced. Printer stops printing, displays...

User's Reference
Page 107
... Restoring Held Job xxx/ yyy Restoring Held Jobs Serial Std Bin Full Supplies Tray Empty Tray Low What this message means What you may have a toner cartridge that is full. The standard bin is low on paper. Remove the stack of the printer supplies requires attention. Replace the appropriate printer supplies. Note...
... Restoring Held Job xxx/ yyy Restoring Held Jobs Serial Std Bin Full Supplies Tray Empty Tray Low What this message means What you may have a toner cartridge that is full. The standard bin is low on paper. Remove the stack of the printer supplies requires attention. Replace the appropriate printer supplies. Note...

User's Reference
Page 108
... the paper path. message. The printer detects the wrong type of the color print units is Remove the Heavy Media Tray from the Lexmark Web site. Correctly install the color print units to clear the message. • Format the disk. Understanding printer messages 103 Note: ...8226; Press Go to print the contents of data to print but is either missing or incorrectly installed. The printer detects an unsupported toner cartridge. through the specified USB port. The printer automatically clears the message in 30 seconds, and then disables the download emulator on the ...
... the paper path. message. The printer detects the wrong type of the color print units is Remove the Heavy Media Tray from the Lexmark Web site. Correctly install the color print units to clear the message. • Format the disk. Understanding printer messages 103 Note: ...8226; Press Go to print the contents of data to print but is either missing or incorrectly installed. The printer detects an unsupported toner cartridge. through the specified USB port. The printer automatically clears the message in 30 seconds, and then disables the download emulator on the ...
User's Reference
Page 116
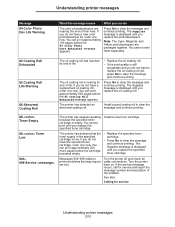
... reached its end of life. The printer has detected that may require service. You cannot print until you replace the specified toner cartridge. Messages 900-999 relate to clear the message and continue printing. If the service message recurs, call for service Understanding printer... messages 111 The oil coating roll is displayed until you do not have the specified toner cartridge, order one now. The Supplies message is nearing its end of life. If you do not have a replacement oil coating roll...
... reached its end of life. The printer has detected that may require service. You cannot print until you replace the specified toner cartridge. Messages 900-999 relate to clear the message and continue printing. If the service message recurs, call for service Understanding printer... messages 111 The oil coating roll is displayed until you do not have the specified toner cartridge, order one now. The Supplies message is nearing its end of life. If you do not have a replacement oil coating roll...

User's Reference
Page 118
... Area E Jam message Check Area F Check MPF Check T1-T4 Check T5 Note: If there is blank. Note: The paper may be covered with unfused toner, which can stain garments. 200 Paper Jam Pages Jammed (Check Areas A-F, T1-5, MPF) 113 To clear areas A- Photodeveloper Warning: Never touch the photodeveloper drum on... message indicates a paper jam in the transfer belt, fuser, or output roller area. Note: If you turn the printer on, the second line of the toner cartridge.
... Area E Jam message Check Area F Check MPF Check T1-T4 Check T5 Note: If there is blank. Note: The paper may be covered with unfused toner, which can stain garments. 200 Paper Jam Pages Jammed (Check Areas A-F, T1-5, MPF) 113 To clear areas A- Photodeveloper Warning: Never touch the photodeveloper drum on... message indicates a paper jam in the transfer belt, fuser, or output roller area. Note: If you turn the printer on, the second line of the toner cartridge.
User's Reference
Page 141
...you should order a new toner cartridge. Ordering a toner cartridge When the 88 Toner Low message appears on the display, you should order a new transfer belt. You can continue to continue printing. Use P/N 12N0774 to order a transfer belt. You can also visit the Lexmark online store at which time ...Ordering a fuser When the 80 Fuser Life Warning message appears on the display, you must replace the toner cartridge to print after the 88 Toner Low message appears for a 230 V printer. Use P/N 56P9900 to order supplies. Maintenance Ordering supplies In the U.S.
...you should order a new toner cartridge. Ordering a toner cartridge When the 88 Toner Low message appears on the display, you should order a new transfer belt. You can continue to continue printing. Use P/N 12N0774 to order a transfer belt. You can also visit the Lexmark online store at which time ...Ordering a fuser When the 80 Fuser Life Warning message appears on the display, you must replace the toner cartridge to print after the 88 Toner Low message appears for a 230 V printer. Use P/N 56P9900 to order supplies. Maintenance Ordering supplies In the U.S.

User's Reference
Page 142
...supplies 137 If you do not have been printed. Maintenance Order the appropriate toner cartridge: Part number 12N0771 12N0770 12N0768 12N0769 Toner cartridge Black toner cartridge Yellow toner cartridge Cyan toner cartridge Magenta toner cartridge Approximate yield 14,000 pages Approximate coverage 5% Replacing supplies The printer calculates and... the second line of the display to remind you there are supplies that need attention. Replacement of your toner cartridges, photodevelopers, fuser cleaner, fuser, and transfer belt. Press Go to monitor the required supply items until you...
...supplies 137 If you do not have been printed. Maintenance Order the appropriate toner cartridge: Part number 12N0771 12N0770 12N0768 12N0769 Toner cartridge Black toner cartridge Yellow toner cartridge Cyan toner cartridge Magenta toner cartridge Approximate yield 14,000 pages Approximate coverage 5% Replacing supplies The printer calculates and... the second line of the display to remind you there are supplies that need attention. Replacement of your toner cartridges, photodevelopers, fuser cleaner, fuser, and transfer belt. Press Go to monitor the required supply items until you...

User's Reference
Page 143
... your printer for your old toner cartridge in a worldwide recycling effort at no cost to install them. The printer warranty does not cover damage caused by using refilled cartridges. Storing supplies 138 To order finisher supplies (staples), see the Finisher Manual. Warning: Lexmark does not recommend refilling used supplies Lexmark's Operation ReSourceSM program lets you...
... your printer for your old toner cartridge in a worldwide recycling effort at no cost to install them. The printer warranty does not cover damage caused by using refilled cartridges. Storing supplies 138 To order finisher supplies (staples), see the Finisher Manual. Warning: Lexmark does not recommend refilling used supplies Lexmark's Operation ReSourceSM program lets you...

User's Reference
Page 170
... replacing the fuser. When the life of your toner cartridges. Once the counter is getting low, the printer displays 88 Toner Low. Use the following headings: Removing the duplex unit Replacing a toner cartridge Replacing a toner cartridge Your printer monitors the toner level of the toner cartridge has expired, the printer displays 88 Toner Empty. Note: If you to print. Maintenance 12...
... replacing the fuser. When the life of your toner cartridges. Once the counter is getting low, the printer displays 88 Toner Low. Use the following headings: Removing the duplex unit Replacing a toner cartridge Replacing a toner cartridge Your printer monitors the toner level of the toner cartridge has expired, the printer displays 88 Toner Empty. Note: If you to print. Maintenance 12...

User's Reference
Page 171
Use cold water to the clothing. Touching the surface of the transfer belt or placing items on the transfer belt. this permanently adheres the toner to remove toner. Do not clean clothing soiled with toner in hot water; Replacing a toner cartridge 166 Warning: Do not touch, drop, or place anything on it may cause damage. 1 Complete the steps to open the top cover. Transfer belt Note: The toner can soil clothing. Maintenance Removing a toner cartridge Note: If you need instructions on how to open the top cover, see Opening the top cover.
Use cold water to the clothing. Touching the surface of the transfer belt or placing items on the transfer belt. this permanently adheres the toner to remove toner. Do not clean clothing soiled with toner in hot water; Replacing a toner cartridge 166 Warning: Do not touch, drop, or place anything on it may cause damage. 1 Complete the steps to open the top cover. Transfer belt Note: The toner can soil clothing. Maintenance Removing a toner cartridge Note: If you need instructions on how to open the top cover, see Opening the top cover.

User's Reference
Page 172
Replacing a toner cartridge 167 Maintenance 2 Pull the waste toner arm away from the photodeveloper. 3 Pull the toner cartridge approximately halfway out of the printer. 4 Grasp the toner cartridge handle and continue to pull the toner cartridge out.
Replacing a toner cartridge 167 Maintenance 2 Pull the waste toner arm away from the photodeveloper. 3 Pull the toner cartridge approximately halfway out of the printer. 4 Grasp the toner cartridge handle and continue to pull the toner cartridge out.

User's Reference
Page 173
Maintenance Installing a toner cartridge 1 Remove the replacement toner cartridge from the packing material. 2 Gently shake the toner cartridge to distribute the toner evenly. 3 Remove the shipping tape and any additional packing material. Replacing a toner cartridge 168
Maintenance Installing a toner cartridge 1 Remove the replacement toner cartridge from the packing material. 2 Gently shake the toner cartridge to distribute the toner evenly. 3 Remove the shipping tape and any additional packing material. Replacing a toner cartridge 168


