User's Reference
Page 4
... ...61 PCL Emul Menu 63 Paper Menu ...66 Fax Menu ...73 PostScript Menu 79 Serial Menu ...80 Setup Menu ...83 Supplies Menu 88 USB Menu ...90 Utilities Menu ...91 Chapter 5: Understanding printer messages 94 Chapter 6: Clearing paper jams 112 200 Paper Jam Pages Jammed (Check Areas A-F, T1-5, MPF 113 240 Paper Jam Check MP Feeder 129 24 Paper Jam Check Tray
... ...61 PCL Emul Menu 63 Paper Menu ...66 Fax Menu ...73 PostScript Menu 79 Serial Menu ...80 Setup Menu ...83 Supplies Menu 88 USB Menu ...90 Utilities Menu ...91 Chapter 5: Understanding printer messages 94 Chapter 6: Clearing paper jams 112 200 Paper Jam Pages Jammed (Check Areas A-F, T1-5, MPF 113 240 Paper Jam Check MP Feeder 129 24 Paper Jam Check Tray

User's Reference
Page 117
... will print. Identifying paper jam areas See the diagram below for the path the paper travels through the printer and options, and areas where jams may occur. Click a message below for more information. 200 Paper Jam Check Areas A,B 200 Paper Jam Check Area D T 1 T 2 T 3 T 4 240 Paper Jam 200 Paper Jam Check Areas C 200 Paper Jam Check Area F 249 Paper Jam T 3/T 5 (depending on the paper source and output bin. To resolve the paper jam messages, you should...
... will print. Identifying paper jam areas See the diagram below for the path the paper travels through the printer and options, and areas where jams may occur. Click a message below for more information. 200 Paper Jam Check Areas A,B 200 Paper Jam Check Area D T 1 T 2 T 3 T 4 240 Paper Jam 200 Paper Jam Check Areas C 200 Paper Jam Check Area F 249 Paper Jam T 3/T 5 (depending on the paper source and output bin. To resolve the paper jam messages, you should...

User's Reference
Page 118
... clear all paper from the paper path. Clearing paper jams 200 Paper Jam Pages Jammed (Check Areas A-F, T15, MPF) This message identifies the areas (A-F, MPF, or T1-T5) you turn the printer on, the second line of the toner cartridge. The display alternates between 200 Paper Jam Pages Jammed and Check Areas A-F., T1-5, MPF: Jam message Check Areas A,B Check Area C Check Area D Check Area E Jam message Check Area F Check MPF...
... clear all paper from the paper path. Clearing paper jams 200 Paper Jam Pages Jammed (Check Areas A-F, T15, MPF) This message identifies the areas (A-F, MPF, or T1-T5) you turn the printer on, the second line of the toner cartridge. The display alternates between 200 Paper Jam Pages Jammed and Check Areas A-F., T1-5, MPF: Jam message Check Areas A,B Check Area C Check Area D Check Area E Jam message Check Area F Check MPF...

User's Reference
Page 119
... top cover, close the top cover, see Closing the top cover. 4 Lift the fuser pressure release lever. 200 Paper Jam Pages Jammed (Check Areas A-F, T1-5, MPF) 114 If the paper source was the multipurpose feeder, check the area between the multipurpose feeder and the transfer belt. This could cause permanent damage to close the top cover...
... top cover, close the top cover, see Closing the top cover. 4 Lift the fuser pressure release lever. 200 Paper Jam Pages Jammed (Check Areas A-F, T1-5, MPF) 114 If the paper source was the multipurpose feeder, check the area between the multipurpose feeder and the transfer belt. This could cause permanent damage to close the top cover...

User's Reference
Page 120
Note: The top cover will not close the top cover and front door. Clearing paper jams 5 Slowly pull the paper out of the fuser toward the inside of the printer. 6 Rotate the fuser pressure release lever down position. 7 Check the top cover for additional jams. If there is present, continue with step 8. 200 Paper Jam Pages Jammed (Check Areas A-F, T1-5, MPF) 115 If a jam is no jam in the top cover, close until the lever is in the down .
Note: The top cover will not close the top cover and front door. Clearing paper jams 5 Slowly pull the paper out of the fuser toward the inside of the printer. 6 Rotate the fuser pressure release lever down position. 7 Check the top cover for additional jams. If there is present, continue with step 8. 200 Paper Jam Pages Jammed (Check Areas A-F, T1-5, MPF) 115 If a jam is no jam in the top cover, close until the lever is in the down .

User's Reference
Page 121
Clearing paper jams 8 Remove the jam from the top cover. 9 Close the top cover and the front door. 10 Open the jam access door on the left side of the printer. 11 Remove any paper inside the printer. 200 Paper Jam Pages Jammed (Check Areas A-F, T1-5, MPF) 116
Clearing paper jams 8 Remove the jam from the top cover. 9 Close the top cover and the front door. 10 Open the jam access door on the left side of the printer. 11 Remove any paper inside the printer. 200 Paper Jam Pages Jammed (Check Areas A-F, T1-5, MPF) 116

User's Reference
Page 122
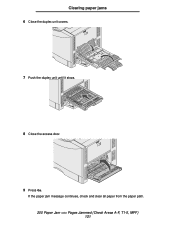
To prevent additional paper jams, make sure both sides of the door are closed. 13 Press Go. 200 Paper Jam Pages Jammed (Check Areas A-F, T1-5, MPF) 117 Clearing paper jams 12 Close the jam access door.
To prevent additional paper jams, make sure both sides of the door are closed. 13 Press Go. 200 Paper Jam Pages Jammed (Check Areas A-F, T1-5, MPF) 117 Clearing paper jams 12 Close the jam access door.
User's Reference
Page 123
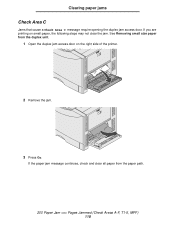
See Removing small size paper from the paper path. 200 Paper Jam Pages Jammed (Check Areas A-F, T1-5, MPF) 118 Clearing paper jams Check Area C Jams that cause a Check Area C message require opening the duplex jam access door. If the paper jam message continues, check and clear all paper from the duplex unit. 1 Open the duplex jam access door on small paper, the following steps may not clear the jam. If you are printing on the right side of the printer. 2 Remove the jam. 3 Press Go.
See Removing small size paper from the paper path. 200 Paper Jam Pages Jammed (Check Areas A-F, T1-5, MPF) 118 Clearing paper jams Check Area C Jams that cause a Check Area C message require opening the duplex jam access door. If the paper jam message continues, check and clear all paper from the duplex unit. 1 Open the duplex jam access door on small paper, the following steps may not clear the jam. If you are printing on the right side of the printer. 2 Remove the jam. 3 Press Go.
User's Reference
Page 124
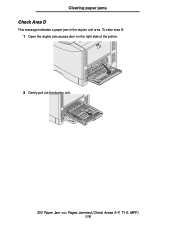
To clear area D: 1 Open the duplex jam access door on the right side of the printer. 2 Gently pull out the duplex unit. 200 Paper Jam Pages Jammed (Check Areas A-F, T1-5, MPF) 119 Clearing paper jams Check Area D This message indicates a paper jam in the duplex unit area.
To clear area D: 1 Open the duplex jam access door on the right side of the printer. 2 Gently pull out the duplex unit. 200 Paper Jam Pages Jammed (Check Areas A-F, T1-5, MPF) 119 Clearing paper jams Check Area D This message indicates a paper jam in the duplex unit area.

User's Reference
Page 125
If the paper does not advance, go to step 4. 4 Open the duplex unit covers. 5 Remove the jam. 200 Paper Jam Pages Jammed (Check Areas A-F, T1-5, MPF) 120 Clearing paper jams 3 Turn the paper forwarding dial counterclockwise. If the paper advances out of the duplex unit, remove the jam and go to step 7.
If the paper does not advance, go to step 4. 4 Open the duplex unit covers. 5 Remove the jam. 200 Paper Jam Pages Jammed (Check Areas A-F, T1-5, MPF) 120 Clearing paper jams 3 Turn the paper forwarding dial counterclockwise. If the paper advances out of the duplex unit, remove the jam and go to step 7.
User's Reference
Page 126
If the paper jam message continues, check and clear all paper from the paper path. 200 Paper Jam Pages Jammed (Check Areas A-F, T1-5, MPF) 121 Clearing paper jams 6 Close the duplex unit covers. 7 Push the duplex unit until it stops. 8 Close the access door. 9 Press Go.
If the paper jam message continues, check and clear all paper from the paper path. 200 Paper Jam Pages Jammed (Check Areas A-F, T1-5, MPF) 121 Clearing paper jams 6 Close the duplex unit covers. 7 Push the duplex unit until it stops. 8 Close the access door. 9 Press Go.
User's Reference
Page 127
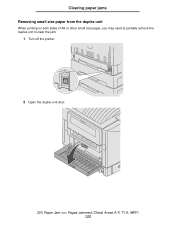
Clearing paper jams Removing small size paper from the duplex unit When printing on both sides of A5 or other small size paper, you may need to partially remove the duplex unit to clear the jam. 1 Turn off the printer. 2 Open the duplex unit door. 200 Paper Jam Pages Jammed (Check Areas A-F, T1-5, MPF) 122
Clearing paper jams Removing small size paper from the duplex unit When printing on both sides of A5 or other small size paper, you may need to partially remove the duplex unit to clear the jam. 1 Turn off the printer. 2 Open the duplex unit door. 200 Paper Jam Pages Jammed (Check Areas A-F, T1-5, MPF) 122
User's Reference
Page 128
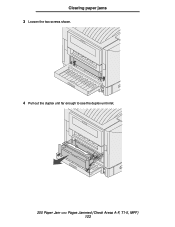
Clearing paper jams 3 Loosen the two screws shown. 4 Pull out the duplex unit far enough to see the duplex unit inlet. 200 Paper Jam Pages Jammed (Check Areas A-F, T1-5, MPF) 123
Clearing paper jams 3 Loosen the two screws shown. 4 Pull out the duplex unit far enough to see the duplex unit inlet. 200 Paper Jam Pages Jammed (Check Areas A-F, T1-5, MPF) 123
User's Reference
Page 129
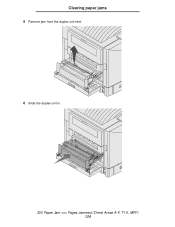
Clearing paper jams 5 Remove jam from the duplex unit inlet. 6 Slide the duplex unit in. 200 Paper Jam Pages Jammed (Check Areas A-F, T1-5, MPF) 124
Clearing paper jams 5 Remove jam from the duplex unit inlet. 6 Slide the duplex unit in. 200 Paper Jam Pages Jammed (Check Areas A-F, T1-5, MPF) 124

User's Reference
Page 130
Clearing paper jams 7 Align the thumbscrews on the duplex unit with the holes in the printer. 8 Tighten the thumbscrews to secure the duplex unit. 9 Close the duplex unit door. 200 Paper Jam Pages Jammed (Check Areas A-F, T1-5, MPF) 125
Clearing paper jams 7 Align the thumbscrews on the duplex unit with the holes in the printer. 8 Tighten the thumbscrews to secure the duplex unit. 9 Close the duplex unit door. 200 Paper Jam Pages Jammed (Check Areas A-F, T1-5, MPF) 125

User's Reference
Page 131
Clearing paper jams Check Area E This message indicates a jam in the middle and bottom drawers. 5 Press Go. Note: If you have a high capacity feeder, pull the feeder away from the paper path. 200 Paper Jam Pages Jammed (Check Areas A-F, T1-5, MPF) 126 If the paper jam message continues, check and clear all paper from the printer. 1 Open the jam access door on the top optional drawer. 2 Remove the jam. 3 Close the jam access door. 4 Repeat these steps for jams in the top, middle, or bottom optional drawer paper path area.
Clearing paper jams Check Area E This message indicates a jam in the middle and bottom drawers. 5 Press Go. Note: If you have a high capacity feeder, pull the feeder away from the paper path. 200 Paper Jam Pages Jammed (Check Areas A-F, T1-5, MPF) 126 If the paper jam message continues, check and clear all paper from the printer. 1 Open the jam access door on the top optional drawer. 2 Remove the jam. 3 Close the jam access door. 4 Repeat these steps for jams in the top, middle, or bottom optional drawer paper path area.

User's Reference
Page 132
Clearing paper jams Check Area F 1 Pull the high capacity feeder away from the printer. 2 Open the jam access door on the top optional drawer. 200 Paper Jam Pages Jammed (Check Areas A-F, T1-5, MPF) 127
Clearing paper jams Check Area F 1 Pull the high capacity feeder away from the printer. 2 Open the jam access door on the top optional drawer. 200 Paper Jam Pages Jammed (Check Areas A-F, T1-5, MPF) 127

User's Reference
Page 135
Paper jam messages 241-244 indicate a jam has occurred in the high capacity feeder. A 249 Paper Jam Check Tray message indicates a jam has occurred in one of the paper trays. Clearing paper jams 24 Paper Jam Check Tray Jams in five areas result in a 24 Paper Jam message, where x represents the tray number where the jam has occurred. See Identifying paper jam areas for tray numbering. 241-244 Paper Jam 1 Pull out the tray indicated on the display. 2 Remove any wrinkled or creased paper. 24 Paper Jam Check Tray 130
Paper jam messages 241-244 indicate a jam has occurred in the high capacity feeder. A 249 Paper Jam Check Tray message indicates a jam has occurred in one of the paper trays. Clearing paper jams 24 Paper Jam Check Tray Jams in five areas result in a 24 Paper Jam message, where x represents the tray number where the jam has occurred. See Identifying paper jam areas for tray numbering. 241-244 Paper Jam 1 Pull out the tray indicated on the display. 2 Remove any wrinkled or creased paper. 24 Paper Jam Check Tray 130

User's Reference
Page 182
Opening the top cover 177 Maintenance Opening the top cover To access the printer supplies and some of the paper jam areas: 1 Open the front door. 2 Rotate the top cover locking lever to the left.
Opening the top cover 177 Maintenance Opening the top cover To access the printer supplies and some of the paper jam areas: 1 Open the front door. 2 Rotate the top cover locking lever to the left.

Service Manual
Page 131
... sensor test in diagnostic mode. Diagnostic information 2-81 Paper jammed (area I). 5055-xxx FRU 1 Timing belts 2 • Invert (tray 2) exit roller • Exit guide (tray 2) invert assembly • Exit guide (tray 1) straight assembly 3 • Paper exit sensor (tray1) • Paper exit sensor (tray 2) • Paper full sensor A (tray 2) • Paper upper level sensor B (tray 2) 4 • Elevator upper...
... sensor test in diagnostic mode. Diagnostic information 2-81 Paper jammed (area I). 5055-xxx FRU 1 Timing belts 2 • Invert (tray 2) exit roller • Exit guide (tray 2) invert assembly • Exit guide (tray 1) straight assembly 3 • Paper exit sensor (tray1) • Paper exit sensor (tray 2) • Paper full sensor A (tray 2) • Paper upper level sensor B (tray 2) 4 • Elevator upper...


