Quick Reference
Page 1
...Mode Infrared Buffer Job Buffering Window Size Transmit Delay Max Baud Rate Job Menu Cancel Job Confidential Job Held Jobs Reset Printer Reset Active Bin Prime Stapler Cancel Fax LocalTalk Menu LocalTalk Port PCL SmartSwitch PS SmartSwitch NPA Mode LocalTalk Buffer Job ...8226; Install a new toner cartridge. Turn Messages 900-999 relate to the printer back on these or other printer messages, refer to temporarily stop all cable connections. P/N 12N0573 E.C. 548073 12N0573 * 12N0573* © Lexmark International, Inc. The current job may encounter and the action you see Cancel ...
...Mode Infrared Buffer Job Buffering Window Size Transmit Delay Max Baud Rate Job Menu Cancel Job Confidential Job Held Jobs Reset Printer Reset Active Bin Prime Stapler Cancel Fax LocalTalk Menu LocalTalk Port PCL SmartSwitch PS SmartSwitch NPA Mode LocalTalk Buffer Job ...8226; Install a new toner cartridge. Turn Messages 900-999 relate to the printer back on these or other printer messages, refer to temporarily stop all cable connections. P/N 12N0573 E.C. 548073 12N0573 * 12N0573* © Lexmark International, Inc. The current job may encounter and the action you see Cancel ...
Quick Reference
Page 2
...the print media you can load another 500 sheets of paper. 9 Repeat steps 7 and 8 until it locks. 3 Squeeze the left paper guide tells the printer the size of plain paper in the high capacity feeder. If the paper guide arrows are correctly aligned to loosen them, and then fan them... before loading. The paper tray lowers so you are loading, go down until you are loading. Stack height Recommended media A Lexmark Glossy Paper*: Letter (P/N 12A5950), A4 (P/N 12A5951) B 11x17, Legal, B4, A3 (90-105 g/m2, 24-28 lb bond) C Letter, A4 (60-105 g/m2, 16-...
...the print media you can load another 500 sheets of paper. 9 Repeat steps 7 and 8 until it locks. 3 Squeeze the left paper guide tells the printer the size of plain paper in the high capacity feeder. If the paper guide arrows are correctly aligned to loosen them, and then fan them... before loading. The paper tray lowers so you are loading, go down until you are loading. Stack height Recommended media A Lexmark Glossy Paper*: Letter (P/N 12A5950), A4 (P/N 12A5951) B 11x17, Legal, B4, A3 (90-105 g/m2, 24-28 lb bond) C Letter, A4 (60-105 g/m2, 16-...

Setup Guide
Page 4
...you . These appear in the United States and/or other countries, contact your printer hardware or software. Attention! therefore, this product by the manufacturer, are trademarks of Lexmark International, Inc., registered in the left column for the use of the FCC ... intended to be obvious. References in this publication may be addressed to Lexmark International Ltd., Marketing and Services Department, Westhorpe House, Westhorpe, Marlow Bucks SL7 3RQ. FCC emissions information This printer complies with the PostScript 3 language. CAUTION: A caution identifies something that...
...you . These appear in the United States and/or other countries, contact your printer hardware or software. Attention! therefore, this product by the manufacturer, are trademarks of Lexmark International, Inc., registered in the left column for the use of the FCC ... intended to be obvious. References in this publication may be addressed to Lexmark International Ltd., Marketing and Services Department, Westhorpe House, Westhorpe, Marlow Bucks SL7 3RQ. FCC emissions information This printer complies with the PostScript 3 language. CAUTION: A caution identifies something that...
Setup Guide
Page 5
... an optional heavy media tray 7 Installing an optional duplex unit 8 Installing an optional high capacity feeder 10 Attaching the paper tray labels 16 Install printer supplies 17 Opening the top cover 17 Installing the fuser oil coating roll 20 Installing the photodevelopers 22 Installing the toner cartridges 24 Attaching an ...
... an optional heavy media tray 7 Installing an optional duplex unit 8 Installing an optional high capacity feeder 10 Attaching the paper tray labels 16 Install printer supplies 17 Opening the top cover 17 Installing the fuser oil coating roll 20 Installing the photodevelopers 22 Installing the toner cartridges 24 Attaching an ...

Setup Guide
Page 6
...51 Attaching a local cable 51 Attaching a network cable 52 Turning on the printer 53 Install drivers for local printing 54 Windows 55 Macintosh 59 UNIX/Linux 60 Serial connections 61 Verify printer setup 64 Printing a menu settings page 64 Printing a network setup page 64... Configure for TCP/IP 66 Assigning a printer IP address 66 Verifying the IP settings 67 Configuring for Pull Printing...
...51 Attaching a local cable 51 Attaching a network cable 52 Turning on the printer 53 Install drivers for local printing 54 Windows 55 Macintosh 59 UNIX/Linux 60 Serial connections 61 Verify printer setup 64 Printing a menu settings page 64 Printing a network setup page 64... Configure for TCP/IP 66 Assigning a printer IP address 66 Verifying the IP settings 67 Configuring for Pull Printing...
Setup Guide
Page 8
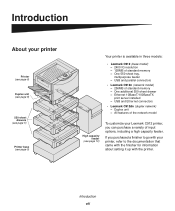
... tray, multipurpose feeder - All features of the network model High capacity feeder (see page 5) Your printer is available in three models: • Lexmark C912 (base model) - 2400 IQ resolution - 128MB of standard memory - USB and parallel connectors • Lexmark C912n (network model) - 256MB of input options, including a high capacity feeder. USB and Ethernet connectors...
... tray, multipurpose feeder - All features of the network model High capacity feeder (see page 5) Your printer is available in three models: • Lexmark C912 (base model) - 2400 IQ resolution - 128MB of standard memory - USB and parallel connectors • Lexmark C912n (network model) - 256MB of input options, including a high capacity feeder. USB and Ethernet connectors...
Setup Guide
Page 9
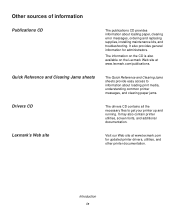
.../publications. Introduction ix The information on the CD is also available on the Lexmark Web site at www.lexmark.com for administrators. It may also contain printer utilities, screen fonts, and additional documentation. Quick Reference and Clearing Jams sheets The ... replacing supplies, installing maintenance kits, and troubleshooting. It also provides general information for updated printer drivers, utilities, and other printer documentation. Other sources of information Publications CD The publications CD provides information about loading print media, understanding common...
.../publications. Introduction ix The information on the CD is also available on the Lexmark Web site at www.lexmark.com for administrators. It may also contain printer utilities, screen fonts, and additional documentation. Quick Reference and Clearing Jams sheets The ... replacing supplies, installing maintenance kits, and troubleshooting. It also provides general information for updated printer drivers, utilities, and other printer documentation. Other sources of information Publications CD The publications CD provides information about loading print media, understanding common...
Setup Guide
Page 10
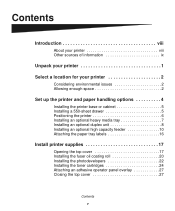
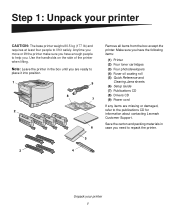
... materials in the box until you have enough people to help you need to place it safely. Step 1: Unpack your printer 1 Note: Leave the printer in case you . Make sure you are missing or damaged, refer to lift it into position. 1 9 8 7... 2 6 5 3 4 Remove all items from the box except the printer. Unpack your printer CAUTION: The base printer weighs 80.5 kg (177 Ib) and requires at least four people to the publications CD for information about contacting Lexmark...
... materials in the box until you have enough people to help you need to place it safely. Step 1: Unpack your printer 1 Note: Leave the printer in case you . Make sure you are missing or damaged, refer to lift it into position. 1 9 8 7... 2 6 5 3 4 Remove all items from the box except the printer. Unpack your printer CAUTION: The base printer weighs 80.5 kg (177 Ib) and requires at least four people to the publications CD for information about contacting Lexmark...
Setup Guide
Page 11
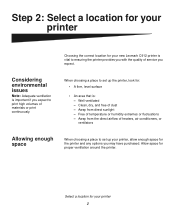
...of materials or print continuously. When choosing a place to set up the printer, look for: • A firm, level surface • An area that is: - Allow space for proper ventilation around the printer. Away from the direct airflow of heaters, air conditioners, or ventilators Allowing ...expect to print high volumes of dust - Free of service you expect. Step 2: Select a location for your printer Choosing the correct location for your new Lexmark C912 printer is vital to ensuring the printer provides you with the quality of temperature or humidity extremes or fluctuations -
...of materials or print continuously. When choosing a place to set up the printer, look for: • A firm, level surface • An area that is: - Allow space for proper ventilation around the printer. Away from the direct airflow of heaters, air conditioners, or ventilators Allowing ...expect to print high volumes of dust - Free of service you expect. Step 2: Select a location for your printer Choosing the correct location for your new Lexmark C912 printer is vital to ensuring the printer provides you with the quality of temperature or humidity extremes or fluctuations -
Setup Guide
Page 12
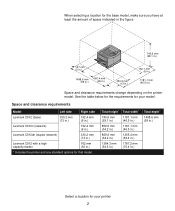
... clearance requirements Model Left side Right side Lexmark C912 (base) 330.2 mm (13 in.) 152.4 mm (6 in.) Lexmark C912n (network) 152.4 mm (6 in.) Lexmark C912dn (duplex network) 330.2 mm (13 in.) Lexmark C912 with a high capacity feeder 762 mm (30 in .) Space and clearance requirements change depending on the printer model. See the table below for the...
... clearance requirements Model Left side Right side Lexmark C912 (base) 330.2 mm (13 in.) 152.4 mm (6 in.) Lexmark C912n (network) 152.4 mm (6 in.) Lexmark C912dn (duplex network) 330.2 mm (13 in.) Lexmark C912 with a high capacity feeder 762 mm (30 in .) Space and clearance requirements change depending on the printer model. See the table below for the...
Setup Guide
Page 13
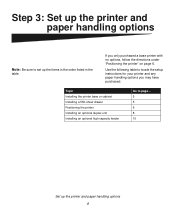
...to locate the setup instructions for your printer and any paper handling options you only purchased a base printer with no options, follow the directions under "Positioning the printer" on page 6. If you may have purchased. Step 3: Set up the printer and paper handling options Note: Be sure... to set up the printer and paper handling options 4 Topic Installing the printer base or cabinet Installing a 550-sheet drawer Positioning the printer Installing an optional duplex unit Installing an optional high...
...to locate the setup instructions for your printer and any paper handling options you only purchased a base printer with no options, follow the directions under "Positioning the printer" on page 6. If you may have purchased. Step 3: Set up the printer and paper handling options Note: Be sure... to set up the printer and paper handling options 4 Topic Installing the printer base or cabinet Installing a 550-sheet drawer Positioning the printer Installing an optional duplex unit Installing an optional high...
Setup Guide
Page 14
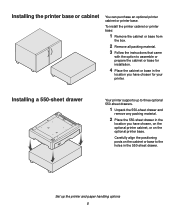
... can purchase an optional printer cabinet or printer base. Set up to three optional 550-sheet drawers. 1 Unpack the 550-sheet drawer and remove any packing material. 2 Place the 550-sheet drawer in the location you have chosen, on the optional printer cabinet, or on the... to assemble or prepare the cabinet or base for your printer. Carefully align the positioning posts on the optional printer base. Installing a 550-sheet drawer Your printer supports up the printer and paper handling options 5 To install the printer cabinet or printer base: 1 Remove the cabinet or base from the box...
... can purchase an optional printer cabinet or printer base. Set up to three optional 550-sheet drawers. 1 Unpack the 550-sheet drawer and remove any packing material. 2 Place the 550-sheet drawer in the location you have chosen, on the optional printer cabinet, or on the... to assemble or prepare the cabinet or base for your printer. Carefully align the positioning posts on the optional printer base. Installing a 550-sheet drawer Your printer supports up the printer and paper handling options 5 To install the printer cabinet or printer base: 1 Remove the cabinet or base from the box...

Setup Guide
Page 15
...lower drawer with the holes in the 550-sheet drawer. Positioning the printer CAUTION: The base printer weighs 80.5 kg (177 Ib) and requires at least four people to position the printer. 1 Have three other drawer. Set up the printer and paper handling options 6 c Repeat steps a and b for ...each additional drawer. You are ready to lift it securely on the sides of the printer. 3 If you lift the printer. b Lower the 550-sheet drawer...
...lower drawer with the holes in the 550-sheet drawer. Positioning the printer CAUTION: The base printer weighs 80.5 kg (177 Ib) and requires at least four people to position the printer. 1 Have three other drawer. Set up the printer and paper handling options 6 c Repeat steps a and b for ...each additional drawer. You are ready to lift it securely on the sides of the printer. 3 If you lift the printer. b Lower the 550-sheet drawer...

Setup Guide
Page 16
... standard tray that came in. 2 Have three other people help you are installing the printer on a 550-sheet drawer, align the positioning posts on the drawer. 3 Remove any tape or packing material. Seat the printer securely on the drawer with the heavy media tray. Store the standard tray in the ...box the optional tray came with the printer (Tray 1) and replace it with the holes in the chosen location. Set up ...
... standard tray that came in. 2 Have three other people help you are installing the printer on a 550-sheet drawer, align the positioning posts on the drawer. 3 Remove any tape or packing material. Seat the printer securely on the drawer with the heavy media tray. Store the standard tray in the ...box the optional tray came with the printer (Tray 1) and replace it with the holes in the chosen location. Set up ...
Setup Guide
Page 17
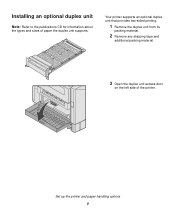
Your printer supports an optional duplex unit that provides two-sided printing. 1 Remove the duplex unit from its packing material. 2 Remove any shipping tape and additional packing material. 3 Open the duplex unit access door on the left side of paper the duplex unit supports. Installing an optional duplex unit Note: Refer to the publications CD for information about the types and sizes of the printer. Set up the printer and paper handling options 8
Your printer supports an optional duplex unit that provides two-sided printing. 1 Remove the duplex unit from its packing material. 2 Remove any shipping tape and additional packing material. 3 Open the duplex unit access door on the left side of paper the duplex unit supports. Installing an optional duplex unit Note: Refer to the publications CD for information about the types and sizes of the printer. Set up the printer and paper handling options 8
Setup Guide
Page 18
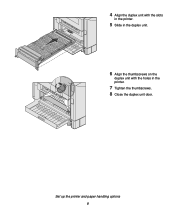
Set up the printer and paper handling options 9 4 Align the duplex unit with the slots in the printer. 5 Slide in the duplex unit. 6 Align the thumbscrews on the duplex unit with the holes in the printer. 7 Tighten the thumbscrews. 8 Close the duplex unit door.
Set up the printer and paper handling options 9 4 Align the duplex unit with the slots in the printer. 5 Slide in the duplex unit. 6 Align the thumbscrews on the duplex unit with the holes in the printer. 7 Tighten the thumbscrews. 8 Close the duplex unit door.
Setup Guide
Page 19
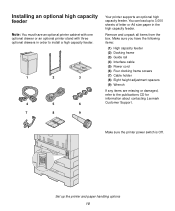
...handling options 10 Remove and unpack all items from the box. Make sure the printer power switch is Off. Make sure you have an optional printer cabinet with one optional drawer or an optional printer stand with three optional drawers in the high capacity feeder. Set up to 3,000... sheets of letter or A4 size paper in order to the publications CD for information about contacting Lexmark Customer Support. Installing an...
...handling options 10 Remove and unpack all items from the box. Make sure the printer power switch is Off. Make sure you have an optional printer cabinet with one optional drawer or an optional printer stand with three optional drawers in the high capacity feeder. Set up to 3,000... sheets of letter or A4 size paper in order to the publications CD for information about contacting Lexmark Customer Support. Installing an...

Setup Guide
Page 20
Set up and outward. 2 Insert two screws through the top screw holes of the docking frame as shown. 3 Use the wrench to tighten the screws. 4 Insert two screws through the bottom screw holes of the docking frame as shown. 5 Tighten the screws. 6 Place the wrench in the holder on the high capacity feeder. Attaching the docking frame 1 Remove the two side covers from the top 550-sheet drawer. You may need to use a small flathead screwdriver to pry the covers up the printer and paper handling options 11
Set up and outward. 2 Insert two screws through the top screw holes of the docking frame as shown. 3 Use the wrench to tighten the screws. 4 Insert two screws through the bottom screw holes of the docking frame as shown. 5 Tighten the screws. 6 Place the wrench in the holder on the high capacity feeder. Attaching the docking frame 1 Remove the two side covers from the top 550-sheet drawer. You may need to use a small flathead screwdriver to pry the covers up the printer and paper handling options 11

Setup Guide
Page 21
Set up the printer and paper handling options 12 Attaching the guide rail and feeder 1 Align the two holes on guide rail with the studs on the docking frame. 2 Slide the guide rail down until it is fully seated on the docking rail and flat against the floor. 3 Place the high capacity feeder on the guide rail. Note: Make sure all four casters are on the guide rail.
Set up the printer and paper handling options 12 Attaching the guide rail and feeder 1 Align the two holes on guide rail with the studs on the docking frame. 2 Slide the guide rail down until it is fully seated on the docking rail and flat against the floor. 3 Place the high capacity feeder on the guide rail. Note: Make sure all four casters are on the guide rail.

Setup Guide
Page 22
... when the feeder locks into the correct position. 6 Attach the interface cable to the docking frame. Set up the printer and paper handling options 13 4 Roll the high capacity feeder toward the printer until the feeder locks to the back of the pins with the holes in the docking frame. Do not... do not align with the holes in the docking frame, see "Installing height adjustment spacers" on page 15. 5 Roll the high capacity feeder toward the printer and check the alignment of the...
... when the feeder locks into the correct position. 6 Attach the interface cable to the docking frame. Set up the printer and paper handling options 13 4 Roll the high capacity feeder toward the printer until the feeder locks to the back of the pins with the holes in the docking frame. Do not... do not align with the holes in the docking frame, see "Installing height adjustment spacers" on page 15. 5 Roll the high capacity feeder toward the printer and check the alignment of the...


