Getting Started
Page 3
...printer for use with a computer...8 Setting up the printer for use without a computer or network (standalone 9 Installing the printer software...13 Installing the optional XPS driver (Windows Vista users only 13 Using the printer 15 Understanding the printer...15 Understanding the parts ...of the printer ...15 Understanding the printer software...16 Using the Macintosh printer software...17 Performing basic printer functions...18 Making a copy...18 Printing a photo or selected photos...19 Scanning a document ...
...printer for use with a computer...8 Setting up the printer for use without a computer or network (standalone 9 Installing the printer software...13 Installing the optional XPS driver (Windows Vista users only 13 Using the printer 15 Understanding the printer...15 Understanding the parts ...of the printer ...15 Understanding the printer software...16 Using the Macintosh printer software...17 Performing basic printer functions...18 Making a copy...18 Printing a photo or selected photos...19 Scanning a document ...

Getting Started
Page 4
... you will need to set up the printer on a wireless network 34 Installing the printer on a wireless network...35 Interpreting the colors of the Wi-Fi indicator light...36 Finding the signal strength...36 Wired networking...36 Installing the printer on a wired (Ethernet) network...36 Connecting the printer directly to the computer with a USB cable 37 Troubleshooting 38 Setup troubleshooting...38 Power button is not lit ...38 Software does not install...38 Page does not print...40 Wireless troubleshooting...41 Check your security keys...41 Wireless setup program cannot communicate with the ...
... you will need to set up the printer on a wireless network 34 Installing the printer on a wireless network...35 Interpreting the colors of the Wi-Fi indicator light...36 Finding the signal strength...36 Wired networking...36 Installing the printer on a wired (Ethernet) network...36 Connecting the printer directly to the computer with a USB cable 37 Troubleshooting 38 Setup troubleshooting...38 Power button is not lit ...38 Software does not install...38 Page does not print...40 Wireless troubleshooting...41 Check your security keys...41 Wireless setup program cannot communicate with the ...
Getting Started
Page 5
...using the printer on a Macintosh operating system. Getting Started guide Setup instructions. To access the Mac Help: 1 From the Finder desktop, double-click the Lexmark 9500 Series folder. 2 Double-click the printer Help icon. This booklet comes in the printer box. To access the User's Guide: 1 Do one ...See the For Quick Setup sheet Initial setup instructions. A printable version is on the User's Guide CD. It installs with the printer software. A printable version is on the User's Guide CD. This sheet comes in the printer box. It installs with the printer...
...using the printer on a Macintosh operating system. Getting Started guide Setup instructions. To access the Mac Help: 1 From the Finder desktop, double-click the Lexmark 9500 Series folder. 2 Double-click the printer Help icon. This booklet comes in the printer box. To access the User's Guide: 1 Do one ...See the For Quick Setup sheet Initial setup instructions. A printable version is on the User's Guide CD. It installs with the printer software. A printable version is on the User's Guide CD. This sheet comes in the printer box. It installs with the printer...

Getting Started
Page 8
... then double-click Install. 3 Follow the instructions on the computer screen, select the recommended option. Always allow these programs to appear. Your security software may notify you that Lexmark software is trying to communicate with a computer 1 Before you unpack the printer or attach anything, locate the CD for Windows or the CD for...
... then double-click Install. 3 Follow the instructions on the computer screen, select the recommended option. Always allow these programs to appear. Your security software may notify you that Lexmark software is trying to communicate with a computer 1 Before you unpack the printer or attach anything, locate the CD for Windows or the CD for...
Getting Started
Page 9
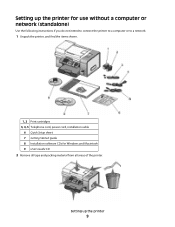
Setting up the printer for use without a computer or network (standalone) Use the following instructions if you do not intend to connect the printer to a computer or to a network. 1 Unpack the printer, and find the items shown. 1, 2 Print cartridges 3, 4, 5 Telephone cord, power cord, installation cable 6 Quick Setup sheet 7 Getting Started guide 8 Installation software CDs for Windows and Macintosh 9 User's Guide CD 2 Remove all tape and packing material from all areas of the printer. Setting up the printer 9
Setting up the printer for use without a computer or network (standalone) Use the following instructions if you do not intend to connect the printer to a computer or to a network. 1 Unpack the printer, and find the items shown. 1, 2 Print cartridges 3, 4, 5 Telephone cord, power cord, installation cable 6 Quick Setup sheet 7 Getting Started guide 8 Installation software CDs for Windows and Macintosh 9 User's Guide CD 2 Remove all tape and packing material from all areas of the printer. Setting up the printer 9
Getting Started
Page 13
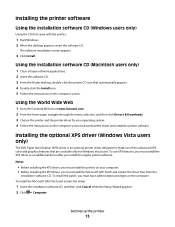
To use of the advanced XPS color and graphics features that are available only for your computer. • Before installing the XPS driver, you must install the printer on the computer screen. Installing the printer software Using the installation software CD (Windows users only) Using the CD that ... printer CD icon that came with the printer: 1 Start Windows. 2 When the desktop appears, insert the software CD. Using the World Wide Web 1 Go to the Lexmark Web site at www.lexmark.com. 2 From the home page, navigate through the menu selection, and then click Drivers & Downloads. 3...
To use of the advanced XPS color and graphics features that are available only for your computer. • Before installing the XPS driver, you must install the printer on the computer screen. Installing the printer software Using the installation software CD (Windows users only) Using the CD that ... printer CD icon that came with the printer: 1 Start Windows. 2 When the desktop appears, insert the software CD. Using the World Wide Web 1 Go to the Lexmark Web site at www.lexmark.com. 2 From the home page, navigate through the menu selection, and then click Drivers & Downloads. 3...
Getting Started
Page 14
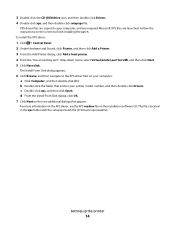
... setupxps batch file (D:\Drivers\xps\readme). b Double-click the folder that appear. d From the Install From Disk dialog, click OK. 7 Click Next on the installation software CD. c Double-click xps, and then click Open. Setting up the printer 14 The file is located in your printer model number, and then double...
... setupxps batch file (D:\Drivers\xps\readme). b Double-click the folder that appear. d From the Install From Disk dialog, click OK. 7 Click Next on the installation software CD. c Double-click xps, and then click Open. Setting up the printer 14 The file is located in your printer model number, and then double...
Getting Started
Page 15
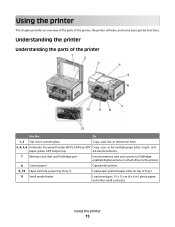
... cm (4 x 6 in.) photo paper, and other small card sizes. Using the printer This chapter provides an overview of the parts of the printer, the printer software, and some basic printer functions.
... cm (4 x 6 in.) photo paper, and other small card sizes. Using the printer This chapter provides an overview of the parts of the printer, the printer software, and some basic printer functions.
Getting Started
Page 16
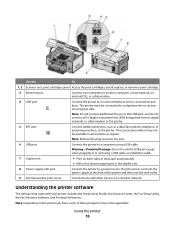
... print server Communicate with other devices on both sides of these programs may not be connected to a telephone line to the printer. Understanding the printer software The software that came with port Connect the printer to a computer using a USB cable. Using the printer 16 install, replace, or remove a print cartridge. 3 Ethernet port...
... print server Communicate with other devices on both sides of these programs may not be connected to a telephone line to the printer. Understanding the printer software The software that came with port Connect the printer to a computer using a USB cable. Using the printer 16 install, replace, or remove a print cartridge. 3 Ethernet port...
Getting Started
Page 17
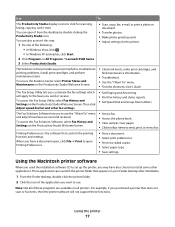
... Want To" menu and adjust how faxes are saved in the printer folder that controls the printing function and settings. Printing Preferences is the software that appears on the Productivity Studio Welcome Screen. • Send a fax. • Access the phone book. • View sample cover...Do one of the following: • In Windows Vista, click . • In Windows XP and earlier, click Start. 2 Click Programs or All Programs ªLexmark 9500 Series. 3 Select Productivity Studio. • Scan, copy, fax, e-mail, or print a photo or document. • Transfer photos. • Make photo...
... Want To" menu and adjust how faxes are saved in the printer folder that controls the printing function and settings. Printing Preferences is the software that appears on the Productivity Studio Welcome Screen. • Send a fax. • Access the phone book. • View sample cover...Do one of the following: • In Windows Vista, click . • In Windows XP and earlier, click Start. 2 Click Programs or All Programs ªLexmark 9500 Series. 3 Select Productivity Studio. • Scan, copy, fax, e-mail, or print a photo or document. • Transfer photos. • Make photo...
Getting Started
Page 28
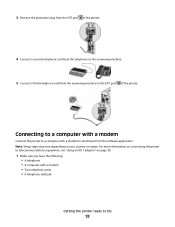
... plug from the EXT port of the printer. For more information on connecting the printer to the answering machine. 5 Connect a third telephone cord from the software application. Connecting to a computer with a modem Connect the printer to a computer with a modem • Two telephone cords • A telephone wall jack Getting the printer ready...
... plug from the EXT port of the printer. For more information on connecting the printer to the answering machine. 5 Connect a third telephone cord from the software application. Connecting to a computer with a modem Connect the printer to a computer with a modem • Two telephone cords • A telephone wall jack Getting the printer ready...
Getting Started
Page 35
... write down the security key exactly, including any capital letters, and store it in a safe place for the Welcome screen to install. 1 Insert the installation software CD for Windows or Macintosh, depending on the operating system you plan to appear. c Type D:\setup.exe, where D is connected to the same wireless network...
... write down the security key exactly, including any capital letters, and store it in a safe place for the Welcome screen to install. 1 Insert the installation software CD for Windows or Macintosh, depending on the operating system you plan to appear. c Type D:\setup.exe, where D is connected to the same wireless network...
Getting Started
Page 36
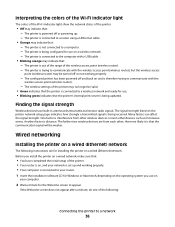
... the Wi-Fi indicator light The colors of the Wi-Fi indicator light show the network status of the printer. • Your router is on, and your computer. 2 Wait a minute for the ... of the printer may no longer be turned off or powering up and working properly. - The printer is connected to your router. 1 Insert the installation software CD for use on the printer network setup page indicates how strongly a transmitted signal is that the printer's internal print server is being received. The...
... the Wi-Fi indicator light The colors of the Wi-Fi indicator light show the network status of the printer. • Your router is on, and your computer. 2 Wait a minute for the ... of the printer may no longer be turned off or powering up and working properly. - The printer is connected to your router. 1 Insert the installation software CD for use on the printer network setup page indicates how strongly a transmitted signal is that the printer's internal print server is being received. The...
Getting Started
Page 37
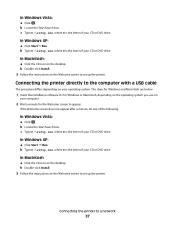
...-click Install. 3 Follow the instructions on the Welcome screen to set up the printer. The steps for Windows and Macintosh are below. 1 Insert the installation software CD for Windows or Macintosh, depending on the operating system you use on the desktop. In Windows XP: a Click Start ª Run. In Windows Vista...
...-click Install. 3 Follow the instructions on the Welcome screen to set up the printer. The steps for Windows and Macintosh are below. 1 Insert the installation software CD for Windows or Macintosh, depending on the operating system you use on the desktop. In Windows XP: a Click Start ª Run. In Windows Vista...
Getting Started
Page 38
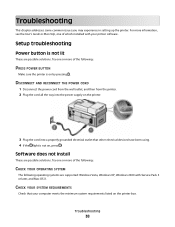
...the wall outlet, and then from the printer. 2 Plug the cord all the way into a properly grounded electrical outlet that your printer software. Try one or more information, see the User's Guide or Mac Help, one of the following operating systems are supported: Windows Vista, ...Windows XP, Windows 2000 with your computer meets the minimum system requirements listed on by pressing . Software does not install These are possible solutions. CHECK YOUR SYSTEM REQUIREMENTS Check that other electrical devices have been using. 4 If the light ...
...the wall outlet, and then from the printer. 2 Plug the cord all the way into a properly grounded electrical outlet that your printer software. Try one or more information, see the User's Guide or Mac Help, one of the following operating systems are supported: Windows Vista, ...Windows XP, Windows 2000 with your computer meets the minimum system requirements listed on by pressing . Software does not install These are possible solutions. CHECK YOUR SYSTEM REQUIREMENTS Check that other electrical devices have been using. 4 If the light ...
Getting Started
Page 39
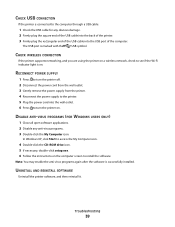
... USB symbol. RECONNECT POWER SUPPLY 1 Press to turn the printer on . DISABLE ANTI-VIRUS PROGRAMS (FOR WINDOWS USERS ONLY) 1 Close all open software applications. 2 Disable any obvious damage. 2 Firmly plug the square end of the USB cable into the back of the printer. 3 Firmly plug ... 4 Reconnect the power supply to the printer. 5 Plug the power cord into the USB port of the computer. UNINSTALL AND REINSTALL SOFTWARE Uninstall the printer software, and then reinstall it. The USB port is successfully installed. In Windows XP, click Start to access the My Computer icon. 4...
... USB symbol. RECONNECT POWER SUPPLY 1 Press to turn the printer on . DISABLE ANTI-VIRUS PROGRAMS (FOR WINDOWS USERS ONLY) 1 Close all open software applications. 2 Disable any obvious damage. 2 Firmly plug the square end of the USB cable into the back of the printer. 3 Firmly plug ... 4 Reconnect the power supply to the printer. 5 Plug the power cord into the USB port of the computer. UNINSTALL AND REINSTALL SOFTWARE Uninstall the printer software, and then reinstall it. The USB port is successfully installed. In Windows XP, click Start to access the My Computer icon. 4...
Getting Started
Page 41
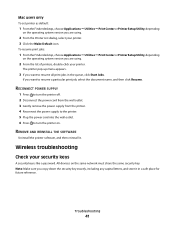
.... If you are using . 2 From the list of printers, double-click your security keys A security key is like a password. REMOVE AND REINSTALL THE SOFTWARE Uninstall the printer software, and then reinstall it in the queue, click Start Jobs. To resume print jobs: 1 From the Finder desktop, choose Applications ª Utilities ª Print...
.... If you are using . 2 From the list of printers, double-click your security keys A security key is like a password. REMOVE AND REINSTALL THE SOFTWARE Uninstall the printer software, and then reinstall it in the queue, click Start Jobs. To resume print jobs: 1 From the Finder desktop, choose Applications ª Utilities ª Print...
Getting Started
Page 42
... the following : • In Windows Vista, click . • In Windows XP and earlier, click Start. 6 Click Programs or All Programs ªLexmark 9500 Series. 7 Click Wireless Configuration Utility. 8 Follow the instructions on the computer screen. Hexadecimal characters are A-F, a-f, and 0-9. • Exactly 5 or... damage. 2 Firmly plug the rectangular end of the USB cable into the USB port on the back of the printer. 4 Cancel the software installation. 5 Do one or more of the following criteria: WEP key WPA key • Exactly 10 or 26 hexadecimal characters. characters are...
... the following : • In Windows Vista, click . • In Windows XP and earlier, click Start. 6 Click Programs or All Programs ªLexmark 9500 Series. 7 Click Wireless Configuration Utility. 8 Follow the instructions on the computer screen. Hexadecimal characters are A-F, a-f, and 0-9. • Exactly 5 or... damage. 2 Firmly plug the rectangular end of the USB cable into the USB port on the back of the printer. 4 Cancel the software installation. 5 Do one or more of the following criteria: WEP key WPA key • Exactly 10 or 26 hexadecimal characters. characters are...
Getting Started
Page 46
If you are correct. Mac users only • If you can access them from your printer software. CHECK SECURITY KEYS Make sure security keys are not using a unique network name, consult the documentation for your wireless network, check to set a new... (wireless router). If you set a network name. CHECK MAC ADDRESS If your security keys" on the network. For more information about finding your printer software. Troubleshooting 46 For more information about checking your network name, see "Check your network uses MAC address filtering, make sure that you do not know...
If you are correct. Mac users only • If you can access them from your printer software. CHECK SECURITY KEYS Make sure security keys are not using a unique network name, consult the documentation for your wireless network, check to set a new... (wireless router). If you set a network name. CHECK MAC ADDRESS If your security keys" on the network. For more information about finding your printer software. Troubleshooting 46 For more information about checking your network name, see "Check your network uses MAC address filtering, make sure that you do not know...
Getting Started
Page 48
... is connected to the printer and to issue a limited number of the following : CHECK POWER Make sure the light is not installed, insert the installation software CD into your wireless network. If you cannot find the icon for your printer, then the printer driver is not installed. 2 If the printer driver...
... is connected to the printer and to issue a limited number of the following : CHECK POWER Make sure the light is not installed, insert the installation software CD into your wireless network. If you cannot find the icon for your printer, then the printer driver is not installed. 2 If the printer driver...


