Troubleshooting Guide
Page 4
.... 5 Press until Jam Recovery appears, and then press . 6 Press until On or Auto appears, and then press . The information in .). Replace the toner cartridge if the defects occur every: • 33.5 mm (1.32 in.) • 35.7 mm (1.41 in.) Replace the photoconductor if the defects occur ... press . and while 3 Release both buttons when Performing Self Test appears. Adjusting the color alignment 1 Make sure the printer is turned off . 2 From the control panel, press and hold turning the printer on . Page that jammed does not reprint after you clear the jam Cause Solution Jam...
.... 5 Press until Jam Recovery appears, and then press . 6 Press until On or Auto appears, and then press . The information in .). Replace the toner cartridge if the defects occur every: • 33.5 mm (1.32 in.) • 35.7 mm (1.41 in.) Replace the photoconductor if the defects occur ... press . and while 3 Release both buttons when Performing Self Test appears. Adjusting the color alignment 1 Make sure the printer is turned off . 2 From the control panel, press and hold turning the printer on . Page that jammed does not reprint after you clear the jam Cause Solution Jam...
Troubleshooting Guide
Page 5
... Clean the printhead dirty. The media being used does not meet the printer specifications. • Load media from Print Properties before fusing to Windows users only. • Adjust the color quality settings in the trays is incorrect. • Select a different Toner Darkness setting, RGB Brightness setting, or RGB Contrast setting from a new package...
... Clean the printhead dirty. The media being used does not meet the printer specifications. • Load media from Print Properties before fusing to Windows users only. • Adjust the color quality settings in the trays is incorrect. • Select a different Toner Darkness setting, RGB Brightness setting, or RGB Contrast setting from a new package...
Troubleshooting Guide
Page 6
... edges Cause Downloaded font is defective. The media being used does not meet the printer specifications. Toner cartridge is not supported. Photoconductor is Replace the toner defective. Replace the transfer belt. Call for the tray Make sure the Paper Type.... Uneven print density Example Cause Solution Toner cartridge is worn or defective. Replace the toner cartridge. 6 Select a different toner darkness setting in the paper path. Solution If you are supported by the printer manufacturer. Print irregularities Example Cause Solution Media...
... edges Cause Downloaded font is defective. The media being used does not meet the printer specifications. Toner cartridge is not supported. Photoconductor is Replace the toner defective. Replace the transfer belt. Call for the tray Make sure the Paper Type.... Uneven print density Example Cause Solution Toner cartridge is worn or defective. Replace the toner cartridge. 6 Select a different toner darkness setting in the paper path. Solution If you are supported by the printer manufacturer. Print irregularities Example Cause Solution Media...
Troubleshooting Guide
Page 7
... path. What is defective Replace the toner cartridge. Printing presses, inkjet printers, and color laser printers create colors in Print Properties or the program. For example, you inserted A4-size paper into the selected tray but you use it . • Install a new toner cartridge. that meets the printer specifications. Toner cartridge is CMYK color? Make sure the correct Media Type...
... path. What is defective Replace the toner cartridge. Printing presses, inkjet printers, and color laser printers create colors in Print Properties or the program. For example, you inserted A4-size paper into the selected tray but you use it . • Install a new toner cartridge. that meets the printer specifications. Toner cartridge is CMYK color? Make sure the correct Media Type...
Troubleshooting Guide
Page 8
... PostScript or PCL emulation printer software? no color conversion is manual color correction? The resulting printed color may be used in the PostScript driver provide preferred color quality for best color quality. The object type information lets different color conversion tables be able to 1, 2, or 3 will slightly increase (or decrease) the amount of toner used in the software...
... PostScript or PCL emulation printer software? no color conversion is manual color correction? The resulting printed color may be used in the PostScript driver provide preferred color quality for best color quality. The object type information lets different color conversion tables be able to 1, 2, or 3 will slightly increase (or decrease) the amount of toner used in the software...
User's Guide
Page 5
......69 Cleaning the printhead lenses...70 Ordering supplies...70 Ordering toner cartridges...71 Ordering a transfer belt...72 Ordering a waste toner box ...73 Ordering a fuser...73 Ordering photoconductors ...73 Moving the printer...73 Before moving the printer ...73 Moving the printer to another location ...74 Administrative support 75 Adjusting the brightness or contrast of the display...
......69 Cleaning the printhead lenses...70 Ordering supplies...70 Ordering toner cartridges...71 Ordering a transfer belt...72 Ordering a waste toner box ...73 Ordering a fuser...73 Ordering photoconductors ...73 Moving the printer...73 Before moving the printer ...73 Moving the printer to another location ...74 Administrative support 75 Adjusting the brightness or contrast of the display...

User's Guide
Page 6
Troubleshooting...82 Checking an unresponsive printer...82 Solving printing problems...82 Multiple-language PDFs do not print ...82 Control panel display is blank or displays only diamonds 82 Error message about ......88 Dark lines...89 Light colored line, white line, or incorrectly colored line 89 Streaked horizontal lines ...89 Streaked vertical lines ...90 Print is too light ...90 Print irregularities...91 Print is too dark...91 Transparency print quality is poor ...91 Toner fog or background shading appears on the page 91 Gray background...
Troubleshooting...82 Checking an unresponsive printer...82 Solving printing problems...82 Multiple-language PDFs do not print ...82 Control panel display is blank or displays only diamonds 82 Error message about ......88 Dark lines...89 Light colored line, white line, or incorrectly colored line 89 Streaked horizontal lines ...89 Streaked vertical lines ...90 Print is too light ...90 Print irregularities...91 Print is too dark...91 Transparency print quality is poor ...91 Toner fog or background shading appears on the page 91 Gray background...

User's Guide
Page 7
Incorrect margins...93 Skewed print...93 Blank pages...93 Solid color pages ...93 Paper curl ...94 Toner specks ...94 Toner rubs off ...94 Solving color quality problems...95 Quality menu ...95 Frequently Asked Questions (FAQ) about color printing 97 Contacting Customer Support...100 Notices...102 Power consumption...105 Index...108 Contents 7
Incorrect margins...93 Skewed print...93 Blank pages...93 Solid color pages ...93 Paper curl ...94 Toner specks ...94 Toner rubs off ...94 Solving color quality problems...95 Quality menu ...95 Frequently Asked Questions (FAQ) about color printing 97 Contacting Customer Support...100 Notices...102 Power consumption...105 Index...108 Contents 7

User's Guide
Page 11
... buttons Press or to scroll through menu lists. Stops all printer activity A list of the printer, such as Ready. • Supplies messages-Provide information about supplies, such as Toner Low. • Show-me screens-Provide instructions for resolving common printer errors. Learning about the printer 11 Understanding the control panel 7 BACK MENU 6 STOP X 5 1 2 7 BACK MENU...
... buttons Press or to scroll through menu lists. Stops all printer activity A list of the printer, such as Ready. • Supplies messages-Provide information about supplies, such as Toner Low. • Show-me screens-Provide instructions for resolving common printer errors. Learning about the printer 11 Understanding the control panel 7 BACK MENU 6 STOP X 5 1 2 7 BACK MENU...

User's Guide
Page 37
Excessive curl can cause media feeding problems. Curl can cause media feeding or print quality issues. If media is too rough, toner cannot fuse to printing and can negatively affect media handling. Always use 90 g/m2 (24 lb bond) grain long media. Moisture content... Leave media in its performance. Paper and specialty media guide Media guidelines Media characteristics The following media characteristics affect print quality and reliability. Weight The printer can degrade its original wrapper until it is time to 47 lb bond) grain long. Media lighter than 182 x 257 mm (7.2 x 10.1...
Excessive curl can cause media feeding problems. Curl can cause media feeding or print quality issues. If media is too rough, toner cannot fuse to printing and can negatively affect media handling. Always use 90 g/m2 (24 lb bond) grain long media. Moisture content... Leave media in its performance. Paper and specialty media guide Media guidelines Media characteristics The following media characteristics affect print quality and reliability. Weight The printer can degrade its original wrapper until it is time to 47 lb bond) grain long. Media lighter than 182 x 257 mm (7.2 x 10.1...
User's Guide
Page 38
... designed for use in the same source; latex inks might not. Selecting preprinted forms and letterhead Use these requirements; This information is acceptable for laser printers. mixing results in toner. Use inks that are not affected by hand. • Do not mix media sizes, types, or weights in xerographic copiers. Paper and specialty...
... designed for use in the same source; latex inks might not. Selecting preprinted forms and letterhead Use these requirements; This information is acceptable for laser printers. mixing results in toner. Use inks that are not affected by hand. • Do not mix media sizes, types, or weights in xerographic copiers. Paper and specialty...

User's Guide
Page 50
...a duplex job manually from the output bin and load them into the paper tray facedown with black toner only for CONFIG MENU to appear. 4 Press until Exit Config Menu appears, and then press . Resetting the Printer appears briefly, followed by a clock, and then Ready appears. ABC 7 Click File Œ...140; Print. 2 From the drop-down and while turning the printer on. 3 Release the buttons when the clock appears, and wait for an extended period, set the printer to Color Lock Out mode, and remove and store the color printing supplies. Printing the print quality test pages Print the print ...
...a duplex job manually from the output bin and load them into the paper tray facedown with black toner only for CONFIG MENU to appear. 4 Press until Exit Config Menu appears, and then press . Resetting the Printer appears briefly, followed by a clock, and then Ready appears. ABC 7 Click File Œ...140; Print. 2 From the drop-down and while turning the printer on. 3 Release the buttons when the clock appears, and wait for an extended period, set the printer to Color Lock Out mode, and remove and store the color printing supplies. Printing the print quality test pages Print the print ...

User's Guide
Page 53
Printing 53 Remove all three color toner cartridges. 8 Place the toner cartridges in a clean, sturdy box. 9 Close the lower door. 6 Close the box to protect the photoconductors from light. 7 Lift the small toner cartridge handles slightly and pull straight out.
Printing 53 Remove all three color toner cartridges. 8 Place the toner cartridges in a clean, sturdy box. 9 Close the lower door. 6 Close the box to protect the photoconductors from light. 7 Lift the small toner cartridge handles slightly and pull straight out.
User's Guide
Page 69
... see the Supplies menu, Quality menu, and Finishing menu in the address bar of the toner cartridges. For the best print quality, complete the following steps after replacing the transfer belt: 1 Make sure the printer is turned off. 2 From the control panel, press and hold and while turning the... printer on page 45. Store supplies right side up in their original packing until Color Alignment appears, and then press . 5 Press again to print ...
... see the Supplies menu, Quality menu, and Finishing menu in the address bar of the toner cartridges. For the best print quality, complete the following steps after replacing the transfer belt: 1 Make sure the printer is turned off. 2 From the control panel, press and hold and while turning the... printer on page 45. Store supplies right side up in their original packing until Color Alignment appears, and then press . 5 Press again to print ...
User's Guide
Page 70
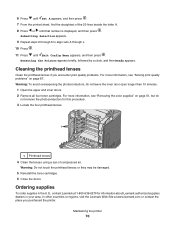
... the inner door open longer than 10 minutes. 1 Open the upper and inner doors. 2 Remove all four toner cartridges. In other countries or regions, visit the Lexmark Web Site at 1-800-539-6275 for this procedure. 3 Locate the four printhead lenses. 1 1 Printhead lenses...appears, and then press . 7 From the printed sheet, find the straightest of compressed air. Maintaining the printer 70 For more information, see "Removing the color supplies" on page 87. Resetting the Printer appears briefly, followed by a clock, and then Ready appears. Submitting Selection appears. 9 Repeat steps 6...
... the inner door open longer than 10 minutes. 1 Open the upper and inner doors. 2 Remove all four toner cartridges. In other countries or regions, visit the Lexmark Web Site at 1-800-539-6275 for this procedure. 3 Locate the four printhead lenses. 1 1 Printhead lenses...appears, and then press . 7 From the printed sheet, find the straightest of compressed air. Maintaining the printer 70 For more information, see "Removing the color supplies" on page 87. Resetting the Printer appears briefly, followed by a clock, and then Ready appears. Submitting Selection appears. 9 Repeat steps 6...
User's Guide
Page 71
... the front of the messages first appears. Once the printed text and graphics remain faded, replace the specified toner cartridge. The recommended toner cartridges specifically designed for printer supplies assume printing on the control panel or when the print becomes faded, first try to extend the life of the specified cartridge: 1 Remove the...
... the front of the messages first appears. Once the printed text and graphics remain faded, replace the specified toner cartridge. The recommended toner cartridges specifically designed for printer supplies assume printing on the control panel or when the print becomes faded, first try to extend the life of the specified cartridge: 1 Remove the...
User's Guide
Page 72
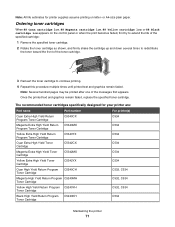
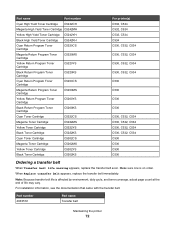
... C5220KS Cyan Return Program Toner Cartridge C5200CS Magenta Return Program Toner Cartridge C5200MS Yellow Return Program Toner Cartridge C5200YS Black Return Program Toner Cartridge C5200KS Cyan Toner Cartridge C5222CS Magenta Toner Cartridge C5222MS Yellow Toner Cartridge C5222YS Black Toner Cartridge C5222KS Cyan Toner Cartridge C5202CS Magenta Toner Cartridge C5202MS Yellow Toner Cartridge C5202YS Black Toner Cartridge C5202KS For printer(s) C532, C534 C532, C534...
... C5220KS Cyan Return Program Toner Cartridge C5200CS Magenta Return Program Toner Cartridge C5200MS Yellow Return Program Toner Cartridge C5200YS Black Return Program Toner Cartridge C5200KS Cyan Toner Cartridge C5222CS Magenta Toner Cartridge C5222MS Yellow Toner Cartridge C5222YS Black Toner Cartridge C5222KS Cyan Toner Cartridge C5202CS Magenta Toner Cartridge C5202MS Yellow Toner Cartridge C5202YS Black Toner Cartridge C5202KS For printer(s) C532, C534 C532, C534...
User's Guide
Page 73
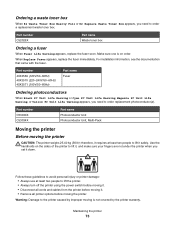
... requires at least two people to the printer caused by the printer warranty. For installation information, see the documentation that came with the fuser. Ordering a waste toner box When 82 Waste Toner Box Nearly Full or 82 Replace Waste Toner Box appears, you need to order a replacement waste toner box. Part number C52025X Part name Waste...
... requires at least two people to the printer caused by the printer warranty. For installation information, see the documentation that came with the fuser. Ordering a waste toner box When 82 Waste Toner Box Nearly Full or 82 Replace Waste Toner Box appears, you need to order a replacement waste toner box. Part number C52025X Part name Waste...
User's Guide
Page 88
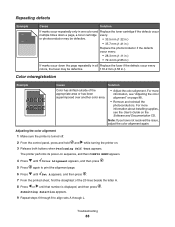
... 7 From the printed sheet, find the straightest of the appropriate area or has been superimposed over another color area. • Adjust the color alignment. The printer performs its power-on page 88. • Remove and reinstall the photoconductors. Repeating defects ) ) Example... Cause Solution If marks occur repeatedly only in one color and Replace the toner cartridge if the defects occur multiple times down a page, a toner cartridge...
... 7 From the printed sheet, find the straightest of the appropriate area or has been superimposed over another color area. • Adjust the color alignment. The printer performs its power-on page 88. • Remove and reinstall the photoconductors. Repeating defects ) ) Example... Cause Solution If marks occur repeatedly only in one color and Replace the toner cartridge if the defects occur multiple times down a page, a toner cartridge...

User's Guide
Page 89
...photoconductor units. Troubleshooting 89 Transfer belt is defective, empty, or worn. Streaked horizontal lines Example ABCDE ABCDE ABCDE Cause A toner cartridge is defective. Resetting the Printer appears briefly, followed by a clock, and then Ready appears. Solution • If the problem is on the back of... units. 10 Press . 11 Press until Exit Config Menu appears, and then press . Solution Replace the toner cartridge. Replace the fuser. Solution Replace the color cartridge causing the line. Fuser is on the front (print side) of the page: 1 Replace the...
...photoconductor units. Troubleshooting 89 Transfer belt is defective, empty, or worn. Streaked horizontal lines Example ABCDE ABCDE ABCDE Cause A toner cartridge is defective. Resetting the Printer appears briefly, followed by a clock, and then Ready appears. Solution • If the problem is on the back of... units. 10 Press . 11 Press until Exit Config Menu appears, and then press . Solution Replace the toner cartridge. Replace the fuser. Solution Replace the color cartridge causing the line. Fuser is on the front (print side) of the page: 1 Replace the...


