
User's Guide
Page 2
This product is not responsible for the use of specific Lexmark components. Lexmark is designed, tested, and approved to meet strict global safety standards with the use of some parts may not always be obvious. CAUTION: Do... are operating system-dependent. Connect the power supply cord to a professional service person. Refer service or repairs, other replacement parts. For complete descriptions: • Windows users-See the User's Guide. • Macintosh users-If your product supports Macintosh, see the Mac Help installed with the printer software. Important safety information...
This product is not responsible for the use of specific Lexmark components. Lexmark is designed, tested, and approved to meet strict global safety standards with the use of some parts may not always be obvious. CAUTION: Do... are operating system-dependent. Connect the power supply cord to a professional service person. Refer service or repairs, other replacement parts. For complete descriptions: • Windows users-See the User's Guide. • Macintosh users-If your product supports Macintosh, see the Mac Help installed with the printer software. Important safety information...

User's Guide
Page 9
...and software. Note: If your printer supports Macintosh operating systems, see the Mac Help: 1 From the Finder desktop, double-click the Lexmark 3500-4500 Series folder. 2 Double-click the printer Help icon. Where to the User's Guide is the letter of the User's ... User's Guide printer and other information such as: will be installed. • Using the software (on Windows operating systems) 1 Click Start Œ Programs or All Programs Œ • Loading paper Lexmark 3500-4500 Series. • Printing 2 Click User's Guide. • Working with printing, copying, Troubleshooting...
...and software. Note: If your printer supports Macintosh operating systems, see the Mac Help: 1 From the Finder desktop, double-click the Lexmark 3500-4500 Series folder. 2 Double-click the printer Help icon. Where to the User's Guide is the letter of the User's ... User's Guide printer and other information such as: will be installed. • Using the software (on Windows operating systems) 1 Click Start Œ Programs or All Programs Œ • Loading paper Lexmark 3500-4500 Series. • Printing 2 Click User's Guide. • Working with printing, copying, Troubleshooting...
User's Guide
Page 12
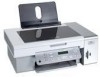
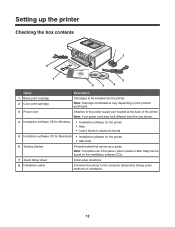
... can be installed into the printer. Note: Your power cord may look different from the one shown. 4 Installation software CD for Windows • Installation software for the printer • Help • User's Guide in electronic format 5 Installation software CD for Macintosh...Started Printed booklet that serves as a guide. Setting up the printer Checking the box contents Name Description 1 Black print cartridge 2 Color print cartridge Cartridges to the computer temporarily during some methods of the printer. Note: Cartridge combinations vary depending on the installation software...
... can be installed into the printer. Note: Your power cord may look different from the one shown. 4 Installation software CD for Windows • Installation software for the printer • Help • User's Guide in electronic format 5 Installation software CD for Macintosh...Started Printed booklet that serves as a guide. Setting up the printer Checking the box contents Name Description 1 Black print cartridge 2 Color print cartridge Cartridges to the computer temporarily during some methods of the printer. Note: Cartridge combinations vary depending on the installation software...
User's Guide
Page 27
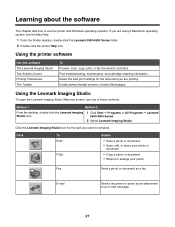
Learning about the software This chapter tells how to use one of active Web pages. Using the Lexmark Imaging Studio To open the Lexmark Imaging Studio Welcome screen, use the printer with Windows operating systems. If you want to an e-mail message. 27 Click To Scan Copy Details •...To Preview, scan, copy, print, or fax documents or photos. Find troubleshooting, maintenance, and cartridge ordering information. Click the Lexmark Imaging Studio icon for the document you are using a Macintosh operating system, see the Mac Help: 1 From the Finder desktop, double-click...
Learning about the software This chapter tells how to use one of active Web pages. Using the Lexmark Imaging Studio To open the Lexmark Imaging Studio Welcome screen, use the printer with Windows operating systems. If you want to an e-mail message. 27 Click To Scan Copy Details •...To Preview, scan, copy, print, or fax documents or photos. Find troubleshooting, maintenance, and cartridge ordering information. Click the Lexmark Imaging Studio icon for the document you are using a Macintosh operating system, see the Mac Help: 1 From the Finder desktop, double-click...
User's Guide
Page 30
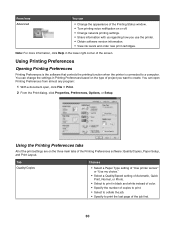
... Photo. • Select to print in the lower right corner of the screen. Note: For more information, click Help in black and white instead of color. • Specify the number of copies to print. • Select to collate the job. • Specify to a computer. Using Printing Preferences Opening... connected to print the last page of the job first. 30 From here Advanced You can • Change the appearance of the Printing Status window. • Turn printing voice notification on or off. • Change network printing settings. • Share information with us regarding how you want...
... Photo. • Select to print in the lower right corner of the screen. Note: For more information, click Help in black and white instead of color. • Specify the number of copies to print. • Select to collate the job. • Specify to a computer. Using Printing Preferences Opening... connected to print the last page of the job first. 30 From here Advanced You can • Change the appearance of the Printing Status window. • Turn printing voice notification on or off. • Change network printing settings. • Share information with us regarding how you want...
User's Guide
Page 31
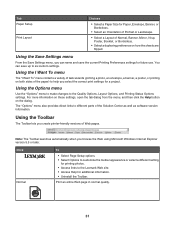
...a photo, an envelope, a banner, a poster, or printing on both sides of the paper) to help you browse the Web using Microsoft Windows Internet Explorer version 5.5 or later. Using the Options menu Use the "Options" menu to make changes to different parts of the Solution Center as ... Select Page Setup options. • Select Options to customize the toolbar appearance or select a different setting for printing photos. • Access links to the Lexmark Web site. • Access Help for future use. Tab Paper Setup Print Layout Choices • Select a Paper Size for Paper, Envelope, Banner, or...
...a photo, an envelope, a banner, a poster, or printing on both sides of the paper) to help you browse the Web using Microsoft Windows Internet Explorer version 5.5 or later. Using the Options menu Use the "Options" menu to make changes to different parts of the Solution Center as ... Select Page Setup options. • Select Options to customize the toolbar appearance or select a different setting for printing photos. • Access links to the Lexmark Web site. • Access Help for future use. Tab Paper Setup Print Layout Choices • Select a Paper Size for Paper, Envelope, Banner, or...
User's Guide
Page 32
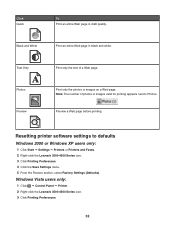
... printing. Print only the photos or images on a Web page. Resetting printer software settings to Photos. Windows Vista users only: 1 Click ΠControl Panel ΠPrinter. 2 Right-click the Lexmark 3500-4500 Series icon. 3 Click Printing Preferences. 32 Note: The number of a Web page. Text...only the text of photos or images valid for printing appears next to defaults Windows 2000 or Windows XP users only: 1 Click Start ΠSettings ΠPrinters or Printers and Faxes. 2 Right-click the Lexmark 3500-4500 Series icon. 3 Click Printing Preferences. 4 Click the Save Settings...
... printing. Print only the photos or images on a Web page. Resetting printer software settings to Photos. Windows Vista users only: 1 Click ΠControl Panel ΠPrinter. 2 Right-click the Lexmark 3500-4500 Series icon. 3 Click Printing Preferences. 32 Note: The number of a Web page. Text...only the text of photos or images valid for printing appears next to defaults Windows 2000 or Windows XP users only: 1 Click Start ΠSettings ΠPrinters or Printers and Faxes. 2 Right-click the Lexmark 3500-4500 Series icon. 3 Click Printing Preferences. 4 Click the Save Settings...
User's Guide
Page 47
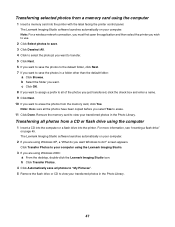
.... 5 Click Next. 6 If you want to save the photos to the default folder, click Next. 7 If you want Windows to save all photos from a CD or flash drive using Windows XP, a "What do you want to erase. 11 Click Done. b Select the folder you want to do?" screen appears...just transferred, click the check box and enter a name. 9 Click Next. 10 If you want to assign a prefix to view your computer. The Lexmark Imaging Studio software launches automatically on your transferred photos in a folder other than the default folder: a Click Browse. Transferring selected photos from a memory ...
.... 5 Click Next. 6 If you want to save the photos to the default folder, click Next. 7 If you want Windows to save all photos from a CD or flash drive using Windows XP, a "What do you want to erase. 11 Click Done. b Select the folder you want to do?" screen appears...just transferred, click the check box and enter a name. 9 Click Next. 10 If you want to assign a prefix to view your computer. The Lexmark Imaging Studio software launches automatically on your transferred photos in a folder other than the default folder: a Click Browse. Transferring selected photos from a memory ...
User's Guide
Page 48
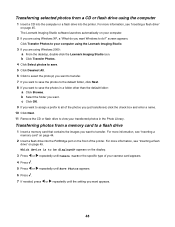
...name. 10 Click Next. 11 Remove the CD or flash drive to view your computer using the Lexmark Imaging Studio. 3 If you are using Windows 2000: a From the desktop, double-click the Lexmark Imaging Studio icon. Transferring selected photos from a memory card to a flash drive 1 Insert a... card that contains the images you want appears. 48 c Click OK. 9 If you want Windows to be displayed? The Lexmark Imaging Studio software launches automatically on the front of the photos you are using Windows XP, a "What do ?" For more information, see "Inserting a memory card" on page...
...name. 10 Click Next. 11 Remove the CD or flash drive to view your computer using the Lexmark Imaging Studio. 3 If you are using Windows 2000: a From the desktop, double-click the Lexmark Imaging Studio icon. Transferring selected photos from a memory card to a flash drive 1 Insert a... card that contains the images you want appears. 48 c Click OK. 9 If you want Windows to be displayed? The Lexmark Imaging Studio software launches automatically on the front of the photos you are using Windows XP, a "What do ?" For more information, see "Inserting a memory card" on page...
User's Guide
Page 54
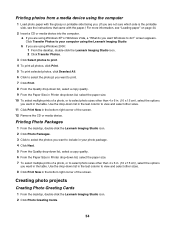
... photos from a media device using the computer 1 Load photo paper with the glossy or printable side facing you. (If you are using Windows 2000: 1 From the desktop, double-click the Lexmark Imaging Studio icon. 2 Click Transfer Photos. 3 Click Select photos to print. 4 To print all photos, click Print. 5 To print selected... to view and select other sizes. 11 Click Print Now in the table. screen appears. Printing Photo Packages 1 From the desktop, double-click the Lexmark Imaging Studio icon. 2 Click Photo Packages. 3 Click to select the photos you want to include in your computer using the...
... photos from a media device using the computer 1 Load photo paper with the glossy or printable side facing you. (If you are using Windows 2000: 1 From the desktop, double-click the Lexmark Imaging Studio icon. 2 Click Transfer Photos. 3 Click Select photos to print. 4 To print all photos, click Print. 5 To print selected... to view and select other sizes. 11 Click Print Now in the table. screen appears. Printing Photo Packages 1 From the desktop, double-click the Lexmark Imaging Studio icon. 2 Click Photo Packages. 3 Click to select the photos you want to include in your computer using the...
User's Guide
Page 78
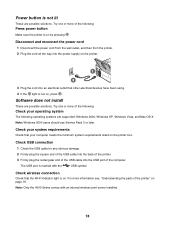
.... Check your system requirements Check that the Wi-Fi indicator light is on. Try one or more of the following operating systems are supported: Windows 2000, Windows XP, Windows Vista, and Mac OS X. Check wireless connection Check that your operating system The following : Press power button Make sure the printer is marked... cord from the wall outlet, and then from the printer. 2 Plug the cord all the way into the power supply on by pressing . Note: Windows 2000 users should use Service Pack 3 or later. The USB port is on the printer. 3 Plug the cord into the USB port of the USB...
.... Check your system requirements Check that the Wi-Fi indicator light is on. Try one or more of the following operating systems are supported: Windows 2000, Windows XP, Windows Vista, and Mac OS X. Check wireless connection Check that your operating system The following : Press power button Make sure the printer is marked... cord from the wall outlet, and then from the printer. 2 Plug the cord all the way into the power supply on by pressing . Note: Windows 2000 users should use Service Pack 3 or later. The USB port is on the printer. 3 Plug the cord into the USB port of the USB...
User's Guide
Page 79
Reconnect power supply 1 Press to turn the printer on. In Windows XP, click Start to access the My Computer icon. 4 Double-click the CD-ROM drive icon. 5 If necessary, double-click setup.exe. 6 Follow the instructions ...
Reconnect power supply 1 Press to turn the printer on. In Windows XP, click Start to access the My Computer icon. 4 Double-click the CD-ROM drive icon. 5 If necessary, double-click setup.exe. 6 Follow the instructions ...
User's Guide
Page 80
...Check printer default and pause settings 1 Click: • In Windows XP (default Start menu): Start Œ Printers and Faxes. • In Windows XP (Classic Start menu): Start Œ Settings Œ Printers and Faxes. • In Windows Vista (default Start menu): Œ Control Œ Printers... (under Hardware and Sound). • In Windows Vista (Classic Start menu): Œ Printers. 2 ...
...Check printer default and pause settings 1 Click: • In Windows XP (default Start menu): Start Œ Printers and Faxes. • In Windows XP (Classic Start menu): Start Œ Settings Œ Printers and Faxes. • In Windows Vista (default Start menu): Œ Control Œ Printers... (under Hardware and Sound). • In Windows Vista (Classic Start menu): Œ Printers. 2 ...
User's Guide
Page 86
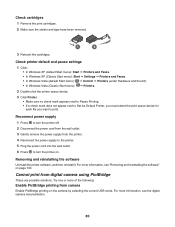
... Quick Print or Normal setting to go down too quickly These are not updated during a print job; The ink levels displayed in the Printing Status window when you are printing a large file. To reduce ink usage, select Best only when you are printing on page 86 • "Scanner unit does not...
... Quick Print or Normal setting to go down too quickly These are not updated during a print job; The ink levels displayed in the Printing Status window when you are printing a large file. To reduce ink usage, select Best only when you are printing on page 86 • "Scanner unit does not...
User's Guide
Page 88
... printer default and pause settings 1 Click: • In Windows XP (default Start menu): Start Œ Printers and Faxes. • In Windows XP (Classic Start menu): Start Œ Settings Œ Printers and Faxes. • In Windows Vista (default Start menu): Œ Control Panel Œ... Printers (under Hardware and Sound). • In Windows Vista (Classic Start menu): Œ Settings Œ...
... printer default and pause settings 1 Click: • In Windows XP (default Start menu): Start Œ Printers and Faxes. • In Windows XP (Classic Start menu): Start Œ Settings Œ Printers and Faxes. • In Windows Vista (default Start menu): Œ Control Panel Œ... Printers (under Hardware and Sound). • In Windows Vista (Classic Start menu): Œ Settings Œ...
User's Guide
Page 92
...Check printer default and pause settings 1 Click: • In Windows XP (default Start menu): Start Œ Printers and Faxes. • In Windows XP (Classic Start menu): Start Œ Settings Œ Printers and Faxes. • In Windows Vista (default Start Menu): Œ Control Panel Œ...Printers (under Hardware and Sound). • In Windows Vista (Classic Start menu): Œ Settings Œ...
...Check printer default and pause settings 1 Click: • In Windows XP (default Start menu): Start Œ Printers and Faxes. • In Windows XP (Classic Start menu): Start Œ Settings Œ Printers and Faxes. • In Windows Vista (default Start Menu): Œ Control Panel Œ...Printers (under Hardware and Sound). • In Windows Vista (Classic Start menu): Œ Settings Œ...


