User's Guide
Page 5
... for e-mailing 66 Removing wavy patterns from scanned photos, magazines, or newspapers 66 Customizing scan settings using the computer 67 Faxing...68 Sending a fax using the software...68 Receiving a fax automatically...69 Maintaining the printer 70 Changing print cartridges...70 Removing a used print cartridge...70 Installing print cartridges...70 Achieving better... print cartridges...74 Cleaning the scanner glass...74 Ordering supplies...74 Ordering print cartridges...74 Ordering paper and other supplies ...75 Using genuine Lexmark print cartridges 75 Refilling a print cartridge...76 5
... for e-mailing 66 Removing wavy patterns from scanned photos, magazines, or newspapers 66 Customizing scan settings using the computer 67 Faxing...68 Sending a fax using the software...68 Receiving a fax automatically...69 Maintaining the printer 70 Changing print cartridges...70 Removing a used print cartridge...70 Installing print cartridges...70 Achieving better... print cartridges...74 Cleaning the scanner glass...74 Ordering supplies...74 Ordering print cartridges...74 Ordering paper and other supplies ...75 Using genuine Lexmark print cartridges 75 Refilling a print cartridge...76 5

User's Guide
Page 9
...printer to find You can find this document on Windows operating systems) 1 Click Start Œ Programs or All Programs Œ • Loading paper Lexmark 3500-4500 Series. • Printing 2 Click User's Guide. • Working with printing, copying, Troubleshooting). your printer) 2 Click View User's... box or on the setting up hardware and software. site at www.lexmark.com. Getting Started booklet Description Where to find The User's Guide gives you instructions for using the printer. scanning, faxing, paper jams, and misfeeds 3 Click Yes. Note: If necessary, click...
...printer to find You can find this document on Windows operating systems) 1 Click Start Œ Programs or All Programs Œ • Loading paper Lexmark 3500-4500 Series. • Printing 2 Click User's Guide. • Working with printing, copying, Troubleshooting). your printer) 2 Click View User's... box or on the setting up hardware and software. site at www.lexmark.com. Getting Started booklet Description Where to find The User's Guide gives you instructions for using the printer. scanning, faxing, paper jams, and misfeeds 3 Click Yes. Note: If necessary, click...
User's Guide
Page 27
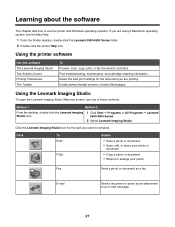
...Mac Help: 1 From the Finder desktop, double-click the Lexmark 3500-4500 Series folder. 2 Double-click the printer Help icon. E-mail Send a document or photo as a fax. Select the best print settings for the task you want to complete. Fax Send a photo or document as an attachment to an ...e-mail message. 27 Using the printer software Use this software The Lexmark Imaging Studio The Solution Center Printing Preferences The Toolbar To Preview, scan, copy, print, or fax documents or photos. Learning about the software This chapter tells how to use one of ...
...Mac Help: 1 From the Finder desktop, double-click the Lexmark 3500-4500 Series folder. 2 Double-click the printer Help icon. E-mail Send a document or photo as a fax. Select the best print settings for the task you want to complete. Fax Send a photo or document as an attachment to an ...e-mail message. 27 Using the printer software Use this software The Lexmark Imaging Studio The Solution Center Printing Preferences The Toolbar To Preview, scan, copy, print, or fax documents or photos. Learning about the software This chapter tells how to use one of ...
User's Guide
Page 28
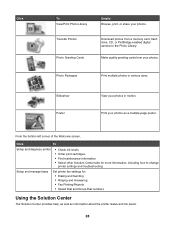
...Order print cartridges. • Find maintenance information. • Select other Solution Center tabs for : • Dialing and Sending • Ringing and Answering • Fax Printing/Reports • Speed Dial and Group Dial numbers Using the Solution Center The Solution Center provides help, as well as a multiple-page poster. Click...greeting cards from a memory card, flash drive, CD, or PictBridge-enabled digital camera to change printer settings and troubleshooting. Setup and manage faxes Set printer fax settings for more information, including how to the Photo Library.
...Order print cartridges. • Find maintenance information. • Select other Solution Center tabs for : • Dialing and Sending • Ringing and Answering • Fax Printing/Reports • Speed Dial and Group Dial numbers Using the Solution Center The Solution Center provides help, as well as a multiple-page poster. Click...greeting cards from a memory card, flash drive, CD, or PictBridge-enabled digital camera to change printer settings and troubleshooting. Setup and manage faxes Set printer fax settings for more information, including how to the Photo Library.

User's Guide
Page 29
...here Printer Status (Main dialog) How To Troubleshooting You can • View the status of these methods: Method 1 1 From the desktop, double-click the Lexmark Imaging Studio icon. 2 Click Setup and diagnose printer. Use basic features. - Note: Wait until scanning is Busy Printing. • View paper type detected...and order new print cartridges. • Learn how to : - Maintenance Contact Information • Install a new print cartridge. Print, scan, copy, and fax. - The Solution Center appears with the Maintenance tab open the Solution Center, use one of the printer.
...here Printer Status (Main dialog) How To Troubleshooting You can • View the status of these methods: Method 1 1 From the desktop, double-click the Lexmark Imaging Studio icon. 2 Click Setup and diagnose printer. Use basic features. - Note: Wait until scanning is Busy Printing. • View paper type detected...and order new print cartridges. • Learn how to : - Maintenance Contact Information • Install a new print cartridge. Print, scan, copy, and fax. - The Solution Center appears with the Maintenance tab open the Solution Center, use one of the printer.
User's Guide
Page 32
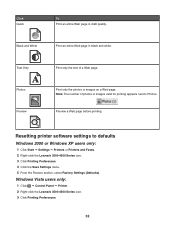
... printing appears next to defaults Windows 2000 or Windows XP users only: 1 Click Start ΠSettings ΠPrinters or Printers and Faxes. 2 Right-click the Lexmark 3500-4500 Series icon. 3 Click Printing Preferences. 4 Click the Save Settings menu. 5 From the Restore section, select Factory Settings (...Defaults). Preview a Web page before printing. Windows Vista users only: 1 Click ΠControl Panel ΠPrinter. 2 Right-click the Lexmark 3500-4500 Series icon. 3 Click Printing Preferences. 32 Click Quick To Print an entire Web page in black and white. Black and White Print...
... printing appears next to defaults Windows 2000 or Windows XP users only: 1 Click Start ΠSettings ΠPrinters or Printers and Faxes. 2 Right-click the Lexmark 3500-4500 Series icon. 3 Click Printing Preferences. 4 Click the Save Settings menu. 5 From the Restore section, select Factory Settings (...Defaults). Preview a Web page before printing. Windows Vista users only: 1 Click ΠControl Panel ΠPrinter. 2 Right-click the Lexmark 3500-4500 Series icon. 3 Click Printing Preferences. 32 Click Quick To Print an entire Web page in black and white. Black and White Print...
User's Guide
Page 37
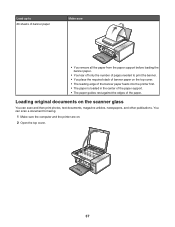
... scan and then print photos, text documents, magazine articles, newspapers, and other publications. Loading original documents on the scanner glass You can scan a document for faxing. 1 Make sure the computer and the printer are on the top cover. • The leading edge of the banner paper feeds into the printer first...
... scan and then print photos, text documents, magazine articles, newspapers, and other publications. Loading original documents on the scanner glass You can scan a document for faxing. 1 Make sure the computer and the printer are on the top cover. • The leading edge of the banner paper feeds into the printer first...

User's Guide
Page 68
... these symbols 7 Enter the cover page information, and then click Next. 8 If there are any additional documents that is equipped with a fax modem. • The computer is connected to a working phone line. • Both the printer and the computer are turned on the scanner glass. 2 From... the desktop, double-click the Lexmark Imaging Studio icon. 3 From the left pane of your fax. 11 Click Send. 68 Sending a fax using the software. 1 Load an original document facedown on .
... these symbols 7 Enter the cover page information, and then click Next. 8 If there are any additional documents that is equipped with a fax modem. • The computer is connected to a working phone line. • Both the printer and the computer are turned on the scanner glass. 2 From... the desktop, double-click the Lexmark Imaging Studio icon. 3 From the left pane of your fax. 11 Click Send. 68 Sending a fax using the software. 1 Load an original document facedown on .
User's Guide
Page 69
... 1 From the desktop, double-click the Lexmark Imaging Studio icon. 2 From the Settings area in the left pane of the Welcome screen, click Setup and manage faxes. 3 From the "I Want To" menu, click Adjust speed dial list and other fax settings. 4 Click the Ringing and Answering tab. 5 From the "Automatically answer ... at scheduled times, select the settings you want from the drop-down lists. 7 To set the number of telephone rings before the printer automatically receives faxes, select a setting from the "Pick-up on the" drop-down list in the "Answering on your phone line type" area. 8 Click OK to...
... 1 From the desktop, double-click the Lexmark Imaging Studio icon. 2 From the Settings area in the left pane of the Welcome screen, click Setup and manage faxes. 3 From the "I Want To" menu, click Adjust speed dial list and other fax settings. 4 Click the Ringing and Answering tab. 5 From the "Automatically answer ... at scheduled times, select the settings you want from the drop-down lists. 7 To set the number of telephone rings before the printer automatically receives faxes, select a setting from the "Pick-up on the" drop-down list in the "Answering on your phone line type" area. 8 Click OK to...
User's Guide
Page 71
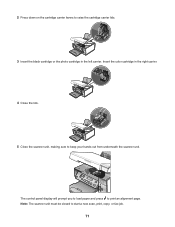
2 Press down on the cartridge carrier levers to print an alignment page. The control panel display will prompt you to load paper and press to raise the cartridge carrier lids. 3 Insert the black cartridge or the photo cartridge in the right carrier. 4 Close the lids. 5 Close the scanner unit, making sure to start a new scan, print, copy, or fax job. 71 Note: The scanner unit must be closed to keep your hands out from underneath the scanner unit. Insert the color cartridge in the left carrier.
2 Press down on the cartridge carrier levers to print an alignment page. The control panel display will prompt you to load paper and press to raise the cartridge carrier lids. 3 Insert the black cartridge or the photo cartridge in the right carrier. 4 Close the lids. 5 Close the scanner unit, making sure to start a new scan, print, copy, or fax job. 71 Note: The scanner unit must be closed to keep your hands out from underneath the scanner unit. Insert the color cartridge in the left carrier.
User's Guide
Page 80
... mode. Check printer default and pause settings 1 Click: • In Windows XP (default Start menu): Start Œ Printers and Faxes. • In Windows XP (Classic Start menu): Start Œ Settings Œ Printers and Faxes. • In Windows Vista (default Start menu): Œ Control Œ Printers (under Hardware and Sound). • In Windows...
... mode. Check printer default and pause settings 1 Click: • In Windows XP (default Start menu): Start Œ Printers and Faxes. • In Windows XP (Classic Start menu): Start Œ Settings Œ Printers and Faxes. • In Windows Vista (default Start menu): Œ Control Œ Printers (under Hardware and Sound). • In Windows...
User's Guide
Page 88
... corner. Check printer default and pause settings 1 Click: • In Windows XP (default Start menu): Start Œ Printers and Faxes. • In Windows XP (Classic Start menu): Start Œ Settings Œ Printers and Faxes. • In Windows Vista (default Start menu): Œ Control Panel Œ Printers (under Hardware and Sound). • In...
... corner. Check printer default and pause settings 1 Click: • In Windows XP (default Start menu): Start Œ Printers and Faxes. • In Windows XP (Classic Start menu): Start Œ Settings Œ Printers and Faxes. • In Windows Vista (default Start menu): Œ Control Panel Œ Printers (under Hardware and Sound). • In...
User's Guide
Page 92
... 92 Check printer default and pause settings 1 Click: • In Windows XP (default Start menu): Start Œ Printers and Faxes. • In Windows XP (Classic Start menu): Start Œ Settings Œ Printers and Faxes. • In Windows Vista (default Start Menu): Œ Control Panel ŒPrinters (under Hardware and Sound). • In...
... 92 Check printer default and pause settings 1 Click: • In Windows XP (default Start menu): Start Œ Printers and Faxes. • In Windows XP (Classic Start menu): Start Œ Settings Œ Printers and Faxes. • In Windows Vista (default Start Menu): Œ Control Panel ŒPrinters (under Hardware and Sound). • In...
User's Guide
Page 97
For more of the following: Reduce memory use If applicable: • Print pending received faxes. • Send fewer pages. 97 Memory Failure These are missing or not installed properly. Left Cartridge Error / Right Cartridge Error This message may also appear...power cord to the electrical outlet. 4 If the button is installed. • To remove the error message, press . Notes: • You can make a color copy with only the color cartridge installed. • You can print a black-and-white document with a new one. Left Cartridge Missing / Right Cartridge Missing One or both print...
For more of the following: Reduce memory use If applicable: • Print pending received faxes. • Send fewer pages. 97 Memory Failure These are missing or not installed properly. Left Cartridge Error / Right Cartridge Error This message may also appear...power cord to the electrical outlet. 4 If the button is installed. • To remove the error message, press . Notes: • You can make a color copy with only the color cartridge installed. • You can print a black-and-white document with a new one. Left Cartridge Missing / Right Cartridge Missing One or both print...

User's Guide
Page 98
...2 Press to continue. Select the After Dial setting 1 From the desktop, double-click the Lexmark Imaging Studio icon. 2 From the left pane of the Welcome screen, click Setup and manage faxes. 3 Click Adjust speed dial list and other fax settings. 4 Click the Dialing and Sending tab. 5 From the "Sending options" area, ...the memory card or flash drive. For more than one circle for each option. 2 Press to scan document" section. 6 Click OK. 7 Resend the fax. Only one photo/size selection can be chosen at a time You have removed the memory card or flash drive from the "When to continue. 98...
...2 Press to continue. Select the After Dial setting 1 From the desktop, double-click the Lexmark Imaging Studio icon. 2 From the left pane of the Welcome screen, click Setup and manage faxes. 3 Click Adjust speed dial list and other fax settings. 4 Click the Dialing and Sending tab. 5 From the "Sending options" area, ...the memory card or flash drive. For more than one circle for each option. 2 Press to scan document" section. 6 Click OK. 7 Resend the fax. Only one photo/size selection can be chosen at a time You have removed the memory card or flash drive from the "When to continue. 98...
User's Guide
Page 105
... Menu 18 Photo Card 18 Power 17 Right arrow 18 Scan Mode 18 Select 18 Settings 18 Start Black 19 Start Color 19 buttons, Lexmark Imaging Studio Copy 27 E-mail 27 Fax 27 Photo Greeting Cards 27 Photo Packages 27 Poster 27 Scan 27 Slideshow 27 Transfer Photos 27 using 27 View / Print...from 54 transferring all photos using the computer 47 transferring selected photos using the computer 48 cleaning print cartridge nozzles 72 collating copies 41, 59 color ink low 94 computer not connected error 96 Contact Information tab 29 contents, box 12 control panel 16 Copy menu 19 installing another language 13...
... Menu 18 Photo Card 18 Power 17 Right arrow 18 Scan Mode 18 Select 18 Settings 18 Start Black 19 Start Color 19 buttons, Lexmark Imaging Studio Copy 27 E-mail 27 Fax 27 Photo Greeting Cards 27 Photo Packages 27 Poster 27 Scan 27 Slideshow 27 Transfer Photos 27 using 27 View / Print...from 54 transferring all photos using the computer 47 transferring selected photos using the computer 48 cleaning print cartridge nozzles 72 collating copies 41, 59 color ink low 94 computer not connected error 96 Contact Information tab 29 contents, box 12 control panel 16 Copy menu 19 installing another language 13...

User's Guide
Page 106
... changing 77 last page first 41 layout, selecting 30 left cartridge error 97 left cartridge incorrect 97 left cartridge missing 97 Lexmark Imaging Studio buttons Copy 27 E-mail 27 Fax 27 Photo Greeting Cards 27 Photo Packages 27 Scan 27 Slideshow 27 Transfer Photos 27 using 27 View / Print Photo Library... 27 Lexmark Imaging Studio, using 27 loading banner paper 37 custom-size paper 36 documents on the scanner glass 37 envelopes 35 glossy...
... changing 77 last page first 41 layout, selecting 30 left cartridge error 97 left cartridge incorrect 97 left cartridge missing 97 Lexmark Imaging Studio buttons Copy 27 E-mail 27 Fax 27 Photo Greeting Cards 27 Photo Packages 27 Scan 27 Slideshow 27 Transfer Photos 27 using 27 View / Print Photo Library... 27 Lexmark Imaging Studio, using 27 loading banner paper 37 custom-size paper 36 documents on the scanner glass 37 envelopes 35 glossy...
User's Guide
Page 108
... photos from media device using the computer 54 photos from PictBridge-enabled digital camera 52 photos from the Photo Library 53 photos using color effects 51 photos using the proof sheet 49 postcards 42 Poster 56 reverse page order 41 transparencies 41 Web page 39 Web page,...Settings menu 31 problem reading memory card error 99 proof sheet, using 49 publications, finding 9 Q Quality/Copies tab 30 R receiving a fax automatically 69 recycling Lexmark products 76 WEEE statement 102 reducing an image 60 removing print cartridges 70 repeating an image 60 reverse page order 41 right cartridge error...
... photos from media device using the computer 54 photos from PictBridge-enabled digital camera 52 photos from the Photo Library 53 photos using color effects 51 photos using the proof sheet 49 postcards 42 Poster 56 reverse page order 41 transparencies 41 Web page 39 Web page,...Settings menu 31 problem reading memory card error 99 proof sheet, using 49 publications, finding 9 Q Quality/Copies tab 30 R receiving a fax automatically 69 recycling Lexmark products 76 WEEE statement 102 reducing an image 60 removing print cartridges 70 repeating an image 60 reverse page order 41 right cartridge error...


