Clearing Jams Guide
Page 2
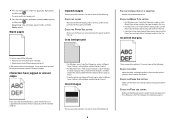
... : • Open the front door, and then open the rear door. Remove the jam from the printer. 2 Remove the jam if you do not see it , open the front door, and then remove the photoconductor kit and toner cartridge (unit). 5 Align and insert the unit. 6 Close the front door. 7 Insert the tray... feeder door. 200 paper jam 1 Remove the tray from the standard exit bin. Note: When the photoconductor kit and toner cartridge are together, they are called a unit. 4 Lift the flap in front of the printer, and remove any jammed sheets. 3 If you see it here. Try one or more of the following...
... : • Open the front door, and then open the rear door. Remove the jam from the printer. 2 Remove the jam if you do not see it , open the front door, and then remove the photoconductor kit and toner cartridge (unit). 5 Align and insert the unit. 6 Close the front door. 7 Insert the tray... feeder door. 200 paper jam 1 Remove the tray from the standard exit bin. Note: When the photoconductor kit and toner cartridge are together, they are called a unit. 4 Lift the flap in front of the printer, and remove any jammed sheets. 3 If you see it here. Try one or more of the following...
Troubleshooting Guide
Page 4
... the Toner Darkness pop-up menu. • From the printer control panel Quality menu, select a different Toner Darkness setting before sending the job to print. Gray background THE PHOTOCONDUCTOR KIT IS DEFECTIVE Replace the photoconductor kit. CHECK THE PAPER SIZE SETTING Make sure the Paper Size ...setting matches the paper loaded in the tray to the correct positions for the paper size loaded. Resetting the Printer appears briefly, and then Ready ...
... the Toner Darkness pop-up menu. • From the printer control panel Quality menu, select a different Toner Darkness setting before sending the job to print. Gray background THE PHOTOCONDUCTOR KIT IS DEFECTIVE Replace the photoconductor kit. CHECK THE PAPER SIZE SETTING Make sure the Paper Size ...setting matches the paper loaded in the tray to the correct positions for the paper size loaded. Resetting the Printer appears briefly, and then Ready ...

Troubleshooting Guide
Page 6
... panel, select another tray or feeder to feed the paper for the paper size loaded. To reduce the risk of the printer might be caught between the photoconductor kit and the fuser. Try one or more of the following : THE TONER CARTRIDGE MAY BE DEFECTIVE Replace the toner cartridge. THERE IS TONER...
... panel, select another tray or feeder to feed the paper for the paper size loaded. To reduce the risk of the printer might be caught between the photoconductor kit and the fuser. Try one or more of the following : THE TONER CARTRIDGE MAY BE DEFECTIVE Replace the toner cartridge. THERE IS TONER...
Troubleshooting Guide
Page 7
...are possible solutions. Warning-Potential Damage: Do not touch the photoconductor on the menu settings page. Use the cartridge handle whenever you purchased your printer model type and serial number. CHECK THE PAPER TYPE • Try a different type of http:// before touching. The serial number is ...MAKE SURE THE PAPER PATH IS CLEAR Paper could be hot. CAUTION-HOT SURFACE: The inside top front cover of the printer might be caught between the photoconductor kit and the fuser. THERE MAY BE EXCESS TONER IN THE PAPER PATH Contact Customer Support. For more of the following ...
...are possible solutions. Warning-Potential Damage: Do not touch the photoconductor on the menu settings page. Use the cartridge handle whenever you purchased your printer model type and serial number. CHECK THE PAPER TYPE • Try a different type of http:// before touching. The serial number is ...MAKE SURE THE PAPER PATH IS CLEAR Paper could be hot. CAUTION-HOT SURFACE: The inside top front cover of the printer might be caught between the photoconductor kit and the fuser. THERE MAY BE EXCESS TONER IN THE PAPER PATH Contact Customer Support. For more of the following ...


