User's Guide
Page 22
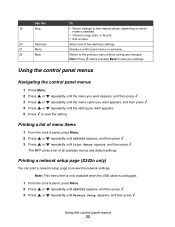
... (X342n only) You can print a network setup page to the previous menu without saving any changes. Using the control panel menus 22 Return to review the network settings. Printing a list of menu items 1 From the control panel, press Menu. 2 Press or repeatedly until REPORTS appears, and then... press . 3 Press or repeatedly until the setting you want appears. 5 Press to save your settings. The MFP prints a list of five darkness settings. Note: Press before pressing Back to save the setting. Note: This menu item is only available when ...
... (X342n only) You can print a network setup page to the previous menu without saving any changes. Using the control panel menus 22 Return to review the network settings. Printing a list of menu items 1 From the control panel, press Menu. 2 Press or repeatedly until REPORTS appears, and then... press . 3 Press or repeatedly until the setting you want appears. 5 Press to save your settings. The MFP prints a list of five darkness settings. Note: Press before pressing Back to save the setting. Note: This menu item is only available when ...

User's Guide
Page 58
... edge first. The profile name is the name that will appear on the Scan Profile list on the MFP control panel when the scan button is pressed. 7 Click Submit. 8 Review the instructions on your documents. Scanning over a network Note: Only available on the desktop. • ...Click Start Æ All Programs Æ Lexmark Æ Lexmark X34x Series Æ QLINK. 2 Select the destination you want to scan to. 3 Click ...
... edge first. The profile name is the name that will appear on the Scan Profile list on the MFP control panel when the scan button is pressed. 7 Click Submit. 8 Review the instructions on your documents. Scanning over a network Note: Only available on the desktop. • ...Click Start Æ All Programs Æ Lexmark Æ Lexmark X34x Series Æ QLINK. 2 Select the destination you want to scan to. 3 Click ...