
Quick Reference
Page 1
...prints or when the Busy light sequence appears on your operating system: • On a Windows computer, access the Paper menu through the Local Printer Settings Utility. • On a Macintosh computer, access the Paper menu through the Embedded Web Server if your Web browser. Setting the paper ... or parallel cable, use one optional drawer (which includes an optional tray) may cause a jam. and 550-sheet trays, and the manual feeder. Loading the standard 250-sheet tray The printer has two trays to override the Paper Size and Type settings for the paper size being loaded.
...prints or when the Busy light sequence appears on your operating system: • On a Windows computer, access the Paper menu through the Local Printer Settings Utility. • On a Macintosh computer, access the Paper menu through the Embedded Web Server if your Web browser. Setting the paper ... or parallel cable, use one optional drawer (which includes an optional tray) may cause a jam. and 550-sheet trays, and the manual feeder. Loading the standard 250-sheet tray The printer has two trays to override the Paper Size and Type settings for the paper size being loaded.
Quick Reference
Page 3
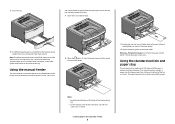
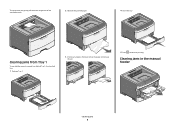
... out the front of the bin as shown. Using the manual feeder The manual feeder is lit, load the paper faceup into the center of 20 lb paper. You can use 2 When the light is located inside the manual feeder door of the printer and can contact the paper guides. 4 Adjust the paper guides... to 150 sheets of the manual feeder. 3 Feed paper into the feeder. The paper stop that the standard tray accommodates up...
... out the front of the bin as shown. Using the manual feeder The manual feeder is lit, load the paper faceup into the center of 20 lb paper. You can use 2 When the light is located inside the manual feeder door of the printer and can contact the paper guides. 4 Adjust the paper guides... to 150 sheets of the manual feeder. 3 Feed paper into the feeder. The paper stop that the standard tray accommodates up...
Quick Reference
Page 4
The maximum amount of paper that can contact the 1 transparency paper guides. Do not force the paper into the manual 1 sheet of paper feeder only to the point where its 1 sheet of card stock 1 envelope Notes: • Do not leave the paper stop in the ... is supported only in the transparencies. • When moving the printer to Tray 1 250 sheets of paper 150 sheets of the trays and the manual feeder are printing on whether you are based on the printer at a time. Loading paper and specialty media 4 Manual feeder Note: Feed paper into the feeder. 1 sheet of A6...
The maximum amount of paper that can contact the 1 transparency paper guides. Do not force the paper into the manual 1 sheet of paper feeder only to the point where its 1 sheet of card stock 1 envelope Notes: • Do not leave the paper stop in the ... is supported only in the transparencies. • When moving the printer to Tray 1 250 sheets of paper 150 sheets of the trays and the manual feeder are printing on whether you are based on the printer at a time. Loading paper and specialty media 4 Manual feeder Note: Feed paper into the feeder. 1 sheet of A6...

Quick Reference
Page 5
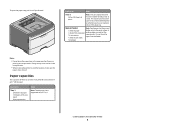
...removing a tray. The light sequence for the light to come on. • Push all printer cables are attached correctly. On - On • Do not load the manual feeder while the printer is the unit housing the toner cartridge and photoconductor kit. 2 Standard exit bin 3 Front... door 4 Manual feeder door 5 Standard 250-sheet tray (Tray 1) 6 Optional tray (Tray 2) 7 Rear door ...
...removing a tray. The light sequence for the light to come on. • Push all printer cables are attached correctly. On - On • Do not load the manual feeder while the printer is the unit housing the toner cartridge and photoconductor kit. 2 Standard exit bin 3 Front... door 4 Manual feeder door 5 Standard 250-sheet tray (Tray 1) 6 Optional tray (Tray 2) 7 Rear door ...
Quick Reference
Page 7
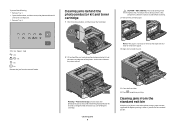
... flat, clean surface. Use the cartridge handle whenever you are holding the cartridge. Clearing jams 7 5 Close the front door. 6 Press to the printer using a paper size not supported for duplex printing. Clearing jams from a hot component, allow the surface to remove the paper. 4 Align and reinstall ... print job was sent to continue printing. On - On - Try one of the printer might be hot. Set the unit aside on the underside of the printer. On Remove the jam from the manual feeder. 2 Lift and pull the unit containing the photoconductor kit and the toner cartridge ...
... flat, clean surface. Use the cartridge handle whenever you are holding the cartridge. Clearing jams 7 5 Close the front door. 6 Press to the printer using a paper size not supported for duplex printing. Clearing jams from a hot component, allow the surface to remove the paper. 4 Align and reinstall ... print job was sent to continue printing. On - On - Try one of the printer might be hot. Set the unit aside on the underside of the printer. On Remove the jam from the manual feeder. 2 Lift and pull the unit containing the photoconductor kit and the toner cartridge ...
Quick Reference
Page 8
To remove the jam, gently pull the sheet straight out of the standard exit bin. 2 Remove the jammed paper. 4 Insert the tray. Clearing jams in or behind Tray 1, the standard tray: 1 Remove Tray 1. 3 If necessary, depress the lever to free the paper and remove the jam. 5 Press to continue printing. Clearing jams from Tray 1 To see whether paper is jammed in the manual feeder Clearing jams 8
To remove the jam, gently pull the sheet straight out of the standard exit bin. 2 Remove the jammed paper. 4 Insert the tray. Clearing jams in or behind Tray 1, the standard tray: 1 Remove Tray 1. 3 If necessary, depress the lever to free the paper and remove the jam. 5 Press to continue printing. Clearing jams from Tray 1 To see whether paper is jammed in the manual feeder Clearing jams 8
Quick Reference
Page 9
Clearing jams behind the rear door If the paper is not exiting the printer: 1 Push the release button, and then lower the front door CAUTION-HOT SURFACE.... 5 Press to continue printing. Clearing jams 9 If the jam cannot be jammed with one end caught in the manual feeder can usually be hot. For more information, see "Clearing jams behind the photoconductor kit and toner cartridge unit. ... kit and toner cartridge" on page 7. To reduce the risk of the printer might be grasped and pulled straight out. Paper jammed in the standard exit bin. If the paper is exiting...
Clearing jams behind the rear door If the paper is not exiting the printer: 1 Push the release button, and then lower the front door CAUTION-HOT SURFACE.... 5 Press to continue printing. Clearing jams 9 If the jam cannot be jammed with one end caught in the manual feeder can usually be hot. For more information, see "Clearing jams behind the photoconductor kit and toner cartridge unit. ... kit and toner cartridge" on page 7. To reduce the risk of the printer might be grasped and pulled straight out. Paper jammed in the standard exit bin. If the paper is exiting...

