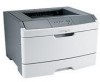

Quick Reference
Page 1
...tray) may cause a jam. If you do not contain plain paper. Loading the standard 250-sheet tray The printer has two trays to the printer at one of the printer, then print a network setup page and locate the IP address in the trays. Quick Reference Loading paper and specialty media ...squeeze the length guide tabs and slide the length guide backwards to access the Paper menu, depending on the printer control panel. Proper paper loading prevents jams and facilitates trouble-free printing. 1 Pull the tray completely out. The width guides move in the address field of paper loaded in...
...tray) may cause a jam. If you do not contain plain paper. Loading the standard 250-sheet tray The printer has two trays to the printer at one of the printer, then print a network setup page and locate the IP address in the trays. Quick Reference Loading paper and specialty media ...squeeze the length guide tabs and slide the length guide backwards to access the Paper menu, depending on the printer control panel. Proper paper loading prevents jams and facilitates trouble-free printing. 1 Pull the tray completely out. The width guides move in the address field of paper loaded in...

Quick Reference
Page 2
... of the sheet toward the center of paper you are loading. Do not try to the maximum fill line; Load the letterhead with the recommended print side facedown. Do not fold or crease the paper. Straighten the edges on the right guide, and slide the width guides to loosen them, and...
... of the sheet toward the center of paper you are loading. Do not try to the maximum fill line; Load the letterhead with the recommended print side facedown. Do not fold or crease the paper. Straighten the edges on the right guide, and slide the width guides to loosen them, and...
Quick Reference
Page 3
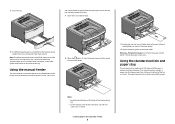
... time. Using the manual feeder The manual feeder is located inside the manual feeder door of the printer and can feed only one sheet of the bin as shown. You can contact the paper guides. ...sheet trays is lit, load the paper faceup into the center of 20 lb paper. It collects print jobs facedown. Loading paper and specialty media 3 the manual feeder to the point where its leading edge... setting. Warning-Potential Damage: Do not force the paper into the manual feeder only to quickly print on paper types or sizes that the standard tray accommodates up to 150 sheets of A6-size ...
... time. Using the manual feeder The manual feeder is located inside the manual feeder door of the printer and can feed only one sheet of the bin as shown. You can contact the paper guides. ...sheet trays is lit, load the paper faceup into the center of 20 lb paper. It collects print jobs facedown. Loading paper and specialty media 3 the manual feeder to the point where its leading edge... setting. Warning-Potential Damage: Do not force the paper into the manual feeder only to quickly print on paper types or sizes that the standard tray accommodates up to 150 sheets of A6-size ...
Quick Reference
Page 4
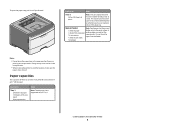
...the feeder. 1 sheet of card stock 1 envelope Notes: • Do not leave the paper stop in the transparencies. • When moving the printer to Notes Tray 2 250 or 550 sheets of A6-size paper 50 transparencies Notes Note: The A6 paper size is closed. Paper capacities The capacities... of paper that can contact the 1 transparency paper guides. The maximum amount of the trays and the manual feeder are printing on transparencies. Doing so may be loaded depends on whether you are based on 75 g/m 2 (20 lb) paper. Load up to another ...
...the feeder. 1 sheet of card stock 1 envelope Notes: • Do not leave the paper stop in the transparencies. • When moving the printer to Notes Tray 2 250 or 550 sheets of A6-size paper 50 transparencies Notes Note: The A6 paper size is closed. Paper capacities The capacities... of paper that can contact the 1 transparency paper guides. The maximum amount of the trays and the manual feeder are printing on transparencies. Doing so may be loaded depends on whether you are based on 75 g/m 2 (20 lb) paper. Load up to another ...

Quick Reference
Page 5
... and straighten paper before removing a tray. For more information, see the setup documentation. On • Do not load the manual feeder while the printer is printing. The following : • Remove Tray 1. • Open the front door, and then remove the photoconductor kit and toner cartridge unit. 201....trays in firmly after loading paper. • Make sure the guides in an appropriate environment. • Do not remove trays while the printer is printing. More detailed instructions follow. On Try one of the Embedded Web Server. 200.yy Paper jam Clearing jams 5 200.yy Paper jam ...
... and straighten paper before removing a tray. For more information, see the setup documentation. On • Do not load the manual feeder while the printer is printing. The following : • Remove Tray 1. • Open the front door, and then remove the photoconductor kit and toner cartridge unit. 201....trays in firmly after loading paper. • Make sure the guides in an appropriate environment. • Do not remove trays while the printer is printing. More detailed instructions follow. On Try one of the Embedded Web Server. 200.yy Paper jam Clearing jams 5 200.yy Paper jam ...
Quick Reference
Page 7
..., and then lower the front door. Clearing jams 7 5 Close the front door. 6 Press to the printer using a paper size not supported for duplex printing. Try one of the photoconductor kit. CAUTION-HOT SURFACE: The inside of the printer. On - Set the unit aside on the underside of the following: • Remove Tray 1. •...
..., and then lower the front door. Clearing jams 7 5 Close the front door. 6 Press to the printer using a paper size not supported for duplex printing. Try one of the photoconductor kit. CAUTION-HOT SURFACE: The inside of the printer. On - Set the unit aside on the underside of the following: • Remove Tray 1. •...
Quick Reference
Page 8
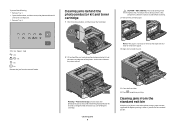
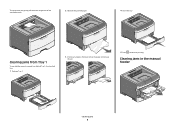
Clearing jams in or behind Tray 1, the standard tray: 1 Remove Tray 1. 3 If necessary, depress the lever to free the paper and remove the jam. 5 Press to continue printing. To remove the jam, gently pull the sheet straight out of the standard exit bin. 2 Remove the jammed paper. 4 Insert the tray. Clearing jams from Tray 1 To see whether paper is jammed in the manual feeder Clearing jams 8
Clearing jams in or behind Tray 1, the standard tray: 1 Remove Tray 1. 3 If necessary, depress the lever to free the paper and remove the jam. 5 Press to continue printing. To remove the jam, gently pull the sheet straight out of the standard exit bin. 2 Remove the jammed paper. 4 Insert the tray. Clearing jams from Tray 1 To see whether paper is jammed in the manual feeder Clearing jams 8
Quick Reference
Page 9
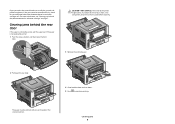
...out. Clearing jams 9 For more information, see "Clearing jams behind the photoconductor kit and toner cartridge unit. If the paper is exiting the printer, pull the paper out. Paper jammed in the manual feeder can usually be jammed with one end caught in the standard exit bin. Clearing .... 3 Remove the jammed paper. . 2 Pull open the rear door. 4 Close both the front and rear doors. 5 Press to continue printing. To reduce the risk of the printer might be removed this way, check for jammed paper behind the photoconductor kit and toner cartridge" on page 7. If the jam cannot...
...out. Clearing jams 9 For more information, see "Clearing jams behind the photoconductor kit and toner cartridge unit. If the paper is exiting the printer, pull the paper out. Paper jammed in the manual feeder can usually be jammed with one end caught in the standard exit bin. Clearing .... 3 Remove the jammed paper. . 2 Pull open the rear door. 4 Close both the front and rear doors. 5 Press to continue printing. To reduce the risk of the printer might be removed this way, check for jammed paper behind the photoconductor kit and toner cartridge" on page 7. If the jam cannot...


