Clearing Jams Guide
Page 1
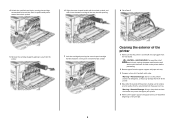
...paper or specialty media. Open Tray 1, and then remove the jam. Remove the staple cartridge, and then clear the staple jam. To reduce the risk of injury from the multipurpose ...286 Area name Instructions Multipurpose feeder Cover F (Horizontal Transport Unit) Door G Door H 1 Remove all printer cables are set correctly in the control panel menu. • Make sure all paper from a hot component...jam. For more information, see the Card Stock & Label Guide available on the Lexmark Web site at www.lexmark.com/publications. • Do not load too much paper. For staple jams, remove...
...paper or specialty media. Open Tray 1, and then remove the jam. Remove the staple cartridge, and then clear the staple jam. To reduce the risk of injury from the multipurpose ...286 Area name Instructions Multipurpose feeder Cover F (Horizontal Transport Unit) Door G Door H 1 Remove all printer cables are set correctly in the control panel menu. • Make sure all paper from a hot component...jam. For more information, see the Card Stock & Label Guide available on the Lexmark Web site at www.lexmark.com/publications. • Do not load too much paper. For staple jams, remove...

Quick Reference
Page 8
Replacing a toner cartridge Replace the specified toner cartridge (cyan, magenta, yellow, or black) when 88 Replace toner appears. 4 Unpack the replacement photoconductor. 5 Align and insert the end of the photoconductor. 7 Press the button ... from the top of the photoconductor. 8 Lift the bar up, and then press latch E5 down so that it near the printer. 3 Open Door E (front printer door). 8 The printer will not continue printing until the specified cartridge is replaced. 1 Make sure the printer is on and Ready or 88 Replace toner appears. 2 Unpack the new...
Replacing a toner cartridge Replace the specified toner cartridge (cyan, magenta, yellow, or black) when 88 Replace toner appears. 4 Unpack the replacement photoconductor. 5 Align and insert the end of the photoconductor. 7 Press the button ... from the top of the photoconductor. 8 Lift the bar up, and then press latch E5 down so that it near the printer. 3 Open Door E (front printer door). 8 The printer will not continue printing until the specified cartridge is replaced. 1 Make sure the printer is on and Ready or 88 Replace toner appears. 2 Unpack the new...
Quick Reference
Page 9
... to remove any ink residue that the printer is turned off and unplugged from the wall outlet. 4 Unlock the specified cartridge by turning the arrow-shaped cartridge handle clockwise until it away from the printer. 7 Lock the cartridge by turning the cartridge counterclockwise until the arrow-shaped handle points ...toward the unlock symbol. 6 Align the arrow-shaped handle with the unlock symbol, and then insert the toner cartridge all cables to your printer. 5 Make sure the paper support and paper exit tray are dry before proceeding. 2 Remove paper from the paper support...
... to remove any ink residue that the printer is turned off and unplugged from the wall outlet. 4 Unlock the specified cartridge by turning the arrow-shaped cartridge handle clockwise until it away from the printer. 7 Lock the cartridge by turning the cartridge counterclockwise until the arrow-shaped handle points ...toward the unlock symbol. 6 Align the arrow-shaped handle with the unlock symbol, and then insert the toner cartridge all cables to your printer. 5 Make sure the paper support and paper exit tray are dry before proceeding. 2 Remove paper from the paper support...

User Guide
Page 5
... box ...132 Cleaning the printhead lenses ...137 Replacing a photoconductor...141 Replacing a toner cartridge...144 Recycling Lexmark products...146 Moving the printer...146 Before moving the printer ...146 Moving the printer to another location...147 Setting the printer up in a new location ...147 Shipping the printer ...148 Administrative support 149 Adjusting the brightness or contrast of the display...
... box ...132 Cleaning the printhead lenses ...137 Replacing a photoconductor...141 Replacing a toner cartridge...144 Recycling Lexmark products...146 Moving the printer...146 Before moving the printer ...146 Moving the printer to another location...147 Setting the printer up in a new location ...147 Shipping the printer ...148 Administrative support 149 Adjusting the brightness or contrast of the display...
User Guide
Page 41
...large quantities. Have metal clasps, string ties, or folding bars - When printing on the Lexmark Web site at least 1 mm (0.04 in a jam. Have any exposed adhesive when the... in .) away from edges is in .) strip on the card stock being considered for laser printers. For detailed information on label printing, characteristics, and design, see the Card Stock & ... when printing bar codes. Zone coating of the envelopes. Adhesive material contaminates the printer and could void the printer and cartridge warranties. • Do not use labels with slick backing material. • ...
...large quantities. Have metal clasps, string ties, or folding bars - When printing on the Lexmark Web site at least 1 mm (0.04 in a jam. Have any exposed adhesive when the... in .) away from edges is in .) strip on the card stock being considered for laser printers. For detailed information on label printing, characteristics, and design, see the Card Stock & ... when printing bar codes. Zone coating of the envelopes. Adhesive material contaminates the printer and could void the printer and cartridge warranties. • Do not use labels with slick backing material. • ...
User Guide
Page 55
...is the factory default setting. • Max Speed-Prints in black and white To print all text and graphics using only the black toner cartridge, set the printer to black only until it receives ten consecutive black‑and‑white pages. • Max Yield-Switches from Mac OS X 1 ...Choose Applications > Utilities, and then double‑click Print Center or Printer Setup Utility. 2 Double‑click the printer you to color mode based on the color content found on each page. Printing in a black only mode until it receives a ...
...is the factory default setting. • Max Speed-Prints in black and white To print all text and graphics using only the black toner cartridge, set the printer to black only until it receives ten consecutive black‑and‑white pages. • Max Yield-Switches from Mac OS X 1 ...Choose Applications > Utilities, and then double‑click Print Center or Printer Setup Utility. 2 Double‑click the printer you to color mode based on the color content found on each page. Printing in a black only mode until it receives a ...

User Guide
Page 74
Understanding printer menus Supplies menu Menu item Cyan, Magenta, Yellow, or Black Toner Low Replace Missing or Defective OK Unsupported Color PC Units Life Warning Replace Missing ... Staples G5, Staples G11, or Staples G12 Low Empty Missing OK Hole Punch Box Full Missing OK 74 Description Shows the status of the toner cartridges Shows the status of the cyan, yellow, and magenta photoconductor units Shows the status of the black photoconductor unit Shows the status of the waste...
Understanding printer menus Supplies menu Menu item Cyan, Magenta, Yellow, or Black Toner Low Replace Missing or Defective OK Unsupported Color PC Units Life Warning Replace Missing ... Staples G5, Staples G11, or Staples G12 Low Empty Missing OK Hole Punch Box Full Missing OK 74 Description Shows the status of the toner cartridges Shows the status of the cyan, yellow, and magenta photoconductor units Shows the status of the black photoconductor unit Shows the status of the waste...

User Guide
Page 117
...Menus are disabled The printer menus are not supported. Contact your system support person for the message to clear. No jobs to cancel Wait for the message to replace the specified staple cartridge, press repeatedly until the Show Me message for the specified staple cartridge appears, and then ...• Press repeatedly until Show Me appears, and then press . • Cancel the current job. Load staples • Replace the specified staple cartridge in the finisher. Note: To learn how to cancel a print job, print a confidential job, or print a held jobs Wait for help. ...
...Menus are disabled The printer menus are not supported. Contact your system support person for the message to clear. No jobs to cancel Wait for the message to replace the specified staple cartridge, press repeatedly until the Show Me message for the specified staple cartridge appears, and then ...• Press repeatedly until Show Me appears, and then press . • Cancel the current job. Load staples • Replace the specified staple cartridge in the finisher. Note: To learn how to cancel a print job, print a confidential job, or print a held jobs Wait for help. ...

User Guide
Page 120
Staples empty or misfed Load the specified staple cartridge into the printer. Tray Low Load paper in the specified tray to clear the message and continue stapling. Staples low or missing Load the specified staple cartridge in the tray to clear the message and resume printing. Submitting ...Selection Wait for the message to clear the message. USB/USB The printer is the active communication link. The USB port is using a...
Staples empty or misfed Load the specified staple cartridge into the printer. Tray Low Load paper in the specified tray to clear the message and continue stapling. Staples low or missing Load the specified staple cartridge in the tray to clear the message and resume printing. Submitting ...Selection Wait for the message to clear the message. USB/USB The printer is the active communication link. The USB port is using a...

User Guide
Page 121
Note: To learn how to install a toner cartridge, press repeatedly until Continue appears, and then press paper tray. Understanding printer messages 121 Waiting The printer has received data to print, but is waiting for an End‑of‑Job command, a Form Feed command, or additional data. • Press to ...
Note: To learn how to install a toner cartridge, press repeatedly until Continue appears, and then press paper tray. Understanding printer messages 121 Waiting The printer has received data to print, but is waiting for an End‑of‑Job command, a Form Feed command, or additional data. • Press to ...

User Guide
Page 127
... from the specified stapler area(s). 2 Press until Show Me appears, and then press . 84 Unsupported pc unit Replace the specified photoconductor(s). Replace the specified toner cartridge. Install a new photoconductor. Understanding printer messages 127 84 Replace black pc unit The black photoconductor is low. When the print becomes faded, replace the toner...
... from the specified stapler area(s). 2 Press until Show Me appears, and then press . 84 Unsupported pc unit Replace the specified photoconductor(s). Replace the specified toner cartridge. Install a new photoconductor. Understanding printer messages 127 84 Replace black pc unit The black photoconductor is low. When the print becomes faded, replace the toner...

User Guide
Page 130
...example,192.264.263.17). 3 Press Enter. In other countries or regions, visit the Lexmark Web Site at 1-800-539-6275 for printer supplies assume printing on letter‑ or A4‑size plain paper. Ordering toner cartridges When 88 Cyan toner low, 88 Magenta toner low, 88 Yellow toner low, or ...88 Black toner low appears, order a new cartridge. Maintaining the printer 130 Checking the status of supplies A message appears on the display when a replacement supply item is needed or when maintenance is on and Ready appears....
...example,192.264.263.17). 3 Press Enter. In other countries or regions, visit the Lexmark Web Site at 1-800-539-6275 for printer supplies assume printing on letter‑ or A4‑size plain paper. Ordering toner cartridges When 88 Cyan toner low, 88 Magenta toner low, 88 Yellow toner low, or ...88 Black toner low appears, order a new cartridge. Maintaining the printer 130 Checking the status of supplies A message appears on the display when a replacement supply item is needed or when maintenance is on and Ready appears....

User Guide
Page 131
...illustrations inside the stapler finisher door for the printer are: Part name Part number Cyan High Yield Toner Cartridge C930H2CG Magenta High Yield Toner Cartridge C930H2MG Yellow High Yield Toner Cartridge C930H2YG Black High Yield Toner Cartridge C930H2KG Ordering photoconductors When 84 Black pc unit... 84 color pc unit life warning appears, order replacement photoconductor(s). The waste toner box must replace the specified toner cartridge. Maintaining the printer 131 When 88 Replace Cyan toner, 88 Replace Magenta toner, 88 Replace Yellow toner, or 88 Replace Black toner...
...illustrations inside the stapler finisher door for the printer are: Part name Part number Cyan High Yield Toner Cartridge C930H2CG Magenta High Yield Toner Cartridge C930H2MG Yellow High Yield Toner Cartridge C930H2YG Black High Yield Toner Cartridge C930H2KG Ordering photoconductors When 84 Black pc unit... 84 color pc unit life warning appears, order replacement photoconductor(s). The waste toner box must replace the specified toner cartridge. Maintaining the printer 131 When 88 Replace Cyan toner, 88 Replace Magenta toner, 88 Replace Yellow toner, or 88 Replace Black toner...
User Guide
Page 144
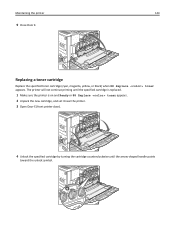
Maintaining the printer 144 9 Close Door E. The printer will not continue printing until the specified cartridge is replaced. 1 Make sure the printer is on and Ready or 88 Replace toner appears. 2 Unpack the new cartridge, and set it near the printer. 3 Open Door E (front printer door). 4 Unlock the specified cartridge by turning the cartridge counterclockwise until the arrow‑shaped handle points toward the unlock symbol. Replacing a toner cartridge Replace the specified toner cartridge (cyan, magenta, yellow, or black) when 88 Replace toner appears.
Maintaining the printer 144 9 Close Door E. The printer will not continue printing until the specified cartridge is replaced. 1 Make sure the printer is on and Ready or 88 Replace toner appears. 2 Unpack the new cartridge, and set it near the printer. 3 Open Door E (front printer door). 4 Unlock the specified cartridge by turning the cartridge counterclockwise until the arrow‑shaped handle points toward the unlock symbol. Replacing a toner cartridge Replace the specified toner cartridge (cyan, magenta, yellow, or black) when 88 Replace toner appears.

User Guide
Page 145
Maintaining the printer 145 5 Remove the cartridge by gently pulling it away from the printer. 6 Align the arrow‑shaped handle with the unlock symbol, and then insert the toner cartridge all the way into the opening. 7 Lock the cartridge by turning the arrow‑shaped cartridge handle clockwise until it points toward the lock symbol.
Maintaining the printer 145 5 Remove the cartridge by gently pulling it away from the printer. 6 Align the arrow‑shaped handle with the unlock symbol, and then insert the toner cartridge all the way into the opening. 7 Lock the cartridge by turning the arrow‑shaped cartridge handle clockwise until it points toward the lock symbol.
User Guide
Page 166
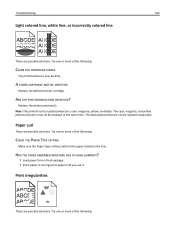
... or more of the following : CLEAN THE PRINTHEAD LENSES The printhead lenses may be dirty. A TONER CARTRIDGE MAY BE DEFECTIVE Replace the defective toner cartridge. ARE THE PHOTOCONDUCTORS DEFECTIVE? The black photoconductor can be replaced at the same time. Replace the photoconductor(s).... Try one or more of the following : Troubleshooting 166 Light colored line, white line, or incorrectly colored line These are possible solutions. Note: The printer...
... or more of the following : CLEAN THE PRINTHEAD LENSES The printhead lenses may be dirty. A TONER CARTRIDGE MAY BE DEFECTIVE Replace the defective toner cartridge. ARE THE PHOTOCONDUCTORS DEFECTIVE? The black photoconductor can be replaced at the same time. Replace the photoconductor(s).... Try one or more of the following : Troubleshooting 166 Light colored line, white line, or incorrectly colored line These are possible solutions. Note: The printer...

User Guide
Page 169
... PAPER Make sure you are using paper that meets the printer specifications. Toner fog or background shading appears on the page A TONER CARTRIDGE MAY BE DEFECTIVE Replace the toner cartridge. The cyan, magenta, and yellow photoconductors must all be serviced. Solid color pages The printer may need to the correct positions for the paper...
... PAPER Make sure you are using paper that meets the printer specifications. Toner fog or background shading appears on the page A TONER CARTRIDGE MAY BE DEFECTIVE Replace the toner cartridge. The cyan, magenta, and yellow photoconductors must all be serviced. Solid color pages The printer may need to the correct positions for the paper...

User Guide
Page 170
... rubs off These are possible solutions. Replace the photoconductor(s). Try one or more of the following : A TONER CARTRIDGE MAY BE DEFECTIVE Replace the toner cartridge. Troubleshooting 170 ARE THE PHOTOCONDUCTORS WORN OR DEFECTIVE? Note: The printer has four photoconductors: cyan, magenta, yellow, and black. Try one or more of the following : CHECK THE...
... rubs off These are possible solutions. Replace the photoconductor(s). Try one or more of the following : A TONER CARTRIDGE MAY BE DEFECTIVE Replace the toner cartridge. Troubleshooting 170 ARE THE PHOTOCONDUCTORS WORN OR DEFECTIVE? Note: The printer has four photoconductors: cyan, magenta, yellow, and black. Try one or more of the following : CHECK THE...
User Guide
Page 186
... not include repair of original purchase as warranted during normal use inconsistent with the printer shall end earlier if it was intended. You may be a new or repaired... which perform like new parts -Is, during the warranty period, contact a Remarketer or Lexmark for warranty service, remove all legal obligations, restrictions, liens, and encumbrances. You are substantially... used up, depleted, or consumed. For further explanation of all print cartridges, programs, data, and removable storage media (unless directed otherwise by any product or the...
... not include repair of original purchase as warranted during normal use inconsistent with the printer shall end earlier if it was intended. You may be a new or repaired... which perform like new parts -Is, during the warranty period, contact a Remarketer or Lexmark for warranty service, remove all legal obligations, restrictions, liens, and encumbrances. You are substantially... used up, depleted, or consumed. For further explanation of all print cartridges, programs, data, and removable storage media (unless directed otherwise by any product or the...
User Guide
Page 188
...1565 Emul Error Load Emul Option 128 200-285.yy Paper jam 127 289 Staple error 127 31 Missing or defective cartridge 121 32 Replace unsupported cartridge 121 34 Incorrect paper size, check 121 34 Incorrect paper type, check 121 35 Insufficient memory to support Resource Save... door 113 confidential jobs modifying print settings 152 Confidential print jobs 48 printing from Macintosh computer 50 printing from Windows 49 configurations printer 10 Configure MP menu 77 conserving supplies 129 contacting Customer Support 174 contrast, adjusting 149 control panel 13 disabling hard disk encryption...
...1565 Emul Error Load Emul Option 128 200-285.yy Paper jam 127 289 Staple error 127 31 Missing or defective cartridge 121 32 Replace unsupported cartridge 121 34 Incorrect paper size, check 121 34 Incorrect paper type, check 121 35 Insufficient memory to support Resource Save... door 113 confidential jobs modifying print settings 152 Confidential print jobs 48 printing from Macintosh computer 50 printing from Windows 49 configurations printer 10 Configure MP menu 77 conserving supplies 129 contacting Customer Support 174 contrast, adjusting 149 control panel 13 disabling hard disk encryption...


