Hardware Maintenance Manual
Page 5
... (TMD) . . . 113 2100 Wireless WAN antenna cable (TMD) . . . 115 2110 LCD panel and LCD cable 117 Locations 119 Front view for ThinkPad X60, X60s, X61, and X61s 119 Rear view for ThinkPad X60, X60s, X61, and X61s 120 Bottom view for ThinkPad X60, X60s, X61, and X61s 121 Rear View for ThinkPad X6 UltraBase . . . . 122 Bottom View for ThinkPad X6 UltraBase . . . 122...
... (TMD) . . . 113 2100 Wireless WAN antenna cable (TMD) . . . 115 2110 LCD panel and LCD cable 117 Locations 119 Front view for ThinkPad X60, X60s, X61, and X61s 119 Rear view for ThinkPad X60, X60s, X61, and X61s 120 Bottom view for ThinkPad X60, X60s, X61, and X61s 121 Rear View for ThinkPad X6 UltraBase . . . . 122 Bottom View for ThinkPad X6 UltraBase . . . 122...
Hardware Maintenance Manual
Page 39
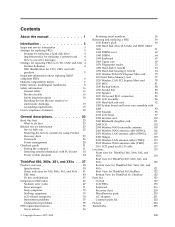
... down for DOS. Use the cursor keys and ESC to the ThinkPad X6 UltraBase™. Full v Memory Test - Quick v Keyboard v Video v Internal Speaker v Mouse v Diskette v System Load v Optical Drive Test v Intel Wireless Radio Notes: v In the Keyboard test in menus. Quick Hardware...Run Quick Test v CPU/Coprocessor v Systemboard v Video Adapter v Serial Ports v Parallel Ports v Fixed Disks v Diskette Drives v Other Devices v ThinkPad Devices v Communication v Wireless LAN v Memory Test - v To test Digital Signature Chip, the chip must be sensed. Follow the instructions on the...
... down for DOS. Use the cursor keys and ESC to the ThinkPad X6 UltraBase™. Full v Memory Test - Quick v Keyboard v Video v Internal Speaker v Mouse v Diskette v System Load v Optical Drive Test v Intel Wireless Radio Notes: v In the Keyboard test in menus. Quick Hardware...Run Quick Test v CPU/Coprocessor v Systemboard v Video Adapter v Serial Ports v Parallel Ports v Fixed Disks v Diskette Drives v Other Devices v ThinkPad Devices v Communication v Wireless LAN v Memory Test - v To test Digital Signature Chip, the chip must be sensed. Follow the instructions on the...
Hardware Maintenance Manual
Page 43
... (TMD) . . . 113 2100 Wireless WAN antenna cable (TMD) . . . 115 2110 LCD panel and LCD cable 117 Locations 119 Front view for ThinkPad X60, X60s, X61, and X61s 119 Rear view for ThinkPad X60, X60s, X61, and X61s 120 Bottom view for ThinkPad X60, X60s, X61, and X61s 121 Rear View for ThinkPad X6 UltraBase . . . . 122 Bottom View for ThinkPad X6 UltraBase . . . 122... (32 bit) DVDs 229 Miscellaneous parts 230 AC adapters 231 Common parts list 232 Tools 232 Power cords 232 Notices 234 Trademarks 235 © Copyright Lenovo 2007, 2008 37
... (TMD) . . . 113 2100 Wireless WAN antenna cable (TMD) . . . 115 2110 LCD panel and LCD cable 117 Locations 119 Front view for ThinkPad X60, X60s, X61, and X61s 119 Rear view for ThinkPad X60, X60s, X61, and X61s 120 Bottom view for ThinkPad X60, X60s, X61, and X61s 121 Rear View for ThinkPad X6 UltraBase . . . . 122 Bottom View for ThinkPad X6 UltraBase . . . 122... (32 bit) DVDs 229 Miscellaneous parts 230 AC adapters 231 Common parts list 232 Tools 232 Power cords 232 Notices 234 Trademarks 235 © Copyright Lenovo 2007, 2008 37

Hardware Maintenance Manual
Page 46
... Business (64 bit) v Windows Vista Home Basic (32 bit) v Windows Vista Ultimate (32 bit) 40 ThinkPad® X60, X60s, X61, and X61s v 802.11a/b/g (Wireless LAN) v 802.11b/g (Wireless LAN) v Wireless WAN v 802.11n (Wireless LAN) v One Type-II v With I /O port (ThinkPad X6 UltraBase) Internal modem Audio Infrared transfer PCI Express Mini Card PC card SD card Ultrabay...
... Business (64 bit) v Windows Vista Home Basic (32 bit) v Windows Vista Ultimate (32 bit) 40 ThinkPad® X60, X60s, X61, and X61s v 802.11a/b/g (Wireless LAN) v 802.11b/g (Wireless LAN) v Wireless WAN v 802.11n (Wireless LAN) v One Type-II v With I /O port (ThinkPad X6 UltraBase) Internal modem Audio Infrared transfer PCI Express Mini Card PC card SD card Ultrabay...

Hardware Maintenance Manual
Page 48
... off briefly.) Orange: The battery is being read from or written to the hard disk drive, or the drive in suspend mode. 3 Wireless WAN Green: Wireless is operational and radio on 8 Battery status 9 AC power status Green: Data is being charged, but the battery power is in standby ... The computer is entering standby mode or hibernation mode, or is enabled. Green: Caps Lock mode is resuming normal operation. 42 ThinkPad® X60, X60s, X61, and X61s Note: Do not move the system while the Green drive in standby mode. When the indicator starts blinking orange, the computer beeps ...
... off briefly.) Orange: The battery is being read from or written to the hard disk drive, or the drive in suspend mode. 3 Wireless WAN Green: Wireless is operational and radio on 8 Battery status 9 AC power status Green: Data is being charged, but the battery power is in standby ... The computer is entering standby mode or hibernation mode, or is enabled. Green: Caps Lock mode is resuming normal operation. 42 ThinkPad® X60, X60s, X61, and X61s Note: Do not move the system while the Green drive in standby mode. When the indicator starts blinking orange, the computer beeps ...
Hardware Maintenance Manual
Page 51
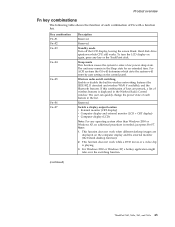
... over the switching function. (continued) ThinkPad X60, X60s, X61, and X61s 45 Hard disk drive spindown while CPU still works. If this combination of each combination of wireless features is displayed in wireless networking features (the IEEE 802.11 standard and wireless WAN if available), and the Bluetooth...keys are displayed on again, press any operating system other than Windows 2000 or Windows XP, no additional procedure is playing. 3. Wireless radio on the control panel. This function does not work when different desktop images are pressed, a list of Fn with a ...
... over the switching function. (continued) ThinkPad X60, X60s, X61, and X61s 45 Hard disk drive spindown while CPU still works. If this combination of each combination of wireless features is displayed in wireless networking features (the IEEE 802.11 standard and wireless WAN if available), and the Bluetooth...keys are displayed on again, press any operating system other than Windows 2000 or Windows XP, no additional procedure is playing. 3. Wireless radio on the control panel. This function does not work when different desktop images are pressed, a list of Fn with a ...

Hardware Maintenance Manual
Page 54
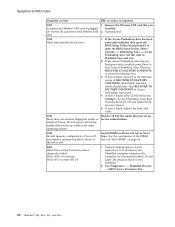
... daughter card. Otherwise, press Esc to continue. 1. Remove one of them . 1. Press to ignore the warning message. 2. System board. 01CA More than one Wireless LAN devices are found . Remove one of them . Reseat the hard disk drive. 2. System board. 021x Keyboard error. Load Setup Defaults in CMOS. DIMM. ...hours by connecting the ac adapter. 2. Replace the backup battery and run BIOS Setup Utility to reset the time and date. 48 ThinkPad® X60, X60s, X61, and X61s Charge the backup battery for more than 8 hours by connecting the ac adapter. 2.
... daughter card. Otherwise, press Esc to continue. 1. Remove one of them . 1. Press to ignore the warning message. 2. System board. 01CA More than one Wireless LAN devices are found . Remove one of them . Reseat the hard disk drive. 2. System board. 021x Keyboard error. Load Setup Defaults in CMOS. DIMM. ...hours by connecting the ac adapter. 2. Replace the backup battery and run BIOS Setup Utility to reset the time and date. 48 ThinkPad® X60, X60s, X61, and X61s Charge the backup battery for more than 8 hours by connecting the ac adapter. 2.
Hardware Maintenance Manual
Page 56
... the reader that you set up for the authentication. 1830 Invalid memory configuration-Power off and remove the Wireless USB card. 1. Run Diagnostics --> ThinkPad Devices --> HDD Active Protection Test. 50 ThinkPad® X60, X60s, X61, and X61s If the Access Predesktop Area has not been previously disabled, press Enter to enter SETUP 1. Run FDISK, and...
... the reader that you set up for the authentication. 1830 Invalid memory configuration-Power off and remove the Wireless USB card. 1. Run Diagnostics --> ThinkPad Devices --> HDD Active Protection Test. 50 ThinkPad® X60, X60s, X61, and X61s If the Access Predesktop Area has not been previously disabled, press Enter to enter SETUP 1. Run FDISK, and...
Hardware Maintenance Manual
Page 78
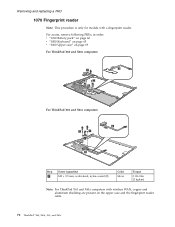
Removing and replacing a FRU 1070 Fingerprint reader Note: This procedure is only for models with wireless WAN, copper and aluminum shielding are present on page 69 For ThinkPad X60 and X60s computers: 4 1 2 2 3 For ThinkPad X61 and X61s computers: 4 1 1 2 3 Step 2 Screw (quantity) M2 × 3.5 mm, wafer-...head, nylon-coated (2) Color Silver Torque 0.196 Nm (2 kgfcm) Note: For ThinkPad X61 and X61s computers with a fingerprint reader. For access, remove following FRUs, in order: v "1010 Battery pack" on page 60 v "1050 Keyboard"...
Removing and replacing a FRU 1070 Fingerprint reader Note: This procedure is only for models with wireless WAN, copper and aluminum shielding are present on page 69 For ThinkPad X60 and X60s computers: 4 1 2 2 3 For ThinkPad X61 and X61s computers: 4 1 1 2 3 Step 2 Screw (quantity) M2 × 3.5 mm, wafer-...head, nylon-coated (2) Color Silver Torque 0.196 Nm (2 kgfcm) Note: For ThinkPad X61 and X61s computers with a fingerprint reader. For access, remove following FRUs, in order: v "1010 Battery pack" on page 60 v "1050 Keyboard"...
Hardware Maintenance Manual
Page 81
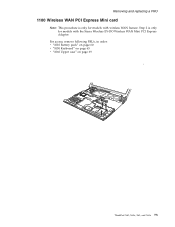
Removing and replacing a FRU 1100 Wireless WAN PCI Express Mini card Note: This procedure is only for models with the Sierra Wireless EV-DO Wireless WAN Mini PCI Express Adapter. Step 2 is only for models with wireless WAN feature. For access, remove following FRUs, in order: v "1010 Battery pack" on page 60 v "1050 Keyboard" on page 65 v "1060 Upper case" on page 69 11 2 ThinkPad X60, X60s, X61, and X61s 75
Removing and replacing a FRU 1100 Wireless WAN PCI Express Mini card Note: This procedure is only for models with the Sierra Wireless EV-DO Wireless WAN Mini PCI Express Adapter. Step 2 is only for models with wireless WAN feature. For access, remove following FRUs, in order: v "1010 Battery pack" on page 60 v "1050 Keyboard" on page 65 v "1060 Upper case" on page 69 11 2 ThinkPad X60, X60s, X61, and X61s 75

Hardware Maintenance Manual
Page 83
Removing and replacing a FRU 1110 Intel Turbo Memory card Note: Either a wireless WAN PCI Express Mini Card or an Intel Turbo Memory card can be installed in order: v "1010 Battery pack" on page 60 v "1050 Keyboard" on page 65 v "1060 Upper case" on page 69 1 2 Step 1 Screw (quantity) M2 × 2.5 mm, wafer-head, nylon-coated (2) Color Silver Torque 0.157 Nm (1.6 kgfcm) ThinkPad X60, X60s, X61, and X61s 77 For access, remove following FRUs, in the system at one time, as they occupy the same slot.
Removing and replacing a FRU 1110 Intel Turbo Memory card Note: Either a wireless WAN PCI Express Mini Card or an Intel Turbo Memory card can be installed in order: v "1010 Battery pack" on page 60 v "1050 Keyboard" on page 65 v "1060 Upper case" on page 69 1 2 Step 1 Screw (quantity) M2 × 2.5 mm, wafer-head, nylon-coated (2) Color Silver Torque 0.157 Nm (1.6 kgfcm) ThinkPad X60, X60s, X61, and X61s 77 For access, remove following FRUs, in the system at one time, as they occupy the same slot.
Hardware Maintenance Manual
Page 84
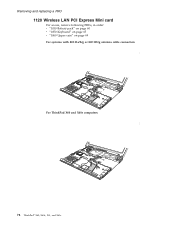
Removing and replacing a FRU 1120 Wireless LAN PCI Express Mini card For access, remove following FRUs, in order: v "1010 Battery pack" on page 60 v "1050 Keyboard" on page 65 v "1060 Upper case" on page 69 For systems with 802.11a/b/g or 802.11b/g antenna cable connection 1 For ThinkPad X60 and X60s computers: 3 2 78 ThinkPad® X60, X60s, X61, and X61s
Removing and replacing a FRU 1120 Wireless LAN PCI Express Mini card For access, remove following FRUs, in order: v "1010 Battery pack" on page 60 v "1050 Keyboard" on page 65 v "1060 Upper case" on page 69 For systems with 802.11a/b/g or 802.11b/g antenna cable connection 1 For ThinkPad X60 and X60s computers: 3 2 78 ThinkPad® X60, X60s, X61, and X61s

Hardware Maintenance Manual
Page 85
If you are installing a 802.11n wireless LAN card, attach the grey cable to the left connector and the black cable to the center connector, the connection speed will be lower. ThinkPad X60, X60s, X61, and X61s 79 For ThinkPad X61 and X61s computers: Removing and replacing a FRU Step 2 Screw (quantity) M2 × 2.5 mm, wafer-head, nylon-coated (2) Color Silver Torque 0.157 Nm (1.6 kgfcm) When installing: If you attach either cable to the right connector.
If you are installing a 802.11n wireless LAN card, attach the grey cable to the left connector and the black cable to the center connector, the connection speed will be lower. ThinkPad X60, X60s, X61, and X61s 79 For ThinkPad X61 and X61s computers: Removing and replacing a FRU Step 2 Screw (quantity) M2 × 2.5 mm, wafer-head, nylon-coated (2) Color Silver Torque 0.157 Nm (1.6 kgfcm) When installing: If you attach either cable to the right connector.

Hardware Maintenance Manual
Page 86
... connector, and the black cable to the mainboard with tape. Removing and replacing a FRU For systems with 802.11n wireless LAN 3rd antenna cable connection For ThinkPad X60 and X60s computers: For ThinkPad X61 and X61s computers: 2 2 3 Step 2 Screw (quantity) M2 × 2.5 mm, wafer-head, nylon-coated (2) Color Silver Torque 0.157 Nm (1.6 kgfcm) When installing..., first insert the connector end of the white cable into a plastic cable bag and affix the cable to the right connector on the card. 80 ThinkPad® X60, X60s, X61, and X61s
... connector, and the black cable to the mainboard with tape. Removing and replacing a FRU For systems with 802.11n wireless LAN 3rd antenna cable connection For ThinkPad X60 and X60s computers: For ThinkPad X61 and X61s computers: 2 2 3 Step 2 Screw (quantity) M2 × 2.5 mm, wafer-head, nylon-coated (2) Color Silver Torque 0.157 Nm (1.6 kgfcm) When installing..., first insert the connector end of the white cable into a plastic cable bag and affix the cable to the right connector on the card. 80 ThinkPad® X60, X60s, X61, and X61s
Hardware Maintenance Manual
Page 89
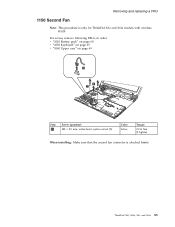
Removing and replacing a FRU 1150 Second Fan Note: This procedure is attached firmly. For access, remove following FRUs, in order: v "1010 Battery pack" on page 60 v "1050 Keyboard" on page 65 v "1060 Upper case" on page 69 2 3 4 Step 1 Screw (quantity) M2 × 2.5 mm, wafer-head, nylon-coated (2) Color Silver Torque 0.196 Nm (2 kgfcm) When installing: Make sure that the second fan connector is only for ThinkPad X61 and X61s models with wireless WAN. ThinkPad X60, X60s, X61, and X61s 83
Removing and replacing a FRU 1150 Second Fan Note: This procedure is attached firmly. For access, remove following FRUs, in order: v "1010 Battery pack" on page 60 v "1050 Keyboard" on page 65 v "1060 Upper case" on page 69 2 3 4 Step 1 Screw (quantity) M2 × 2.5 mm, wafer-head, nylon-coated (2) Color Silver Torque 0.196 Nm (2 kgfcm) When installing: Make sure that the second fan connector is only for ThinkPad X61 and X61s models with wireless WAN. ThinkPad X60, X60s, X61, and X61s 83

Hardware Maintenance Manual
Page 92
Removing and replacing a FRU 1180 LCD assembly For access, remove following FRUs, in steps 6 to 9 . 11 4 2 3 Step 1 Screw (quantity) M2 × 3.5 mm, wafer-head, nylon-coated (2) (continued) Color Silver Torque 0.196 Nm (2 kgfcm) 86 ThinkPad® X60, X60s, X61, and X61s Then release the antenna cables in order: v "1010 Battery pack" on page 60 v "1050 Keyboard" on page 65 v "1060 Upper case" on page 69 v "1100 Wireless WAN PCI Express Mini card" on page 75 v "1120 Wireless LAN PCI Express Mini card" on page 78 Before removing LCD assembly, detach the connector 4 .
Removing and replacing a FRU 1180 LCD assembly For access, remove following FRUs, in steps 6 to 9 . 11 4 2 3 Step 1 Screw (quantity) M2 × 3.5 mm, wafer-head, nylon-coated (2) (continued) Color Silver Torque 0.196 Nm (2 kgfcm) 86 ThinkPad® X60, X60s, X61, and X61s Then release the antenna cables in order: v "1010 Battery pack" on page 60 v "1050 Keyboard" on page 65 v "1060 Upper case" on page 69 v "1100 Wireless WAN PCI Express Mini card" on page 75 v "1120 Wireless LAN PCI Express Mini card" on page 78 Before removing LCD assembly, detach the connector 4 .
Hardware Maintenance Manual
Page 93
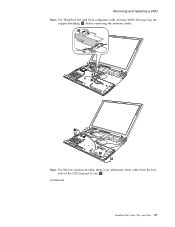
Removing and replacing a FRU Note: For ThinkPad X61 and X61s computers with wireless WAN, first peel up the copper shielding 5 before removing the antenna cables. 5 66 6 6 66 7 8 9 Note: For 802.11n wireless models, there is an additional white cable from the left side of the LCD instead of one 7 . (continued) ThinkPad X60, X60s, X61, and X61s 87
Removing and replacing a FRU Note: For ThinkPad X61 and X61s computers with wireless WAN, first peel up the copper shielding 5 before removing the antenna cables. 5 66 6 6 66 7 8 9 Note: For 802.11n wireless models, there is an additional white cable from the left side of the LCD instead of one 7 . (continued) ThinkPad X60, X60s, X61, and X61s 87
Hardware Maintenance Manual
Page 96
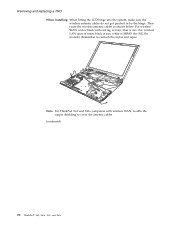
...for 802.11n models). white is main; Remember to cover the antenna cables. (continued) 90 ThinkPad® X60, X60s, X61, and X61s Removing and replacing a FRU When installing: When fitting the LCD hinge into the system, make sure the wireless antenna cables do not get pinched in by the hinge. For... wireless WAN: red or black with wireless WAN, re-affix the copper shielding to reattach the mylar and tapes. 1 2 3 Note: For ThinkPad X61 and X61s computers with red tag is main; Then ...
...for 802.11n models). white is main; Remember to cover the antenna cables. (continued) 90 ThinkPad® X60, X60s, X61, and X61s Removing and replacing a FRU When installing: When fitting the LCD hinge into the system, make sure the wireless antenna cables do not get pinched in by the hinge. For... wireless WAN: red or black with wireless WAN, re-affix the copper shielding to reattach the mylar and tapes. 1 2 3 Note: For ThinkPad X61 and X61s computers with red tag is main; Then ...
Hardware Maintenance Manual
Page 99
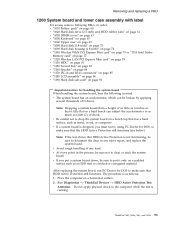
... (1.8-inch)" on page 73 v "1090 Hard disk housing (1.8-inch)" on page 74 v "1100 Wireless WAN PCI Express Mini card" on page 75 or "1110 Intel Turbo Memory card" on page 77 v "1120 Wireless LAN PCI Express Mini card" on page 78 v "1130 MDC" on page 81 v "1150 ...system board. v At every point in mind. The procedure is running. Run Diagnostics --> ThinkPad Devices --> HDD Active Protection Test. Note: If the test shows that HDD Active Protection still functions. ThinkPad X60, X60s, X61, and X61s 93 v If you must test it falls flat on a horizontal surface. 2. Place the ...
... (1.8-inch)" on page 73 v "1090 Hard disk housing (1.8-inch)" on page 74 v "1100 Wireless WAN PCI Express Mini card" on page 75 or "1110 Intel Turbo Memory card" on page 77 v "1120 Wireless LAN PCI Express Mini card" on page 78 v "1130 MDC" on page 81 v "1150 ...system board. v At every point in mind. The procedure is running. Run Diagnostics --> ThinkPad Devices --> HDD Active Protection Test. Note: If the test shows that HDD Active Protection still functions. ThinkPad X60, X60s, X61, and X61s 93 v If you must test it falls flat on a horizontal surface. 2. Place the ...

Hardware Maintenance Manual
Page 101
1 1 Removing and replacing a FRU Step 1 Screw (quantity) M2 × 3.5 mm, wafer-head, nylon-coated (2) Color Silver Torque 0.1372 Nm (1.4 kgfcm) 2 When installing: Do not damage the wireless micro switch 1 on the system board. 1 ThinkPad X60, X60s, X61, and X61s 95
1 1 Removing and replacing a FRU Step 1 Screw (quantity) M2 × 3.5 mm, wafer-head, nylon-coated (2) Color Silver Torque 0.1372 Nm (1.4 kgfcm) 2 When installing: Do not damage the wireless micro switch 1 on the system board. 1 ThinkPad X60, X60s, X61, and X61s 95

