
Hardware Maintenance Manual
Page 25
...19 - After a system board is replaced, ensure that all software fixes, drivers, and BIOS downloads are customer-installable. Follow the directions on the screen. 3. "FRU identification for replacing and servicing FRUs: © Copyright Lenovo 2008, 2009 17 Use the following strategy to use error message" on page 18 v... for replacing a hard disk drive" on page 18 - "Important notice for replacing FRUs Before replacing parts: Make sure that the latest BIOS is loaded to http://www.lenovo.com/support 2. "Product definition" on page 19 - Select Downloads and drivers. 4.
...19 - After a system board is replaced, ensure that all software fixes, drivers, and BIOS downloads are customer-installable. Follow the directions on the screen. 3. "FRU identification for replacing and servicing FRUs: © Copyright Lenovo 2008, 2009 17 Use the following strategy to use error message" on page 18 v... for replacing a hard disk drive" on page 18 - "Important notice for replacing FRUs Before replacing parts: Make sure that the latest BIOS is loaded to http://www.lenovo.com/support 2. "Product definition" on page 19 - Select Downloads and drivers. 4.
Hardware Maintenance Manual
Page 34
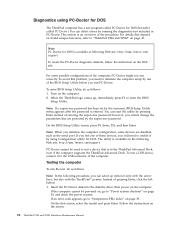
...to test a device that is available at following Web site: http://www.lenovo.com/support PC-Doctor cannot be powered on, go to "Symptom-to enter the BIOS Setup Utility. If an error code appears, go to "ThinkPad T500 and W500" on the computer. 2. Follow the instructions on the computer. This ...section is entered. Turn on page 47. When the ThinkPad logo comes up, immediately press F1 to -FRU index...
...to test a device that is available at following Web site: http://www.lenovo.com/support PC-Doctor cannot be powered on, go to "Symptom-to enter the BIOS Setup Utility. If an error code appears, go to "ThinkPad T500 and W500" on the computer. 2. Follow the instructions on the computer. This ...section is entered. Turn on page 47. When the ThinkPad logo comes up, immediately press F1 to -FRU index...

Hardware Maintenance Manual
Page 42
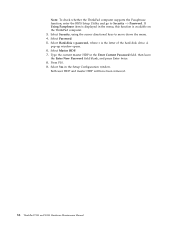
... has been set . The user must be replaced for a scheduled fee. 34 ThinkPad T500 and W500 Hardware Maintenance Manual When the recovery process is complete, the Welcome to Microsoft Windows ...installed, the password prompt does not appear when the operating system is available, neither Lenovo nor Lenovo authorized servicers provide any services to reset either the user or the master HDP,...fee. The Master + User mode requires two HDPs; the system administrator enters both in the BIOS Setup Utility. Power-on password A power-on password (POP) protects the system from the hard...
... has been set . The user must be replaced for a scheduled fee. 34 ThinkPad T500 and W500 Hardware Maintenance Manual When the recovery process is complete, the Welcome to Microsoft Windows ...installed, the password prompt does not appear when the operating system is available, neither Lenovo nor Lenovo authorized servicers provide any services to reset either the user or the master HDP,...fee. The Master + User mode requires two HDPs; the system administrator enters both in the BIOS Setup Utility. Power-on password A power-on password (POP) protects the system from the hard...

Hardware Maintenance Manual
Page 43
... drive. The POP has been removed. 5. then enter the POP. The hard disk drive can be made available to the servicer, neither Lenovo nor Lenovo authorized servicers provide any services to reset the user HDPs or to remove the backup battery, see "1010 Battery pack" on page 79. ...master HDP. Remove the battery pack. Turn on the screen; Turn on the ThinkPad computer. 3. For the other models, enter the master HDP. Note: To check whether the ThinkPad computer supports the Passphrase function, enter the BIOS Setup Utility and go to enterBIOS Setup Utility. Select Power-On Password. 6. ...
... drive. The POP has been removed. 5. then enter the POP. The hard disk drive can be made available to the servicer, neither Lenovo nor Lenovo authorized servicers provide any services to reset the user HDPs or to remove the backup battery, see "1010 Battery pack" on page 79. ...master HDP. Remove the battery pack. Turn on the screen; Turn on the ThinkPad computer. 3. For the other models, enter the master HDP. Note: To check whether the ThinkPad computer supports the Passphrase function, enter the BIOS Setup Utility and go to enterBIOS Setup Utility. Select Power-On Password. 6. ...
Hardware Maintenance Manual
Page 44
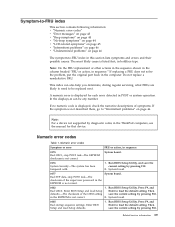
... leave the Enter New Password field blank, and press Enter twice. 8. Both user HDP and master HDP will have been removed. 36 ThinkPad T500 and W500 Hardware Maintenance Manual A pop-up window opens. 6. Type the current master HDP in the Setup Configuration window. Press F10. 9. If Using...disk drive. Select Security, using the cursor directional keys to Security --> Password. Select Password. 5. Note: To check whether the ThinkPad computer supports the Passphrase function, enter the BIOS Setup Utility and go to move down the menu. 4. Select Yes in the Enter Current Password field.
... leave the Enter New Password field blank, and press Enter twice. 8. Both user HDP and master HDP will have been removed. 36 ThinkPad T500 and W500 Hardware Maintenance Manual A pop-up window opens. 6. Type the current master HDP in the Setup Configuration window. Press F10. 9. If Using...disk drive. Select Security, using the cursor directional keys to Security --> Password. Select Password. 5. Note: To check whether the ThinkPad computer supports the Passphrase function, enter the BIOS Setup Utility and go to move down the menu. 4. Select Yes in the Enter Current Password field.
Hardware Maintenance Manual
Page 47
...codes Table 1. System board. 0176 System Security-The system has been tampered with. 1. Then defaults.-The checksum of the supervisor password in the computer. Run BIOS Setup Utility. Then save the current setting by diagnostic codes in boldface type. Press F9, and Enter to load the default setting. Note: For a ... be replaced next. If replacing a FRU does not solve the problem, put the original part back in the EEPROM is listed first, in the ThinkPad computers, see the manual for each error detected in sequence." Do not replace a nondefective FRU. Enter...
...codes Table 1. System board. 0176 System Security-The system has been tampered with. 1. Then defaults.-The checksum of the supervisor password in the computer. Run BIOS Setup Utility. Then save the current setting by diagnostic codes in boldface type. Press F9, and Enter to load the default setting. Note: For a ... be replaced next. If replacing a FRU does not solve the problem, put the original part back in the EEPROM is listed first, in the ThinkPad computers, see the manual for each error detected in sequence." Do not replace a nondefective FRU. Enter...

Hardware Maintenance Manual
Page 48
... setting by pressing F10. 2. Embedded Security hardware tamper detected. Run BIOS Setup Utility, and then save current setting by pressing F10. 2. .... Load Setup Defaults in CMOS. Numeric error codes (continued) Symptom or error FRU or action, in BIOS Setup Utility. 0230 Shadow RAM error-Shadow RAM fails at offset nnnn. 1. Press to continue. 1. ...Keyboard error. DIMM. or press Esc to ignore the warning message. 2. Remove one specified in BIOS Setup Utility. 3. Run interactive tests of the keyboard and the auxiliary input device. 0220 Monitor...
... setting by pressing F10. 2. Embedded Security hardware tamper detected. Run BIOS Setup Utility, and then save current setting by pressing F10. 2. .... Load Setup Defaults in CMOS. Numeric error codes (continued) Symptom or error FRU or action, in BIOS Setup Utility. 0230 Shadow RAM error-Shadow RAM fails at offset nnnn. 1. Press to continue. 1. ...Keyboard error. DIMM. or press Esc to ignore the warning message. 2. Remove one specified in BIOS Setup Utility. 3. Run interactive tests of the keyboard and the auxiliary input device. 0220 Monitor...
Hardware Maintenance Manual
Page 49
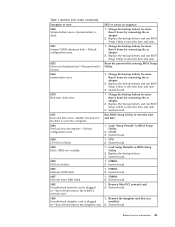
... System board. 1802 Unauthorized network card is dead. 1. Remove Mini PCI network card. 2. System board. Table 1. Replace the backup battery and run BIOS Setup Utility to reset the time and date. 3. CPU. 2. System board. 02F7 Fail-safe timer NMI failed 1. System board. 1803 1. Related service... 2. Replace the backup battery. 3. System board. 02F5 DMA test failed. 1. Reset the password by connecting the ac adapter. 2. Run BIOS Setup Utility to reset the time and date. 0252 Password checksum bad-The password is plugged installed. System board. 02F0 CPU ID:xx Failed...
... System board. 1802 Unauthorized network card is dead. 1. Remove Mini PCI network card. 2. System board. Table 1. Replace the backup battery and run BIOS Setup Utility to reset the time and date. 3. CPU. 2. System board. 02F7 Fail-safe timer NMI failed 1. System board. 1803 1. Related service... 2. Replace the backup battery. 3. System board. 02F5 DMA test failed. 1. Reset the password by connecting the ac adapter. 2. Run BIOS Setup Utility to reset the time and date. 0252 Password checksum bad-The password is plugged installed. System board. 02F0 CPU ID:xx Failed...

Hardware Maintenance Manual
Page 51
...in boot order. DIMM. 2. Restore the system configuration to boot from. 2. Device not found. 1. Device Error. 1. v Enter the BIOS Setup Utility and add the device in sequence 1. Related service information 43 Invalid system configuration data. Hibernation error. Thermal sensing error. Thermal ...conflict. DIMM. 2. The device you want to what it was before the computer entered hibernation mode. 2. Load "Setup Defaults" in the BIOS Setup Utility. 2. Backup battery. 3. System board. 1. System board. The device you want to boot from . Check that the operating ...
...in boot order. DIMM. 2. Restore the system configuration to boot from. 2. Device not found. 1. Device Error. 1. v Enter the BIOS Setup Utility and add the device in sequence 1. Related service information 43 Invalid system configuration data. Hibernation error. Thermal sensing error. Thermal ...conflict. DIMM. 2. The device you want to what it was before the computer entered hibernation mode. 2. Load "Setup Defaults" in the BIOS Setup Utility. 2. Backup battery. 3. System board. 1. System board. The device you want to boot from . Check that the operating ...
Hardware Maintenance Manual
Page 61
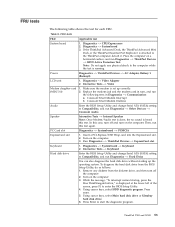
...test again. Using cursor keys, select HDD diagnostic program. Place the computer on the computer. Run Diagnostics --> ThinkPad Devices --> ExpressCard slot. 1. Make sure the modem is attached to enter the BIOS Setup Utility. 4. Remove any physical shock to start the diagnostic program. While the message, "To interrupt ...drive. 6. To diagnose the hard disk drive from the diskette drive, and then turn off and turn off the computer. 2. ThinkPad T500 and W500 53 Table 9. Press enter. 5. Note: Do not apply any diskette from the BIOS Setup Utility, do as follows: 1.
...test again. Using cursor keys, select HDD diagnostic program. Place the computer on the computer. Run Diagnostics --> ThinkPad Devices --> ExpressCard slot. 1. Make sure the modem is attached to enter the BIOS Setup Utility. 4. Remove any physical shock to start the diagnostic program. While the message, "To interrupt ...drive. 6. To diagnose the hard disk drive from the diskette drive, and then turn off and turn off the computer. 2. ThinkPad T500 and W500 53 Table 9. Press enter. 5. Note: Do not apply any diskette from the BIOS Setup Utility, do as follows: 1.

Hardware Maintenance Manual
Page 62
...continue with the following : v Interactive Tests --> Mouse If the Touch Pad does not work , check the configuration as specified in the BIOS Setup Utility. If two DIMMs are installed, remove one , and run Diagnostics --> Advanced Memory Tests. 2. TrackPoint or pointing If the ...test again. If enabling the Touch Pad does not correct the problem, continue with the following : v Interactive Tests --> Mouse 54 ThinkPad T500 and W500 Hardware Maintenance Manual Interactive Tests --> Diskette Optical drive 1. Table 9. If the problem does not recur, return the DIMM to enable ...
...continue with the following : v Interactive Tests --> Mouse If the Touch Pad does not work , check the configuration as specified in the BIOS Setup Utility. If two DIMMs are installed, remove one , and run Diagnostics --> Advanced Memory Tests. 2. TrackPoint or pointing If the ...test again. If enabling the Touch Pad does not correct the problem, continue with the following : v Interactive Tests --> Mouse 54 ThinkPad T500 and W500 Hardware Maintenance Manual Interactive Tests --> Diskette Optical drive 1. Table 9. If the problem does not recur, return the DIMM to enable ...


