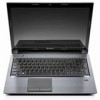
Lenovo V470/V570/B470/B570 UserGuide V1.0
Page 3
... 28 Chapter 4. Lenovo limited warranty ..... 49 Warranty information 53 Appendix C. Product specific notices ..... 56 Energy star information 56 Electronic emissions notices 58 Appendix D. Contents Chapter 1. Connecting to know your computer 26 Chapter 3. CRU instructions 40 Replacing the battery 40 Replacing the hard disk drive 41 Replacing memory 45 Removing the optical drive (only for V470...
... 28 Chapter 4. Lenovo limited warranty ..... 49 Warranty information 53 Appendix C. Product specific notices ..... 56 Energy star information 56 Electronic emissions notices 58 Appendix D. Contents Chapter 1. Connecting to know your computer 26 Chapter 3. CRU instructions 40 Replacing the battery 40 Replacing the hard disk drive 41 Replacing memory 45 Removing the optical drive (only for V470...
Lenovo V470/V570/B470/B570 UserGuide V1.0
Page 15
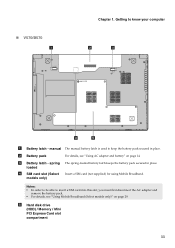
manual The manual battery latch is used to keep the battery pack secured in place. e Hard disk drive (HDD) / Memory / Mini PCI Express Card slot compartment 11 „ V570/B570 a Chapter 1. b Battery pack For details, see "Using Mobile Broadband (Select models only)" on page 14. c Battery latch - spring loaded d SIM card slot (...Insert a SIM card (not supplied) for using Mobile Broadband. Getting to insert a SIM card into this slot, you must first disconnect the AC adapter and remove the battery pack. • For details, see "Using AC adapter and battery" on page 29.
manual The manual battery latch is used to keep the battery pack secured in place. e Hard disk drive (HDD) / Memory / Mini PCI Express Card slot compartment 11 „ V570/B570 a Chapter 1. b Battery pack For details, see "Using Mobile Broadband (Select models only)" on page 14. c Battery latch - spring loaded d SIM card slot (...Insert a SIM card (not supplied) for using Mobile Broadband. Getting to insert a SIM card into this slot, you must first disconnect the AC adapter and remove the battery pack. • For details, see "Using AC adapter and battery" on page 29.
Lenovo V470/V570/B470/B570 UserGuide V1.0
Page 18
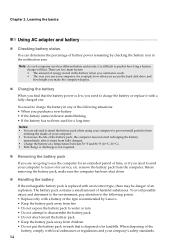
... be danger of harmful substances. Note: As each computer user has different habits and needs, it is difficult to Lenovo for example, how often you access the hard disk drive and how bright you make sure the computer has been shut down. „ Handling the battery If the rechargeable .... There are not going to use your computer to predict how long a battery charge will last. The battery pack contains a small amount of an explosion. remove the battery pack from fully charged. • Charge the battery at a temperature between 50 °F and 86 °F (10 °C-30 °C)....
... be danger of harmful substances. Note: As each computer user has different habits and needs, it is difficult to Lenovo for example, how often you access the hard disk drive and how bright you make sure the computer has been shut down. „ Handling the battery If the rechargeable .... There are not going to use your computer to predict how long a battery charge will last. The battery pack contains a small amount of an explosion. remove the battery pack from fully charged. • Charge the battery at a temperature between 50 °F and 86 °F (10 °C-30 °C)....
Lenovo V470/V570/B470/B570 UserGuide V1.0
Page 30
... characters in data loss. Note: To enter BIOS setup utility, press F2 when the Lenovo logo appears on the screen while the computer is starting up. „ Fingerprint reader ...System (APS) (V470/V570) (Select models only) As a reliable safeguard, APS reduces the possibility of your password at the prompt. The computer cannot be from being removed without your permission. For ...details on installing the security lock, please refer to the instructions shipped with your fingerprint to secure your computer from one to the hard disk drive...
... characters in data loss. Note: To enter BIOS setup utility, press F2 when the Lenovo logo appears on the screen while the computer is starting up. „ Fingerprint reader ...System (APS) (V470/V570) (Select models only) As a reliable safeguard, APS reduces the possibility of your password at the prompt. The computer cannot be from being removed without your permission. For ...details on installing the security lock, please refer to the instructions shipped with your fingerprint to secure your computer from one to the hard disk drive...
Lenovo V470/V570/B470/B570 UserGuide V1.0
Page 45
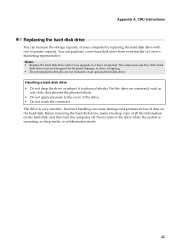
... drive on an optional hard disk drive. CRU instructions Replacing the hard disk drive You can increase the storage capacity of your reseller or Lenovo marketing representative. The drive is operating, in sleep mode, or in hibernation mode. 41 Appendix A. You can cause damage and permanent loss of the drive. • Do not touch the connector. Never remove the drive...
... drive on an optional hard disk drive. CRU instructions Replacing the hard disk drive You can increase the storage capacity of your reseller or Lenovo marketing representative. The drive is operating, in sleep mode, or in hibernation mode. 41 Appendix A. You can cause damage and permanent loss of the drive. • Do not touch the connector. Never remove the drive...
Lenovo V470/V570/B470/B570 UserGuide V1.0
Page 46
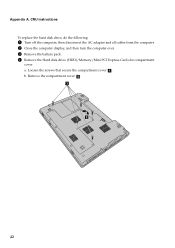
Appendix A. b. Remove the compartment cover b . then disconnect the AC adapter and all cables from the computer. 2 Close the computer display, and then turn the computer over. 3 Remove the battery pack. 4 Remove the Hard disk drive (HDD)/Memory/Mini PCI Express Card slot compartment cover. a b 42 a. CRU instructions To replace the hard disk drive, do the following: 1 Turn off the computer; Loosen the screws that secure the compartment cover a .
Appendix A. b. Remove the compartment cover b . then disconnect the AC adapter and all cables from the computer. 2 Close the computer display, and then turn the computer over. 3 Remove the battery pack. 4 Remove the Hard disk drive (HDD)/Memory/Mini PCI Express Card slot compartment cover. a b 42 a. CRU instructions To replace the hard disk drive, do the following: 1 Turn off the computer; Loosen the screws that secure the compartment cover a .
Lenovo V470/V570/B470/B570 UserGuide V1.0
Page 48
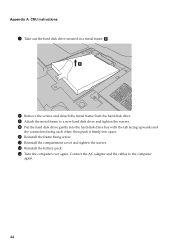
.... D Turn the computer over again. then push it firmly into the hard disk drive bay with the tab facing upwards and the connectors facing each other; e 8 Remove the screws and detach the metal frame from the hard disk drive. 9 Attach the metal frame to the computer again. 44 C Reinstall ...the battery pack. CRU instructions 7 Take out the hard disk drive secured in a metal frame e . Connect the AC ...
.... D Turn the computer over again. then push it firmly into the hard disk drive bay with the tab facing upwards and the connectors facing each other; e 8 Remove the screws and detach the metal frame from the hard disk drive. 9 Attach the metal frame to the computer again. 44 C Reinstall ...the battery pack. CRU instructions 7 Take out the hard disk drive secured in a metal frame e . Connect the AC ...

Lenovo V470/V570/B470/B570 UserGuide V1.0
Page 49
... off the computer. Disconnect the AC adapter and all cables from the computer. 3 Close the computer display, and turn the computer over. 4 Remove the battery pack. 5 Remove the Hard disk drive (HDD)/Memory/Mini PCI Express Card slot compartment cover. Do not touch the contact edge of your computer by your body, which could...
... off the computer. Disconnect the AC adapter and all cables from the computer. 3 Close the computer display, and turn the computer over. 4 Remove the battery pack. 5 Remove the Hard disk drive (HDD)/Memory/Mini PCI Express Card slot compartment cover. Do not touch the contact edge of your computer by your body, which could...
Lenovo V470/V570/B470/B570 UserGuide V1.0
Page 52
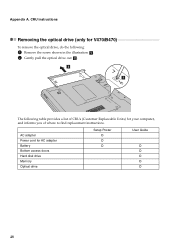
Appendix A. AC adapter Power cord for your computer, and informs you of where to find replacement instructions. b a The following : 1 Remove the screw shown in the illustration a . 2 Gently pull the optical drive out b . CRU instructions Removing the optical drive (only for V470/B470 To remove the optical drive, do the following table provides a list of CRUs (Customer Replaceable Units) for AC adapter Battery Bottom access doors Hard disk drive Memory Optical drive Setup Poster O O O User Guide O O O O O 48
Appendix A. AC adapter Power cord for your computer, and informs you of where to find replacement instructions. b a The following : 1 Remove the screw shown in the illustration a . 2 Gently pull the optical drive out b . CRU instructions Removing the optical drive (only for V470/B470 To remove the optical drive, do the following table provides a list of CRUs (Customer Replaceable Units) for AC adapter Battery Bottom access doors Hard disk drive Memory Optical drive Setup Poster O O O User Guide O O O O O 48


