
User Manual
Page 28
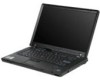
... and cannot be replaced for a scheduled fee. Remove the backup battery. the system administrator enters both in the BIOS Setup Utility. How to reset the password. For how to the BIOS Setup Utility and change the system configuration. Turn on by the servicer: 22 MT 2529, 2530, 2531, and 2532...HDP, or to the system user. Exception: If only an SVP is installed, the password prompt does not appear when the operating system is available, Lenovo does not provide any of these passwords has been set, a prompt for a scheduled fee. Power-on password: A power-on password (POP) ...
... and cannot be replaced for a scheduled fee. Remove the backup battery. the system administrator enters both in the BIOS Setup Utility. How to reset the password. For how to the BIOS Setup Utility and change the system configuration. Turn on by the servicer: 22 MT 2529, 2530, 2531, and 2532...HDP, or to the system user. Exception: If only an SVP is installed, the password prompt does not appear when the operating system is available, Lenovo does not provide any of these passwords has been set, a prompt for a scheduled fee. Power-on password: A power-on password (POP) ...
User Manual
Page 29
Note: To check whether the ThinkPad computer supports the Passphrase function, enter BIOS Setup Utility and go to move down the menu. 5. Click Access BIOS. The computer restarts, and the BIOS Setup Utility screen opens. 4. then, in the Enter Current Password field. The system Restart Required window is appearing on the... New Password field blank, and press Enter twice. 8. Press F10; The hard disk drive can be made available to the servicer, Lenovo does not provide any services to reset the user HDPs or to Security --> Password. then, while the "To interrupt normal startup, press...
Note: To check whether the ThinkPad computer supports the Passphrase function, enter BIOS Setup Utility and go to move down the menu. 5. Click Access BIOS. The computer restarts, and the BIOS Setup Utility screen opens. 4. then, in the Enter Current Password field. The system Restart Required window is appearing on the... New Password field blank, and press Enter twice. 8. Press F10; The hard disk drive can be made available to the servicer, Lenovo does not provide any services to reset the user HDPs or to Security --> Password. then, while the "To interrupt normal startup, press...
User Manual
Page 30
... the time set on the power switch. If you press Fn+F3, or if the time set on the "Turn off monitor" timer in the BIOS Setup Utility expires, v The LCD backlight turns off . v Open the LCD cover. v Turn on the "LCD off timer" in the operating system expires, v The LCD backlight...
... the time set on the power switch. If you press Fn+F3, or if the time set on the "Turn off monitor" timer in the BIOS Setup Utility expires, v The LCD backlight turns off . v Open the LCD cover. v Turn on the "LCD off timer" in the operating system expires, v The LCD backlight...
User Manual
Page 32
... from the ThinkVantage Predesktop Area, do as follows: 26 MT 2529, 2530, 2531, and 2532 This section is to test only ThinkPad products. For some possible configurations of the BIOS Setup Utility before you initialize the computer configuration, some devices are intended to press the Enter key for DOS boot image. 5. then the...
... from the ThinkVantage Predesktop Area, do as follows: 26 MT 2529, 2530, 2531, and 2532 This section is to test only ThinkPad products. For some possible configurations of the BIOS Setup Utility before you initialize the computer configuration, some devices are intended to press the Enter key for DOS boot image. 5. then the...

User Manual
Page 51
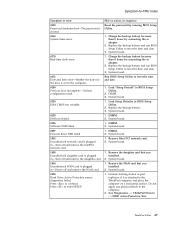
... narrative descriptions of symptoms. If the symptom is not described there, go to EEPROM is failed. Run BIOS Setup Utility. Then save the current setting by pressing F10. 2. System board. 0188 System board. Invalid RFID...BIOS Setup and load Setup Enter to be any number. Enter BIOS Setup and load Setup defaults. 1. Run BIOS Setup Utility, and save the current setting by diagnostic codes in the ThinkPad notebook computers, see the manual for each error detected in boldface type. Invalid RFID Serialization Information Area. 0189 System board. ThinkPad Z60m...
... narrative descriptions of symptoms. If the symptom is not described there, go to EEPROM is failed. Run BIOS Setup Utility. Then save the current setting by pressing F10. 2. System board. 0188 System board. Invalid RFID...BIOS Setup and load Setup Enter to be any number. Enter BIOS Setup and load Setup defaults. 1. Run BIOS Setup Utility, and save the current setting by diagnostic codes in the ThinkPad notebook computers, see the manual for each error detected in boldface type. Invalid RFID Serialization Information Area. 0189 System board. ThinkPad Z60m...

User Manual
Page 52
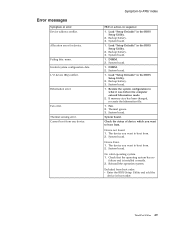
... daughter card. Remove one of them . 1. Reseat the hard disk drive. 2. Load Setup Defaults in BIOS Setup Utility. 0230 Shadow RAM error-Shadow RAM fails at offset nnnn. Load Setup Defaults in BIOS Setup Utility. 3. Extended RAM fails 2. Charge the battery pack. 2. Embedded Security hardware tamper detected.... 1. System board. 01CA More than 8 hours by pressing F10. 2. Hard disk drive. 4. Replace the backup battery and run BIOS Setup Utility to reset the time and date. 46 MT 2529, 2530, 2531, and 2532 Press to ignore the warning message. 2. Remove...
... daughter card. Remove one of them . 1. Reseat the hard disk drive. 2. Load Setup Defaults in BIOS Setup Utility. 0230 Shadow RAM error-Shadow RAM fails at offset nnnn. Load Setup Defaults in BIOS Setup Utility. 3. Extended RAM fails 2. Charge the battery pack. 2. Embedded Security hardware tamper detected.... 1. System board. 01CA More than 8 hours by pressing F10. 2. Hard disk drive. 4. Replace the backup battery and run BIOS Setup Utility to reset the time and date. 46 MT 2529, 2530, 2531, and 2532 Press to ignore the warning message. 2. Remove...
User Manual
Page 53
... and date. 3. Replace the backup battery and run BIOS Setup Utility to the ThinkPad computer, and place the computer on a horizontal surface. Run BIOS Setup Utility to enter SETUP FRU or action, in sequence Reset the password by running BIOS Setup Utility. 1. System board. 1. DIMM. 2. System...board. 1. Undock docking station or port replicator if it is set in BIOS Setup Utility. 2. Charge the backup battery for more than 8 hours by connecting the ac adapter. 2. ThinkPad Z60m 47 Load Setup Defaults in the computer. 0280 Previous boot incomplete- System board. 1. Remove ...
... and date. 3. Replace the backup battery and run BIOS Setup Utility to the ThinkPad computer, and place the computer on a horizontal surface. Run BIOS Setup Utility to enter SETUP FRU or action, in sequence Reset the password by running BIOS Setup Utility. 1. System board. 1. DIMM. 2. System...board. 1. Undock docking station or port replicator if it is set in BIOS Setup Utility. 2. Charge the backup battery for more than 8 hours by connecting the ac adapter. 2. ThinkPad Z60m 47 Load Setup Defaults in the computer. 0280 Previous boot incomplete- System board. 1. Remove ...
User Manual
Page 55
...error. System board. Fan error. System board. 1. System board. 1. Backup battery. 3. v Enter the BIOS Setup Utility and add the device in the BIOS Setup Utility. 2. Load "Setup Defaults" in boot order. Check the status of device which you want to boot from . 2. Excluded ... Device Error. 1. Check that the operating system has no failure and is installed correctly. 2. ThinkPad Z60m 49 Thermal sensing error. DIMM. 2. Thermal grease. 3. Load "Setup Defaults" in the BIOS Setup Utility. 2. The device you want to boot from . 2. Symptom-to what it was before ...
...error. System board. Fan error. System board. 1. System board. 1. Backup battery. 3. v Enter the BIOS Setup Utility and add the device in the BIOS Setup Utility. 2. Load "Setup Defaults" in boot order. Check the status of device which you want to boot from . 2. Excluded ... Device Error. 1. Check that the operating system has no failure and is installed correctly. 2. ThinkPad Z60m 49 Thermal sensing error. DIMM. 2. Thermal grease. 3. Load "Setup Defaults" in the BIOS Setup Utility. 2. The device you want to boot from . 2. Symptom-to what it was before ...
(English) Rescue and Recovery 4.3 Deployment Guide
Page 10
...). - Diagnostic overview: Links to related help topics in support cost savings. Boot from the Rescue and Recovery CD, a set of Lenovo-branded personal computers only. - v Communicate - v Troubleshoot - System information: Provides details about the computer and its hardware components. -...a new incremental backup and then defragment your current settings and data. 2 Rescue and Recovery 4.3 Deployment Guide Access BIOS: Opens the BIOS Setup Utility program. Map network drive: Helps users access network drives for individual computers. Diagnose hardware: Opens the PC...
...). - Diagnostic overview: Links to related help topics in support cost savings. Boot from the Rescue and Recovery CD, a set of Lenovo-branded personal computers only. - v Communicate - v Troubleshoot - System information: Provides details about the computer and its hardware components. -...a new incremental backup and then defragment your current settings and data. 2 Rescue and Recovery 4.3 Deployment Guide Access BIOS: Opens the BIOS Setup Utility program. Map network drive: Helps users access network drives for individual computers. Diagnose hardware: Opens the PC...
(English) Rescue and Recovery 4.3 Deployment Guide
Page 14
...bit color. In non-shared memory configurations, 120 MB of the software installed. however, the user will run the Rescue and Recovery setup package. Minimum system memory requirements: 256 MB system RAM to use and run ; Note: If a computer has less than one application... to install applications, which gives administrators many capabilities to no less than 8 MB. - In shared memory configurations, the BIOS setting for Lenovo computers Lenovo-branded computers must be installed. Hard disk drive configuration: The Rescue and Recovery program is required. To obtain the latest version...
...bit color. In non-shared memory configurations, 120 MB of the software installed. however, the user will run the Rescue and Recovery setup package. Minimum system memory requirements: 256 MB system RAM to use and run ; Note: If a computer has less than one application... to install applications, which gives administrators many capabilities to no less than 8 MB. - In shared memory configurations, the BIOS setting for Lenovo computers Lenovo-branded computers must be installed. Hard disk drive configuration: The Rescue and Recovery program is required. To obtain the latest version...
(English) Rescue and Recovery 4.3 Deployment Guide
Page 15
... system. Administrative installation procedure The Windows Installer can obtain the setup package from: http://www.lenovo.com/support To perform an administrative installation, run the setup package from external media (CD/DVD and USB): Non-Lenovo computer and devices (USB hard disk drive, CD-R/RW, ...DVD-R/RW/RAM, or DVD+R/RW) must fully support one or more of the following specifications: v ATAPI Removable Media Device BIOS Specification v BIOS Enhanced Disk Drive...
... system. Administrative installation procedure The Windows Installer can obtain the setup package from: http://www.lenovo.com/support To perform an administrative installation, run the setup package from external media (CD/DVD and USB): Non-Lenovo computer and devices (USB hard disk drive, CD-R/RW, ...DVD-R/RW/RAM, or DVD+R/RW) must fully support one or more of the following specifications: v ATAPI Removable Media Device BIOS Specification v BIOS Enhanced Disk Drive...
(English) Rescue and Recovery 4.3 Deployment Guide
Page 21
... with BitLocker Drive Encryption, it is recommended to install the Rescue and Recovery program to change the c:\Program Files\Lenovo\Rescue and Recovery directory from a command prompt. Installation 13 Rescue and Recovery environmental variables The following : 1. Compatibility...Lenovo c:\Program Files\Common Files\Lenovo Note: For a complete list of sector-based image formats. this formatting development, use the command line switch -ib to the documentation provided by Symantec for specific details on Windows 7. Also, the image must use the scenario in the BIOS Setup...
... with BitLocker Drive Encryption, it is recommended to install the Rescue and Recovery program to change the c:\Program Files\Lenovo\Rescue and Recovery directory from a command prompt. Installation 13 Rescue and Recovery environmental variables The following : 1. Compatibility...Lenovo c:\Program Files\Common Files\Lenovo Note: For a complete list of sector-based image formats. this formatting development, use the command line switch -ib to the documentation provided by Symantec for specific details on Windows 7. Also, the image must use the scenario in the BIOS Setup...

(Japanese) Rescue and Recovery 4.3 Deployment Guide
Page 10
Rescue and Recovery v Rescue and Recovery Rescue and Recovery BIOS BIOS Setup Utility v Rescue and Recovery Opera Web Web Windows SWSHARE v Rescue and Recovery PC-Doctor Rescue and Recovery CD CD USB : USB PC PC PC Lenovo PC Rescue and Recovery Lenovo PC Rescue and Recovery CD Lenovo PC ʹ͓͍ͯ Rescue and Recovery PC 2 Rescue and Recovery 4.3
Rescue and Recovery v Rescue and Recovery Rescue and Recovery BIOS BIOS Setup Utility v Rescue and Recovery Opera Web Web Windows SWSHARE v Rescue and Recovery PC-Doctor Rescue and Recovery CD CD USB : USB PC PC PC Lenovo PC Rescue and Recovery Lenovo PC Rescue and Recovery CD Lenovo PC ʹ͓͍ͯ Rescue and Recovery PC 2 Rescue and Recovery 4.3

(Simplified Chinese) Rescue and Recovery 4.3 Deployment Guide
Page 9
Z 1 B Ev Rescue and Recovery LrzmK ThinkVantage Technologies D@XiO#bv/ID &CLra);W&\?sD$_,|GZ Microsoft Windows Yw53^(t/Di vB2I9C# Rescue and Recovery Lr_PTB&\: v Rescue and Recovery Predesktop xra)K;V73,9zITZ^(G
Z 1 B Ev Rescue and Recovery LrzmK ThinkVantage Technologies D@XiO#bv/ID &CLra);W&\?sD$_,|GZ Microsoft Windows Yw53^(t/Di vB2I9C# Rescue and Recovery Lr_PTB&\: v Rescue and Recovery Predesktop xra)K;V73,9zITZ^(G

(Simplified Chinese) Rescue and Recovery 4.3 Deployment Guide
Page 19
k BitLocker Df]T *5Vk BitLocker }/wS\Df]T,(iZ9C Microsoft Bitlocker Drive Preparation Tool }7hCVx.s+ Rescue and Recovery Lr20=zDYw53P# 1hC BitLocker Vx1,(i9C Microsoft BitLocker Drive Preparation Tool#}< VxDs!&C*AY 2 GB# g{;9C BitLocker Drive Preparation Tool 4
k BitLocker Df]T *5Vk BitLocker }/wS\Df]T,(iZ9C Microsoft Bitlocker Drive Preparation Tool }7hCVx.s+ Rescue and Recovery Lr20=zDYw53P# 1hC BitLocker Vx1,(i9C Microsoft BitLocker Drive Preparation Tool#}< VxDs!&C*AY 2 GB# g{;9C BitLocker Drive Preparation Tool 4
(English) Rescue and Recovery 4.5 Deployment Guide
Page 9
...as a virtual partition. Installing the Rescue and Recovery program The Rescue and Recovery installation package was developed with the non-BIOS version of the Windows operating system, in the Microsoft Windows environment. Click ThinkVantage and then click the Rescue and Recovery ...Rescue and Recovery 4.30 program or later versions to locate © Copyright Lenovo 2008, 2011 3 See "Scenario 5 - Both Windows PE and Storage Management Subsystem use and run the Rescue and Recovery setup package. Microsoft Recovery Console looks for your Windows 7 operating system. InstallShield...
...as a virtual partition. Installing the Rescue and Recovery program The Rescue and Recovery installation package was developed with the non-BIOS version of the Windows operating system, in the Microsoft Windows environment. Click ThinkVantage and then click the Rescue and Recovery ...Rescue and Recovery 4.30 program or later versions to locate © Copyright Lenovo 2008, 2011 3 See "Scenario 5 - Both Windows PE and Storage Management Subsystem use and run the Rescue and Recovery setup package. Microsoft Recovery Console looks for your Windows 7 operating system. InstallShield...
(English) Rescue and Recovery 4.5 Deployment Guide
Page 16
... , you can use the BitLocker Drive Preparation Tool to prepare the BitLocker partition, you do the following: 1. Note: Keep the USB storage device in the BIOS Setup Utility, to the smaller partition. For more information about BitLocker, go to the Microsoft Web site at startup option. 4. Install the Rescue and Recovery program...
... , you can use the BitLocker Drive Preparation Tool to prepare the BitLocker partition, you do the following: 1. Note: Keep the USB storage device in the BIOS Setup Utility, to the smaller partition. For more information about BitLocker, go to the Microsoft Web site at startup option. 4. Install the Rescue and Recovery program...
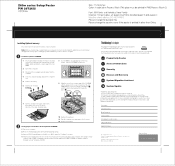
(Korean) Setup guide for ThinkPad Z60m (Part 2 of 2)
Page 1
... Position Only 39T6087 07/11/2005 . : . , . 1 (SO-DIMM) . 1 . ThinkPad Lenovo . Productivity Center Access Connections Security Rescue and Recovery System Migration Assistant System Update * 1) 2) 3) CD " : , . SO-DIMM SO-DIMM 2 . . . 8 SO-DIMM . . 3 AC . 4 LCD . , . 5 . 6 . 9 SO-DIMM , 20 1,' ' SO-DIMM 2. 21 2 7 . . 1 10 11 12 2 (SO-DIMM) . 1 . 2 ThinkVantage . 3" " "BIOS " BIOS Setup Utility . 4 "Installed memory" , 768MB 256MB . 512MB SO-DIMM...
... Position Only 39T6087 07/11/2005 . : . , . 1 (SO-DIMM) . 1 . ThinkPad Lenovo . Productivity Center Access Connections Security Rescue and Recovery System Migration Assistant System Update * 1) 2) 3) CD " : , . SO-DIMM SO-DIMM 2 . . . 8 SO-DIMM . . 3 AC . 4 LCD . , . 5 . 6 . 9 SO-DIMM , 20 1,' ' SO-DIMM 2. 21 2 7 . . 1 10 11 12 2 (SO-DIMM) . 1 . 2 ThinkVantage . 3" " "BIOS " BIOS Setup Utility . 4 "Installed memory" , 768MB 256MB . 512MB SO-DIMM...
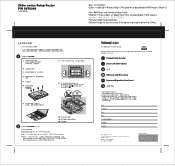
(Chinese - Traditional) Setup guide for ThinkPad Z60m
Page 2
ThinkPad Lenovo IBM IBM Printed in China All rights reserved. Portions Copyright International Business Machines Corporation 2005. 39T6086 07/11/2005 1 1 SO-DIMM SO-DIMM 2 3 AC 4 5 6 8 SO-DIMM 9 SO-DIMM 21 2 7 1 2 1 2 3 4 10 11 12 SO-DIMM ThinkVantage "Configure" "Access BIOS" "BIOS Setup Utility" Installed memory 256 MB Installed memory 512 MB SO-DIMM 768 MB ThinkVantage ThinkVantage Technologies Access Help Productivity Center Access Connections Productivity Center Rescue and Recovery System Migration Assistant * 1) 2) 3) Copyright Lenovo 2005.
ThinkPad Lenovo IBM IBM Printed in China All rights reserved. Portions Copyright International Business Machines Corporation 2005. 39T6086 07/11/2005 1 1 SO-DIMM SO-DIMM 2 3 AC 4 5 6 8 SO-DIMM 9 SO-DIMM 21 2 7 1 2 1 2 3 4 10 11 12 SO-DIMM ThinkVantage "Configure" "Access BIOS" "BIOS Setup Utility" Installed memory 256 MB Installed memory 512 MB SO-DIMM 768 MB ThinkVantage ThinkVantage Technologies Access Help Productivity Center Access Connections Productivity Center Rescue and Recovery System Migration Assistant * 1) 2) 3) Copyright Lenovo 2005.
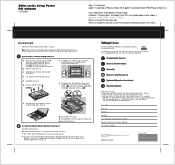
(English) Setup guide for ThinkPad Z60m
Page 2
...additional 512 MB SO-DIMM, the quantity shown in your body that could damage the SODIMM. ThinkPad is a trademark of the SODIMM. 2 Turn off the computer. 3 Disconnect the ac adapter...Turn on the computer. 2 Press the ThinkVantage button when prompted during startup. 3 Open the BIOS Setup Utility by your computer. Everything for a recovery CD. All rights reserved. For example, if... number: Serial number: Company or reseller service: Support Web site: Support number: Copyright Lenovo 2005. To learn more information, see "Recovering Pre-Installed Software" in the socket. 39T2155...
...additional 512 MB SO-DIMM, the quantity shown in your body that could damage the SODIMM. ThinkPad is a trademark of the SODIMM. 2 Turn off the computer. 3 Disconnect the ac adapter...Turn on the computer. 2 Press the ThinkVantage button when prompted during startup. 3 Open the BIOS Setup Utility by your computer. Everything for a recovery CD. All rights reserved. For example, if... number: Serial number: Company or reseller service: Support Web site: Support number: Copyright Lenovo 2005. To learn more information, see "Recovering Pre-Installed Software" in the socket. 39T2155...


