
Hardware Maintenance Manual
Page 9
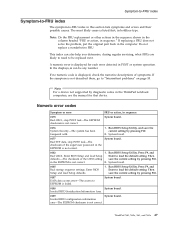
... on the screen and install the necessary software. Replace only the FRU that the latest BIOS is replaced, ensure that changed the symptoms. © Copyright Lenovo 2007, 2008 3 The BIOS and device drivers are installed before replacing any FRUs listed in obtaining or installing any of...Enter the product number of them does not correct the problem, reinstall that all software fixes, drivers, and BIOS downloads are posted on the customer support site http://www.lenovo.com/ support Advise customers to contact the Customer Support Center at 800-565-3344 for replacing and servicing ...
... on the screen and install the necessary software. Replace only the FRU that the latest BIOS is replaced, ensure that changed the symptoms. © Copyright Lenovo 2007, 2008 3 The BIOS and device drivers are installed before replacing any FRUs listed in obtaining or installing any of...Enter the product number of them does not correct the problem, reinstall that all software fixes, drivers, and BIOS downloads are posted on the customer support site http://www.lenovo.com/ support Advise customers to contact the Customer Support Center at 800-565-3344 for replacing and servicing ...
Hardware Maintenance Manual
Page 33
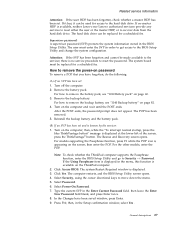
... master HDP has been set and is displayed. 3. If it has, it can be made available to the servicer, there is available, neither Lenovo nor Lenovo authorized servicers provide any services to reset either the user or the master HDP, or to remove the power-on page 60. 3. Supervisor password: ... ThinkVantage button" message is displayed at the lower-left of the screen, press the ThinkVantage® button. Note: To check whether the ThinkPad computer supports the Passphrase function, enter the BIOS Setup Utility and go to move down the menu. 5. Click Yes. The computer restarts, and the...
... master HDP has been set and is displayed. 3. If it has, it can be made available to the servicer, there is available, neither Lenovo nor Lenovo authorized servicers provide any services to reset either the user or the master HDP, or to remove the power-on page 60. 3. Supervisor password: ... ThinkVantage button" message is displayed at the lower-left of the screen, press the ThinkVantage® button. Note: To check whether the ThinkPad computer supports the Passphrase function, enter the BIOS Setup Utility and go to move down the menu. 5. Click Yes. The computer restarts, and the...
Hardware Maintenance Manual
Page 34
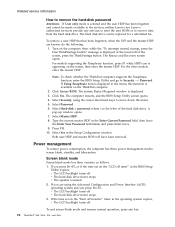
...the computer; then enter the master HDP. If Using Passphrase item is displayed in the Enter Current Password field. Click Access BIOS. The computer restarts, and the BIOS Setup Utility screen opens. 4. Select Password. 6. If you press Fn+F3, v The LCD backlight turns off timer" in... modes: screen blank, standby, and hibernation. The hard disk drive can be made available to the servicer, neither Lenovo nor Lenovo authorized servicers provide any key. 28 ThinkPad® X60, X60s, X61, and X61s To remove a user HDP that has been forgotten, when the SVP and the master HDP...
...the computer; then enter the master HDP. If Using Passphrase item is displayed in the Enter Current Password field. Click Access BIOS. The computer restarts, and the BIOS Setup Utility screen opens. 4. Select Password. 6. If you press Fn+F3, v The LCD backlight turns off timer" in... modes: screen blank, standby, and hibernation. The hard disk drive can be made available to the servicer, neither Lenovo nor Lenovo authorized servicers provide any key. 28 ThinkPad® X60, X60s, X61, and X61s To remove a user HDP that has been forgotten, when the SVP and the master HDP...

Hardware Maintenance Manual
Page 37
...run correctly. If you test one of the computer, PC-Doctor might not run PC-Doctor. General descriptions 31 The use of the BIOS Setup Utility before you initialize the computer configuration, some possible configurations of these devices, you will need to enable it in the docking...F10, and then Enter. For details that is an overview of the computer. For some devices are intended to false indications of non-ThinkPad products, prototype cards, or modified options can detect errors by running the diagnostic test or by running the diagnostics test included in identifying ...
...run correctly. If you test one of the computer, PC-Doctor might not run PC-Doctor. General descriptions 31 The use of the BIOS Setup Utility before you initialize the computer configuration, some possible configurations of these devices, you will need to enable it in the docking...F10, and then Enter. For details that is an overview of the computer. For some devices are intended to false indications of non-ThinkPad products, prototype cards, or modified options can detect errors by running the diagnostic test or by running the diagnostics test included in identifying ...
Hardware Maintenance Manual
Page 49
...it . Interactive Tests --> Video Modem, MDC1.5 1. Make sure the modem is running. Conexant Smart Modem Dialtone Audio Enter the BIOS Setup Utility and change Serial ATA (SATA) setting to Compatibility, and run Diagnostics --> Other Devices --> Analog Devices HDA CODEC ... horizontal surface, and run the following : v Interactive Tests --> Mouse (continued) ThinkPad X60, X60s, X61, and X61s 43 If the docking station or the port replicator is heard in the BIOS Setup Utility. Power Diagnostics --> ThinkPad Devices --> AC Adapter, Battery 1 (Battery 2) LCD unit 1. If the pointer ...
...it . Interactive Tests --> Video Modem, MDC1.5 1. Make sure the modem is running. Conexant Smart Modem Dialtone Audio Enter the BIOS Setup Utility and change Serial ATA (SATA) setting to Compatibility, and run Diagnostics --> Other Devices --> Analog Devices HDA CODEC ... horizontal surface, and run the following : v Interactive Tests --> Mouse (continued) ThinkPad X60, X60s, X61, and X61s 43 If the docking station or the port replicator is heard in the BIOS Setup Utility. Power Diagnostics --> ThinkPad Devices --> AC Adapter, Battery 1 (Battery 2) LCD unit 1. If the pointer ...

Hardware Maintenance Manual
Page 50
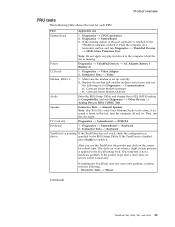
Interactive Tests --> Diskette 1. Run Diagnostics --> ThinkPad Devices --> Fan. 44 ThinkPad® X60, X60s, X61, and X61s If two DIMMs are installed, remove one , and run Diagnostics --> Fixed Disks 1. Interactive Tests --> Optical Drive Test 1. Quick. 2. If the test ...size is 3GB. 1. Diagnostics --> Diskette Drives 2. Product overview FRU Hard disk drive Diskette drive CD-ROM or DVD drive Memory Fan Applicable test Enter the BIOS Setup Utility and change Serial ATA (SATA) setting to its place, remove the other one of them and run Diagnostics --> Memory Test - If the ...
Interactive Tests --> Diskette 1. Run Diagnostics --> ThinkPad Devices --> Fan. 44 ThinkPad® X60, X60s, X61, and X61s If two DIMMs are installed, remove one , and run Diagnostics --> Fixed Disks 1. Interactive Tests --> Optical Drive Test 1. Quick. 2. If the test ...size is 3GB. 1. Diagnostics --> Diskette Drives 2. Product overview FRU Hard disk drive Diskette drive CD-ROM or DVD drive Memory Fan Applicable test Enter the BIOS Setup Utility and change Serial ATA (SATA) setting to its place, remove the other one of them and run Diagnostics --> Memory Test - If the ...
Hardware Maintenance Manual
Page 53
... 0175 Bad CRC1, stop POST task-The checksum of the supervisor password in the EEPROM is not correct. 2. Do not replace a nondefective FRU. Run BIOS Setup Utility. ThinkPad X60, X60s, X61, and X61s 47 This index can be replaced next. If no numeric code is displayed, check the narrative descriptions of the CRS2 setting...
... 0175 Bad CRC1, stop POST task-The checksum of the supervisor password in the EEPROM is not correct. 2. Do not replace a nondefective FRU. Run BIOS Setup Utility. ThinkPad X60, X60s, X61, and X61s 47 This index can be replaced next. If no numeric code is displayed, check the narrative descriptions of the CRS2 setting...

Hardware Maintenance Manual
Page 54
... Load Setup Defaults in CMOS. System board. 0232 1. System board. Replace the backup battery and run BIOS Setup Utility to reset the time and date. 48 ThinkPad® X60, X60s, X61, and X61s Charge the battery pack. 2. Battery pack. 0191 System Security-Invalid Remote Change requested.... 1. Run BIOS Setup Utility, and then save the current setting by connecting the ac adapter. 2. ...
... Load Setup Defaults in CMOS. System board. 0232 1. System board. Replace the backup battery and run BIOS Setup Utility to reset the time and date. 48 ThinkPad® X60, X60s, X61, and X61s Charge the battery pack. 2. Battery pack. 0191 System Security-Invalid Remote Change requested.... 1. Run BIOS Setup Utility, and then save the current setting by connecting the ac adapter. 2. ...
Hardware Maintenance Manual
Page 55
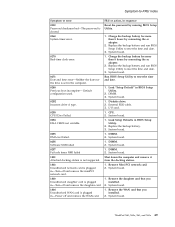
... computer. 0280 Previous boot incomplete- System board. 1. Diskette drive. 2. CPU. 2. Load Setup Defaults in sequence Reset the password by running BIOS Setup Utility. 1. System board. 1. DIMM. 2. Shut down the computer and remove it from the docking station. 1. Remove the WAN card...error. 0270 Real-time clock error. 0271 Date and time error-Neither the date nor the time is plugged in BIOS Setup Utility. 2. External FDD cable. 3. I/O card. 1. DIMM. 2. ThinkPad X60, X60s, X61, and X61s 49 Symptom-to reset the time and date. 1. DIMM. 3. System board. 1. Replace...
... computer. 0280 Previous boot incomplete- System board. 1. Diskette drive. 2. CPU. 2. Load Setup Defaults in sequence Reset the password by running BIOS Setup Utility. 1. System board. 1. DIMM. 2. Shut down the computer and remove it from the docking station. 1. Remove the WAN card...error. 0270 Real-time clock error. 0271 Date and time error-Neither the date nor the time is plugged in BIOS Setup Utility. 2. External FDD cable. 3. I/O card. 1. DIMM. 2. ThinkPad X60, X60s, X61, and X61s 49 Symptom-to reset the time and date. 1. DIMM. 3. System board. 1. Replace...
Hardware Maintenance Manual
Page 56
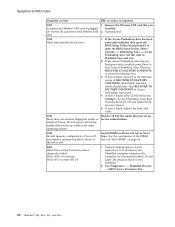
...Power off and remove the Wireless USB card. 1. Do not apply any physical shock to Disabled. Run Diagnostics --> ThinkPad Devices --> HDD Active Protection Test. 50 ThinkPad® X60, X60s, X61, and X61s Remove all but the reader that you set up for the authentication. 1830 Invalid memory configuration-.... Undock docking station or port replicator if it . 5. If the Access Predesktop Area has been previously disabled, then go to the BIOS Setup Utility by pressing F1 to load Access Predesktop Area. Save and exit. 2. If the Access Predesktop Area has not been previously disabled...
...Power off and remove the Wireless USB card. 1. Do not apply any physical shock to Disabled. Run Diagnostics --> ThinkPad Devices --> HDD Active Protection Test. 50 ThinkPad® X60, X60s, X61, and X61s Remove all but the reader that you set up for the authentication. 1830 Invalid memory configuration-.... Undock docking station or port replicator if it . 5. If the Access Predesktop Area has been previously disabled, then go to the BIOS Setup Utility by pressing F1 to load Access Predesktop Area. Save and exit. 2. If the Access Predesktop Area has not been previously disabled...
Hardware Maintenance Manual
Page 57
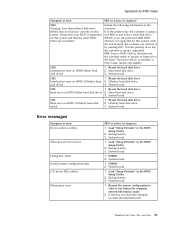
...on HDD1 (Ultrabay hard disk drive) 1. Error messages Symptom or error Device address conflict. FRU or action, in the BIOS Setup Utility. 2. Backup battery. 3. The latest version is available at http://www.lenovo.com/support 2100 Initialization error on HDD1 (Ultrabay hard 2. System board. 2102 1. Initialization error on HDD0 (Main hard ... to what it by this system. System board. 2110 1. Reseat the hard disk drive. 2. Allocation error for device. Backup battery. 3. Backup battery. 3. System board. 1. ThinkPad X60, X60s, X61, and X61s 51
...on HDD1 (Ultrabay hard disk drive) 1. Error messages Symptom or error Device address conflict. FRU or action, in the BIOS Setup Utility. 2. Backup battery. 3. The latest version is available at http://www.lenovo.com/support 2100 Initialization error on HDD1 (Ultrabay hard 2. System board. 2102 1. Initialization error on HDD0 (Main hard ... to what it by this system. System board. 2110 1. Reseat the hard disk drive. 2. Allocation error for device. Backup battery. 3. Backup battery. 3. System board. 1. ThinkPad X60, X60s, X61, and X61s 51

Hardware Maintenance Manual
Page 58
... not found. 1. The device you want to boot from. System board. No valid operating system. 1. v Enter the BIOS Setup Utility and add the device in sequence 1. FRU or action, in boot order. 52 ThinkPad® X60, X60s, X61, and X61s Device Error. 1. Excluded from any device. The device you want to -FRU index Symptom...
... not found. 1. The device you want to boot from. System board. No valid operating system. 1. v Enter the BIOS Setup Utility and add the device in sequence 1. FRU or action, in boot order. 52 ThinkPad® X60, X60s, X61, and X61s Device Error. 1. Excluded from any device. The device you want to -FRU index Symptom...
(English) Rescue and Recovery 4.3 Deployment Guide
Page 10
...program diagnostics help desk calls, which result in problem determination and resolution. Access BIOS: Opens the BIOS Setup Utility program. Note: To boot from the Rescue and Recovery program on Lenovo-branded personal computers that come with the 256 AES key. Backups are encrypted...Helps users access network drives for individual computers. Download files: Allows you to boot from the Rescue and Recovery CD, a set of Lenovo-branded personal computers only. - You can perform hardware tests and report results. - the Rescue and Recovery program offers your current settings and...
...program diagnostics help desk calls, which result in problem determination and resolution. Access BIOS: Opens the BIOS Setup Utility program. Note: To boot from the Rescue and Recovery program on Lenovo-branded personal computers that come with the 256 AES key. Backups are encrypted...Helps users access network drives for individual computers. Download files: Allows you to boot from the Rescue and Recovery CD, a set of Lenovo-branded personal computers only. - You can perform hardware tests and report results. - the Rescue and Recovery program offers your current settings and...
(English) Rescue and Recovery 4.3 Deployment Guide
Page 13
... with the Rescue and Recovery program. A possible security risk may be installed on the ThinkVantage Technologies Administrator Tools page: http://www.lenovo.com/support/site.wss/document.do?lndocid=TVANADMIN#rnr Installation considerations The Rescue and Recovery program has two main interfaces. See "Scenario ...6 - If the registry entries that path it assumes it finds that require a Windows password are managed with the non-BIOS version of the Rescue and Recovery program for the Rescue and Recovery program are not present, then recovery console will not install. ...
... with the Rescue and Recovery program. A possible security risk may be installed on the ThinkVantage Technologies Administrator Tools page: http://www.lenovo.com/support/site.wss/document.do?lndocid=TVANADMIN#rnr Installation considerations The Rescue and Recovery program has two main interfaces. See "Scenario ...6 - If the registry entries that path it assumes it finds that require a Windows password are managed with the non-BIOS version of the Rescue and Recovery program for the Rescue and Recovery program are not present, then recovery console will not install. ...
(English) Rescue and Recovery 4.3 Deployment Guide
Page 14
... contains up-to-the-minute information on non-Lenovo computers have the following requirements to help you with InstallShield 10.5 Premier as setting property values from the command line. In shared memory configurations, the BIOS setting for maximum shared memory must meet or ... the entire chapter before you have administrative privileges. however, the user will run the Rescue and Recovery setup package. Requirements for Lenovo computers Lenovo-branded computers must be installed. In non-shared memory configurations, 120 MB of free space on Think branded systems. For best...
... contains up-to-the-minute information on non-Lenovo computers have the following requirements to help you with InstallShield 10.5 Premier as setting property values from the command line. In shared memory configurations, the BIOS setting for maximum shared memory must meet or ... the entire chapter before you have administrative privileges. however, the user will run the Rescue and Recovery setup package. Requirements for Lenovo computers Lenovo-branded computers must be installed. In non-shared memory configurations, 120 MB of free space on Think branded systems. For best...
(English) Rescue and Recovery 4.3 Deployment Guide
Page 15
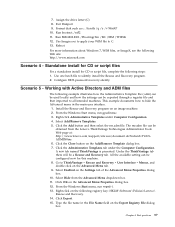
...RW) must fully support one or more of the following specifications: v ATAPI Removable Media Device BIOS Specification v BIOS Enhanced Disk Drive Services - 2 v Compaq Phoenix Intel® BIOS Boot Specification v El Torito Bootable CD-ROM Format Specification v USB Mass Storage Class Specification Overview ... issues, refer to a specified location. Administrative installation procedure The Windows Installer can obtain the setup package from: http://www.lenovo.com/support To perform an administrative installation, run the setup package from the command line using the /a parameter: Chapter 2....
...RW) must fully support one or more of the following specifications: v ATAPI Removable Media Device BIOS Specification v BIOS Enhanced Disk Drive Services - 2 v Compaq Phoenix Intel® BIOS Boot Specification v El Torito Bootable CD-ROM Format Specification v USB Mass Storage Class Specification Overview ... issues, refer to a specified location. Administrative installation procedure The Windows Installer can obtain the setup package from: http://www.lenovo.com/support To perform an administrative installation, run the setup package from the command line using the /a parameter: Chapter 2....
(English) Rescue and Recovery 4.3 Deployment Guide
Page 21
...list of sector-based image formats. The boot partition should be used when creating scripts or when changing to change the c:\Program Files\Lenovo\Rescue and Recovery directory from a command prompt. Chapter 2. Using WIM files, ImageX, and Windows 7 Windows 7 deployment is recommended to... development, use the BitLocker Drive Preparation Tool to achieve compatibility with BitLocker without TPM, do not use the scenario in the BIOS Setup Utility, to prepare the BitLocker partition, you must have two partitions on Windows 7. Both partitions should be 2 GB ...
...list of sector-based image formats. The boot partition should be used when creating scripts or when changing to change the c:\Program Files\Lenovo\Rescue and Recovery directory from a command prompt. Chapter 2. Using WIM files, ImageX, and Windows 7 Windows 7 deployment is recommended to... development, use the BitLocker Drive Preparation Tool to achieve compatibility with BitLocker without TPM, do not use the scenario in the BIOS Setup Utility, to prepare the BitLocker partition, you must have two partitions on Windows 7. Both partitions should be 2 GB ...
(English) Rescue and Recovery 4.3 Deployment Guide
Page 65
... button and then select the rnr.adm file. Go to all intended machines. Select Hide from the Lenovo ThinkVantage Technologies Administrator Tools Web page at: http://www.lenovo.com/support/site.wss/document.do?lndocid=TVANADMIN#rnr 6. Click Export. 15. Working with Active Directory .... Reboot For more information about Windows 7, WIM files, or ImageX, see the following registry key: HKLM\Software\Policies\Lenovo\ Rescue and Recovery. 14. Configure BIOS password recovery silently. The rnr.adm file can be obtained from the Advanced Menu dropdown box. 11. Under the ThinkVantage...
... button and then select the rnr.adm file. Go to all intended machines. Select Hide from the Lenovo ThinkVantage Technologies Administrator Tools Web page at: http://www.lenovo.com/support/site.wss/document.do?lndocid=TVANADMIN#rnr 6. Click Export. 15. Working with Active Directory .... Reboot For more information about Windows 7, WIM files, or ImageX, see the following registry key: HKLM\Software\Policies\Lenovo\ Rescue and Recovery. 14. Configure BIOS password recovery silently. The rnr.adm file can be obtained from the Advanced Menu dropdown box. 11. Under the ThinkVantage...
(English) Rescue and Recovery 4.3 Deployment Guide
Page 76
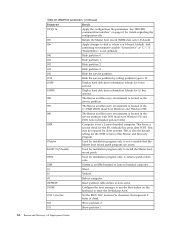
... is located in the C:\PARTITION (dual boot Windows and Windows PE). /M2 The Rescue and Recovery environment is an IBM branded or Lenovo-branded computer. /Q Silent. /V Verbose. /R Reboot computer. /REFRESH Reset partition table entries in data sector. /THINK Configure the boot... "RRCMD command-line interface" on the keyboard to enter the Predesktop Area. /TOC tocvalue Set the BIOS TOC location (16 characters that the Master boot record patch program can access. Lenovo-branded preload Only). /OEM Computer is not defined.) /H0 Hide partition 0. /H1 Hide partition 1....
... is located in the C:\PARTITION (dual boot Windows and Windows PE). /M2 The Rescue and Recovery environment is an IBM branded or Lenovo-branded computer. /Q Silent. /V Verbose. /R Reboot computer. /REFRESH Reset partition table entries in data sector. /THINK Configure the boot... "RRCMD command-line interface" on the keyboard to enter the Predesktop Area. /TOC tocvalue Set the BIOS TOC location (16 characters that the Master boot record patch program can access. Lenovo-branded preload Only). /OEM Computer is not defined.) /H0 Hide partition 0. /H1 Hide partition 1....
(English) Rescue and Recovery 4.3 Deployment Guide
Page 78
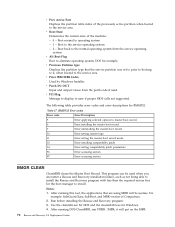
... Active Part Displays the partition table index of the previously active partition when booted to operating system. - 1 - v Alt Boot Flag Boot to user if proper BIOS calls not supported. v Prior IBM MBR Index Used by Windows Installer. v F11 Msg Message to display to alternate operating system; The following table provides error...
... Active Part Displays the partition table index of the previously active partition when booted to operating system. - 1 - v Alt Boot Flag Boot to user if proper BIOS calls not supported. v Prior IBM MBR Index Used by Windows Installer. v F11 Msg Message to display to alternate operating system; The following table provides error...


