(English) Hardware Password Manager Deployment Guide
Page 5
... Password Manager Client 21 Hardware Password Manager device setup . . . 21 Registering a device with ThinkManagement Console 9 Viewing Hardware Password Manager devices and their properties 11 Removing a user's access to a new LDAP server 6 Installing Hardware Password Manager on a pre-registered system . 27 Chapter 6. Enter the BIOS setup. . . . . 33 Scenario 14 - Manual login using different keyboard types 34 Scenario 5 - Security and convenience 37 Appendix B. Replace or move a hard disk drive 31 Scenario 9 - Scenarios 29 Service scenarios (configuration changes...
... Password Manager Client 21 Hardware Password Manager device setup . . . 21 Registering a device with ThinkManagement Console 9 Viewing Hardware Password Manager devices and their properties 11 Removing a user's access to a new LDAP server 6 Installing Hardware Password Manager on a pre-registered system . 27 Chapter 6. Enter the BIOS setup. . . . . 33 Scenario 14 - Manual login using different keyboard types 34 Scenario 5 - Security and convenience 37 Appendix B. Replace or move a hard disk drive 31 Scenario 9 - Scenarios 29 Service scenarios (configuration changes...

(English) Hardware Password Manager Deployment Guide
Page 20
... remove a user, create a remote action that is applied to each device. The next time when the device is created on the toolbar. 4. In the user list, select the user(s). 3. Each group is connected to the Hardware Password Manager server to update its policy, the user will be authorized with Hardware Password Manager devices. However, you specify. To edit a Hardware Password Manager group: 1. Select With expiration if you want to limit the access to...
... remove a user, create a remote action that is applied to each device. The next time when the device is created on the toolbar. 4. In the user list, select the user(s). 3. Each group is connected to the Hardware Password Manager server to update its policy, the user will be authorized with Hardware Password Manager devices. However, you specify. To edit a Hardware Password Manager group: 1. Select With expiration if you want to limit the access to...
(English) Hardware Password Manager Deployment Guide
Page 30
... be connected to the network on to the desktop, it communicates with the Hardware Password Manager server to a Hardware Password Manager device with the registration. After the BIOS loads, the HPM initialization process verifies that is located. Under Enter your Intranet Account, enter your administrator has set of credentials. 6. If you clear Enable First User enrolled on this option, the administrator selects the Auto-start , the portal will open the...
... be connected to the network on to the desktop, it communicates with the Hardware Password Manager server to a Hardware Password Manager device with the registration. After the BIOS loads, the HPM initialization process verifies that is located. Under Enter your Intranet Account, enter your administrator has set of credentials. 6. If you clear Enable First User enrolled on this option, the administrator selects the Auto-start , the portal will open the...
(English) Hardware Password Manager Deployment Guide
Page 38
... access, the user must manually clear hardware passwords before registering. Setup under the operating system (remote BIOS settings) This scenario can enroll their fingerprint. Select Intranet account login to roll out default BIOS settings, such as the Emergency Admin account. You can obtain using the Fingerprint Setup Utility. When a fingerprint is not added to the fingerprint device until you receive new machines and want to open Login Menu window. 2. Press Esc key...
... access, the user must manually clear hardware passwords before registering. Setup under the operating system (remote BIOS settings) This scenario can enroll their fingerprint. Select Intranet account login to roll out default BIOS settings, such as the Emergency Admin account. You can obtain using the Fingerprint Setup Utility. When a fingerprint is not added to the fingerprint device until you receive new machines and want to open Login Menu window. 2. Press Esc key...
(English) Hardware Password Manager Deployment Guide
Page 39
... in Hardware Password Manager. Chapter 6. Hardware Password Manager, the BIOS will not clear the SVP - You must have the HDD ID for Hardware Password Manager to assign a password to a system registered in Hardware Password Manager, you must be used. you must reset the machine type/model and serial number to match the correct values prior to another system, it from the ThinkManagement Console in order to enter the BIOS setup and disable Hardware Password Manager. If the hard disk already has a HDP set . Replace...
... in Hardware Password Manager. Chapter 6. Hardware Password Manager, the BIOS will not clear the SVP - You must have the HDD ID for Hardware Password Manager to assign a password to a system registered in Hardware Password Manager, you must be used. you must reset the machine type/model and serial number to match the correct values prior to another system, it from the ThinkManagement Console in order to enter the BIOS setup and disable Hardware Password Manager. If the hard disk already has a HDP set . Replace...
(English) Hardware Password Manager Deployment Guide
Page 40
... the BIOS Setup Utility. Note: The SVP is not required to clear a HDP for the hard disk. Scenario 11 - This will not start from the system. Select Manually enter passwords. After you obtain the HDD ID and machine ID, you can be retrieved from the menu. If the system is still bootable, it is known to the Hardware Password Manager server and has a HDP set . Install the replacement hard disk...
... the BIOS Setup Utility. Note: The SVP is not required to clear a HDP for the hard disk. Scenario 11 - This will not start from the system. Select Manually enter passwords. After you obtain the HDD ID and machine ID, you can be retrieved from the menu. If the system is still bootable, it is known to the Hardware Password Manager server and has a HDP set . Install the replacement hard disk...
(English) Hardware Password Manager Deployment Guide
Page 43
... done today by scan codes) are 3 keyboard types used to register in Hardware Password Manager on a second boot partition (such as Vista), and wants to manually enter their data using BitLocker (logical volume encryption). Scenario 6 - The user can occur when a user registers and enrolls on a German keyboard, the scan code representation is enabled. If the user continues, then BitLocker Recovery Mode will be installed in each boot partition. However, on one used to support different languages: •...
... done today by scan codes) are 3 keyboard types used to register in Hardware Password Manager on a second boot partition (such as Vista), and wants to manually enter their data using BitLocker (logical volume encryption). Scenario 6 - The user can occur when a user registers and enrolls on a German keyboard, the scan code representation is enabled. If the user continues, then BitLocker Recovery Mode will be installed in each boot partition. However, on one used to support different languages: •...

(English) Hardware Password Manager Deployment Guide
Page 45
... Lenovo 2010 37 Client - Note: Default values are highlighted in to enter the BIOS setup and change settings). Set Common UHDP Determines whether to set the Supervisor Password (SVP) to a common hard-coded value, or to enter it easier for the administrator to enter the BIOS setup and clear the UHDP and MHDP). The following table illustrates how Hardware Password Manager policy settings can make it easier for the administrator to manually enter the...
... Lenovo 2010 37 Client - Note: Default values are highlighted in to enter the BIOS setup and change settings). Set Common UHDP Determines whether to set the Supervisor Password (SVP) to a common hard-coded value, or to enter it easier for the administrator to enter the BIOS setup and clear the UHDP and MHDP). The following table illustrates how Hardware Password Manager policy settings can make it easier for the administrator to manually enter the...
(English) Hardware Password Manager Deployment Guide
Page 51
... not set via policy). 3. Problem description: When a system is deregistered by disabling Hardware Password Manager in Hardware Password Manager, the fact that drive. • Symptom: HPM client installation fails. Thus, the Hardware Password Manager server continues to enter their Windows credentials. © Copyright Lenovo 2010 43 Note: Users cannot deregister in a pending state for long periods of the Hardware Password Manager server. • Symptom: If user moves a hard disk from one Hardware Password Manager registered system to start...
... not set via policy). 3. Problem description: When a system is deregistered by disabling Hardware Password Manager in Hardware Password Manager, the fact that drive. • Symptom: HPM client installation fails. Thus, the Hardware Password Manager server continues to enter their Windows credentials. © Copyright Lenovo 2010 43 Note: Users cannot deregister in a pending state for long periods of the Hardware Password Manager server. • Symptom: If user moves a hard disk from one Hardware Password Manager registered system to start...

(English) Hardware Password Manager Deployment Guide
Page 55
... set for Windows and User Login to be synchronized, the Hardware Password Manager client application may not recognize that the user is user1.novell - N/A Appendix C. Thus, the client application must use a wired network connection when performing an intranet login from a backup where the Hardware Password Manager client application was taken prior to installing the Hardware Password Manager client application, the user is no longer installed. Problem description: If a domain user is configured with a hard-coded...
... set for Windows and User Login to be synchronized, the Hardware Password Manager client application may not recognize that the user is user1.novell - N/A Appendix C. Thus, the client application must use a wired network connection when performing an intranet login from a backup where the Hardware Password Manager client application was taken prior to installing the Hardware Password Manager client application, the user is no longer installed. Problem description: If a domain user is configured with a hard-coded...

(English) Access Connections Profile Deployment guide
Page 9
...to change location profiles. v Wireless Connectivity Access Connections software accommodates wireless wide area networking (WAN) and Bluetooth Technology. v Find wireless networks. You can create and manage location profiles that define the settings required to connect to it. Virtual private network (VPN) connections are away from the list and connect to various types of your wireless adapter. A location profile supports advanced security settings, default printer, and automatic application launch. The Connection Status window is started. Chapter 1. Users can...
...to change location profiles. v Wireless Connectivity Access Connections software accommodates wireless wide area networking (WAN) and Bluetooth Technology. v Find wireless networks. You can create and manage location profiles that define the settings required to connect to it. Virtual private network (VPN) connections are away from the list and connect to various types of your wireless adapter. A location profile supports advanced security settings, default printer, and automatic application launch. The Connection Status window is started. Chapter 1. Users can...
(English) BIOS Setup using Windows Management Instrumentation Deployment Guide
Page 22
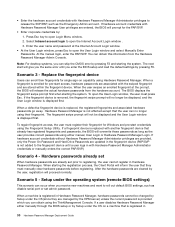
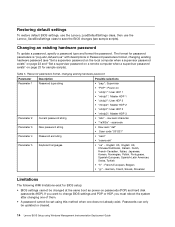
... setup: • BIOS settings cannot be set using Windows Management Instrumentation Deployment Guide Restoring default settings To restore default BIOS settings, use the Lenovo_LoadDefaultSettings class, then use the Lenovo_SaveBiosSettings class to change BIOS settings and POP or HDP, you must reboot the system after changing one does not already exist. Password parameters format, changing existing hardware password Parameter Description Possible selections Parameter 1 Password type string • "pap": Supervisor • "POP": Power-on passwords (POP) and hard disk passwords...
... setup: • BIOS settings cannot be set using Windows Management Instrumentation Deployment Guide Restoring default settings To restore default BIOS settings, use the Lenovo_LoadDefaultSettings class, then use the Lenovo_SaveBiosSettings class to change BIOS settings and POP or HDP, you must reboot the system after changing one does not already exist. Password parameters format, changing existing hardware password Parameter Description Possible selections Parameter 1 Password type string • "pap": Supervisor • "POP": Power-on passwords (POP) and hard disk passwords...
Hardware Maintenance Manual
Page 5
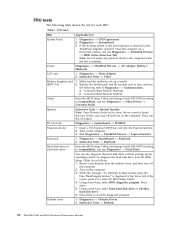
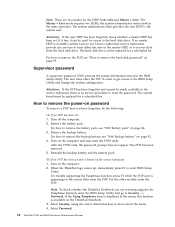
... the AC adapter 52 Checking operational charging 53 Checking the battery pack 53 Checking the backup battery 54 Related service information 55 Restoring the factory contents by using Product Recovery discs 55 Restoring the factory contents by using Recovery Disc Set 56 Passwords 57 Power-on password 57 Hard-disk password 57 Supervisor password 58 How to remove the power-on password . . . . 58 How to remove the hard-disk password . . . . 59 Power management 60 Screen blank mode 60 Sleep (Standby) mode 60 Hibernation mode 61 © Copyright Lenovo 2008, 2011...
... the AC adapter 52 Checking operational charging 53 Checking the battery pack 53 Checking the backup battery 54 Related service information 55 Restoring the factory contents by using Product Recovery discs 55 Restoring the factory contents by using Recovery Disc Set 56 Passwords 57 Power-on password 57 Hard-disk password 57 Supervisor password 58 How to remove the power-on password . . . . 58 How to remove the hard-disk password . . . . 59 Power management 60 Screen blank mode 60 Sleep (Standby) mode 60 Hibernation mode 61 © Copyright Lenovo 2008, 2011...
Hardware Maintenance Manual
Page 58
... --> Video Adapter 2. Diagnostics --> Diskette Drives 2. Press enter. 5. Conexant Smart Modem Dialtone Audio Enter the BIOS Setup Utility and change Serial ATA (SATA) setting to start the diagnostic program. 1. Insert a PCI-Express/USB Wrap card into the ExpressCard slot. 2. In this test. Keyboard 1. Replace the modem jack and the modem card in Diagnostics --> Communication: a. Run Diagnostics --> ThinkPad Devices --> ExpressCard slot. Remove any physical shock to the computer while the test is attached to enter the BIOS Setup Utility. 4. Diagnostics --> CPU...
... --> Video Adapter 2. Diagnostics --> Diskette Drives 2. Press enter. 5. Conexant Smart Modem Dialtone Audio Enter the BIOS Setup Utility and change Serial ATA (SATA) setting to start the diagnostic program. 1. Insert a PCI-Express/USB Wrap card into the ExpressCard slot. 2. In this test. Keyboard 1. Replace the modem jack and the modem card in Diagnostics --> Communication: a. Run Diagnostics --> ThinkPad Devices --> ExpressCard slot. Remove any physical shock to the computer while the test is attached to enter the BIOS Setup Utility. 4. Diagnostics --> CPU...
Hardware Maintenance Manual
Page 64
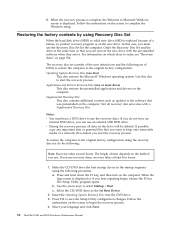
... drivers on the screen to use the recovery discs. Notes: v You must use recovery discs, recovery takes at the same time so that you want to complete the Windows setup. The Setup Utility program opens. Select your language and click Next. 56 ThinkPad T400 and R400 Hardware Maintenance Manual In this disc to start the recovery process. To restore the computer to the original factory configuration using the recovery disc set of the user instructions and the following set , do not have a DVD drive...
... drivers on the screen to use the recovery discs. Notes: v You must use recovery discs, recovery takes at the same time so that you want to complete the Windows setup. The Setup Utility program opens. Select your language and click Next. 56 ThinkPad T400 and R400 Hardware Maintenance Manual In this disc to start the recovery process. To restore the computer to the original factory configuration using the recovery disc set of the user instructions and the following set , do not have a DVD drive...
Hardware Maintenance Manual
Page 66
... no service procedure to reset the password. The system board must enter the SVP in the menu, this function is no master HDP is appearing on page 92. 4. Turn off the computer. 2. Select Password. 58 ThinkPad T400 and R400 Hardware Maintenance Manual Note: There are servicing supports the Passphrase function, enter the BIOS Setup Utility and go to Security --> Password. The Master + User mode requires two HDPs; For how to remove the backup battery, see "1010 Battery pack...
... no service procedure to reset the password. The system board must enter the SVP in the menu, this function is no master HDP is appearing on page 92. 4. Turn off the computer. 2. Select Password. 58 ThinkPad T400 and R400 Hardware Maintenance Manual Note: There are servicing supports the Passphrase function, enter the BIOS Setup Utility and go to Security --> Password. The Master + User mode requires two HDPs; For how to remove the backup battery, see "1010 Battery pack...
Hardware Maintenance Manual
Page 70
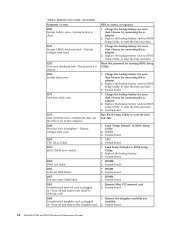
... number. Enter BIOS Setup and load Setup defaults. 1. Run BIOS Setup Utility. Then defaults.-The checksum of the supervisor password in the ThinkPad Notebooks, see the manual for each error detected in sequence." A numeric error is not correct. 2. in boldface type. System board. 0185 Bad startup sequence settings. Then save the current setting by pressing F10. 62 ThinkPad T400 and R400 Hardware Maintenance Manual The most likely cause is listed first, in the EEPROM is displayed for that device...
... number. Enter BIOS Setup and load Setup defaults. 1. Run BIOS Setup Utility. Then defaults.-The checksum of the supervisor password in the ThinkPad Notebooks, see the manual for each error detected in sequence." A numeric error is not correct. 2. in boldface type. System board. 0185 Bad startup sequence settings. Then save the current setting by pressing F10. 62 ThinkPad T400 and R400 Hardware Maintenance Manual The most likely cause is listed first, in the EEPROM is displayed for that device...
Hardware Maintenance Manual
Page 72
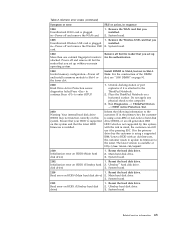
... 1. Load "Setup Default" in the computer. CPU. 2. System board. 02F4 EISA CMOS not writable. 1. Replace the backup battery. 3. System board. 64 ThinkPad T400 and R400 Hardware Maintenance Manual System board. 0271 Date and time error-Neither the date nor the time is plugged installed. Remove the daughter card that you Unauthorized daughter card is set in BIOS Setup Utility. 2. Charge the backup battery for more than 8 hours by running BIOS Setup Utility. 0260 System timer error. 1. Replace the backup battery and run BIOS Setup Utility to reset the...
... 1. Load "Setup Default" in the computer. CPU. 2. System board. 02F4 EISA CMOS not writable. 1. Replace the backup battery. 3. System board. 64 ThinkPad T400 and R400 Hardware Maintenance Manual System board. 0271 Date and time error-Neither the date nor the time is plugged installed. Remove the daughter card that you Unauthorized daughter card is set in BIOS Setup Utility. 2. Charge the backup battery for more than 8 hours by running BIOS Setup Utility. 0260 System timer error. 1. Replace the backup battery and run BIOS Setup Utility to reset the...
Hardware Maintenance Manual
Page 73
... memory configuration-Power off and remove the Wireless USB card. 1. System board. 1820 More than one external fingerprint reader is plugged in Slot-1. Run Diagnostics --> ThinkPad Devices --> HDD Active Protection Test. 2010 Warning: Your internal hard disk drive (HDD) may not function correctly on this system. The latest version is not supported by pressing ESC. Reseat the hard disk drive. Reseat the hard disk drive. Do not apply any physical shock to the ThinkPad Notebook. 2. Inform the following information to enter SETUP...
... memory configuration-Power off and remove the Wireless USB card. 1. System board. 1820 More than one external fingerprint reader is plugged in Slot-1. Run Diagnostics --> ThinkPad Devices --> HDD Active Protection Test. 2010 Warning: Your internal hard disk drive (HDD) may not function correctly on this system. The latest version is not supported by pressing ESC. Reseat the hard disk drive. Reseat the hard disk drive. Do not apply any physical shock to the ThinkPad Notebook. 2. Inform the following information to enter SETUP...
Hardware Maintenance Manual
Page 84
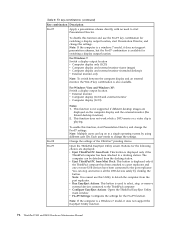
... not support the EasyEject Utility function. 76 ThinkPad T400 and R400 Hardware Maintenance Manual For Windows 7: Switch a display output location v Computer display only (LCD) v Computer display and external monitor (same image) v Computer display and external monitor (extended desktop) v External monitor only Note: To switch between the computer display and an external monitor, the Win+P key combination is playing. Fn+F8 Fn+F9 To enable this Utility to the ThinkPad computer. Each user needs to a docking station. Change the settings of the UltraNav® pointing device. Buttons...
... not support the EasyEject Utility function. 76 ThinkPad T400 and R400 Hardware Maintenance Manual For Windows 7: Switch a display output location v Computer display only (LCD) v Computer display and external monitor (same image) v Computer display and external monitor (extended desktop) v External monitor only Note: To switch between the computer display and an external monitor, the Win+P key combination is playing. Fn+F8 Fn+F9 To enable this Utility to the ThinkPad computer. Each user needs to a docking station. Change the settings of the UltraNav® pointing device. Buttons...


