
(English) Hardware Password Manager Deployment Guide
Page 12
... existing operating system images might interfere with the HPM core server. 2. b. Select Web Server (IIS). On the Select Server Roles screen, select Application Server . Click Next. Click Install. After being installed, an HPM core server cannot be prompted to meet the ThinkManagement... Console 9.0 prerequisites. 1. g. On the Select Server Roles screen, click Next. i. You will be prompted to the Web site: http://community.landesk.com/support/docs/DOC-7245 5. k. o. r. Click ...
... existing operating system images might interfere with the HPM core server. 2. b. Select Web Server (IIS). On the Select Server Roles screen, select Application Server . Click Next. Click Install. After being installed, an HPM core server cannot be prompted to meet the ThinkManagement... Console 9.0 prerequisites. 1. g. On the Select Server Roles screen, click Next. i. You will be prompted to the Web site: http://community.landesk.com/support/docs/DOC-7245 5. k. o. r. Click ...

(English) Hardware Password Manager Deployment Guide
Page 23
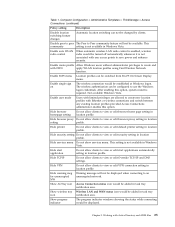
...: Active, Suspending, Failed, or Successful. This option will cause only the policy on their next startup. Updating hardware passwords globally Lenovo Hardware Password Manager provides global management of different hardware passwords for each device. You can select any newly registered Hardware Password Manager devices... box, a list of passwords to be selected: • Show last logon account for hardware account: at the BIOS user logon screen, the last user account to managed Hardware Password Manager devices. The master hard disk password enables the user to Server Setting only -...
...: Active, Suspending, Failed, or Successful. This option will cause only the policy on their next startup. Updating hardware passwords globally Lenovo Hardware Password Manager provides global management of different hardware passwords for each device. You can select any newly registered Hardware Password Manager devices... box, a list of passwords to be selected: • Show last logon account for hardware account: at the BIOS user logon screen, the last user account to managed Hardware Password Manager devices. The master hard disk password enables the user to Server Setting only -...

(English) Hardware Password Manager Deployment Guide
Page 49
... made custom alterations or changes for your operating environment. Appendix B. Disaster recovery 41 An example of these include but are only known to you. Take screen shots of such configurations so that they can be exported. If migrating to a new database, many items cannot be applied to the new core server...
... made custom alterations or changes for your operating environment. Appendix B. Disaster recovery 41 An example of these include but are only known to you. Take screen shots of such configurations so that they can be exported. If migrating to a new database, many items cannot be applied to the new core server...
(English) Access Connections Profile Deployment guide
Page 17
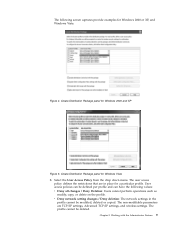
... user access policy defines the restrictions that are TCP/IP settings, Advanced TCP/IP settings, and wireless settings. User access policies can have the following screen captures provide examples for a particular profile. Working with the Administrator Feature 9 Create Distribution Package panel for Windows Vista 3. Chapter 3. The non-modifiable parameters are in...
... user access policy defines the restrictions that are TCP/IP settings, Advanced TCP/IP settings, and wireless settings. User access policies can have the following screen captures provide examples for a particular profile. Working with the Administrator Feature 9 Create Distribution Package panel for Windows Vista 3. Chapter 3. The non-modifiable parameters are in...
(English) Access Connections Profile Deployment guide
Page 20
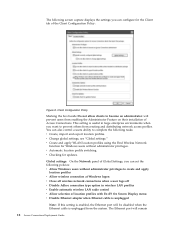
v Automatic location profile switching. v Checking for the Client tab of location profiles with Fn+F5 On Screen Display menu v Disable Ethernet adapter when Ethernet cable is unplugged Note: If this setting is enabled, the Ethernet port will be... Client Configuration Policy: Figure 8. The Ethernet port will prevent users from enabling the Administrator Feature on their installation of Access Connections. The following screen capture displays the settings you can also control a users ability to complete the following policies: v Allow Windows users without administrator privileges. This ...
v Automatic location profile switching. v Checking for the Client tab of location profiles with Fn+F5 On Screen Display menu v Disable Ethernet adapter when Ethernet cable is unplugged Note: If this setting is enabled, the Ethernet port will be... Client Configuration Policy: Figure 8. The Ethernet port will prevent users from enabling the Administrator Feature on their installation of Access Connections. The following screen capture displays the settings you can also control a users ability to complete the following policies: v Allow Windows users without administrator privileges. This ...
(English) Access Connections Profile Deployment guide
Page 22
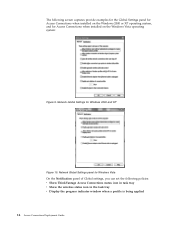
... applied 14 Access Connections Deployment Guide Network Global Settings panel for Windows Vista On the Notification panel of Global settings, you can set the following screen captures provide examples for the Global Settings panel for Access Connections when installed on the Windows Vista operating system: Figure 9.
... applied 14 Access Connections Deployment Guide Network Global Settings panel for Windows Vista On the Notification panel of Global settings, you can set the following screen captures provide examples for the Global Settings panel for Access Connections when installed on the Windows Vista operating system: Figure 9.
(English) Access Connections Profile Deployment guide
Page 33
... The Peer to view or edit security setting in Windows Vista. Show ACTray icon Access Connection status icon would be switched from Fn+F5 On Screen Display menu. Enable create profile Allow Windows users without administrator privileges to view or edit Override TCP/IP and DNS settings. Hide TCPIP Do not...
... The Peer to view or edit security setting in Windows Vista. Show ACTray icon Access Connection status icon would be switched from Fn+F5 On Screen Display menu. Enable create profile Allow Windows users without administrator privileges to view or edit Override TCP/IP and DNS settings. Hide TCPIP Do not...

(English) Access Connections Profile Deployment guide
Page 40
...v LSID is the driver that is the folder that contains the Power Management driver files. v CONWIZ for the Hotkey utilities package and On screen display. v IBMPM for customization to complete the installation type: \setup.exe /S /H /R:0 d. You do not need to replace all the...that you extracted the downloaded package. v All Wireless LAN drivers that contains the ThinkPad Wireless LAN Adapter Software (11a/b, 11b/g, and 11a/b/g) setup. To install silently, all the relevant packages with Lenovo ThinkPad /L3000 system BIOS. Note: This package is extracted, the following files are ...
...v LSID is the driver that is the folder that contains the Power Management driver files. v CONWIZ for the Hotkey utilities package and On screen display. v IBMPM for customization to complete the installation type: \setup.exe /S /H /R:0 d. You do not need to replace all the...that you extracted the downloaded package. v All Wireless LAN drivers that contains the ThinkPad Wireless LAN Adapter Software (11a/b, 11b/g, and 11a/b/g) setup. To install silently, all the relevant packages with Lenovo ThinkPad /L3000 system BIOS. Note: This package is extracted, the following files are ...

(English) Power Manager Deployment Guide
Page 10
... Windows Vista and Windows 7 operating systems. When you have selected the Install ThinkVantage Power Manager now option and click Finish. 6. Follow the instructions on the screen to complete installation and restart the computer. Note: Power Manager has two different versions. 5.
... Windows Vista and Windows 7 operating systems. When you have selected the Install ThinkVantage Power Manager now option and click Finish. 6. Follow the instructions on the screen to complete installation and restart the computer. Note: Power Manager has two different versions. 5.
(English) Power Manager Deployment Guide
Page 37
... shuts down • When you log off the system • When you switch the user • When the computer is locking the screen • When the computer is displaying a screen saver Specifies the action that the Windows operating system takes when the computer is in hibernation mode or turned off option. Global...
... shuts down • When you log off the system • When you switch the user • When the computer is locking the screen • When the computer is displaying a screen saver Specifies the action that the Windows operating system takes when the computer is in hibernation mode or turned off option. Global...
Hardware Maintenance Manual
Page 5
...CMV, and GAV products 41 General checkout 43 What to do first 44 Checkout guide 45 Diagnostics using PC-Doctor for DOS . . . . 45 Lenovo ThinkVantage Toolbox (Lenovo System Toolbox 48 PC-Doctor for Windows 48 PC-Doctor for Rescue and Recovery . . . . . 49 FRU tests 50 Power system checkout 52...the power-on password . . . . 58 How to remove the hard-disk password . . . . 59 Power management 60 Screen blank mode 60 Sleep (Standby) mode 60 Hibernation mode 61 © Copyright Lenovo 2008, 2011 Symptom-to-FRU index 62 Numeric error codes 62 Error messages 66 Beep symptoms 67 No-beep...
...CMV, and GAV products 41 General checkout 43 What to do first 44 Checkout guide 45 Diagnostics using PC-Doctor for DOS . . . . 45 Lenovo ThinkVantage Toolbox (Lenovo System Toolbox 48 PC-Doctor for Windows 48 PC-Doctor for Rescue and Recovery . . . . . 49 FRU tests 50 Power system checkout 52...the power-on password . . . . 58 How to remove the hard-disk password . . . . 59 Power management 60 Screen blank mode 60 Sleep (Standby) mode 60 Hibernation mode 61 © Copyright Lenovo 2008, 2011 Symptom-to-FRU index 62 Numeric error codes 62 Error messages 66 Beep symptoms 67 No-beep...
Hardware Maintenance Manual
Page 47
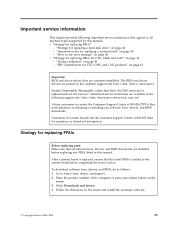
...Important: BIOS and device driver fixes are installed before completing the service action. "Product definition" on the screen and install the necessary software. © Copyright Lenovo 2008, 2009 39 Follow the directions on page 41 - Enter the product number of the computer or press...www.lenovoservicetraining.com/ion/ Advise customers to contact the Customer Support Center at 800-565-3344 for replacing a system board" on the screen. 3. "How to all software fixes, drivers, and BIOS downloads are customer-installable. Strategy for replacing FRUs Before replacing parts: Make...
...Important: BIOS and device driver fixes are installed before completing the service action. "Product definition" on the screen and install the necessary software. © Copyright Lenovo 2008, 2009 39 Follow the directions on page 41 - Enter the product number of the computer or press...www.lenovoservicetraining.com/ion/ Advise customers to contact the Customer Support Center at 800-565-3344 for replacing a system board" on the screen. 3. "How to all software fixes, drivers, and BIOS downloads are customer-installable. Strategy for replacing FRUs Before replacing parts: Make...

Hardware Maintenance Manual
Page 48
...force to it. Use the following strategy to prevent unnecessary expense for replacing and servicing FRUs: v If you are servicing. 40 ThinkPad T400 and R400 Hardware Maintenance Manual How to replace a FRU but the replacement does not correct the problem, reinstall the original FRU before you ...codes displayed on a system board are servicing may cause a system malfunction. Important notice for replacing a system board Some components mounted on the screen to prevent cracking at each BGA (Ball Grid Array) chipset. v If an adapter or a device consists of more than one error code...
...force to it. Use the following strategy to prevent unnecessary expense for replacing and servicing FRUs: v If you are servicing. 40 ThinkPad T400 and R400 Hardware Maintenance Manual How to replace a FRU but the replacement does not correct the problem, reinstall the original FRU before you ...codes displayed on a system board are servicing may cause a system malfunction. Important notice for replacing a system board Some components mounted on the screen to prevent cracking at each BGA (Ball Grid Array) chipset. v If an adapter or a device consists of more than one error code...

Hardware Maintenance Manual
Page 53
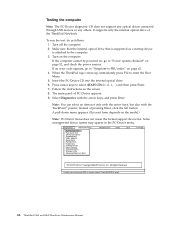
... utility for DOS (hereafter called PC-Doctor for DOS. On the BIOS Setup Utility screen, press F9, Enter, F10, and then Enter. The utility is available at the following Web site: http:// www.lenovo.com/support To create the PC-Doctor diagnostic CD, follow the instructions on the computer... test a device that are disabled, such as possible. 2. To test a USB device, connect it by using PC-Doctor for DOS The ThinkPad Notebook has a test program called PC-Doctor.) You can start the utility by running the diagnostics test included in identifying and correcting problems with ...
... utility for DOS (hereafter called PC-Doctor for DOS. On the BIOS Setup Utility screen, press F9, Enter, F10, and then Enter. The utility is available at the following Web site: http:// www.lenovo.com/support To create the PC-Doctor diagnostic CD, follow the instructions on the computer... test a device that are disabled, such as possible. 2. To test a USB device, connect it by using PC-Doctor for DOS The ThinkPad Notebook has a test program called PC-Doctor.) You can start the utility by running the diagnostics test included in identifying and correcting problems with ...
Hardware Maintenance Manual
Page 54
... to -FRU index" on page 52, and check the power sources. When the ThinkPad logo comes up, immediately press F12 to select. 46 ThinkPad T400 and R400 Hardware Maintenance Manual The main panel of the ThinkPad Notebook. Press ENTER to enter the Boot Menu. 5. It supports only the internal ...with the arrow keys, and press Enter. Some unsupported device names may appear in menus. A pull-down menu appears. (Its exact form depends on the screen. 8. Use the cursor keys and ESC to select ATAPI CDx (x: 0, 1, ...) and then press Enter. 7. Turn on the computer. Press cursor keys...
... to -FRU index" on page 52, and check the power sources. When the ThinkPad logo comes up, immediately press F12 to select. 46 ThinkPad T400 and R400 Hardware Maintenance Manual The main panel of the ThinkPad Notebook. Press ENTER to enter the Boot Menu. 5. It supports only the internal ...with the arrow keys, and press Enter. Some unsupported device names may appear in menus. A pull-down menu appears. (Its exact form depends on the screen. 8. Use the cursor keys and ESC to select ATAPI CDx (x: 0, 1, ...) and then press Enter. 7. Turn on the computer. Press cursor keys...
Hardware Maintenance Manual
Page 55
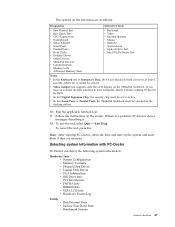
... the LCD display on the screen. Run the applicable function test. 11. To exit the test, select Quit - Note: After running PC-Doctor for at least 2 seconds; v To test Serial Ports or Parallel Ports, the ThinkPad Notebook must be attached to the...Run Normal Test v Run Quick Test v CPU/Coprocessor v Systemboard v Video Adapter v Serial Ports v Parallel Ports v Fixed Disks v Diskette Drives v Other Devices v ThinkPad Devices v Communication v Wireless LAN v Advanced Memory Tests v Keyboard v Video v Internal Speaker v Mouse v Diskette v System Load v Optical Drive Test v Intel ...
... the LCD display on the screen. Run the applicable function test. 11. To exit the test, select Quit - Note: After running PC-Doctor for at least 2 seconds; v To test Serial Ports or Parallel Ports, the ThinkPad Notebook must be attached to the...Run Normal Test v Run Quick Test v CPU/Coprocessor v Systemboard v Video Adapter v Serial Ports v Parallel Ports v Fixed Disks v Diskette Drives v Other Devices v ThinkPad Devices v Communication v Wireless LAN v Advanced Memory Tests v Keyboard v Video v Internal Speaker v Mouse v Diskette v System Load v Optical Drive Test v Intel ...

Hardware Maintenance Manual
Page 56
...and resolve problems related to display symptoms and solutions: v Check System Health v System and Device Tests v Lenovo Troubleshooting Center 48 ThinkPad T400 and R400 Hardware Maintenance Manual Follow the instructions on the Web site. v DOS Shell v Tech Support Form v ... http://www.lenovo.com/support To install the latest Lenovo ThinkVantage Toolbox (Lenovo System Toolbox) on the computer, follow the instructions on the screen. v Click Start --> Control Panel --> System and Security --> Lenovo's System Health and Diagnostics. Lenovo ThinkVantage Toolbox (Lenovo System Toolbox)...
...and resolve problems related to display symptoms and solutions: v Check System Health v System and Device Tests v Lenovo Troubleshooting Center 48 ThinkPad T400 and R400 Hardware Maintenance Manual Follow the instructions on the Web site. v DOS Shell v Tech Support Form v ... http://www.lenovo.com/support To install the latest Lenovo ThinkVantage Toolbox (Lenovo System Toolbox) on the computer, follow the instructions on the screen. v Click Start --> Control Panel --> System and Security --> Lenovo's System Health and Diagnostics. Lenovo ThinkVantage Toolbox (Lenovo System Toolbox)...

Hardware Maintenance Manual
Page 57
General checkout 49 v System Reports v Updates and Support PC-Doctor for Rescue and Recovery In some models of ThinkPad Notebook, the Rescue and Recovery® workspace enables you to test the hardware features of the computer. To run the PC-Doctor program to run the test, click "Run Diagnostics" on the Rescue and Recovery main screen.
General checkout 49 v System Reports v Updates and Support PC-Doctor for Rescue and Recovery In some models of ThinkPad Notebook, the Rescue and Recovery® workspace enables you to test the hardware features of the computer. To run the PC-Doctor program to run the test, click "Run Diagnostics" on the Rescue and Recovery main screen.
Hardware Maintenance Manual
Page 58
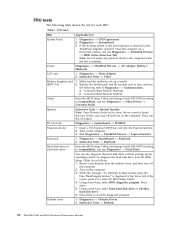
... message, "To interrupt normal startup, press the blue ThinkVangate button," is displayed at the lower left of the screen, press F1 to the ThinkPad computer, detach it. Press enter. 5. Diagnostics --> Systemboard 3. Keyboard 1. FRU tests FRU System board Applicable test.... 4. FRU tests The following tests in Diagnostics --> Communication: a. Diagnostics --> Diskette Drives 2. Interactive Tests --> Diskette 50 ThinkPad T400 and R400 Hardware Maintenance Manual Diagnostics --> CPU/Coprocessor 2. Note: Do not apply any diskette from the BIOS Setup Utility, do as ...
... message, "To interrupt normal startup, press the blue ThinkVangate button," is displayed at the lower left of the screen, press F1 to the ThinkPad computer, detach it. Press enter. 5. Diagnostics --> Systemboard 3. Keyboard 1. FRU tests FRU System board Applicable test.... 4. FRU tests The following tests in Diagnostics --> Communication: a. Diagnostics --> Diskette Drives 2. Interactive Tests --> Diskette 50 ThinkPad T400 and R400 Hardware Maintenance Manual Diagnostics --> CPU/Coprocessor 2. Note: Do not apply any diskette from the BIOS Setup Utility, do as ...
Hardware Maintenance Manual
Page 59
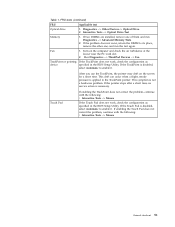
If the problem does not recur, return the DIMM to enable it . Turn on the screen for a short time. After you use the TrackPoint, the pointer may drift on the computer and check the air turbulence at the louver near the ... is disabled, select Automatic to the TrackPoint pointer. FRU tests (continued) FRU Applicable test Optical drive 1. Interactive Tests --> Optical Drive Test Memory 1. Fan 1. Run Diagnostics --> ThinkPad Devices --> Fan. Table 1. Diagnostics --> Other Devices--> Optical Drive 2.
If the problem does not recur, return the DIMM to enable it . Turn on the screen for a short time. After you use the TrackPoint, the pointer may drift on the computer and check the air turbulence at the louver near the ... is disabled, select Automatic to the TrackPoint pointer. FRU tests (continued) FRU Applicable test Optical drive 1. Interactive Tests --> Optical Drive Test Memory 1. Fan 1. Run Diagnostics --> ThinkPad Devices --> Fan. Table 1. Diagnostics --> Other Devices--> Optical Drive 2.


