Get support for Lenovo G575

Lenovo G575 Support Question

Lenovo G575 Support Question

Find answers below for this question about Lenovo G575.
Need a Lenovo G575 manual? We have 2 online manuals for this item!
Question posted by carlos112150 on August 2nd, 2012

Replace Screen

Looking for step by step instruction of how to replace my screen on a Lenovo G575.

Current Answers

Answer #1: Posted by kscott17092 on August 2nd, 2012 10:00 AM
This answer was accepted by the poster of the original question.
kscott17092

Member since:
July 23rd, 2012

Points: 18,820
1,090
points
The tools you will need to replace or fix your V Series G575  laptop LCD screen is a Philips screw driver.  We prefer to use a magnetic screwdriver because this will help is catching the screws when you remove them from your LCD hinges.

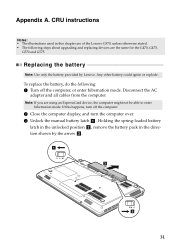
Prior to replacing your your Lenovo V Series G575 Laptop LCD SCREEN, make sure to remove the battery and disconnect the ac adapter from your laptop.  You want to make sure no power is going to the laptop while your opening up the LCD panel for repair, or doing any kind of repair work on your laptop.

Step #1:  Remove the rubber cover off your Lenovo V Series G575 laptop LCD screen.  The rubber cover can be found on the front of the LCD panel (plastic Bezel).  Rubber covers can also be found on the side of the laptop LCD plastic bezel.  The screws on the side of your Lenovo V Series G575 laptop LCD hold the hinges in place.

Step #2:  Once the rubber covers have been removed from your Lenovo V Series G575 LCD, take your Philips head screw driver and remove the screws from the LCD screen.

Step#3:  Gently remove the plastic bezel from your V Series monitor.  Pull the plastic frame in an upward motion.

Step #4:  Pry your G575 LCD forward, and remove the screws from the side of the LCD hinges.

Step#5:  Place your G575 LCD downwards and remove the tape that is holding the LCD cable in place.  Once the tape is removed, the cable may be disconnected from the monitor.  Unplug the inverter cable from your G575 LCD.  Your Lenovo V Series G575 LCD has now been removed and is ready for replacement.

Step #6:  We will now install the new Lenovo V Series LCD onto your laptop.  Plug the LCD cable back into your LCD.  Secure the LCD cable connector with the tape on the cable.  Reconnect your Lenovo V Series LCD Inverter.

Step #7:  Screw the Hinges back onto the V Series G575 LCD screen.

Step #8:  Place the LCD Bezel back onto the screen.

Step #9:  Snap the V Series G575 plastic bezel cover back in place.

Step #10: Screw the plastic bezel back onto the LCD monitor.

Step #11: Place the rubber covers over the screws.

Step #12: And that all.  You just replaced your laptop V Series G575 LCD screen!

Related Lenovo G575 Manual Pages

Lenovo G470/G475/G570/G575 User Guide V1.0 - Page 35

..., G475, G570 and G575. Any other battery could ignite or explode. To replace the battery, do the following steps about upgrading and replacing devices are using an ExpressCard device, the computer might not be able to enter hibernation mode. CRU instructions Notes: • The illustrations used in the direction shown by Lenovo. If this chapter are...
Hardware Maintenance Manual - Page 3

... Power-on password 24 Supervisor password 24 Power management 25 Screen blank mode 25 Sleep (standby) mode 25 Hibernation mode 26 Lenovo G470/G475/G570/G575 27 Specifications 27 Status indicators 29 Fn key combinations 31 FRU replacement notices 32 Screw notices 32 Removing and replacing an FRU 33 1010 Battery pack 34 1020 Dummy...
Hardware Maintenance Manual - Page 20

.../. 2. Lenovo G470/G475/G570/G575 Hardware Maintenance Manual Important service information This chapter presents the following important service information: •• "Strategy for replacing FRUs" on page 18 Important: BIOS and device driver fixes are customer-installable. To download software fixes, drivers, and BIOS, follow the steps below: 1. Go to the system board before replacing...
Hardware Maintenance Manual - Page 25

... verify a symptom, follow the steps below : 1. Make sure that the battery pack supplies power when you turn on page 27. Measure the output voltage at the plug of the following : •• Replace the system board. •• If the problem continues, go to "Lenovo G470/G475/G570/G575" on the computer. If the...
Hardware Maintenance Manual - Page 26

... Meter shows that less than +11.0 V DC after recharging, replace the battery. 4. To check the battery pack, follow the steps below: 1. If the charge indicator still does not light on...the battery pack and measure the voltage between battery terminals 5 and 7. Lenovo G470/G475/G570/G575 Hardware Maintenance Manual Perform operational charging. Then reinstall the battery pack. ...
Hardware Maintenance Manual - Page 28

...user must be entered before an operating system can be replaced for a scheduled fee. 24 Attention: If the SVP...to insert the backup discs to 2 hours. Lenovo G470/G475/G570/G575 Hardware Maintenance Manual When you use the recovery ...discs to boot your computer, the system will enter the user interface for it appears on the screen...
Hardware Maintenance Manual - Page 30

...file in the boot record on , the computer returns from the hard disk drive. 26 Lenovo G470/G475/G570/G575 Hardware Maintenance Manual Hibernation mode In hibernation mode, the following occurs: •• The...as the event that action: - To cause the computer to enter hibernation mode, follow the steps below: •• If you are satisfied in suspend mode. Also, the computer goes ...
Hardware Maintenance Manual - Page 36

...one . Make sure that all screws firmly to removing and replacing parts. Lenovo G470/G475/G570/G575 Hardware Maintenance Manual FRU replacement notices This section presents notices related to the torque shown in...firmly. •• Ensure torque screwdrivers are harder to the "Torque" column for each step. •• Make sure that you use new screws. •• Use a ...
Hardware Maintenance Manual - Page 37

...instructions to indicate how to observe the following procedures about connecting and arranging internal cables, see "Locations" on page 32 3. Make sure to remove and replace the FRU. When replacing an FRU, use the correct screw as given by shaking the computer gently and listening for the G470&G475&G570&G575. 33 Lenovo... the correct sequence in the steps to , and can cause electrical ...
Hardware Maintenance Manual - Page 38

... the direction shown by arrow 3. 1 3 2 When installing: Install the battery pack along the slide rails of battery pack Unlock the battery release lever 1. Removal steps of the slot. Figure 1. Lenovo G470/G475/G570/G575 Hardware Maintenance Manual 1010 Battery pack DANGER Only use the battery specified in the parts list for your computer.
Hardware Maintenance Manual - Page 39

Removal steps of dummy card Remove dummy card in the direction shown by arrows 1 2. 1 2 35 Lenovo G470/G475/G570/G575 1020 Dummy card For access, remove this FRU: •• "1010 Battery pack" on page 34 Figure 2.
Hardware Maintenance Manual - Page 40

... pull the optical drive out in order: •• "1010 Battery pack" on page 34 Figure 3. Lenovo G470/G475/G570/G575 Hardware Maintenance Manual 1030 Optical drive For access, remove these FRUs in the direction shown by arrow 2 3. 1 Step 1 Screw (quantity) M2.5 × 8 mm, flat-head, nylon-coated (1) Color Black Torque 2.0kgfcm 2 3 36...
Hardware Maintenance Manual - Page 41

Lenovo G470/G475/G570/G575 1040 Hard disk drive (HDD)/Memory/CPU (Central processing unit)/Mini PCI ExpressCard slot compartment cover For access, remove this FRU: •• "1010 Battery pack" on page 34 Figure 4. Removal steps of HDD/Memory/CPU/Mini PCI ExpressCard slot compartment cover Note: Loosen the screws 1, but do not...
Hardware Maintenance Manual - Page 42

Lenovo G470/G475/G570/G575 Hardware Maintenance Manual 1050 Hard disk drive For access, remove these FRUs in order: •• "1010 ...or is sensitive to it. Improper handling can cause damages and permanent loss of Hard disk drive Remove two screws 1. Removal steps of data. • Before removing the drive, suggest the customer to backup all the information on page 37 Attention: •...
Hardware Maintenance Manual - Page 43

Lenovo G470/G475/G570/G575 3 Step 1 Screw (quantity) M2.0 × 4 mm, flat-head, nylon-coated (2) Color Black Torque 2.0kgfcm When installing: Make sure that the HDD connector is attached firmly. 39
Hardware Maintenance Manual - Page 44

Lenovo G470/G475/G570/G575 Hardware Maintenance Manual 1060 DIMM For access, remove these FRUs in the slot and difficult to be installed in SLOT-0 ( a : lower slot), but not in SLOT-1 ( b : upper slot). Removal steps of DIMM Release the two latches on both edges of the DIMM into the place. b a When installing: Insert the...
Hardware Maintenance Manual - Page 45

..., nylon-coated (3) Silver M2.0 × 3.2 mm, with spring, nylon-coated (4) Black Torque 2.0kgfcm 2.0kgfcm 41 Removal steps of fan assembly and heat sink assembly Note: Remove three screws 1 and four spring screws 2. Lenovo G470/G475/G570/G575 1070 Fan assembly and Heat Sink assembly For access, remove these FRUs in the direction shown...
Hardware Maintenance Manual - Page 46

... the connector. 4 Attention: Do not handle the heat sink assembly roughly. Improper handling can cause distortion or deformation and imperfect contact with components. 42 Removal steps of fan assembly and heat sink assembly (continued) Lift the fan assembly and heat sink assembly in the direction shown by arrow...
Hardware Maintenance Manual - Page 47

Either too much or too less grease application can cause a thermal problem due to the a part shown in the figure above. Removal steps of fan assembly and heat sink assembly (continued) a When installing: •• Before you attach the fan assembly to the computer, apply thermal grease, at ...
Hardware Maintenance Manual - Page 71

Remove the integrated camera in the figure above. 67 When replacing the integrated camera, route the connector cable as shown in the direction shown... make sure the connector is stuck on page 65 Figure 18. Removal steps of integrated camera Note: The integrated camera is attached firmly. Lenovo G470/G475/G570/G575 1180 Integrated camera For access, remove these FRUs in order: •&#...

Similar Questions

Ask a New Question
Use the box below to post a new question about this Lenovo product .
Points & Prizes
  • You can earn points for nearly everything you do on HelpOwl.com
  • You can trade in those points for gift cards at leading retailers such as Amazon.com and Walmart
  • It's that simple!
See How it Works
Create a Free Account

Lenovo Manuals

Find free Lenovo G575 manuals and user guides available at ManualOwl.com. Try out our unique manual viewer allowing you to interact with manuals from directly within your browser!

Lenovo Reviews

View thousands of Lenovo user reviews and customer ratings available at ReviewOwl.com.

Contact Information

Complete Lenovo customer service contact information including steps to reach representatives, hours of operation, customer support links and more from ContactHelp.com.

Scoreboard Ratings

See detailed Lenovo customer service rankings, employee comments and much more from our sister site.

Lenovo Recalls

Find comprehensive Lenovo recall information updated hourly on RecallOwl.com.