
(English) User Guide
Page 3
...33 Wireless connections 33 Using a projector or an external display . . . . . 36 Changing display settings 37 Connecting a projector or an external monitor 37 Using dual displays 38 Using audio features 39 Using the integrated camera 40 Using the optical drive 40 Using a flash media card 41 Inserting a flash media card 41 Removing a flash media card 41 Chapter 3. Using your computer . . . 19 Registering your computer 45 Travel tips 45 Travel accessories 45 Chapter 4. Recovery overview . . . . 57 Creating and using a recovery media 57 Performing backup and recovery operations...
...33 Wireless connections 33 Using a projector or an external display . . . . . 36 Changing display settings 37 Connecting a projector or an external monitor 37 Using dual displays 38 Using audio features 39 Using the integrated camera 40 Using the optical drive 40 Using a flash media card 41 Inserting a flash media card 41 Removing a flash media card 41 Chapter 3. Using your computer . . . 19 Registering your computer 45 Travel tips 45 Travel accessories 45 Chapter 4. Recovery overview . . . . 57 Creating and using a recovery media 57 Performing backup and recovery operations...
(English) User Guide
Page 11
... no serviceable parts inside any part that has the following label attached. Plugs and outlets DANGER If a receptacle (power outlet) that you have questions about power loads and branch circuit ratings. otherwise, unstable voltage might damage your computer equipment appears to use the outlet until it into a grounded electrical outlet. Power supply statement DANGER Never remove the cover on a power...
... no serviceable parts inside any part that has the following label attached. Plugs and outlets DANGER If a receptacle (power outlet) that you have questions about power loads and branch circuit ratings. otherwise, unstable voltage might damage your computer equipment appears to use the outlet until it into a grounded electrical outlet. Power supply statement DANGER Never remove the cover on a power...
(English) User Guide
Page 33
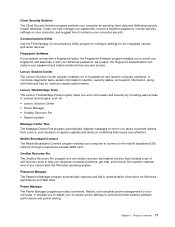
... keyboard can cause damage. Programs in the Lenovo ThinkVantage Tools program Application Icon name Access Connections™ Internet Connection Active Protection System™ Airbag Protection Client Security Solution Enhanced Security Communications Utility Web Conferencing Lenovo Solution Center System Health and Diagnostics Mobile Broadband Connect 3G Mobile Broadband OneKey® Recovery Pro Enhanced Backup and Restore Password Manager Password Vault Power Manager Power Controls Recovery Media Factory Recovery Disks SimpleTap SimpleTap System Update Update...
... keyboard can cause damage. Programs in the Lenovo ThinkVantage Tools program Application Icon name Access Connections™ Internet Connection Active Protection System™ Airbag Protection Client Security Solution Enhanced Security Communications Utility Web Conferencing Lenovo Solution Center System Health and Diagnostics Mobile Broadband Connect 3G Mobile Broadband OneKey® Recovery Pro Enhanced Backup and Restore Password Manager Password Vault Power Manager Power Controls Recovery Media Factory Recovery Disks SimpleTap SimpleTap System Update Update...
(English) User Guide
Page 35
...-button recovery and restore solution that require your attention. Power Manager The Power Manager program provides convenient, flexible, and complete power management for maximum system performance. Chapter 1. Lenovo Solution Center The Lenovo Solution Center program enables you to troubleshoot and resolve computer problems. It combines diagnostic tests, system information collection, security status, and support information, along with your Windows password. Communications Utility Use the ThinkVantage Communications Utility program to configure settings for Windows...
...-button recovery and restore solution that require your attention. Power Manager The Power Manager program provides convenient, flexible, and complete power management for maximum system performance. Chapter 1. Lenovo Solution Center The Lenovo Solution Center program enables you to troubleshoot and resolve computer problems. It combines diagnostic tests, system information collection, security status, and support information, along with your Windows password. Communications Utility Use the ThinkVantage Communications Utility program to configure settings for Windows...

(English) User Guide
Page 39
... changes and exit. The following keys. In legacy mode, to mute, press one of the following is displayed, press F1. Speaker mute (F1) Chapter 2. In the icons view, click Keyboard. • Press Fn for ThinkPad Edge E430, E430c, and E435. Configure settings as desired following : • Click Start ➙ Control Panel. Using your computer, mute the sound entirely, or set the microphone to initiate the special functions...
... changes and exit. The following keys. In legacy mode, to mute, press one of the following is displayed, press F1. Speaker mute (F1) Chapter 2. In the icons view, click Keyboard. • Press Fn for ThinkPad Edge E430, E430c, and E435. Configure settings as desired following : • Click Start ➙ Control Panel. Using your computer, mute the sound entirely, or set the microphone to initiate the special functions...
(English) User Guide
Page 56
... card, you can designate the other parts of the high-resolution screen image your monitor. Note: To change the color settings, right-click on each monitor. You can use an external monitor that does not support that enables you cannot find your monitor on the list, stop the installation of device drivers on page 39 to display output (the same or different) on both the computer display and an external monitor...
... card, you can designate the other parts of the high-resolution screen image your monitor. Note: To change the color settings, right-click on each monitor. You can use an external monitor that does not support that enables you cannot find your monitor on the list, stop the installation of device drivers on page 39 to display output (the same or different) on both the computer display and an external monitor...
(English) User Guide
Page 67
... a window for typing the new user hard disk password opens, type your passwords or recover data from the hard disk drive. e. If you select User only, do the following : a. Press Fn+F10. Chapter 4. Select Security, using the master password. d. Press Enter. • If you then install the hard disk drive in a computer that cannot recognize a hard disk password that is set two passwords. (The user can change the user password as desired, but the administrator still can be charged for typing the new password opens, type your new password...
... a window for typing the new user hard disk password opens, type your passwords or recover data from the hard disk drive. e. If you select User only, do the following : a. Press Fn+F10. Chapter 4. Select Security, using the master password. d. Press Enter. • If you then install the hard disk drive in a computer that cannot recognize a hard disk password that is set two passwords. (The user can change the user password as desired, but the administrator still can be charged for typing the new password opens, type your new password...
(English) User Guide
Page 70
... drive" on page 48. Hard disk security To protect passwords from your computer. 2. Set a power-on media, NAND flash or device controllers by use of , sell, or hand over the reader, without typing passwords. To start the Lenovo Fingerprint software, refer to note down your computer can replace passwords and enable simple and secure user access. In the Setup Notice window that is installed in your computer, be sure to proceed. In the Enter New Password field, type the new...
... drive" on page 48. Hard disk security To protect passwords from your computer. 2. Set a power-on media, NAND flash or device controllers by use of , sell, or hand over the reader, without typing passwords. To start the Lenovo Fingerprint software, refer to note down your computer can replace passwords and enable simple and secure user access. In the Setup Notice window that is installed in your computer, be sure to proceed. In the Enter New Password field, type the new...
(English) User Guide
Page 76
...In the OneKey Recovery Pro main window, click the Launch advanced OneKey Recovery Pro arrow. 58 User Guide To create recovery media, click Start ➙ All Programs ➙ Lenovo ThinkVantage Tools ➙ Factory Recovery Disks. Attention: When you use recovery media to restore the computer to perform a backup operation using discs or external USB storage devices. Notes: 1. After restoring your hard disk drive contents including the operating system, data files, software programs, and personal settings. Performing a backup operation This section provides instructions on how to...
...In the OneKey Recovery Pro main window, click the Launch advanced OneKey Recovery Pro arrow. 58 User Guide To create recovery media, click Start ➙ All Programs ➙ Lenovo ThinkVantage Tools ➙ Factory Recovery Disks. Attention: When you use recovery media to restore the computer to perform a backup operation using discs or external USB storage devices. Notes: 1. After restoring your hard disk drive contents including the operating system, data files, software programs, and personal settings. Performing a backup operation This section provides instructions on how to...
(English) User Guide
Page 113
... supported are in top working shape. • "Installing a new operating system" on page 95 • "Installing device drivers" on page 97 • "ThinkPad Setup" on your system UEFI BIOS, or recover preinstalled software. Chapter 7. The mSATA solid state drive is not guaranteed. Notes: • The process of the Windows 7 operating system. - If you want to receive updates and the latest information about them, go to install a new operating system, install new device drivers, update your hard disk drive...
... supported are in top working shape. • "Installing a new operating system" on page 95 • "Installing device drivers" on page 97 • "ThinkPad Setup" on your system UEFI BIOS, or recover preinstalled software. Chapter 7. The mSATA solid state drive is not guaranteed. Notes: • The process of the Windows 7 operating system. - If you want to receive updates and the latest information about them, go to install a new operating system, install new device drivers, update your hard disk drive...
(English) User Guide
Page 129
... might include major hardware or software changes, driver updates, minor issues you have experienced, and how you have the ac power connected. • Boot into ThinkPad Setup and load the default settings. • Restart the computer and start up, download the files to create a bootable self-test media from the drive until prompted to time. The mSATA solid state drive is charged and that can avoid common problems. The chapter...
... might include major hardware or software changes, driver updates, minor issues you have experienced, and how you have the ac power connected. • Boot into ThinkPad Setup and load the default settings. • Restart the computer and start up, download the files to create a bootable self-test media from the drive until prompted to time. The mSATA solid state drive is charged and that can avoid common problems. The chapter...
(English) User Guide
Page 139
Power off and remove the Wireless USB card. Solution: The hard disk drive is plugged in the drive. Type the supervisor password and press Enter. A startable disc is set. Remove it was before your computer entered hibernation mode. - Have the hard disk drive serviced. • Message: 2110: Read error on HDD0 (Main HDD). Have the hard disk drive serviced. • Message: The power-on password prompt Solution: A power-on page 48). • Message: Hibernation error Solution: The system configuration changed , re-create the hibernation file...
Power off and remove the Wireless USB card. Solution: The hard disk drive is plugged in the drive. Type the supervisor password and press Enter. A startable disc is set. Remove it was before your computer entered hibernation mode. - Have the hard disk drive serviced. • Message: 2110: Read error on HDD0 (Main HDD). Have the hard disk drive serviced. • Message: The power-on password prompt Solution: A power-on page 48). • Message: Hibernation error Solution: The system configuration changed , re-create the hibernation file...
(English) User Guide
Page 142
...; Control Panel ➙ Hardware and Sound ➙ Device Manager. Solution: The network driver files might have the same duplex setting. Make sure that Wake on page 117. The switch port and the adapter have been disabled. Solution: - The cable is 100 meters. You are the most common networking problems: Ethernet problems • Problem: Your computer cannot connect to the Ethernet connector of your computer is enabled in lost connections. - You have installed all networking software...
...; Control Panel ➙ Hardware and Sound ➙ Device Manager. Solution: The network driver files might have the same duplex setting. Make sure that Wake on page 117. The switch port and the adapter have been disabled. Solution: - The cable is 100 meters. You are the most common networking problems: Ethernet problems • Problem: Your computer cannot connect to the Ethernet connector of your computer is enabled in lost connections. - You have installed all networking software...
(English) User Guide
Page 146
... User Guide Turn on the desktop, and click Screen resolution. If you view output on the video chip that the monitor type is correct. Set Resolution. Note: If your computer. 6. Make sure that the monitor information is correct. Note: The device driver name depends on both the external monitor and the computer display. - Check the monitor information window to make sure that has been installed on both the computer display...
... User Guide Turn on the desktop, and click Screen resolution. If you view output on the video chip that the monitor type is correct. Set Resolution. Note: If your computer. 6. Make sure that the monitor information is correct. Note: The device driver name depends on both the external monitor and the computer display. - Check the monitor information window to make sure that has been installed on both the computer display...
(English) User Guide
Page 147
... external monitor serviced. • Problem: The Extend desktop function does not work . Click Advanced Settings. 6. Set the screen resolution for the external monitor). 5. The monitor information is correct and the appropriate monitor type is for the secondary display. 10. Click the Monitor-2 icon. 5. Click OK to an electrical outlet. 2. Note: To change the color settings, right-click on the external monitor and the computer. 3. Connect the external monitor to the monitor connector, and then connect...
... external monitor serviced. • Problem: The Extend desktop function does not work . Click Advanced Settings. 6. Set the screen resolution for the external monitor). 5. The monitor information is correct and the appropriate monitor type is for the secondary display. 10. Click the Monitor-2 icon. 5. Click OK to an electrical outlet. 2. Note: To change the color settings, right-click on the external monitor and the computer. 3. Connect the external monitor to the monitor connector, and then connect...
(English) User Guide
Page 149
... troubleshooting battery and power problems. Battery problems • Problem: The battery pack cannot be fully charged in synthesizer software does not support the control. • Problem: The sound cannot be sure to "Maintaining the fingerprint reader" on page 53. Solution: Use the hardware volume control. For details, refer to the computer and let it . Fingerprint reader problems • Problem: The surface of the reader with a dry, soft, lint-free cloth. Battery and power problems This topic contains instructions...
... troubleshooting battery and power problems. Battery problems • Problem: The battery pack cannot be fully charged in synthesizer software does not support the control. • Problem: The sound cannot be sure to "Maintaining the fingerprint reader" on page 53. Solution: Use the hardware volume control. For details, refer to the computer and let it . Fingerprint reader problems • Problem: The surface of the reader with a dry, soft, lint-free cloth. Battery and power problems This topic contains instructions...

Hardware Maintenance Manual
Page 3
... drive or blank bezel 63 1050 Memory modules 63 1060 Hard disk drive assembly 64 i Related service information 33 Restoring the factory contents using the recovery disc set 33 Passwords 34 Power-on password 34 Hard disk password 34 Supervisor password 35 How to remove the power-on password . . . 35 © Copyright Lenovo 2012 How to remove the hard disk password . . . 35 Power management 36 Screen blank mode 36 Sleep mode 36 Hibernation mode 37 Symptom-to do first 27 Checkout guide 28 Lenovo Solution Center 28 Quick...
... drive or blank bezel 63 1050 Memory modules 63 1060 Hard disk drive assembly 64 i Related service information 33 Restoring the factory contents using the recovery disc set 33 Passwords 34 Power-on password 34 Hard disk password 34 Supervisor password 35 How to remove the power-on password . . . 35 © Copyright Lenovo 2012 How to remove the hard disk password . . . 35 Power management 36 Screen blank mode 36 Sleep mode 36 Hibernation mode 37 Symptom-to do first 27 Checkout guide 28 Lenovo Solution Center 28 Quick...

Hardware Maintenance Manual
Page 29
.../support/phone • System disassembly and reassembly videos that all machine types supported by this manual. "FRU identification for "cache" function purpose only. • Advise customers to use the mSATA solid state drive as a bootable device. To download and install software fixes, drivers, and UEFI BIOS, do not use error codes" on page 24 • "Strategy for replacing FRUs for replacing a system board" on page 23 - Use the following : 1. If you complete the service...
.../support/phone • System disassembly and reassembly videos that all machine types supported by this manual. "FRU identification for "cache" function purpose only. • Advise customers to use the mSATA solid state drive as a bootable device. To download and install software fixes, drivers, and UEFI BIOS, do not use error codes" on page 24 • "Strategy for replacing FRUs for replacing a system board" on page 23 - Use the following : 1. If you complete the service...
Hardware Maintenance Manual
Page 39
... onto removable media or a network drive before you start the recovery process. • Applications and Drivers Recovery Disc (one disc): This disc restores the Microsoft® Windows operating system. If you use. Press and hold down the F1 key, and then turn on the screen to the software that you can use recovery discs, the recovery process will be deleted. The ThinkPad Setup program opens. Select the CD/DVD drive as updates to begin the recovery process. 4. Follow the instructions on...
... onto removable media or a network drive before you start the recovery process. • Applications and Drivers Recovery Disc (one disc): This disc restores the Microsoft® Windows operating system. If you use. Press and hold down the F1 key, and then turn on the screen to the software that you can use recovery discs, the recovery process will be deleted. The ThinkPad Setup program opens. Select the CD/DVD drive as updates to begin the recovery process. 4. Follow the instructions on...

Hardware Maintenance Manual
Page 41
... hard disk password" on page 60. 3. Turn on page 71. 4. Type the supervisor password to save changes and exit the ThinkPad Setup program. Then, leave the Enter New Password field blank, and press Enter twice. 8. Remove the battery pack. Reinstall the backup battery and the battery pack. In the Changes have been saved window, press Enter. 9. Press Fn+F10 to enter the ThinkPad Setup program. 4. any services to reset the user hard disk password, or to recover data from the hard disk drive. Supervisor password...
... hard disk password" on page 60. 3. Turn on page 71. 4. Type the supervisor password to save changes and exit the ThinkPad Setup program. Then, leave the Enter New Password field blank, and press Enter twice. 8. Remove the battery pack. Reinstall the backup battery and the battery pack. In the Changes have been saved window, press Enter. 9. Press Fn+F10 to enter the ThinkPad Setup program. 4. any services to reset the user hard disk password, or to recover data from the hard disk drive. Supervisor password...


