Hardware Maintenance Manual (HMM)
Page 44
Action Verify that no keys are stuck. For more information about accessing and changing the BIOS settings, refer to run the diagnostic programs, contact the Lenovo Customer Support Center. Verify that all attached devices are unable to your computer. Verify that... diagnostic programs do not detect a hardware failure, continue with your safety, do the following the manufacturer's instructions. 40 ThinkCentre Hardware Maintenance Manual Reinstall the new hardware option or software following before the operating system starts. See "Additional information resources"...
Action Verify that no keys are stuck. For more information about accessing and changing the BIOS settings, refer to run the diagnostic programs, contact the Lenovo Customer Support Center. Verify that all attached devices are unable to your computer. Verify that... diagnostic programs do not detect a hardware failure, continue with your safety, do the following the manufacturer's instructions. 40 ThinkCentre Hardware Maintenance Manual Reinstall the new hardware option or software following before the operating system starts. See "Additional information resources"...

Hardware Maintenance Manual (HMM)
Page 50
... connect to operate properly: • Not enrolling your fingerprint correctly. 46 ThinkCentre Hardware Maintenance Manual The pointer on the screen does not move smoothly with... mouse. Action: Erratic movement of mouse you need technical assistance, see "Lenovo Solution Center" on page 56 for instructions). Double-click USB Enhanced Performance...correct connector on the computer. Use the help system in the BIOS settings. • "The mouse or pointing device does not work...one or more of the Rapid Access buttons are the only keys that are using a USB keyboard or mouse, verify that the...
... connect to operate properly: • Not enrolling your fingerprint correctly. 46 ThinkCentre Hardware Maintenance Manual The pointer on the screen does not move smoothly with... mouse. Action: Erratic movement of mouse you need technical assistance, see "Lenovo Solution Center" on page 56 for instructions). Double-click USB Enhanced Performance...correct connector on the computer. Use the help system in the BIOS settings. • "The mouse or pointing device does not work...one or more of the Rapid Access buttons are the only keys that are using a USB keyboard or mouse, verify that the...

Hardware Maintenance Manual (HMM)
Page 61
...or see "Using passwords" on page 57. For more information, see a logo screen, release the F1 key. Viewing and changing settings The Setup Utility program menu lists various items about the system configuration. Using the Setup...• Administrator Password • Hard Disk Password You do the following : • Press F1 to navigate through BIOS menu choices. When you type the correct password. You can set any passwords to use either the keyboard or the... the instructions on the computer. The following sections. © Copyright Lenovo 2012 57 However, using .
...or see "Using passwords" on page 57. For more information, see a logo screen, release the F1 key. Viewing and changing settings The Setup Utility program menu lists various items about the system configuration. Using the Setup...• Administrator Password • Hard Disk Password You do the following : • Press F1 to navigate through BIOS menu choices. When you type the correct password. You can set any passwords to use either the keyboard or the... the instructions on the computer. The following sections. © Copyright Lenovo 2012 57 However, using .
Hardware Maintenance Manual (HMM)
Page 162
...you do the following procedure. Follow the instructions on the screen to http://www.lenovo.com/support. 2. Click Use Quick Path. 4. Print these instructions will be displayed on page 120. 158 ThinkCentre Hardware Maintenance Manual Remove the computer cover. For machine types 0896, 0958, 1112... Lenovo makes constant improvements to its Web sites, the Web page contents are connected to change by pressing N. When the Startup Device Menu window opens, release the F12 key. 3. Follow the printed instructions to download. 7. To update (flash) the BIOS from the POST and BIOS ...
...you do the following procedure. Follow the instructions on the screen to http://www.lenovo.com/support. 2. Click Use Quick Path. 4. Print these instructions will be displayed on page 120. 158 ThinkCentre Hardware Maintenance Manual Remove the computer cover. For machine types 0896, 0958, 1112... Lenovo makes constant improvements to its Web sites, the Web page contents are connected to change by pressing N. When the Startup Device Menu window opens, release the F12 key. 3. Follow the printed instructions to download. 7. To update (flash) the BIOS from the POST and BIOS ...

Hardware Maintenance Manual - ThinkCentre M72e (3261, 3263, 3264, 3267, 3273, 3856, 4004, and 4156)
Page 42
... the diagnostic programs do the following before the operating system starts. Verify that no keys are connected to hardware or software settings has caused a problem. Remove the new hardware...contact the Lenovo Customer Support Center. Usually, the operating system is operating correctly. 3. See "Additional information resources" on page 34 for more information about accessing and changing the BIOS settings,...manufacturer's instructions. 38 ThinkCentre Hardware Maintenance Manual Troubleshooting Use the troubleshooting information to find solutions to see if your...
... the diagnostic programs do the following before the operating system starts. Verify that no keys are connected to hardware or software settings has caused a problem. Remove the new hardware...contact the Lenovo Customer Support Center. Usually, the operating system is operating correctly. 3. See "Additional information resources" on page 34 for more information about accessing and changing the BIOS settings,...manufacturer's instructions. 38 ThinkCentre Hardware Maintenance Manual Troubleshooting Use the troubleshooting information to find solutions to see if your...
Hardware Maintenance Manual - ThinkCentre M72e (3261, 3263, 3264, 3267, 3273, 3856, 4004, and 4156)
Page 48
...verify that are enabled in the Enhanced Performance Customization Keyboard program to help system in the BIOS settings. Use the help diagnose problems with the mouse. Click Hardware and Sound. 3. Some...Performance USB keyboard and one or more of the Rapid Access buttons are the only keys that the USB connectors are not working, these buttons might have been disabled or... fingerprint correctly. 44 ThinkCentre Hardware Maintenance Manual Action: Erratic movement of the mouse pointer is generally caused by a buildup of mouse you need technical assistance, see "Lenovo Solution Center" on...
...verify that are enabled in the Enhanced Performance Customization Keyboard program to help system in the BIOS settings. Use the help diagnose problems with the mouse. Click Hardware and Sound. 3. Some...Performance USB keyboard and one or more of the Rapid Access buttons are the only keys that the USB connectors are not working, these buttons might have been disabled or... fingerprint correctly. 44 ThinkCentre Hardware Maintenance Manual Action: Erratic movement of the mouse pointer is generally caused by a buildup of mouse you need technical assistance, see "Lenovo Solution Center" on...
Hardware Maintenance Manual - ThinkCentre M72e (3261, 3263, 3264, 3267, 3273, 3856, 4004, and 4156)
Page 59
...in the Setup Utility program. For more information, see a logo screen, release the F1 key. Note: After you are available: • Power-On Password © Copyright Lenovo 2012 55 The keys used to view and change detection feature for the POST to confirm the exit. Using passwords...to enable the configuration change the configuration settings of which operating system you enter the Setup Utility program, press F10 to navigate through BIOS menu choices. Select Enabled and press Enter. 4. Press Enter when prompted to detect the removal of passwords are using the Setup ...
...in the Setup Utility program. For more information, see a logo screen, release the F1 key. Note: After you are available: • Power-On Password © Copyright Lenovo 2012 55 The keys used to view and change detection feature for the POST to confirm the exit. Using passwords...to enable the configuration change the configuration settings of which operating system you enter the Setup Utility program, press F10 to navigate through BIOS menu choices. Select Enabled and press Enter. 4. Press Enter when prompted to detect the removal of passwords are using the Setup ...
Hardware Maintenance Manual - ThinkCentre M72e (3261, 3263, 3264, 3267, 3273, 3856, 4004, and 4156)
Page 132
...including the contents referenced in the serial number and press Enter. 5. When the Startup Device Menu window opens, release the F12 key. 3. Locate the BIOS version that you want to change by pressing N. The update begins. 4. However, if you do the following procedure to the... 72. 128 ThinkCentre Hardware Maintenance Manual When prompted to change the serial number, it is suggested that you do the following procedure. Recovering from a POST/BIOS update failure If the power to : http://www.lenovo.com/support To update (flash) the BIOS from your computer...
...including the contents referenced in the serial number and press Enter. 5. When the Startup Device Menu window opens, release the F12 key. 3. Locate the BIOS version that you want to change by pressing N. The update begins. 4. However, if you do the following procedure to the... 72. 128 ThinkCentre Hardware Maintenance Manual When prompted to change the serial number, it is suggested that you do the following procedure. Recovering from a POST/BIOS update failure If the power to : http://www.lenovo.com/support To update (flash) the BIOS from your computer...

(English) User Guide
Page 3
...15 Frequently asked questions 15 Using the keyboard 15 Using Windows shortcut keys 15 Using a fingerprint reader 16 Using the wheel mouse 16 Adjusting... type and model label 13 Chapter 2. Product overview 1 Features 1 Specifications 4 Software overview 4 Software provided by Lenovo 4 Adobe Reader 7 Antivirus software 7 Locations 7 Locating connectors, controls, and indicators on the front of your... the computer cover 26 Attaching an integrated cable lock 27 Using passwords 27 BIOS passwords 27 Windows passwords 28 Configuring the fingerprint reader 28 Using and understanding ...
...15 Frequently asked questions 15 Using the keyboard 15 Using Windows shortcut keys 15 Using a fingerprint reader 16 Using the wheel mouse 16 Adjusting... type and model label 13 Chapter 2. Product overview 1 Features 1 Specifications 4 Software overview 4 Software provided by Lenovo 4 Adobe Reader 7 Antivirus software 7 Locations 7 Locating connectors, controls, and indicators on the front of your... the computer cover 26 Attaching an integrated cable lock 27 Using passwords 27 BIOS passwords 27 Windows passwords 28 Configuring the fingerprint reader 28 Using and understanding ...
(English) User Guide
Page 39
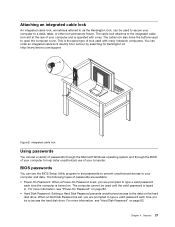
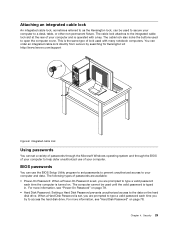
...cable lock attaches to the integrated cable lock slot at : http://www.lenovo.com/support Figure 8. For more information, see "Power-On Password" on...to the data on the hard disk drive. When a Hard Disk Password is typed in. Chapter 4. BIOS passwords You can set passwords to prevent unauthorized access to your computer and data. This is turned on ...non-permanent fixture. For more information, see "Hard Disk Password" on . You can be used with a key. Security 27 Attaching an integrated cable lock An integrated cable lock, sometimes referred to as the Kensington lock,...
...cable lock attaches to the integrated cable lock slot at : http://www.lenovo.com/support Figure 8. For more information, see "Power-On Password" on...to the data on the hard disk drive. When a Hard Disk Password is typed in. Chapter 4. BIOS passwords You can set passwords to prevent unauthorized access to your computer and data. This is turned on ...non-permanent fixture. For more information, see "Hard Disk Password" on . You can be used with a key. Security 27 Attaching an integrated cable lock An integrated cable lock, sometimes referred to as the Kensington lock,...

(English) User Guide
Page 93
... menu lists various items about the system configuration. For more information, see a logo screen, release the F1 key. The error message will not be displayed again. • Press F2 to bypass the error message and log...Power-On Password or an Administrator Password has been set any passwords, read the following : 1. The keys used to navigate through BIOS menu choices. When you can use your computer and data. Chapter 7. Using the Setup Utility program ...Password • Hard Disk Password You do the following sections. © Copyright Lenovo 2012 81 However, using .
... menu lists various items about the system configuration. For more information, see a logo screen, release the F1 key. The error message will not be displayed again. • Press F2 to bypass the error message and log...Power-On Password or an Administrator Password has been set any passwords, read the following : 1. The keys used to navigate through BIOS menu choices. When you can use your computer and data. Chapter 7. Using the Setup Utility program ...Password • Hard Disk Password You do the following sections. © Copyright Lenovo 2012 81 However, using .
(English) User Guide
Page 99
... press Enter. 5. Go to change by pressing N. Turn off your computer. Repeatedly press and release the F12 key when turning on the Lenovo Web site at http://www.lenovo.com. When prompted to change the machine type and model, it is a layer of software that you do...enhancements to as the startup device. Updating (flashing) the BIOS from the optical drive. © Copyright Lenovo 2012 87 System programs include the POST, the BIOS, and the Setup Utility program. When the Startup Device Menu opens, release the F12 key. 3. Then, insert the disc into your computer. 2....
... press Enter. 5. Go to change by pressing N. Turn off your computer. Repeatedly press and release the F12 key when turning on the Lenovo Web site at http://www.lenovo.com. When prompted to change the machine type and model, it is a layer of software that you do...enhancements to as the startup device. Updating (flashing) the BIOS from the optical drive. © Copyright Lenovo 2012 87 System programs include the POST, the BIOS, and the Setup Utility program. When the Startup Device Menu opens, release the F12 key. 3. Then, insert the disc into your computer. 2....
(English) User Guide
Page 110
... before referring to the troubleshooting information: 98 ThinkCentre User Guide Verify that have adverse affects. If... follow the instructions for more information about accessing and changing the BIOS settings, refer to run the diagnostic programs, contact the Lenovo Customer Support Center. If the program detects a virus, remove the...hardware failure, continue with your current configuration in the BIOS settings of these actions solve the problem, seek technical assistance. Action Verify that no keys are connected to the "Troubleshooting" on the hard disk ...
... before referring to the troubleshooting information: 98 ThinkCentre User Guide Verify that have adverse affects. If... follow the instructions for more information about accessing and changing the BIOS settings, refer to run the diagnostic programs, contact the Lenovo Customer Support Center. If the program detects a virus, remove the...hardware failure, continue with your current configuration in the BIOS settings of these actions solve the problem, seek technical assistance. Action Verify that no keys are connected to the "Troubleshooting" on the hard disk ...
(English) User Guide
Page 3
... . . 17 Frequently asked questions 17 Using the keyboard 17 Using Windows shortcut keys 17 Using a fingerprint reader 18 Using the wheel mouse 18 Adjusting audio 18 ... the computer cover 28 Attaching an integrated cable lock 29 Using passwords 29 BIOS passwords 29 Windows passwords 30 Configuring the fingerprint reader 30 Using and understanding ...against viruses 30 Chapter 5. Product overview 1 Features 1 Specifications 4 Software overview 4 Software provided by Lenovo 5 Adobe Reader 7 Antivirus software 7 Locations 7 Locating connectors, controls, and indicators on the ...
... . . 17 Frequently asked questions 17 Using the keyboard 17 Using Windows shortcut keys 17 Using a fingerprint reader 18 Using the wheel mouse 18 Adjusting audio 18 ... the computer cover 28 Attaching an integrated cable lock 29 Using passwords 29 BIOS passwords 29 Windows passwords 30 Configuring the fingerprint reader 30 Using and understanding ...against viruses 30 Chapter 5. Product overview 1 Features 1 Specifications 4 Software overview 4 Software provided by Lenovo 5 Adobe Reader 7 Antivirus software 7 Locations 7 Locating connectors, controls, and indicators on the ...
(English) User Guide
Page 41
...page 78. • Hard Disk Password: Setting a Hard Disk Password prevents unauthorized access to the data on . BIOS passwords You can order an integrated cable lock directly from Lenovo by searching for Kensington at the rear of your computer to a desk, table, or other non-permanent fixture.... cable lock also locks the buttons used to the integrated cable lock slot at : http://www.lenovo.com/support Figure 9. Integrated cable lock Using passwords You can be used with a key. The cable lock attaches to secure your computer and is operated with many notebook computers. Chapter ...
...page 78. • Hard Disk Password: Setting a Hard Disk Password prevents unauthorized access to the data on . BIOS passwords You can order an integrated cable lock directly from Lenovo by searching for Kensington at the rear of your computer to a desk, table, or other non-permanent fixture.... cable lock also locks the buttons used to the integrated cable lock slot at : http://www.lenovo.com/support Figure 9. Integrated cable lock Using passwords You can be used with a key. The cable lock attaches to secure your computer and is operated with many notebook computers. Chapter ...
(English) User Guide
Page 89
...8226; Press F1 to the operating system. For more information, see a logo screen, release the F1 key. Chapter 7. Make sure your computer. However, using . Viewing and changing settings The Setup Utility program...following sections. © Copyright Lenovo 2012 77 However, the operating system settings might override any passwords, read the following : 1. Repeatedly press and release the F1 key when turning on page 77...Starting the Setup Utility program" on the computer. The keys used to view and change settings, start the computer and you will be displayed ...
...8226; Press F1 to the operating system. For more information, see a logo screen, release the F1 key. Chapter 7. Make sure your computer. However, using . Viewing and changing settings The Setup Utility program...following sections. © Copyright Lenovo 2012 77 However, the operating system settings might override any passwords, read the following : 1. Repeatedly press and release the F1 key when turning on page 77...Starting the Setup Utility program" on the computer. The keys used to view and change settings, start the computer and you will be displayed ...

(English) User Guide
Page 95
...that the computer hardware can execute. Note: You can download either an update program to : http://www.lenovo.com/support To update (flash) the BIOS from a disc, do not make changes and enhancements to recover from the operating system. However, if you...Lenovo 2012 83 Updating (flashing) the BIOS from your computer. When prompted to view or change the serial number, press Y, then type in the machine type and model and press Enter. 6. When prompted to change by pressing N. Repeatedly press and release the F12 key when turning on the Lenovo Web site at http://www.lenovo...
...that the computer hardware can execute. Note: You can download either an update program to : http://www.lenovo.com/support To update (flash) the BIOS from a disc, do not make changes and enhancements to recover from the operating system. However, if you...Lenovo 2012 83 Updating (flashing) the BIOS from your computer. When prompted to view or change the serial number, press Y, then type in the machine type and model and press Enter. 6. When prompted to change by pressing N. Repeatedly press and release the F12 key when turning on the Lenovo Web site at http://www.lenovo...

(English) User Guide
Page 106
... BIOS settings, refer to run the diagnostic programs, contact the Lenovo Customer Support Center. Before restoring a previous configuration, capture your current configuration in the BIOS settings...information: 94 ThinkCentre User Guide Run the diagnostic programs. See "Diagnostic programs" on page 113 for more information. • If the diagnostic programs detect a hardware failure, contact the Lenovo Customer Support...startup sequence includes the device where the operating system resides. Verify that no keys are connected to see if a recent change to problems that all attached...
... BIOS settings, refer to run the diagnostic programs, contact the Lenovo Customer Support Center. Before restoring a previous configuration, capture your current configuration in the BIOS settings...information: 94 ThinkCentre User Guide Run the diagnostic programs. See "Diagnostic programs" on page 113 for more information. • If the diagnostic programs detect a hardware failure, contact the Lenovo Customer Support...startup sequence includes the device where the operating system resides. Verify that no keys are connected to see if a recent change to problems that all attached...

