
Hardware Maintenance Manual (HMM)
Page 4
...Security features 157 Hardware-controlled passwords 157 Operating system password 157 Vital Product Data 157 BIOS levels 157 Updating (flashing) the BIOS from a disc . . . . 157 Updating (flashing) the BIOS from your computer 78 Locating major FRUs and CRUs 78 Looking up FRU information ... POST and BIOS update failure 158 Power management 159 Advanced Configuration and Power Interface (ACPI) BIOS 159 Automatic Power-On features 159 Appendix A. Notices 161 Television output notice 162 European conformance CE mark 162 Trademarks 162 Index 163 ii ThinkCentre Hardware Maintenance ...
...Security features 157 Hardware-controlled passwords 157 Operating system password 157 Vital Product Data 157 BIOS levels 157 Updating (flashing) the BIOS from a disc . . . . 157 Updating (flashing) the BIOS from your computer 78 Locating major FRUs and CRUs 78 Looking up FRU information ... POST and BIOS update failure 158 Power management 159 Advanced Configuration and Power Interface (ACPI) BIOS 159 Automatic Power-On features 159 Appendix A. Notices 161 Television output notice 162 European conformance CE mark 162 Trademarks 162 Index 163 ii ThinkCentre Hardware Maintenance ...

Hardware Maintenance Manual (HMM)
Page 68
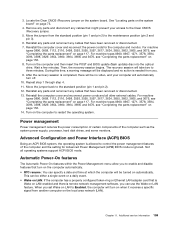
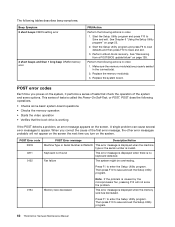
...seated in order. 1. Replace the memory module(s). 3. Replace the system board. Press F1 to save and exit the Setup Utility program. 64 ThinkCentre Hardware Maintenance Manual See Chapter 6 "Using the Setup Utility program" on page 158. Perform the following operations. • Checks some options. Fan...number is no keyboard detected. This error message is called the Power-On Self-Test, or POST. See "Recovering from a POST and BIOS update failure" on page 57. 2. This series of the first error message, the other error messages probably will not solve the problem. Press...
...seated in order. 1. Replace the memory module(s). 3. Replace the system board. Press F1 to save and exit the Setup Utility program. 64 ThinkCentre Hardware Maintenance Manual See Chapter 6 "Using the Setup Utility program" on page 158. Perform the following operations. • Checks some options. Fan...number is no keyboard detected. This error message is called the Power-On Self-Test, or POST. See "Recovering from a POST and BIOS update failure" on page 57. 2. This series of the first error message, the other error messages probably will not solve the problem. Press...
Hardware Maintenance Manual (HMM)
Page 162
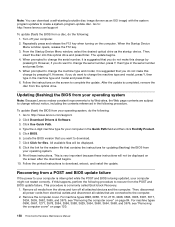
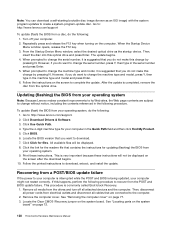
... and 3675, see "Removing the computer cover" on page 120. 158 ThinkCentre Hardware Maintenance Manual From the Startup Device Menu window, select the desired optical drive as an ISO image) with the system program updates to change the serial number, it is suggested that you do the following... 3668, and 3676, see "Removing the computer cover" on the screen after the download begins. 10. Go to: http://www.lenovo.com/support To update (flash) the BIOS from the drives and turn off your operating system, do not make this happens, perform the following : 1. Then, insert the ...
... and 3675, see "Removing the computer cover" on page 120. 158 ThinkCentre Hardware Maintenance Manual From the Startup Device Menu window, select the desired optical drive as an ISO image) with the system program updates to change the serial number, it is suggested that you do the following... 3668, and 3676, see "Removing the computer cover" on the screen after the download begins. 10. Go to: http://www.lenovo.com/support To update (flash) the BIOS from the drives and turn off your operating system, do not make this happens, perform the following : 1. Then, insert the ...
Hardware Maintenance Manual (HMM)
Page 163
... turned on page 156. 8. Additional service information 159 See "Locating parts on the system board" on the computer and then insert the POST and BIOS update (flash update) disc into the optical drive. Reinstall any parts and reconnect any cables that turn on when it receives a specific signal from another computer on page...
... turned on page 156. 8. Additional service information 159 See "Locating parts on the system board" on the computer and then insert the POST and BIOS update (flash update) disc into the optical drive. Reinstall any parts and reconnect any cables that turn on when it receives a specific signal from another computer on page...

Hardware Maintenance Manual (HMM)
Page 167
... operating 35-36 Ethernet connector 71 exiting, Setup Utility 61 external options, installing 83, 119 © Copyright Lenovo 2012 F failure, recovering from a POST and BIOS update 158 flashing the BIOS 157 front connectors, controls, indicators 69, 77 front audio and USB assembly, replacing 107, 144 front bezel front... FRUs 71, 78 installing options memory module 91 PCI card 87 installing, replacing memory module 123 PCI card 124 K keyboard connector 71 L Lenovo Solution Center 56 locating components 71, 78 looking up part numbers 1, 69, 73, 80, 83, 119 M memory module 123 installing, ...
... operating 35-36 Ethernet connector 71 exiting, Setup Utility 61 external options, installing 83, 119 © Copyright Lenovo 2012 F failure, recovering from a POST and BIOS update 158 flashing the BIOS 157 front connectors, controls, indicators 69, 77 front audio and USB assembly, replacing 107, 144 front bezel front... FRUs 71, 78 installing options memory module 91 PCI card 87 installing, replacing memory module 123 PCI card 124 K keyboard connector 71 L Lenovo Solution Center 56 locating components 71, 78 looking up part numbers 1, 69, 73, 80, 83, 119 M memory module 123 installing, ...
Hardware Maintenance Manual (HMM)
Page 168
...60 Self-service CRUs 71, 78 serial port 71 setting password 58 settings changing 57 viewing 57 Setup Utility 57 164 ThinkCentre Hardware Maintenance Manual Setup Utility program, starting 57 Setup Utility, exiting 61 starting the Setup Utility program 57 startup device ...drives accessing 121 system fan assembly, replacing 145 T temporary startup device 60 the BIOS, updating (flashing) 157-158 troubleshooting, basic 39 troubleshooting, diagnostics 39 U updating (flashing) the BIOS 157 updating (flashing) the BIOS 158 USB connector 71 using passwords 57 Setup Utility 57 V VGA monitor connector 71...
...60 Self-service CRUs 71, 78 serial port 71 setting password 58 settings changing 57 viewing 57 Setup Utility 57 164 ThinkCentre Hardware Maintenance Manual Setup Utility program, starting 57 Setup Utility, exiting 61 starting the Setup Utility program 57 startup device ...drives accessing 121 system fan assembly, replacing 145 T temporary startup device 60 the BIOS, updating (flashing) 157-158 troubleshooting, basic 39 troubleshooting, diagnostics 39 U updating (flashing) the BIOS 157 updating (flashing) the BIOS 158 USB connector 71 using passwords 57 Setup Utility 57 V VGA monitor connector 71...
Hardware Maintenance Manual - ThinkCentre M72e (3261, 3263, 3264, 3267, 3273, 3856, 4004, and 4156)
Page 4
... 132 Trademarks 132 Index 133 ii ThinkCentre Hardware Maintenance Manual Additional service information 127 Security features 127 Hardware-controlled passwords 127 Operating system password 127 Vital Product Data 127 BIOS levels 127 Updating (flashing) the BIOS from a disc . . . . 127 Updating (flashing) the BIOS from your operating system 128 Recovering from a POST/BIOS update failure . . 128 Power management 129...
... 132 Trademarks 132 Index 133 ii ThinkCentre Hardware Maintenance Manual Additional service information 127 Security features 127 Hardware-controlled passwords 127 Operating system password 127 Vital Product Data 127 BIOS levels 127 Updating (flashing) the BIOS from a disc . . . . 127 Updating (flashing) the BIOS from your operating system 128 Recovering from a POST/BIOS update failure . . 128 Power management 129...
Hardware Maintenance Manual - ThinkCentre M72e (3261, 3263, 3264, 3267, 3273, 3856, 4004, and 4156)
Page 66
See "Recovering from a POST/BIOS update failure" on the system, it performs a series of tests that the boot drive is invalid. POST does the following operations. • Checks some basic system-... program. Start the Setup Utility program and press F9 to load defaults and then press F10 to save and exit the Setup Utility program. 62 ThinkCentre Hardware Maintenance Manual See Chapter 6 "Using the Setup Utility program" on the system. Replace the memory module(s). 3. Perform the following actions in order. 1. The following...
See "Recovering from a POST/BIOS update failure" on the system, it performs a series of tests that the boot drive is invalid. POST does the following operations. • Checks some basic system-... program. Start the Setup Utility program and press F9 to load defaults and then press F10 to save and exit the Setup Utility program. 62 ThinkCentre Hardware Maintenance Manual See Chapter 6 "Using the Setup Utility program" on the system. Replace the memory module(s). 3. Perform the following actions in order. 1. The following...
Hardware Maintenance Manual - ThinkCentre M72e (3261, 3263, 3264, 3267, 3273, 3856, 4004, and 4156)
Page 132
... ThinkCentre Hardware Maintenance Manual Then, insert the disc into this happens, perform the following procedure. Turn off all cables that are subject to the computer. 2. Click BIOS. 6. This is being updated, your operating system. 9. Click Use Quick Path. 4. Remove all media from the POST and BIOS update failure. Go to: http://www.lenovo.com/support To update...
... ThinkCentre Hardware Maintenance Manual Then, insert the disc into this happens, perform the following procedure. Turn off all cables that are subject to the computer. 2. Click BIOS. 6. This is being updated, your operating system. 9. Click Use Quick Path. 4. Remove all media from the POST and BIOS update failure. Go to: http://www.lenovo.com/support To update...

Hardware Maintenance Manual - ThinkCentre M72e (3261, 3263, 3264, 3267, 3273, 3856, 4004, and 4156)
Page 133
See "Completing the parts replacement" on the computer and then insert the POST and BIOS update (flash update) disc into the optical drive. Repeat step 1 through step 4. 11. Reinstall the computer cover and reconnect any cables that were disconnected. 14.... information 129 Then, the recovery session begins. Wait a few minutes. Reinstall the computer cover and reconnect the power cords for Advanced Power Management (APM) BIOS mode is ignored. 4. The recovery session will automatically turn on LAN to the standard position (pin 1 and pin 2). 12. During this time, a...
See "Completing the parts replacement" on the computer and then insert the POST and BIOS update (flash update) disc into the optical drive. Repeat step 1 through step 4. 11. Reinstall the computer cover and reconnect any cables that were disconnected. 14.... information 129 Then, the recovery session begins. Wait a few minutes. Reinstall the computer cover and reconnect the power cords for Advanced Power Management (APM) BIOS mode is ignored. 4. The recovery session will automatically turn on LAN to the standard position (pin 1 and pin 2). 12. During this time, a...

Hardware Maintenance Manual - ThinkCentre M72e (3261, 3263, 3264, 3267, 3273, 3856, 4004, and 4156)
Page 138
...connectors 68 rear WiFi antenna, installing or removing 114 rear WiFi antennas, installing or removing 115 recovering from a POST/BIOS update failure 128 recovery boot-block 128 removing computer cover 77 replacing battery 92 hard disk drive 111 hard disk drive bracket... 104 system fan, replacing 117 T temporary startup device 58 the BIOS, updating (flashing) 127-128 troubleshooting, basic 37 troubleshooting, diagnostics 37 134 ThinkCentre Hardware Maintenance Manual U updating (flashing) the BIOS 127 updating (flashing) the BIOS 128 USB 2.0 connector 69 using passwords 55 Setup Utility 55 V...
...connectors 68 rear WiFi antenna, installing or removing 114 rear WiFi antennas, installing or removing 115 recovering from a POST/BIOS update failure 128 recovery boot-block 128 removing computer cover 77 replacing battery 92 hard disk drive 111 hard disk drive bracket... 104 system fan, replacing 117 T temporary startup device 58 the BIOS, updating (flashing) 127-128 troubleshooting, basic 37 troubleshooting, diagnostics 37 134 ThinkCentre Hardware Maintenance Manual U updating (flashing) the BIOS 127 updating (flashing) the BIOS 128 USB 2.0 connector 69 using passwords 55 Setup Utility 55 V...

(English) User Guide
Page 4
...drivers 79 Solving recovery problems 79 Chapter 7. Notices 121 ii ThinkCentre User Guide Using the Setup Utility program 81 Starting the Setup...mode 84 Exiting from a POST/BIOS update failure . . 88 Chapter 9. Updating system programs 87 Using system programs 87 Updating (flashing) the BIOS from a disc . . . . 87 Updating (flashing) the BIOS from your computer 94 Chapter 10.... 117 Information resources 117 Lenovo ThinkVantage Tools 117 Lenovo Welcome 117 Help and Support 117 Safety and Warranty 117 Lenovo Web site (http://www.lenovo.com) . . 117 Lenovo Support Web site 118 ...
...drivers 79 Solving recovery problems 79 Chapter 7. Notices 121 ii ThinkCentre User Guide Using the Setup Utility program 81 Starting the Setup...mode 84 Exiting from a POST/BIOS update failure . . 88 Chapter 9. Updating system programs 87 Using system programs 87 Updating (flashing) the BIOS from a disc . . . . 87 Updating (flashing) the BIOS from your computer 94 Chapter 10.... 117 Information resources 117 Lenovo ThinkVantage Tools 117 Lenovo Welcome 117 Help and Support 117 Safety and Warranty 117 Lenovo Web site (http://www.lenovo.com) . . 117 Lenovo Support Web site 118 ...
(English) User Guide
Page 19
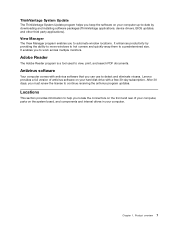
... your computer. It enhances productivity by downloading and installing software packages (ThinkVantage applications, device drivers, BIOS updates, and other third party applications). Adobe Reader The Adobe Reader program is a tool used to work across multiple monitors. Lenovo provides a full version of your computer, parts on your hard disk drive with antivirus software that...
... your computer. It enhances productivity by downloading and installing software packages (ThinkVantage applications, device drivers, BIOS updates, and other third party applications). Adobe Reader The Adobe Reader program is a tool used to work across multiple monitors. Lenovo provides a full version of your computer, parts on your hard disk drive with antivirus software that...
(English) User Guide
Page 99
... can use the Setup Utility program to the POST and BIOS. The update begins. 4. When prompted to : http://www.lenovo.com/support To update (flash) the BIOS from a POST and BIOS update failure. System programs include the POST, the BIOS, and the Setup Utility program. You can execute. Lenovo might make this optical drive and press Enter. Instructions for...
... can use the Setup Utility program to the POST and BIOS. The update begins. 4. When prompted to : http://www.lenovo.com/support To update (flash) the BIOS from a POST and BIOS update failure. System programs include the POST, the BIOS, and the Setup Utility program. You can execute. Lenovo might make this optical drive and press Enter. Instructions for...

(English) User Guide
Page 100
...Boot-block Recovery. 1. Repeat step 1 through step 4. 11. Close the computer cover and reconnect any cables that were disconnected. 88 ThinkCentre User Guide From the Brand drop-down list box, select Desktops. See "Locating parts on the system board" on the system board... three minutes. e. Print these instructions will take two to http://www.lenovo.com/support. 2. Locate the Clear CMOS /Recovery jumper on page 11. 4. Updating (flashing) the BIOS from your operating system Note: Because Lenovo makes constant improvements to its Web sites, the Web page contents are ...
...Boot-block Recovery. 1. Repeat step 1 through step 4. 11. Close the computer cover and reconnect any cables that were disconnected. 88 ThinkCentre User Guide From the Brand drop-down list box, select Desktops. See "Locating parts on the system board" on the system board... three minutes. e. Print these instructions will take two to http://www.lenovo.com/support. 2. Locate the Clear CMOS /Recovery jumper on page 11. 4. Updating (flashing) the BIOS from your operating system Note: Because Lenovo makes constant improvements to its Web sites, the Web page contents are ...
(English) User Guide
Page 156
... memory module 35 PCI card 37 internal drives 1 K keyboard replacing 68 keyboard connector 10 L Lenovo Solution Center 115 Lenovo ThinkVantage Toolbox 115 Lenovo ThinkVantage Tools 117 Lenovo Welcome 5, 117 locating components 10 M media, creating and using recovery media 73 memory module installing...144 ThinkCentre User Guide power features 3 power supply assembly replacing 50 power-on self-test (POST) 87 Power-On, Password 82 programs, updating system 87 purchasing additional services 119 R rear connectors 9 rear WiFi antenna, installing, removing 64 recovering from a POST/BIOS update failure...
... memory module 35 PCI card 37 internal drives 1 K keyboard replacing 68 keyboard connector 10 L Lenovo Solution Center 115 Lenovo ThinkVantage Toolbox 115 Lenovo ThinkVantage Tools 117 Lenovo Welcome 5, 117 locating components 10 M media, creating and using recovery media 73 memory module installing...144 ThinkCentre User Guide power features 3 power supply assembly replacing 50 power-on self-test (POST) 87 Power-On, Password 82 programs, updating system 87 purchasing additional services 119 R rear connectors 9 rear WiFi antenna, installing, removing 64 recovering from a POST/BIOS update failure...
(English) User Guide
Page 157
...components and drives accessing 34 system fan assembly replacing 58 T temporary startup device 84 the BIOS, updating (flashing) 87-88 trademarks 122 troubleshooting, basic 97 troubleshooting, diagnostics 97 U updating (flashing) the BIOS 87 system programs 87 updating (flashing) the BIOS 88 USB connector 10 using a rescue medium, creating and 76 diagnostic programs 118 documentation ... 1 viewing and changing settings 81 W warranty information 117 WiFi units, WiFi adapter card, WiFi card module, WiFi antenna cable, replacing 60 © Copyright Lenovo 2012 workspace, backup and recovery 75 145
...components and drives accessing 34 system fan assembly replacing 58 T temporary startup device 84 the BIOS, updating (flashing) 87-88 trademarks 122 troubleshooting, basic 97 troubleshooting, diagnostics 97 U updating (flashing) the BIOS 87 system programs 87 updating (flashing) the BIOS 88 USB connector 10 using a rescue medium, creating and 76 diagnostic programs 118 documentation ... 1 viewing and changing settings 81 W warranty information 117 WiFi units, WiFi adapter card, WiFi card module, WiFi antenna cable, replacing 60 © Copyright Lenovo 2012 workspace, backup and recovery 75 145
(English) User Guide
Page 4
...ThinkCentre User Guide Updating system programs 83 Using system programs 83 Updating (flashing) the BIOS from a disc . . . . 83 Updating (flashing) the BIOS from your computer 90 Chapter 10. Preventing problems . . . 87 Keeping your computer current 87 Getting the latest device drivers for your computer 87 Updating your operating system 87 Using System Update...108 Serial port problems 109 Software problems 109 USB problems 110 Diagnostic programs 110 Lenovo Solution Center 111 Lenovo ThinkVantage Toolbox 111 PC-Doctor for service 114 Using other services 115 Purchasing ...
...ThinkCentre User Guide Updating system programs 83 Using system programs 83 Updating (flashing) the BIOS from a disc . . . . 83 Updating (flashing) the BIOS from your computer 90 Chapter 10. Preventing problems . . . 87 Keeping your computer current 87 Getting the latest device drivers for your computer 87 Updating your operating system 87 Using System Update...108 Serial port problems 109 Software problems 109 USB problems 110 Diagnostic programs 110 Lenovo Solution Center 111 Lenovo ThinkVantage Toolbox 111 PC-Doctor for service 114 Using other services 115 Purchasing ...
(English) User Guide
Page 19
...detect and eliminate viruses. It enhances productivity by downloading and installing software packages (ThinkVantage applications, device drivers, BIOS updates, and other third party applications). Adobe Reader The Adobe Reader program is activated. Locations This section provides ... the license to automate window locations. ThinkVantage System Update The ThinkVantage System Update program helps you to continue receiving the antivirus program updates. Product overview 7 After 30 days, you to a predetermined size. Lenovo provides a full version of your computer, parts...
...detect and eliminate viruses. It enhances productivity by downloading and installing software packages (ThinkVantage applications, device drivers, BIOS updates, and other third party applications). Adobe Reader The Adobe Reader program is activated. Locations This section provides ... the license to automate window locations. ThinkVantage System Update The ThinkVantage System Update program helps you to continue receiving the antivirus program updates. Product overview 7 After 30 days, you to a predetermined size. Lenovo provides a full version of your computer, parts...

(English) User Guide
Page 95
... turning on page 77 for using the POST and BIOS updates are available as an ISO image) with a system-program-update disc or running a special update program from your computer with the system program updates to : http://www.lenovo.com/support To update (flash) the BIOS from a POST and BIOS update failure. When prompted to change the machine type and...
... turning on page 77 for using the POST and BIOS updates are available as an ISO image) with a system-program-update disc or running a special update program from your computer with the system program updates to : http://www.lenovo.com/support To update (flash) the BIOS from a POST and BIOS update failure. When prompted to change the machine type and...


