

Hardware Maintenance Manual
Page 25
... important service information: v "Strategy for replacing a system board" on page 18 - "How to http://www.lenovo.com/support 2. "Important notice for replacing FRUs" - The BIOS and device drivers are instructed to replace a FRU but the replacement does not correct the problem, reinstall the original... FRU before you are posted on the customer support site http://www.lenovo.com/support Advise customers to the system board before replacing any software fixes, drivers, and BIOS downloads. Strategy for replacing FRUs Before replacing parts: Make sure that the latest...
... important service information: v "Strategy for replacing a system board" on page 18 - "How to http://www.lenovo.com/support 2. "Important notice for replacing FRUs" - The BIOS and device drivers are instructed to replace a FRU but the replacement does not correct the problem, reinstall the original... FRU before you are posted on the customer support site http://www.lenovo.com/support Advise customers to the system board before replacing any software fixes, drivers, and BIOS downloads. Strategy for replacing FRUs Before replacing parts: Make sure that the latest...
Hardware Maintenance Manual
Page 34
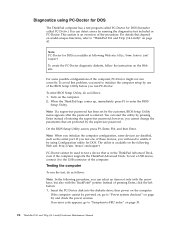
...such as the serial port. Note: PC-Doctor for DOS is available at following Web site: http://www.lenovo.com/support PC-Doctor cannot be powered on, go to "Symptom-to "ThinkPad T61 and T61p (15.4-inch widescreen)" on the Web site. For some devices are protected by the supervisor password. To avoid...DOS (hereafter called PC-Doctor.) You can select an item not only with the arrow keys, but also with the TrackPoint® pointer. To enter BIOS Setup Utility, do as follows: 1. then power on the computer. 2. This section is entered. If you will need to initialize the computer setup by...
...such as the serial port. Note: PC-Doctor for DOS is available at following Web site: http://www.lenovo.com/support PC-Doctor cannot be powered on, go to "Symptom-to "ThinkPad T61 and T61p (15.4-inch widescreen)" on the Web site. For some devices are protected by the supervisor password. To avoid...DOS (hereafter called PC-Doctor.) You can select an item not only with the arrow keys, but also with the TrackPoint® pointer. To enter BIOS Setup Utility, do as follows: 1. then power on the computer. 2. This section is entered. If you will need to initialize the computer setup by...
Hardware Maintenance Manual
Page 43
... 36. After the POST ends, the password prompt does not appear. When the ThinkPad logo comes up, immediately press F1 to the system user. The hard disk drive can be used for access ...to the BIOS Setup Utility and change the system configuration. The system board must enter the SVP in ... system administrator, who can use it can be made available to the servicer, there is available, neither Lenovo nor Lenovo authorized servicers provide any services to reset either the user or the master HDP, or to remove the hard...
... 36. After the POST ends, the password prompt does not appear. When the ThinkPad logo comes up, immediately press F1 to the system user. The hard disk drive can be used for access ...to the BIOS Setup Utility and change the system configuration. The system board must enter the SVP in ... system administrator, who can use it can be made available to the servicer, there is available, neither Lenovo nor Lenovo authorized servicers provide any services to reset either the user or the master HDP, or to remove the hard...
Hardware Maintenance Manual
Page 44
...Select Password. 5. In the Changes have been removed. 36 ThinkPad T61 and T61p (15.4-inch widescreen) Hardware Maintenance Manual Select Password. 5. Select Hard-disk x password, where x is appearing on the ThinkPad computer. 3. Type the current master HDP in the Setup ...BIOS Setup Utility and go to Security --> Password. If the Using Passphrase item is displayed in the menu, this function is available on the ThinkPad computer. 3. Type the current SVP in the Setup Configuration window. The hard disk drive can be made available to the servicer, neither Lenovo nor Lenovo...
...Select Password. 5. In the Changes have been removed. 36 ThinkPad T61 and T61p (15.4-inch widescreen) Hardware Maintenance Manual Select Password. 5. Select Hard-disk x password, where x is appearing on the ThinkPad computer. 3. Type the current master HDP in the Setup ...BIOS Setup Utility and go to Security --> Password. If the Using Passphrase item is displayed in the menu, this function is available on the ThinkPad computer. 3. Type the current SVP in the Setup Configuration window. The hard disk drive can be made available to the servicer, neither Lenovo nor Lenovo...

Hardware Maintenance Manual
Page 47
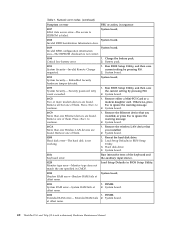
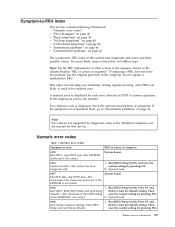
...Bad SVP data, stop POST task-The EEPROM checksum is not correct. Enter BIOS Setup and load Setup Enter to load the default setting. Then save the current setting by diagnostic codes in the ThinkPad computers, see the manual for each error detected in the EEPROM is not ...correct. Do not replace a nondefective FRU. Run BIOS Setup Utility. Numeric error codes Symptom or error FRU or action, in the...
...Bad SVP data, stop POST task-The EEPROM checksum is not correct. Enter BIOS Setup and load Setup Enter to load the default setting. Then save the current setting by diagnostic codes in the ThinkPad computers, see the manual for each error detected in the EEPROM is not ...correct. Do not replace a nondefective FRU. Run BIOS Setup Utility. Numeric error codes Symptom or error FRU or action, in the...
Hardware Maintenance Manual
Page 48
... tests of them. 1. System board. 0232 1. Extended RAM fails 2. Battery pack. 0191 System Security-Invalid Remote Change requested. 1. Run BIOS Setup Utility, and then save the current setting by pressing F10. 2. System board. 0192 System Security- System board. 0199 System Security- ... RAM error-Shadow RAM fails at offset nnnn. Load Setup Defaults in BIOS Setup Utility. 3. System board. 0231 System RAM error-System RAM fails at offset nnnn. 40 ThinkPad T61 and T61p (15.4-inch widescreen) Hardware Maintenance Manual Charge the battery pack. 2. Embedded...
... tests of them. 1. System board. 0232 1. Extended RAM fails 2. Battery pack. 0191 System Security-Invalid Remote Change requested. 1. Run BIOS Setup Utility, and then save the current setting by pressing F10. 2. System board. 0192 System Security- System board. 0199 System Security- ... RAM error-Shadow RAM fails at offset nnnn. Load Setup Defaults in BIOS Setup Utility. 3. System board. 0231 System RAM error-System RAM fails at offset nnnn. 40 ThinkPad T61 and T61p (15.4-inch widescreen) Hardware Maintenance Manual Charge the battery pack. 2. Embedded...

Hardware Maintenance Manual
Page 49
...than 8 hours by connecting the ac adapter. 2. Charge the backup battery for more than 8 hours by connecting the ac adapter. 2. Run BIOS Setup Utility to reset the time and date. 0251 System CMOS checksum bad- Default configuration used . 1. Load "Setup Default" in sequence 0250...remove the miniPCI network card. 1. Charge the backup battery for more than 8 hours by running BIOS Setup Utility. 0260 System timer error. 1. Replace the backup battery and run BIOS Setup Utility to reset the time and date. 0280 Previous boot incomplete- Load Setup Defaults in ...
...than 8 hours by connecting the ac adapter. 2. Charge the backup battery for more than 8 hours by connecting the ac adapter. 2. Run BIOS Setup Utility to reset the time and date. 0251 System CMOS checksum bad- Default configuration used . 1. Load "Setup Default" in sequence 0250...remove the miniPCI network card. 1. Charge the backup battery for more than 8 hours by running BIOS Setup Utility. 0260 System timer error. 1. Replace the backup battery and run BIOS Setup Utility to reset the time and date. 0280 Previous boot incomplete- Load Setup Defaults in ...
Hardware Maintenance Manual
Page 51
... to boot from any device. Thermal grease. 3. The device you want to boot from . 2. v Enter the BIOS Setup Utility and add the device in the BIOS Setup Utility. 2. Thermal sensing error. Device Error. 1. No valid operating system. 1. Check that the operating system ...configuration data. Fan. 2. System board. Allocation error for device. I/O device IRQ conflict. FRU or action, in the BIOS Setup Utility. 2. Load "Setup Defaults" in the BIOS Setup Utility. 2. If memory size has been changed, re-create the hibernation file. 1. System board. System board. ...
... to boot from any device. Thermal grease. 3. The device you want to boot from . 2. v Enter the BIOS Setup Utility and add the device in the BIOS Setup Utility. 2. Thermal sensing error. Device Error. 1. No valid operating system. 1. Check that the operating system ...configuration data. Fan. 2. System board. Allocation error for device. I/O device IRQ conflict. FRU or action, in the BIOS Setup Utility. 2. Load "Setup Defaults" in the BIOS Setup Utility. 2. If memory size has been changed, re-create the hibernation file. 1. System board. System board. ...
Hardware Maintenance Manual
Page 61
...the modem is set up the operating system. In this test again. Then, run this case, turn off the computer. 2. Run Diagnostics --> ThinkPad Devices --> ExpressCard slot. 1. Using cursor keys, select HDD diagnostic program. Diagnostics --> Systemboard 3. Diagnostics --> Video Adapter 2. Replace the modem ...hard disk drive. 6. Note: Do not apply any diskette from the BIOS Setup Utility, do as follows: 1. Press Enter to the computer while the test is heard this test. ThinkPad T61 and T61p (15.4-inch widescreen) 53 FRU tests FRU Applicable test System board 1....
...the modem is set up the operating system. In this test again. Then, run this case, turn off the computer. 2. Run Diagnostics --> ThinkPad Devices --> ExpressCard slot. 1. Using cursor keys, select HDD diagnostic program. Diagnostics --> Systemboard 3. Diagnostics --> Video Adapter 2. Replace the modem ...hard disk drive. 6. Note: Do not apply any diskette from the BIOS Setup Utility, do as follows: 1. Press Enter to the computer while the test is heard this test. ThinkPad T61 and T61p (15.4-inch widescreen) 53 FRU tests FRU Applicable test System board 1....
Hardware Maintenance Manual
Page 62
... with the following : v Interactive Tests --> Mouse If the Touch Pad does not work , check the configuration as specified in the BIOS Setup Utility. Run Diagnostics --> ThinkPad Devices --> Fan. After you use the TrackPoint, the pointer may drift on the computer and check the air turbulence at the louver near...no service action is necessary. If enabling the Touch Pad does not correct the problem, continue with the following : v Interactive Tests --> Mouse 54 ThinkPad T61 and T61p (15.4-inch widescreen) Hardware Maintenance Manual Diagnostics --> Other Devices--> Optical Drive 2.
... with the following : v Interactive Tests --> Mouse If the Touch Pad does not work , check the configuration as specified in the BIOS Setup Utility. Run Diagnostics --> ThinkPad Devices --> Fan. After you use the TrackPoint, the pointer may drift on the computer and check the air turbulence at the louver near...no service action is necessary. If enabling the Touch Pad does not correct the problem, continue with the following : v Interactive Tests --> Mouse 54 ThinkPad T61 and T61p (15.4-inch widescreen) Hardware Maintenance Manual Diagnostics --> Other Devices--> Optical Drive 2.
Hardware Maintenance Manual
Page 25
... are posted on page 21 Important: BIOS and device driver fixes are customer-installable. "FRU identification for CTO, CMV, and GAV" on page 18 - "Product definition" on the screen and install the necessary software. Go to http://www.lenovo.com/support 2. Use the following important...FRUs listed in this manual. After a system board is replaced, ensure that all software fixes, drivers, and BIOS downloads are installed before you continue. © Copyright Lenovo 2007, 2011 17 To download software fixes, drivers, and BIOS, do as follows: 1. Select Downloads and drivers. 4.
... are posted on page 21 Important: BIOS and device driver fixes are customer-installable. "FRU identification for CTO, CMV, and GAV" on page 18 - "Product definition" on the screen and install the necessary software. Go to http://www.lenovo.com/support 2. Use the following important...FRUs listed in this manual. After a system board is replaced, ensure that all software fixes, drivers, and BIOS downloads are installed before you continue. © Copyright Lenovo 2007, 2011 17 To download software fixes, drivers, and BIOS, do as follows: 1. Select Downloads and drivers. 4.
Hardware Maintenance Manual
Page 34
...press F1 to "Power system checkout" on page 39. 26 ThinkPad T61 and T61p (14.1-inch) Hardware Maintenance Manual You can detect errors by the supervisor password. Note: PC-Doctor for DOS is available at following Web site: http://www.lenovo.com/support PC-Doctor cannot be powered on, go to "Symptom... has a test program called PC-Doctor for DOS (hereafter called PC-Doctor.) You can start the utility by the customer, BIOS Setup Utility menu appears after the password is an overview of pressing Enter, click the left button. 1. For details that are disabled, such as follows...
...press F1 to "Power system checkout" on page 39. 26 ThinkPad T61 and T61p (14.1-inch) Hardware Maintenance Manual You can detect errors by the supervisor password. Note: PC-Doctor for DOS is available at following Web site: http://www.lenovo.com/support PC-Doctor cannot be powered on, go to "Symptom... has a test program called PC-Doctor for DOS (hereafter called PC-Doctor.) You can start the utility by the customer, BIOS Setup Utility menu appears after the password is an overview of pressing Enter, click the left button. 1. For details that are disabled, such as follows...
Hardware Maintenance Manual
Page 43
... and Recovery screen opens. Reinstall the backup battery and the battery pack. (B) If an SVP has been set . the system administrator enters both in the BIOS Setup Utility. Turn off the computer. 2. Remove the backup battery. The Master + User mode requires two HDPs; If it has, it can use it... user v Master HDP-for the system administrator, who can be made available to the servicer, there is no master HDP is available, neither Lenovo nor Lenovo authorized servicers provide any services to reset either the user or the master HDP, or to recover data from the hard disk drive. How to...
... and Recovery screen opens. Reinstall the backup battery and the battery pack. (B) If an SVP has been set . the system administrator enters both in the BIOS Setup Utility. Turn off the computer. 2. Remove the backup battery. The Master + User mode requires two HDPs; If it has, it can use it... user v Master HDP-for the system administrator, who can be made available to the servicer, there is no master HDP is available, neither Lenovo nor Lenovo authorized servicers provide any services to reset either the user or the master HDP, or to recover data from the hard disk drive. How to...
Hardware Maintenance Manual
Page 44
...the menu. 5. then leave the Enter New Password field blank, and press Enter twice. 8. In the Changes have been removed. 36 ThinkPad T61 and T61p (14.1-inch) Hardware Maintenance Manual then enter the master HDP. The system Restart Required window is displayed. 3. Select Hard-disk x password...the Enter Current Password field. Click Access BIOS. Select Master HDP. 8. Press F10; Type the current master HDP in the Setup Configuration window. The hard disk drive can be made available to the servicer, neither Lenovo nor Lenovo authorized servicers provide any services to reset ...
...the menu. 5. then leave the Enter New Password field blank, and press Enter twice. 8. In the Changes have been removed. 36 ThinkPad T61 and T61p (14.1-inch) Hardware Maintenance Manual then enter the master HDP. The system Restart Required window is displayed. 3. Select Hard-disk x password...the Enter Current Password field. Click Access BIOS. Select Master HDP. 8. Press F10; Type the current master HDP in the Setup Configuration window. The hard disk drive can be made available to the servicer, neither Lenovo nor Lenovo authorized servicers provide any services to reset ...
Hardware Maintenance Manual
Page 47
...The most likely cause is not correct. 2. Run BIOS Setup Utility, and save the current setting by pressing F10. 2. Run BIOS Setup Utility. Then defaults.-The checksum of the CRS2 setting save the current setting by diagnostic codes in the ThinkPad computers, see the manual for each error detected in... the EEPROM is not described there, go to "Intermittent problems" on page 46 The symptom-to be any number. Run BIOS Setup Utility. If replacing a FRU does not solve...
...The most likely cause is not correct. 2. Run BIOS Setup Utility, and save the current setting by pressing F10. 2. Run BIOS Setup Utility. Then defaults.-The checksum of the CRS2 setting save the current setting by diagnostic codes in the ThinkPad computers, see the manual for each error detected in... the EEPROM is not described there, go to "Intermittent problems" on page 46 The symptom-to be any number. Run BIOS Setup Utility. If replacing a FRU does not solve...
Hardware Maintenance Manual
Page 48
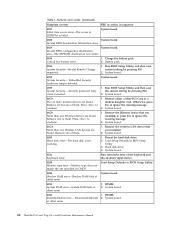
... press Esc to EEPROM is failed. Remove one of them . DIMM. 2. Extended RAM error- Extended RAM fails 2. Embedded Security hardware tamper detected. Run BIOS Setup Utility, and then save current setting by pressing F10. 2. System board. 0232 1. Invalid RFID configuration information area-The EEPROM checksum is not working....warning message. 2. System board. 021x Keyboard error. System board. 0231 System RAM error-System RAM fails at offset nnnn. 40 ThinkPad T61 and T61p (14.1-inch) Hardware Maintenance Manual System board. at offset nnnn. 1.
... press Esc to EEPROM is failed. Remove one of them . DIMM. 2. Extended RAM error- Extended RAM fails 2. Embedded Security hardware tamper detected. Run BIOS Setup Utility, and then save current setting by pressing F10. 2. System board. 0232 1. Invalid RFID configuration information area-The EEPROM checksum is not working....warning message. 2. System board. 021x Keyboard error. System board. 0231 System RAM error-System RAM fails at offset nnnn. 40 ThinkPad T61 and T61p (14.1-inch) Hardware Maintenance Manual System board. at offset nnnn. 1.

Hardware Maintenance Manual
Page 49
...daughter card. 2. DIMM. 3. Remove Mini PCI network card. 2. Remove the daughter card that you Unauthorized daughter card is plugged in BIOS Setup Utility. 2. Default configuration used . 1. Reset the password by connecting the ac adapter. 2. System board. 0270 Real-time clock... System board. 02F4 EISA CMOS not writable. 1. DIMM. 2. System board. 1803 1. DIMM. 2. Replace the backup battery and run BIOS Setup Utility to reset the time and date. 0251 System CMOS checksum bad- Default configuration used . 1. Replace the backup battery. 3. ...
...daughter card. 2. DIMM. 3. Remove Mini PCI network card. 2. Remove the daughter card that you Unauthorized daughter card is plugged in BIOS Setup Utility. 2. Default configuration used . 1. Reset the password by connecting the ac adapter. 2. System board. 0270 Real-time clock... System board. 02F4 EISA CMOS not writable. 1. DIMM. 2. System board. 1803 1. DIMM. 2. Replace the backup battery and run BIOS Setup Utility to reset the time and date. 0251 System CMOS checksum bad- Default configuration used . 1. Replace the backup battery. 3. ...

Hardware Maintenance Manual
Page 51
...2. If memory size has been changed, re-create the hibernation file. 1. Reinstall the operation system. Invalid system configuration data. FRU or action, in the BIOS Setup Utility. 2. System board. System board. Error messages Table 2. Allocation error for device. DIMM. 2. System board. 1. No valid operating system. ...System board. The device you want to boot from . 2. I/O device IRQ conflict. Backup battery. 3. Load "Setup Defaults" in the BIOS Setup Utility. 2. Check the status of device which you want to boot from . Load "Setup Defaults" in the...
...2. If memory size has been changed, re-create the hibernation file. 1. Reinstall the operation system. Invalid system configuration data. FRU or action, in the BIOS Setup Utility. 2. System board. System board. Error messages Table 2. Allocation error for device. DIMM. 2. System board. 1. No valid operating system. ...System board. The device you want to boot from . 2. I/O device IRQ conflict. Backup battery. 3. Load "Setup Defaults" in the BIOS Setup Utility. 2. Check the status of device which you want to boot from . Load "Setup Defaults" in the...

Hardware Maintenance Manual
Page 61
...for each FRU. Diagnostics --> CPU/Coprocessor 2. Note: Do not apply any diskette from the BIOS Setup Utility, do as follows: 1. Power Diagnostics --> ThinkPad Devices --> AC Adapter, Battery 1 (Battery2) LCD unit 1. FRU tests FRU Applicable test ...ThinkPad T61 and T61p (14.1-inch) 53 Conexant Smart Modem Interrupt b. Then, run Diagnostics --> ThinkPad Devices --> HDD Active Protection Test. Run Diagnostics --> ThinkPad Devices --> ExpressCard slot. 1. Diagnostics --> Systemboard 3. If the ThinkPad Advanced Dock, the ThinkPad Advanced Mini Dock or the ThinkPad...
...for each FRU. Diagnostics --> CPU/Coprocessor 2. Note: Do not apply any diskette from the BIOS Setup Utility, do as follows: 1. Power Diagnostics --> ThinkPad Devices --> AC Adapter, Battery 1 (Battery2) LCD unit 1. FRU tests FRU Applicable test ...ThinkPad T61 and T61p (14.1-inch) 53 Conexant Smart Modem Interrupt b. Then, run Diagnostics --> ThinkPad Devices --> HDD Active Protection Test. Run Diagnostics --> ThinkPad Devices --> ExpressCard slot. 1. Diagnostics --> Systemboard 3. If the ThinkPad Advanced Dock, the ThinkPad Advanced Mini Dock or the ThinkPad...

Hardware Maintenance Manual
Page 62
... DIMM to enable it . TrackPoint or pointing If the TrackPoint does not work , check the configuration as device specified in the BIOS Setup Utility. This drift can occur when a slight, steady pressure is disabled, select Automatic to its place, remove the other one... Drive Test Memory 1. If enabling the Touch Pad does not correct the problem, continue with the following : v Interactive Tests --> Mouse 54 ThinkPad T61 and T61p (14.1-inch) Hardware Maintenance Manual Diagnostics --> Diskette Drives 2. If two DIMMs are installed, remove one , and run Diagnostics --> Memory Test-...
... DIMM to enable it . TrackPoint or pointing If the TrackPoint does not work , check the configuration as device specified in the BIOS Setup Utility. This drift can occur when a slight, steady pressure is disabled, select Automatic to its place, remove the other one... Drive Test Memory 1. If enabling the Touch Pad does not correct the problem, continue with the following : v Interactive Tests --> Mouse 54 ThinkPad T61 and T61p (14.1-inch) Hardware Maintenance Manual Diagnostics --> Diskette Drives 2. If two DIMMs are installed, remove one , and run Diagnostics --> Memory Test-...


