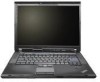
Troubleshooting Guide
Page 5
... Specifications 70 Appendix D. Upgrading and replacing devices 39 Replacing the battery 39 Upgrading the hard disk drive or solid state drive 41 Replacing memory 48 Chapter 6. Taking care...or solid state drive (SSD) problems 31 Fingerprint reader problems . . . . . 33 © Copyright Lenovo 2008 Startup problems 33 Chapter 4. Finding information . . . . . 1 This guide and other publications . ... correctly . . . 6 Handle storage media and drives properly 6 Be sure not to modify your ThinkPad computer 5 Important tips 5 Be careful about where and how you work 5 Be gentle with the ...
... Specifications 70 Appendix D. Upgrading and replacing devices 39 Replacing the battery 39 Upgrading the hard disk drive or solid state drive 41 Replacing memory 48 Chapter 6. Taking care...or solid state drive (SSD) problems 31 Fingerprint reader problems . . . . . 33 © Copyright Lenovo 2008 Startup problems 33 Chapter 4. Finding information . . . . . 1 This guide and other publications . ... correctly . . . 6 Handle storage media and drives properly 6 Be sure not to modify your ThinkPad computer 5 Important tips 5 Be careful about where and how you work 5 Be gentle with the ...

Troubleshooting Guide
Page 23
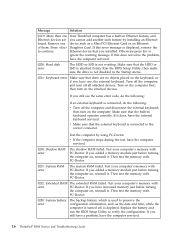
... error, enter the BIOS Setup Utility. 01C8: More than three times. of PC-Doctor referred to the computer and charge the battery, or replace the battery with . Enter BIOS Setup and load Setup defaults. Press F1 to restart the system. 0185: Bad startup sequence settings. Press F10... computer serviced. Troubleshooting If you from accessing this help system. Press F1 to restart the system. 0190: Critical low-battery error The computer turned off because the battery is not correct. To clear the error, enter the BIOS Setup Utility. 0199: System Security - The version of ...
... error, enter the BIOS Setup Utility. 01C8: More than three times. of PC-Doctor referred to the computer and charge the battery, or replace the battery with . Enter BIOS Setup and load Setup defaults. Press F1 to restart the system. 0185: Bad startup sequence settings. Press F10... computer serviced. Troubleshooting If you from accessing this help system. Press F1 to restart the system. 0190: Critical low-battery error The computer turned off because the battery is not correct. To clear the error, enter the BIOS Setup Utility. 0199: System Security - The version of ...
Troubleshooting Guide
Page 24
... on the attached devices. If you installed. If it . v If the computer stops during the test, have the computer serviced. 16 ThinkPad® R500 Service and Troubleshooting Guide Then test the memory with PC-Doctor. 0232: Extended RAM The extended RAM failed. Then test the memory with PC...make sure the drive is not disabled in the Startup menu. 021x: Keyboard error Make sure that the external keyboard is attached firmly. Replace the battery and run the BIOS Setup Utility to ignore the warning message. If you have increased memory just before turning the computer on, reinstall ...
... on the attached devices. If you installed. If it . v If the computer stops during the test, have the computer serviced. 16 ThinkPad® R500 Service and Troubleshooting Guide Then test the memory with PC-Doctor. 0232: Extended RAM The extended RAM failed. Then test the memory with PC...make sure the drive is not disabled in the Startup menu. 021x: Keyboard error Make sure that the external keyboard is attached firmly. Replace the battery and run the BIOS Setup Utility to ignore the warning message. If you have increased memory just before turning the computer on, reinstall ...

Troubleshooting Guide
Page 33
Make sure that: v The battery is within the acceptable range. See "Specifications" on it into an electrical outlet. Solution: 1. Do either of the following Problem. If the problem persists, do ... message is getting low. v Press Fn+F7 to the computer and plug it . Solution: 1. Check whether an external monitor was in three seconds. 3. v Replace the battery with a fully charged one. Chapter 3. Sleep (standby) or hibernation problems Problem: The computer enters sleep (standby) mode (the sleep/standby indicator turns on) immediately after ...
Make sure that: v The battery is within the acceptable range. See "Specifications" on it into an electrical outlet. Solution: 1. Do either of the following Problem. If the problem persists, do ... message is getting low. v Press Fn+F7 to the computer and plug it . Solution: 1. Check whether an external monitor was in three seconds. 3. v Replace the battery with a fully charged one. Chapter 3. Sleep (standby) or hibernation problems Problem: The computer enters sleep (standby) mode (the sleep/standby indicator turns on) immediately after ...

Troubleshooting Guide
Page 47
Chapter 5. Upgrading and replacing devices Replacing the battery Important: Read Safety and Warranty Guide before replacing the battery. Close the computer display, and turn the computer over. 3. To replace the battery, do the following: 1. Then disconnect the AC adapter and all cables from the computer. 2. Turn off the computer, or enter hibernation mode. Then, remove the battery 2 . 1 2 © Copyright Lenovo 2008 39 Unlock the battery latch by sliding it to the left 1 .
Chapter 5. Upgrading and replacing devices Replacing the battery Important: Read Safety and Warranty Guide before replacing the battery. Close the computer display, and turn the computer over. 3. To replace the battery, do the following: 1. Then disconnect the AC adapter and all cables from the computer. 2. Turn off the computer, or enter hibernation mode. Then, remove the battery 2 . 1 2 © Copyright Lenovo 2008 39 Unlock the battery latch by sliding it to the left 1 .

Troubleshooting Guide
Page 50
Remove the battery. 4. Turn off the computer; Remove the screw that secures the slot cover. 5. Close the computer display, and turn the computer over. 3. Remove the slot cover. 42 ThinkPad® R500 Service and Troubleshooting Guide then disconnect the AC adapter and all cables from the computer. 2. To replace the HDD, do the following: 1.
Remove the battery. 4. Turn off the computer; Remove the screw that secures the slot cover. 5. Close the computer display, and turn the computer over. 3. Remove the slot cover. 42 ThinkPad® R500 Service and Troubleshooting Guide then disconnect the AC adapter and all cables from the computer. 2. To replace the HDD, do the following: 1.

Troubleshooting Guide
Page 53
To replace the SSD, do the following: 1. Turn off the computer; Remove the battery. 4. Chapter 5. Close the computer display, and turn the computer over. 3. Remove the screw that secures the slot cover. 5. then disconnect the AC adapter and all cables from the computer. 2. Upgrading and replacing devices 45 Remove the slot cover.
To replace the SSD, do the following: 1. Turn off the computer; Remove the battery. 4. Chapter 5. Close the computer display, and turn the computer over. 3. Remove the screw that secures the slot cover. 5. then disconnect the AC adapter and all cables from the computer. 2. Upgrading and replacing devices 45 Remove the slot cover.
Troubleshooting Guide
Page 56
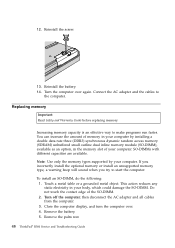
... the memory slot of the SO-DIMM. 2. Remove the palm rest. 48 ThinkPad® R500 Service and Troubleshooting Guide Close the computer display, and turn the computer over again. 12. Reinstall the screw. 13. Reinstall the battery. 14. Replacing memory Important: Read Safety and Warranty Guide before replacing memory. Turn off the computer; Remove the...
... the memory slot of the SO-DIMM. 2. Remove the palm rest. 48 ThinkPad® R500 Service and Troubleshooting Guide Close the computer display, and turn the computer over again. 12. Reinstall the screw. 13. Reinstall the battery. 14. Replacing memory Important: Read Safety and Warranty Guide before replacing memory. Turn off the computer; Remove the...

Troubleshooting Guide
Page 61
Reinstall the four screws for the palm rest. 12. When the ThinkPad logo comes up, immediately press F1 to the computer. Upgrading and replacing devices 53 Close the computer display, and turn the computer over , and reconnect the AC adapter and the cables to enter the BIOS ...Setup Utility. 3. The "Installed memory" item shows the total amount of the palm rest until it clicks into place. c. Chapter 5. Reinstall the battery. 13...
Reinstall the four screws for the palm rest. 12. When the ThinkPad logo comes up, immediately press F1 to the computer. Upgrading and replacing devices 53 Close the computer display, and turn the computer over , and reconnect the AC adapter and the cables to enter the BIOS ...Setup Utility. 3. The "Installed memory" item shows the total amount of the palm rest until it clicks into place. c. Chapter 5. Reinstall the battery. 13...
Troubleshooting Guide
Page 72
...Lenovo install Self-service CRUs for you to return your Service Provider. Machine Type 2734 2735 Country or Region of Purchase Warranty period All New Zealand, Australia, Japan, Korea, and Association of Southeast Asian Nations Parts and Labor - 3 years Battery pack - 1 year Parts and Labor - 3 years Battery...exchanged at your product. CRU information and replacement instructions are shipped with your product and are responsible for your location. An optional service offering may require your product and 64 ThinkPad® R500 Service and Troubleshooting Guide CRUs that a ...
...Lenovo install Self-service CRUs for you to return your Service Provider. Machine Type 2734 2735 Country or Region of Purchase Warranty period All New Zealand, Australia, Japan, Korea, and Association of Southeast Asian Nations Parts and Labor - 3 years Battery pack - 1 year Parts and Labor - 3 years Battery...exchanged at your product. CRU information and replacement instructions are shipped with your product and are responsible for your location. An optional service offering may require your product and 64 ThinkPad® R500 Service and Troubleshooting Guide CRUs that a ...
Troubleshooting Guide
Page 75
...down and select." Both types of CRU: self-service and optional-service. Online Access Help and the Lenovo Limited Warranty-01 (LLW) warranty URL "http://www.lenovo.com/CRUs" provide instructions for replacing all self-service CRUs. There are unable to access these instructions or if you have difficulty... the computer that the customer can be unplugged, or are the AC adapter, the power cord, the battery, and the hard drive. Optional-service CRUs can upgrade or replace. v Optional-service CRUs: these CRUs can use either of two screws, whereas optional-service CRUs require some...
...down and select." Both types of CRU: self-service and optional-service. Online Access Help and the Lenovo Limited Warranty-01 (LLW) warranty URL "http://www.lenovo.com/CRUs" provide instructions for replacing all self-service CRUs. There are unable to access these instructions or if you have difficulty... the computer that the customer can be unplugged, or are the AC adapter, the power cord, the battery, and the hard drive. Optional-service CRUs can upgrade or replace. v Optional-service CRUs: these CRUs can use either of two screws, whereas optional-service CRUs require some...
Troubleshooting Guide
Page 76
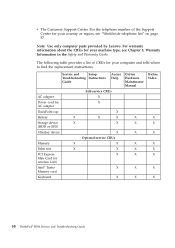
... Access Help AC adapter Power cord for AC adapter TrackPoint cap Battery Storage device (HDD or SSD) Ultrabay device Memory Palm rest ... X Optional-service CRUs X X X X X X X Online Hardware Maintenance Manual X X X X X X X X Online Video X X X X X X X X 68 ThinkPad® R500 Service and Troubleshooting Guide The following table provides a list of the Support Center for your country or region, see Chapter 3, Warranty Information in the Safety...tells where to find the replacement instructions. v The Customer Support Center. Note: Use only computer parts provided by Lenovo.
... Access Help AC adapter Power cord for AC adapter TrackPoint cap Battery Storage device (HDD or SSD) Ultrabay device Memory Palm rest ... X Optional-service CRUs X X X X X X X Online Hardware Maintenance Manual X X X X X X X X Online Video X X X X X X X X 68 ThinkPad® R500 Service and Troubleshooting Guide The following table provides a list of the Support Center for your country or region, see Chapter 3, Warranty Information in the Safety...tells where to find the replacement instructions. v The Customer Support Center. Note: Use only computer parts provided by Lenovo.
Troubleshooting Guide
Page 91
... 30 Access Help 1, 11, 15 additional information for Access Help 3 B battery replacing 39 troubleshooting 30 BIOS Setup Utility 12 initializing 36 C carrying the computer 6 cleaning computer cover 8 computer display 8 keyboard 8 computer display cleaning 8 computer screen troubleshooting 27 CRU (customer replaceable units) 67 Customer Replaceable Unit (CRU) 67 customer support center 55 worldwide telephone list...
... 30 Access Help 1, 11, 15 additional information for Access Help 3 B battery replacing 39 troubleshooting 30 BIOS Setup Utility 12 initializing 36 C carrying the computer 6 cleaning computer cover 8 computer display 8 keyboard 8 computer display cleaning 8 computer screen troubleshooting 27 CRU (customer replaceable units) 67 Customer Replaceable Unit (CRU) 67 customer support center 55 worldwide telephone list...


