User Guide
Page 2
... this user guide. • The illustrations used in this manual are for Lenovo G580 unless otherwise stated. • The illustrations in Contract No. If you are using other Windows operating system, some operations may not apply to you are common to restrictions set forth in this guide are using Windows® 7. LIMITED AND RESTRICTED RIGHTS NOTICE: If data or software is delivered pursuant a General Services Administration...
... this user guide. • The illustrations used in this manual are for Lenovo G580 unless otherwise stated. • The illustrations in Contract No. If you are using other Windows operating system, some operations may not apply to you are common to restrictions set forth in this guide are using Windows® 7. LIMITED AND RESTRICTED RIGHTS NOTICE: If data or software is delivered pursuant a General Services Administration...
User Guide
Page 3
... Using AC adapter and battery 18 Using the touchpad 20 Using the keyboard 21 Connecting external devices 24 Special keys and buttons 26 System status indicators 27 Securing your computer 1 Top view ...1 Left-side view ...5 Right-side view...7 Front view ...9 Bottom view ...10 Chapter 2. Contents Chapter 1. Getting to the Internet 31 Wired connection ...31 Wireless connection 32 Chapter 4. CRU instructions 35 Replacing the battery 35 Replacing the hard disk drive 37 Replacing memory ...44 Replacing the wireless LAN card 48 Removing...
... Using AC adapter and battery 18 Using the touchpad 20 Using the keyboard 21 Connecting external devices 24 Special keys and buttons 26 System status indicators 27 Securing your computer 1 Top view ...1 Left-side view ...5 Right-side view...7 Front view ...9 Bottom view ...10 Chapter 2. Contents Chapter 1. Getting to the Internet 31 Wired connection ...31 Wireless connection 32 Chapter 4. CRU instructions 35 Replacing the battery 35 Replacing the hard disk drive 37 Replacing memory ...44 Replacing the wireless LAN card 48 Removing...
User Guide
Page 9
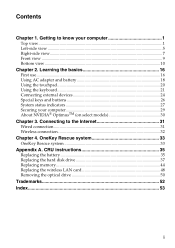
Chapter 1. c VGA port Connects to know your computer Left-side view „ G480/G485/G580/G585 1 2 „ G780 3 4 5 6 1 2 3 4 5 6 a Kensington slot Attach a security lock (not supplied) here. Note: Make sure that none of the fan louvers are blocked or else overheating of the computer may occur. b Fan louvers Dissipate internal heat. Getting to external display devices. 5 Note: For details, see "Attaching a security lock (not supplied)" on page 29.
Chapter 1. c VGA port Connects to know your computer Left-side view „ G480/G485/G580/G585 1 2 „ G780 3 4 5 6 1 2 3 4 5 6 a Kensington slot Attach a security lock (not supplied) here. Note: Make sure that none of the fan louvers are blocked or else overheating of the computer may occur. b Fan louvers Dissipate internal heat. Getting to external display devices. 5 Note: For details, see "Attaching a security lock (not supplied)" on page 29.
User Guide
Page 11
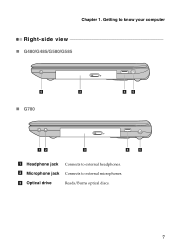
b Microphone jack Connects to external headphones. c Optical drive Reads/Burns optical discs. 7 Getting to know your computer Right-side view „ G480/G485/G580/G585 6 3 „ G780 45 12 3 4 5 a Headphone jack Connects to external microphones. Chapter 1.
b Microphone jack Connects to external headphones. c Optical drive Reads/Burns optical discs. 7 Getting to know your computer Right-side view „ G480/G485/G580/G585 6 3 „ G780 45 12 3 4 5 a Headphone jack Connects to external microphones. Chapter 1.
User Guide
Page 22
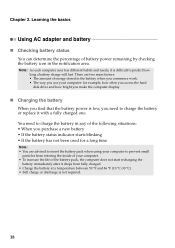
... amount of energy stored in the battery when you commence work. • The way you use your computer: for example, how often you access the hard disk drive and how bright you make the computer display. „ Charging the battery When you find that the battery power is not required. 18 Note: As each computer user has different habits and needs, it with a fully charged one. Chapter 2.
... amount of energy stored in the battery when you commence work. • The way you use your computer: for example, how often you access the hard disk drive and how bright you make the computer display. „ Charging the battery When you find that the battery power is not required. 18 Note: As each computer user has different habits and needs, it with a fully charged one. Chapter 2.
User Guide
Page 23
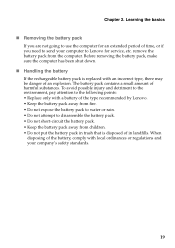
...; Replace only with local ordinances or regulations and your computer to Lenovo for an extended period of the type recommended by Lenovo. • Keep the battery pack away from fire. • Do not expose the battery pack to water or rain. • Do not attempt to use the computer for service, etc. Learning the basics „ Removing the battery pack...
...; Replace only with local ordinances or regulations and your computer to Lenovo for an extended period of the type recommended by Lenovo. • Keep the battery pack away from fire. • Do not expose the battery pack to water or rain. • Do not attempt to use the computer for service, etc. Learning the basics „ Removing the battery pack...

User Guide
Page 25
G580/G585/G780 The keyboard has a separate numeric keypad. To enable or disable the numeric keypad, press the Num Lock key. Note: The Num lock indicator will light on if the numeric keypad is enabled (G780). 21 Chapter 2. Learning the basics Using the keyboard Your computer has a numeric keypad and function keys incorporated in its standard keyboard. „ Numeric keypad G480/G485 The keyboard has keys that, when enabled, work as a 10-key numeric keypad. To enable or disable the numeric keypad, press Fn+F8 .
G580/G585/G780 The keyboard has a separate numeric keypad. To enable or disable the numeric keypad, press the Num Lock key. Note: The Num lock indicator will light on if the numeric keypad is enabled (G780). 21 Chapter 2. Learning the basics Using the keyboard Your computer has a numeric keypad and function keys incorporated in its standard keyboard. „ Numeric keypad G480/G485 The keyboard has keys that, when enabled, work as a 10-key numeric keypad. To enable or disable the numeric keypad, press Fn+F8 .
User Guide
Page 27
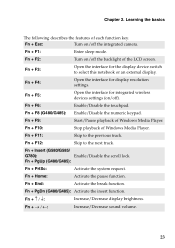
...): Activate the insert function. Fn Increase/Decrease sound volume. 23 Fn + F5: Open the interface for integrated wireless devices settings (on /off the integrated camera. Fn + F10: Stop playback of the LCD screen. Fn + Esc: Turn on/off the backlight of Windows Media Player. Fn + F8 (G480/G485): Enable/Disable the numeric keypad. Fn + End: Activate the break function. Chapter 2. Fn + Insert (G580/G585/ G780): Enable/Disable the scroll lock. Fn + F1: Enter sleep mode. Fn...
...): Activate the insert function. Fn Increase/Decrease sound volume. 23 Fn + F5: Open the interface for integrated wireless devices settings (on /off the integrated camera. Fn + F10: Stop playback of the LCD screen. Fn + Esc: Turn on/off the backlight of Windows Media Player. Fn + F8 (G480/G485): Enable/Disable the numeric keypad. Fn + End: Activate the break function. Chapter 2. Fn + Insert (G580/G585/ G780): Enable/Disable the scroll lock. Fn + F1: Enter sleep mode. Fn...
User Guide
Page 28
... via Windows safely remove hardware and eject media utility to avoid data corruption. 24 Note: The dummy card is used for future use . Note: Before removing the memory card, disable it clicks into place. Inserting a memory card 1 Push the dummy card until you hear a click. Learning the basics Connecting external devices Your computer has a wide range of built-in features and connection capabilities. „ Using memory cards (not supplied) Your computer supports the following types...
... via Windows safely remove hardware and eject media utility to avoid data corruption. 24 Note: The dummy card is used for future use . Note: Before removing the memory card, disable it clicks into place. Inserting a memory card 1 Push the dummy card until you hear a click. Learning the basics Connecting external devices Your computer has a wide range of built-in features and connection capabilities. „ Using memory cards (not supplied) Your computer supports the following types...
User Guide
Page 29
Note: When using a high power consumption USB device such as USB ODD, use the Bluetooth function, turn it can connect to and transfer data wirelessly to other Bluetooth enabled devices, such as notebook computers, PDAs and cell phones. Note: The actual maximum range may result. „ Connecting a Bluetooth device (on select models) If your computer has an integrated Bluetooth adapter card, it off to save battery power. • You need to interference and transmission barriers. Note...
Note: When using a high power consumption USB device such as USB ODD, use the Bluetooth function, turn it can connect to and transfer data wirelessly to other Bluetooth enabled devices, such as notebook computers, PDAs and cell phones. Note: The actual maximum range may result. „ Connecting a Bluetooth device (on select models) If your computer has an integrated Bluetooth adapter card, it off to save battery power. • You need to interference and transmission barriers. Note...
User Guide
Page 33
... the instructions shipped with the security lock that becomes the system's "password". Lenovo offers no comment judgement or warranty regarding the function, quality or performance of locking devices and security features. „ Using VeriFace™ (on the system. For more details on installing the security lock, please refer to register your face, and creates a digital map that you log on select models...
... the instructions shipped with the security lock that becomes the system's "password". Lenovo offers no comment judgement or warranty regarding the function, quality or performance of locking devices and security features. „ Using VeriFace™ (on the system. For more details on installing the security lock, please refer to register your face, and creates a digital map that you log on select models...
User Guide
Page 34
... to set a password and enable it, a prompt appears on the screen each time you power on the screen while the computer is automatically switched by others. Note: To enter BIOS setup utility, press F2 when the Lenovo logo appears on the computer. if you enter the correct password. Learning the basics „ Using passwords Using passwords helps prevent your password at the prompt. About NVIDIA® OptimusTM (on select models...
... to set a password and enable it, a prompt appears on the screen each time you power on the screen while the computer is automatically switched by others. Note: To enter BIOS setup utility, press F2 when the Lenovo logo appears on the computer. if you enter the correct password. Learning the basics „ Using passwords Using passwords helps prevent your password at the prompt. About NVIDIA® OptimusTM (on select models...
User Guide
Page 36
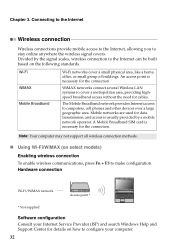
... connection. Hardware connection Wi-Fi/WiMAX network Access point * * Not supplied Software configuration Consult your computer. 32 A Mobile Broadband SIM card is usually provided by the signal scales, wireless connection to the Internet can be built based on select models) Enabling wireless connection To enable wireless communications, press Fn + F5 to cover a metropolitan area, providing highspeed broadband access without the need for cables. Note: Your computer may not support all wireless connection methods. „ Using...
... connection. Hardware connection Wi-Fi/WiMAX network Access point * * Not supplied Software configuration Consult your computer. 32 A Mobile Broadband SIM card is usually provided by the signal scales, wireless connection to the Internet can be built based on select models) Enabling wireless connection To enable wireless communications, press Fn + F5 to cover a metropolitan area, providing highspeed broadband access without the need for cables. Note: Your computer may not support all wireless connection methods. „ Using...
User Guide
Page 37
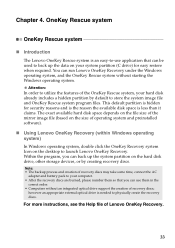
...; After the recovery discs are burned, please number them in the correct order. • Computers without starting the Windows operating system. Note: • The backup process and creation of recovery discs may take some time, connect the AC adapter and battery pack to physically create the recovery discs. This default partition is needed to your hard disk already includes a hidden partition by creating recovery discs. Within the program, you can run Lenovo OneKey Recovery under the Windows operating system...
...; After the recovery discs are burned, please number them in the correct order. • Computers without starting the Windows operating system. Note: • The backup process and creation of recovery discs may take some time, connect the AC adapter and battery pack to physically create the recovery discs. This default partition is needed to your hard disk already includes a hidden partition by creating recovery discs. Within the program, you can run Lenovo OneKey Recovery under the Windows operating system...
User Guide
Page 39
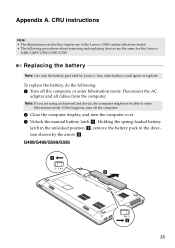
... the unlocked position b, remove the battery pack in this happens, turn the computer over. 3 Unlock the manual battery latch a . Disconnect the AC adapter and all cables from the computer. G480/G485/G580/G585 1 3 2 35 If this chapter are using an ExpressCard device, the computer might not be able to enter hibernation mode. CRU instructions Note: • The illustrations used in the direction shown by Lenovo. Replacing the battery Note: Use...
... the unlocked position b, remove the battery pack in this happens, turn the computer over. 3 Unlock the manual battery latch a . Disconnect the AC adapter and all cables from the computer. G480/G485/G580/G585 1 3 2 35 If this chapter are using an ExpressCard device, the computer might not be able to enter hibernation mode. CRU instructions Note: • The illustrations used in the direction shown by Lenovo. Replacing the battery Note: Use...
User Guide
Page 41
Note: • Replace the hard disk drive only if you upgrade it or have it to the cover of all the information on the hard disk, and then turn the computer off. Before removing the hard disk drive, make a backup copy of the drive. • Do not touch the connector. The drive is operating, in sleep mode, or in hibernation mode. 37 Put the drive on a material, such as soft cloth, that absorbs the...
Note: • Replace the hard disk drive only if you upgrade it or have it to the cover of all the information on the hard disk, and then turn the computer off. Before removing the hard disk drive, make a backup copy of the drive. • Do not touch the connector. The drive is operating, in sleep mode, or in hibernation mode. 37 Put the drive on a material, such as soft cloth, that absorbs the...
User Guide
Page 42
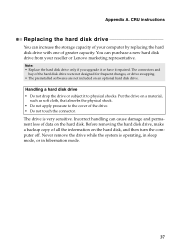
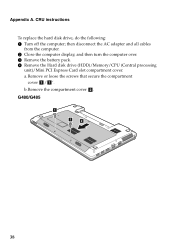
a.Remove or loose the screws that secure the compartment cover a/ a '. G480/G485 1 1 2 38 CRU instructions To replace the hard disk drive, do the following: 1 Turn off the computer; b.Remove the compartment cover b. then disconnect the AC adapter and all cables from the computer. 2 Close the computer display, and then turn the computer over. 3 Remove the battery pack. 4 Remove the Hard disk drive (HDD)/Memory/CPU (Central processing unit)/Mini PCI Express Card slot compartment cover. Appendix A.
a.Remove or loose the screws that secure the compartment cover a/ a '. G480/G485 1 1 2 38 CRU instructions To replace the hard disk drive, do the following: 1 Turn off the computer; b.Remove the compartment cover b. then disconnect the AC adapter and all cables from the computer. 2 Close the computer display, and then turn the computer over. 3 Remove the battery pack. 4 Remove the Hard disk drive (HDD)/Memory/CPU (Central processing unit)/Mini PCI Express Card slot compartment cover. Appendix A.
User Guide
Page 48
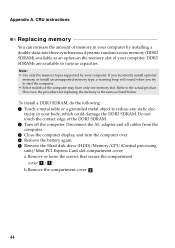
... unsupported memory type, a warning beep will sound when you try to start the computer. • Select models of the DDR3 SDRAM. 2 Turn off the computer. Disconnect the AC adapter and all cables from the computer. 3 Close the computer display, and turn the computer over. 4 Remove the battery again. 5 Remove the Hard disk drive (HDD)/Memory/CPU (Central processing unit)/Mini PCI Express Card slot compartment cover. To install a DDR3 SDRAM, do the following: 1 Touch...
... unsupported memory type, a warning beep will sound when you try to start the computer. • Select models of the DDR3 SDRAM. 2 Turn off the computer. Disconnect the AC adapter and all cables from the computer. 3 Close the computer display, and turn the computer over. 4 Remove the battery again. 5 Remove the Hard disk drive (HDD)/Memory/CPU (Central processing unit)/Mini PCI Express Card slot compartment cover. To install a DDR3 SDRAM, do the following: 1 Touch...
User Guide
Page 52
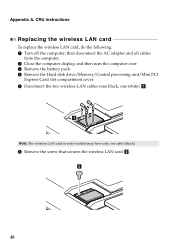
... computer. 2 Close the computer display, and then turn the computer over. 3 Remove the battery pack. 4 Remove the Hard disk drive/Memory/Central processing unit/Mini PCI Express Card slot compartment cover. 5 Disconnect the two wireless LAN cables (one black, one white) a . 1 Note: The wireless LAN card in select models may have only one cable (black). 6 Remove the screw that secures the wireless LAN card b. 2 48 Appendix A. CRU instructions Replacing the wireless LAN card To replace the wireless LAN card, do the following: 1 Turn off the computer;
... computer. 2 Close the computer display, and then turn the computer over. 3 Remove the battery pack. 4 Remove the Hard disk drive/Memory/Central processing unit/Mini PCI Express Card slot compartment cover. 5 Disconnect the two wireless LAN cables (one black, one white) a . 1 Note: The wireless LAN card in select models may have only one cable (black). 6 Remove the screw that secures the wireless LAN card b. 2 48 Appendix A. CRU instructions Replacing the wireless LAN card To replace the wireless LAN card, do the following: 1 Turn off the computer;
User Guide
Page 55
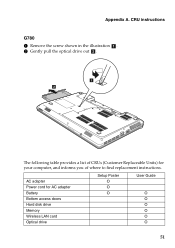
CRU instructions G780 1 Remove the screw shown in the illustration a . 2 Gently pull the optical drive out b . 1 2 The following table provides a list of where to find replacement instructions. AC adapter Power cord for your computer, and informs you of CRUs (Customer Replaceable Units) for AC adapter Battery Bottom access doors Hard disk drive Memory Wireless LAN card Optical drive Setup Poster O O O User Guide O O O O O O 51 Appendix A.
CRU instructions G780 1 Remove the screw shown in the illustration a . 2 Gently pull the optical drive out b . 1 2 The following table provides a list of where to find replacement instructions. AC adapter Power cord for your computer, and informs you of CRUs (Customer Replaceable Units) for AC adapter Battery Bottom access doors Hard disk drive Memory Wireless LAN card Optical drive Setup Poster O O O User Guide O O O O O O 51 Appendix A.


