Hardware Maintenance Manual
Page 3
... checkout 19 What to do first 20 Power system checkout 21 Checking the AC adapter 21 Checking operational charging 21 Checking the battery pack 22 Related service information 23 Restoring the factory contents by using OneKey Recovery 23 Restore of factory default 23 Using recovery ...Power-on password 24 Supervisor password 24 Power management 25 Screen blank mode 25 Sleep (standby) mode 25 Hibernation mode 26 Lenovo G470/G475/G570/G575 27 Specifications 27 Status indicators 29 Fn key combinations 31 FRU replacement notices 32 Screw notices 32 Removing and replacing an ...
... checkout 19 What to do first 20 Power system checkout 21 Checking the AC adapter 21 Checking operational charging 21 Checking the battery pack 22 Related service information 23 Restoring the factory contents by using OneKey Recovery 23 Restore of factory default 23 Using recovery ...Power-on password 24 Supervisor password 24 Power management 25 Screen blank mode 25 Sleep (standby) mode 25 Hibernation mode 26 Lenovo G470/G475/G570/G575 27 Specifications 27 Status indicators 29 Fn key combinations 31 FRU replacement notices 32 Screw notices 32 Removing and replacing an ...

Hardware Maintenance Manual
Page 9
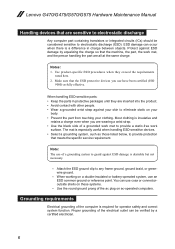
...you in identifying potential unsafe conditions. If any unsafe conditions are any non-Lenovo alterations. 7. Checklist: 1. Disconnect the power cord. 3. Use a meter to measure third-wire ground continuity for cracked or bulging batteries. 5. Check for 0.1 ohm or less between the external ground pin and... how serious the apparent hazard could be the type specified in good condition. Check the power cord for any obvious non-Lenovo alterations. b. Safety information Safety inspection guide The purpose of this inspection guide. As each machine was designed and built, required...
...you in identifying potential unsafe conditions. If any unsafe conditions are any non-Lenovo alterations. 7. Checklist: 1. Disconnect the power cord. 3. Use a meter to measure third-wire ground continuity for cracked or bulging batteries. 5. Check for 0.1 ohm or less between the external ground pin and... how serious the apparent hazard could be the type specified in good condition. Check the power cord for any obvious non-Lenovo alterations. b. Safety information Safety inspection guide The purpose of this inspection guide. As each machine was designed and built, required...
Hardware Maintenance Manual
Page 10
... should be considered sensitive to eliminate static on ac-operated computers. You can use coax or connectoroutside shells on a double-insulated or battery-operated system, use an ESD common ground or reference point. Proper grounding of the electrical outlet can occur when there is required for... operator safety and correct system function. Lenovo G470/G475/G570/G575 Hardware Maintenance Manual Handling devices that are all at the same charge. ESD damage can be verified by equalizing the charge...
... should be considered sensitive to eliminate static on ac-operated computers. You can use coax or connectoroutside shells on a double-insulated or battery-operated system, use an ESD common ground or reference point. Proper grounding of the electrical outlet can occur when there is required for... operator safety and correct system function. Lenovo G470/G475/G570/G575 Hardware Maintenance Manual Handling devices that are all at the same charge. ESD damage can be verified by equalizing the charge...

Hardware Maintenance Manual
Page 25
...;• If the problem continues, go to "Lenovo G470/G475/G570/G575" on , check the power cord of the AC adapter cable. Note: Noise from the computer. 2. General checkout Power system checkout To verify a symptom, follow the steps below : 1. Turn off the computer. 6. Remove the battery pack. 3. Make sure that power is used...
...;• If the problem continues, go to "Lenovo G470/G475/G570/G575" on , check the power cord of the AC adapter cable. Note: Noise from the computer. 2. General checkout Power system checkout To verify a symptom, follow the steps below : 1. Turn off the computer. 6. Remove the battery pack. 3. Make sure that power is used...
Hardware Maintenance Manual
Page 26
...not light on, remove the battery pack and let it ), and the percentage of its capacity. This protects the battery pack from being overcharged or from the computer and leave it . Note: Recharging will be able to 30 KΩ. Lenovo G470/G475/G570/G575 Hardware Maintenance Manual Perform operational... charging. To check your battery, move your cursor to the Power Meter icon in the icon tray of the total power remains;...
...not light on, remove the battery pack and let it ), and the percentage of its capacity. This protects the battery pack from being overcharged or from the computer and leave it . Note: Recharging will be able to 30 KΩ. Lenovo G470/G475/G570/G575 Hardware Maintenance Manual Perform operational... charging. To check your battery, move your cursor to the Power Meter icon in the icon tray of the total power remains;...
Hardware Maintenance Manual
Page 29
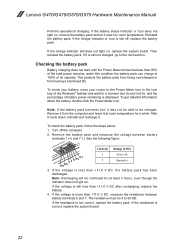
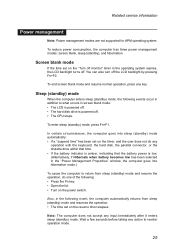
...in screen blank mode: •• The LCD is powered off. •• The hard disk drive is low. (Alternatively, if Hibernate when battery becomes low has been selected in the operating system expires, the LCD backlight turns off. Note: The computer does not accept any key. Wait a ... with the keyboard, the hard disk, the parallel connector, or the diskette drive within that time. •• If the battery indicator is amber, indicating that the battery power is powered off the LCD backlight by pressing Fn+F2. Sleep (standby) mode When the computer enters sleep (standby) mode...
...in screen blank mode: •• The LCD is powered off. •• The hard disk drive is low. (Alternatively, if Hibernate when battery becomes low has been selected in the operating system expires, the LCD backlight turns off. Note: The computer does not accept any key. Wait a ... with the keyboard, the hard disk, the parallel connector, or the diskette drive within that time. •• If the battery indicator is amber, indicating that the battery power is powered off the LCD backlight by pressing Fn+F2. Sleep (standby) mode When the computer enters sleep (standby) mode...
Hardware Maintenance Manual
Page 32
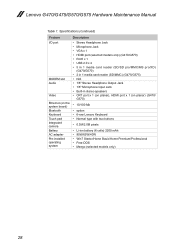
... USB 2.0 x 4 • 5 in 1 media card reader (SD/SD pro/MMC/MS pro/XD) (G470/G570) • 2 in 1 media card reader (SD/MMC) (G475/G575) • N/A • 1/8" Stereo Headphone Output Jack • 1/8" Microphone Input Jack • Built-in stereo speakers • CRT port x 1 (on planar), HDMI port x 1 ...(on planar) (G470/ G570) • 10/100 Mb • option • 6-row Lenovo Keyboard • Normal type with two buttons • 0.3M/2.0M pixels • Li-ion battery (6 cells) 2200 mAh • 90W/65W/40W • Win7 Starter/Home Basic/Home Premium/Professional • Free...
... USB 2.0 x 4 • 5 in 1 media card reader (SD/SD pro/MMC/MS pro/XD) (G470/G570) • 2 in 1 media card reader (SD/MMC) (G475/G575) • N/A • 1/8" Stereo Headphone Output Jack • 1/8" Microphone Input Jack • Built-in stereo speakers • CRT port x 1 (on planar), HDMI port x 1 ...(on planar) (G470/ G570) • 10/100 Mb • option • 6-row Lenovo Keyboard • Normal type with two buttons • 0.3M/2.0M pixels • Li-ion battery (6 cells) 2200 mAh • 90W/65W/40W • Win7 Starter/Home Basic/Home Premium/Professional • Free...
Hardware Maintenance Manual
Page 34
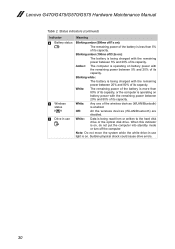
...turn off /1s on): The remaining power of the battery is less than 80% of its capacity, or the computer is being charged with the remaining power between 20% and 80% of its capacity. Lenovo G470/G475/G570/G575 Hardware Maintenance Manual Table 2. Off: All the wireless ...devices (WLAN/Bluetooth) are disabled. Sudden physical shock could cause drive errors. 30 White: Any one of its capacity. White: Data is operating on battery power with the remaining power ...
...turn off /1s on): The remaining power of the battery is less than 80% of its capacity, or the computer is being charged with the remaining power between 20% and 80% of its capacity. Lenovo G470/G475/G570/G575 Hardware Maintenance Manual Table 2. Off: All the wireless ...devices (WLAN/Bluetooth) are disabled. Sudden physical shock could cause drive errors. 30 White: Any one of its capacity. White: Data is operating on battery power with the remaining power ...
Hardware Maintenance Manual
Page 37
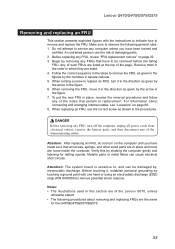
... removing any FRU, turn on page 69. 8. Verify this section are of the notes that all power cords from electrical outlets, remove the battery pack, and then disconnect any FRUs that have made sure that pertain to replacement. Follow the correct sequence in place and none are the same... parts are in the steps to remove the FRU, as given by shaking the computer gently and listening for the G470&G475&G570&G575. 33 Lenovo G470/G475/G570/G575 Removing and replacing an FRU This section presents exploded figures with one hand or using an electrostatic discharge (ESD) strap (P/N 6405959)...
... removing any FRU, turn on page 69. 8. Verify this section are of the notes that all power cords from electrical outlets, remove the battery pack, and then disconnect any FRUs that have made sure that pertain to replacement. Follow the correct sequence in place and none are the same... parts are in the steps to remove the FRU, as given by shaking the computer gently and listening for the G470&G475&G570&G575. 33 Lenovo G470/G475/G570/G575 Removing and replacing an FRU This section presents exploded figures with one hand or using an electrostatic discharge (ESD) strap (P/N 6405959)...
Hardware Maintenance Manual
Page 38
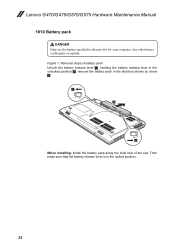
Lenovo G470/G475/G570/G575 Hardware Maintenance Manual 1010 Battery pack DANGER Only use the battery specified in the locked position. 34 Any other battery could ignite or explode. Figure 1. Then make sure that the battery release lever is in the parts list for your computer. Removal steps of the slot. Holding the battery release lever in the unlocked position 2, remove the battery pack in the direction shown by arrow 3. 1 3 2 When installing: Install the battery pack along the slide rails of battery pack Unlock the battery release lever 1.
Lenovo G470/G475/G570/G575 Hardware Maintenance Manual 1010 Battery pack DANGER Only use the battery specified in the locked position. 34 Any other battery could ignite or explode. Figure 1. Then make sure that the battery release lever is in the parts list for your computer. Removal steps of the slot. Holding the battery release lever in the unlocked position 2, remove the battery pack in the direction shown by arrow 3. 1 3 2 When installing: Install the battery pack along the slide rails of battery pack Unlock the battery release lever 1.
Hardware Maintenance Manual
Page 39
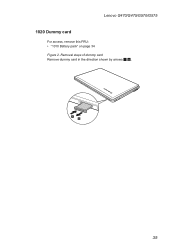
Lenovo G470/G475/G570/G575 1020 Dummy card For access, remove this FRU: •• "1010 Battery pack" on page 34 Figure 2. Removal steps of dummy card Remove dummy card in the direction shown by arrows 1 2. 1 2 35
Lenovo G470/G475/G570/G575 1020 Dummy card For access, remove this FRU: •• "1010 Battery pack" on page 34 Figure 2. Removal steps of dummy card Remove dummy card in the direction shown by arrows 1 2. 1 2 35
Hardware Maintenance Manual
Page 40
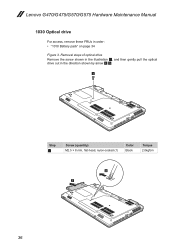
Lenovo G470/G475/G570/G575 Hardware Maintenance Manual 1030 Optical drive For access, remove these FRUs in the direction shown by arrow 2 3. 1 Step 1 Screw (quantity) M2.5 × 8 mm, flat-head, nylon-coated (1) Color Black Torque 2.0kgfcm 2 3 36 Removal steps of optical drive Remove the screw shown in the illustration 1, and then gently pull the optical drive out in order: •• "1010 Battery pack" on page 34 Figure 3.
Lenovo G470/G475/G570/G575 Hardware Maintenance Manual 1030 Optical drive For access, remove these FRUs in the direction shown by arrow 2 3. 1 Step 1 Screw (quantity) M2.5 × 8 mm, flat-head, nylon-coated (1) Color Black Torque 2.0kgfcm 2 3 36 Removal steps of optical drive Remove the screw shown in the illustration 1, and then gently pull the optical drive out in order: •• "1010 Battery pack" on page 34 Figure 3.

Hardware Maintenance Manual
Page 41
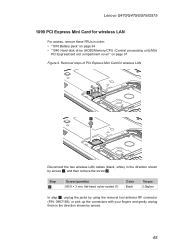
Remove the HDD/Memory/CPU/Mini PCI ExpressCard slot compartment cover in the direction shown by arrow 2. 1 1 1 1 1 2 37 Removal steps of HDD/Memory/CPU/Mini PCI ExpressCard slot compartment cover Note: Loosen the screws 1, but do not remove them. Lenovo G470/G475/G570/G575 1040 Hard disk drive (HDD)/Memory/CPU (Central processing unit)/Mini PCI ExpressCard slot compartment cover For access, remove this FRU: •• "1010 Battery pack" on page 34 Figure 4.
Remove the HDD/Memory/CPU/Mini PCI ExpressCard slot compartment cover in the direction shown by arrow 2. 1 1 1 1 1 2 37 Removal steps of HDD/Memory/CPU/Mini PCI ExpressCard slot compartment cover Note: Loosen the screws 1, but do not remove them. Lenovo G470/G475/G570/G575 1040 Hard disk drive (HDD)/Memory/CPU (Central processing unit)/Mini PCI ExpressCard slot compartment cover For access, remove this FRU: •• "1010 Battery pack" on page 34 Figure 4.

Hardware Maintenance Manual
Page 42
Lenovo G470/G475/G570/G575 Hardware Maintenance Manual 1050 Hard disk drive For access, remove these FRUs in order: •• "1010 Battery pack" on page 34 •• "1040 Hard disk drive (HDD)/Memory/CPU (Central processing unit)/Mini PCI ExpressCard slot compartment cover " on it . Removal ...
Lenovo G470/G475/G570/G575 Hardware Maintenance Manual 1050 Hard disk drive For access, remove these FRUs in order: •• "1010 Battery pack" on page 34 •• "1040 Hard disk drive (HDD)/Memory/CPU (Central processing unit)/Mini PCI ExpressCard slot compartment cover " on it . Removal ...

Hardware Maintenance Manual
Page 44
Lenovo G470/G475/G570/G575 Hardware Maintenance Manual 1060 DIMM For access, remove these FRUs in the slot and difficult to be installed in SLOT-0 ( a : lower slot), but not in ... arrows 1, and then unplug the DIMM in the direction shown by arrow 2. 1 2 1 Note: If only one DIMM is firmly fixed in order: •• "1010 Battery pack" on page 34 •• "1040 Hard disk drive (HDD)/Memory/CPU (Central processing unit)/Mini PCI ExpressCard slot compartment cover " on both edges...
Lenovo G470/G475/G570/G575 Hardware Maintenance Manual 1060 DIMM For access, remove these FRUs in the slot and difficult to be installed in SLOT-0 ( a : lower slot), but not in ... arrows 1, and then unplug the DIMM in the direction shown by arrow 2. 1 2 1 Note: If only one DIMM is firmly fixed in order: •• "1010 Battery pack" on page 34 •• "1040 Hard disk drive (HDD)/Memory/CPU (Central processing unit)/Mini PCI ExpressCard slot compartment cover " on both edges...

Hardware Maintenance Manual
Page 45
Lenovo G470/G475/G570/G575 1070 Fan assembly and Heat Sink assembly For access, remove these FRUs in the direction shown by arrow 3. 1 1 2 2 2 1 2 3 When installing: Make sure that the fan ..., flat-head, nylon-coated (3) Silver M2.0 × 3.2 mm, with spring, nylon-coated (4) Black Torque 2.0kgfcm 2.0kgfcm 41 Unplug the connector in order: •• "1010 Battery pack" on page 34 •• "1040 Hard disk drive (HDD)/Memory/CPU (Central processing unit)/Mini PCI ExpressCard slot compartment cover " on page 37...
Lenovo G470/G475/G570/G575 1070 Fan assembly and Heat Sink assembly For access, remove these FRUs in the direction shown by arrow 3. 1 1 2 2 2 1 2 3 When installing: Make sure that the fan ..., flat-head, nylon-coated (3) Silver M2.0 × 3.2 mm, with spring, nylon-coated (4) Black Torque 2.0kgfcm 2.0kgfcm 41 Unplug the connector in order: •• "1010 Battery pack" on page 34 •• "1040 Hard disk drive (HDD)/Memory/CPU (Central processing unit)/Mini PCI ExpressCard slot compartment cover " on page 37...

Hardware Maintenance Manual
Page 48
... shown by arrow 2. 1 a b 2 When installing: Place the CPU on page 41 Attention: CPU is extremely sensitive. Lenovo G470/G475/G570/G575 Hardware Maintenance Manual 1080 CPU For access, remove these FRUs in order: •• "1010 Battery pack" on page 34 •• "1040 Hard disk drive (HDD)/Memory/CPU (Central processing unit...
... shown by arrow 2. 1 a b 2 When installing: Place the CPU on page 41 Attention: CPU is extremely sensitive. Lenovo G470/G475/G570/G575 Hardware Maintenance Manual 1080 CPU For access, remove these FRUs in order: •• "1010 Battery pack" on page 34 •• "1040 Hard disk drive (HDD)/Memory/CPU (Central processing unit...
Hardware Maintenance Manual
Page 49
... tool antenna RF connector (P/N: 08K7159), or pick up the connectors with your fingers and gently unplug them in order: •• "1010 Battery pack" on page 34 •• "1040 Hard disk drive (HDD)/Memory/CPU (Central processing unit)/Mini PCI ExpressCard slot compartment cover "... on page 37 Figure 9. Lenovo G470/G475/G570/G575 1090 PCI Express Mini Card for wireless LAN 1 2 Disconnect the two wireless LAN cables (black, white) in the direction shown by arrows...
... tool antenna RF connector (P/N: 08K7159), or pick up the connectors with your fingers and gently unplug them in order: •• "1010 Battery pack" on page 34 •• "1040 Hard disk drive (HDD)/Memory/CPU (Central processing unit)/Mini PCI ExpressCard slot compartment cover "... on page 37 Figure 9. Lenovo G470/G475/G570/G575 1090 PCI Express Mini Card for wireless LAN 1 2 Disconnect the two wireless LAN cables (black, white) in the direction shown by arrows...

Hardware Maintenance Manual
Page 51
Removal steps of keyboard Remove the screws 1, 2 on page 37 Figure 10. Lenovo G470/G475/G570/G575 1100 Keyboard For access, remove these FRUs in order: •• "1010 Battery pack" on page 34 •• "1040 Hard disk drive (HDD)/Memory/CPU (Central processing unit)/Mini PCI ExpressCard slot compartment cover " on the bottom. 1 1 2 Step 1 2 Screw (quantity) M2.5 × 8 mm, flat-head, nylon-coated (2) M2.5 × 4 mm, flat-head, nylon-coated (1) Color Black Black Torque 2.0kgfcm 2.0kgfcm 47
Removal steps of keyboard Remove the screws 1, 2 on page 37 Figure 10. Lenovo G470/G475/G570/G575 1100 Keyboard For access, remove these FRUs in order: •• "1010 Battery pack" on page 34 •• "1040 Hard disk drive (HDD)/Memory/CPU (Central processing unit)/Mini PCI ExpressCard slot compartment cover " on the bottom. 1 1 2 Step 1 2 Screw (quantity) M2.5 × 8 mm, flat-head, nylon-coated (2) M2.5 × 4 mm, flat-head, nylon-coated (1) Color Black Black Torque 2.0kgfcm 2.0kgfcm 47
Hardware Maintenance Manual
Page 53
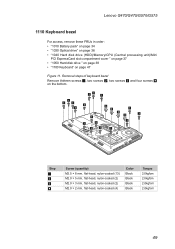
Lenovo G470/G475/G570/G575 1110 Keyboard bezel For access, remove these FRUs in order: •• "1010 Battery pack" on page 34 •• "1030 Optical drive" on page 36 •• "1040 Hard disk drive (HDD)/Memory/CPU (Central processing unit)/Mini ...
Lenovo G470/G475/G570/G575 1110 Keyboard bezel For access, remove these FRUs in order: •• "1010 Battery pack" on page 34 •• "1030 Optical drive" on page 36 •• "1040 Hard disk drive (HDD)/Memory/CPU (Central processing unit)/Mini ...


