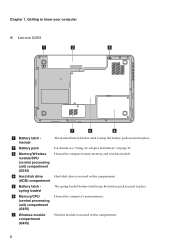
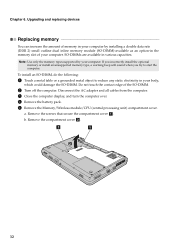
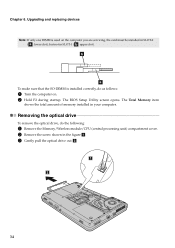
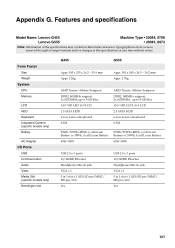
Lenovo G455/G555 UserGuide V1.0
Page 16
Getting to know your computer Lenovo G455 2 1 a Battery latch manual b Battery pack c Memory/Wireless module/CPU (central processing unit) compartment (G555) d Hard disk drive (HDD) compartment e Battery latch spring loaded f Memory/CPU (central processing unit) compartment (G455) g Wireless module compartment (G455) The manual battery latch is used to keep the battery pack secured in...
Lenovo G455/G555 UserGuide V1.0
Page 40
... adapter and all cables from the computer. 3 Close the computer display, and turn the computer over. 4 Remove the battery pack. 5 Remove the Memory/Wireless module/CPU (central processing unit) compartment cover.
Lenovo G455/G555 UserGuide V1.0
Page 42
... in SLOT-1 ( b : upper slot). Chapter 6. Upgrading and replacing devices Note: If only one DIMM is installed correctly, do the following: 1 Remove the Memory/Wireless module/CPU (central processing unit) compartment cover. 2 Remove the screw shown in your computer.
Lenovo G455/G555 UserGuide V1.0
Page 111
... specifications Model Name: Lenovo G455 Lenovo G555 Machine Type • 20044, 0708 • 20045, 0873 Note: Information of the specifications may contain technical inaccuracies or typographical errors. Lenovo reserved the right to 8 GB Max 15.6" HD CCFL 16:9 LCD 2.5 SATA HDD 6-row Lenovo Keyboard 0.3M 53Wh/57Wh...In jack VGA x 1 5 in 1 slot x 1 (SD/SD pro/MMC/ MS pro/xD) Yes 103 Form Factor Size Weight System CPU Memory LCD HDD Keyboard Integrated Camera (specific models only) Battery AC Adapter I/O Ports USB Communication Audio Video Media Slot (specific models only) Kensington ...
Lenovo G555 Hardware Maintenance Manual V2.0
Page 3
... 23 Passwords 24 Power-on password 24 Supervisor password 24 Power management 25 Screen blank mode 25 Sleep (standby) mode 25 Hibernation mode 26 Lenovo G555 27 Specifications 27 Status indicators 29 Fn key combinations 31 FRU replacement notices 32 Screw notices 32 Removing and replacing an FRU 33 1010 Battery... pack 34 1020 Dummy cards 35 1030 Hard disk drive (HDD) slot cover and HDD 36 1040 Memory/Wireless module/CPU (central processing unit) compartment cover 38 1050 Optical drive 39 1060 DIMM 40 1070 Fan assembly and Heat Sink assembly... 41 1080...
Lenovo G555 Hardware Maintenance Manual V2.0
Page 29
... from sleep (standby) mode and resumes the operation: •• The time set on the power switch. You can also turn off . •• The CPU stops. Screen blank mode If the time set on the timer, and the user does not do one of the following events occur in addition...
Lenovo G555 Hardware Maintenance Manual V2.0
Page 42
Lenovo G555 Hardware Maintenance Manual 1040 Memory/Wireless module/CPU (central processing unit) compartment cover For access, remove this FRU: •• "1010 Battery pack" on page 34 Figure 4. Remove the Memory/Wireless module/CPU compartment cover in the direction shown by arrow 2. 1 1 2 38 Removal steps of Memory/Wireless module/CPU compartment cover Note: Loosen the screws 1, but do not remove them.
Lenovo G555 Hardware Maintenance Manual V2.0
Page 43
Removal steps of optical drive Remove the screw 1, insert a screwdriver into the screw hole and push the optical drive in the direction shown by arrow 3. 1 Step 1 Screw (quantity) M2.5 × 8 mm, flat-head, nylon-coated (1) Color Black Torque 2.0~2.5 kgf·cm 2 3 39 Lenovo G555 1050 Optical drive For access, remove these FRUs in the direction shown by arrow 2, then pull the optical drive out in order: •• "1010 Battery pack" on page 34 •• "1040 Memory/Wireless module/CPU (central processing unit) compartment cover" on page 38 Figure 5.
Lenovo G555 Hardware Maintenance Manual V2.0
Page 44
Removal steps of DIMM Release the two latches on both edges of the DIMM into the place. Make sure that it snaps into the socket. Lenovo G555 Hardware Maintenance Manual 1060 DIMM For access, remove these FRUs in order: •• "1010 Battery pack" on page 34 •• "1040... Memory/Wireless module/CPU (central processing unit) compartment cover" on the computer you are servicing, the card must be installed in SLOT-0 ( a : lower slot), but not in...
Lenovo G555 Hardware Maintenance Manual V2.0
Page 45
... module/CPU (central processing unit) compartment cover" on page 38 Figure 7. Step 1 2 3 Screw (quantity) Color M2.0 × 4 mm, flat-head, nylon-coated (3) Black M2.0 × 3 mm, flat-head, nylon-coated (1) Black M2.0 × 3.2 mm, with spring, nylon-coated (4) Silver Torque 1.5~2.0 kgf·cm 1.0~1.5 kgf·cm 2.0~2.5 kgf·cm 41 Lenovo G555 1070...
Lenovo G555 Hardware Maintenance Manual V2.0
Page 48
... by arrow 1 to release the lock, then remove the CPU in the direction shown by arrow 2. 1 a b 2 When installing: Place the CPU on page 41 Attention: CPU is extremely sensitive. Lenovo G555 Hardware Maintenance Manual 1080 CPU For access, remove these FRUs in order: ••... "1010 Battery pack" on page 34 •• "1040 Memory/Wireless module/CPU (central processing unit) compartment cover" ...
Lenovo G555 Hardware Maintenance Manual V2.0
Page 49
... LAN cables (black, white) in order: •• "1010 Battery pack" on page 34 •• "1040 Memory/Wireless module/CPU (central processing unit) compartment cover" on page 38 Figure 9. Lenovo G555 1090 PCI Express Mini Card for wireless LAN/WAN For access, remove these FRUs in the direction shown by arrows. Step...
Lenovo G555 Hardware Maintenance Manual V2.0
Page 56
...detach the LCD connector 2. 1 2 1 Step 1 Screw (quantity) M2.5 × 8 mm, flat-head, nylon-coated (2) Color Black Torque 2.0~2.5 kgf·cm 52 Lenovo G555 Hardware Maintenance Manual 1120 LCD unit For access, remove these FRUs in order: •• "1010 Battery pack" on page 34 •• "1040 Memory.../Wireless module/CPU (central processing unit) compartment cover" on page 38 •• "1090 PCI Express Mini Card for wireless LAN/WAN" on page 45 •...
Lenovo G555 Hardware Maintenance Manual V2.0
Page 60
... bezel Remove fourteen screws 1 and three screws 2 on page 52 Figure 13. Lenovo G555 Hardware Maintenance Manual 1130 Keyboard bezel For access, remove these FRUs in order: •• "1010 Battery pack" on page 34 •• "1040 Memory/Wireless module/CPU (central processing unit) compartment cover" on page 38 •• "1090...
Lenovo G555 Hardware Maintenance Manual V2.0
Page 64
...Battery pack" on page 34 •• "1030 Hard disk drive (HDD) slot cover and HDD" on page 36 •• "1040 Memory/Wireless module/CPU (central processing unit) compartment cover" on page 38 •• "1050 Optical drive" on page 39 •• "1060 DIMM" on page 40 ...8226; If you put a system board down, make sure to drop the system board on a bench top that the power connector is attached firmly. 60 Lenovo G555 Hardware Maintenance Manual 1140 System board Important notices for wireless LAN/WAN" on page 45 •• "1100 Keyboard cover and power board" on page...
Lenovo G555 Hardware Maintenance Manual V2.0
Page 67
...Battery pack" on page 34 •• "1030 Hard disk drive (HDD) slot cover and HDD" on page 36 •• "1040 Memory/Wireless module/CPU (central processing unit) compartment cover" on page 38 •• "1050 Optical drive" on page 39 •• "1060 DIMM" on page 40 ... "1120 LCD unit" on page 52 •• "1130 Keyboard bezel" on page 56 •• "1140 System board " on page 60 Figure 15. Lenovo G555 1150 Bluetooth daughter card, speakers and base cover For access, remove these FRUs in the direction shown by arrow 2. 1 2 2 When installing: Make sure that the...
Lenovo G555 Hardware Maintenance Manual V2.0
Page 71
... Torque 2.0~2.5 kgf·cm Remove the LCD front bezel in order: •• "1010 Battery pack" on page 34 •• "1040 Memory/Wireless module/CPU (central processing unit) compartment cover" on page 38 •• "1090 PCI Express Mini Card for wireless LAN/WAN" on page 45 •• "1100...;• "1110 Keyboard" on page 50 •• "1120 LCD unit" on page 52 Figure 16. Removal steps of LCD front bezel Remove six screws 1. Lenovo G555 1160 LCD front bezel For access, remove these FRUs in the direction shown by arrows 2. 2 2 2 2 67
Lenovo G555 Hardware Maintenance Manual V2.0
Page 72
...then release the LCD panel. 1 1 Step 1 Screw (quantity) M2.5 × 5 mm, flat-head, nylon-coated (2) Color Black Torque 2.0~2.5 kgf·cm 68 Lenovo G555 Hardware Maintenance Manual 1170 LCD panel and hinges For access, remove these FRUs in order: •• "1010 Battery pack" on page 34 ••...; "1040 Memory/Wireless module/CPU (central processing unit) compartment cover" on page 38 •• "1090 PCI Express Mini Card for wireless LAN/WAN" on page 45 •...
Lenovo G555 Hardware Maintenance Manual V2.0
Page 74
... the integrated camera, route the connector cable as shown in order: •• "1010 Battery pack" on page 34 •• "1040 Memory/Wireless module/CPU (central processing unit) compartment cover" on page 38 •• "1090 PCI Express Mini Card for wireless LAN/WAN" on page 45 •• "1100... the placement of it to make sure the connector is attached to the top center of integrated camera Note: The integrated camera is attached firmly. Lenovo G555 Hardware Maintenance Manual 1180 Integrated camera For access, remove these FRUs in the figure above. 70
Lenovo G555 Hardware Maintenance Manual V2.0
Page 75
Lenovo G555 1190 Antenna assembly and LCD cover For access, remove these FRUs in the direction shown by the cable guides, or a wire to any tension. Tension ... the cable guide, and then remove the antenna assembly in order: •• "1010 Battery pack" on page 34 •• "1040 Memory/Wireless module/CPU (central processing unit) compartment cover" on page 38 •• "1090 PCI Express Mini Card for wireless LAN/WAN" on page 45 •• "1100...