User Guide
Page 4
... 7 Connecting the power cord 8 Important information about using the computer 9 Wired keyboard (selected models only 10 Connecting to the Internet 10 Using Windows 8 11 Switching between the main Windows 8 interfaces 12 The Charms Bar 12 Shutting down the computer 12 Switching between apps 12 Closing an app 13 Opening other system programs 13 Windows Help and Support 13 Using the Rescue System 15 OneKey Recovery 16 Driver and Application Installation...
... 7 Connecting the power cord 8 Important information about using the computer 9 Wired keyboard (selected models only 10 Connecting to the Internet 10 Using Windows 8 11 Switching between the main Windows 8 interfaces 12 The Charms Bar 12 Shutting down the computer 12 Switching between apps 12 Closing an app 13 Opening other system programs 13 Windows Help and Support 13 Using the Rescue System 15 OneKey Recovery 16 Driver and Application Installation...
User Guide
Page 5
Troubleshooting and Confirming Setup 19 Troubleshooting Display Problems 20 Troubleshooting Audio Problems 21 Troubleshooting Software Problems 22 Troubleshooting Problems with Optical Drives and Hard Disks 23 Special considerations for troubleshooting Windows 24 Windows Help and Support 24 BIOS setup utility 25 Performing Daily Maintenance Tasks 26 Hardware Replacement Guide 27 Overview 28 Replacing hardware 31 Appendix 41 Declaration 41 Trademarks 42 Energy Star Statement 43 Enabling ErP compliance mode 44 ii Contents
Troubleshooting and Confirming Setup 19 Troubleshooting Display Problems 20 Troubleshooting Audio Problems 21 Troubleshooting Software Problems 22 Troubleshooting Problems with Optical Drives and Hard Disks 23 Special considerations for troubleshooting Windows 24 Windows Help and Support 24 BIOS setup utility 25 Performing Daily Maintenance Tasks 26 Hardware Replacement Guide 27 Overview 28 Replacing hardware 31 Appendix 41 Declaration 41 Trademarks 42 Energy Star Statement 43 Enabling ErP compliance mode 44 ii Contents
User Guide
Page 7
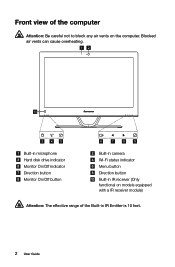
Blocked air vents can cause overheating. 12 10 3 45 Built-in microphone Hard disk drive indicator Monitor On/Off indicator Direction button Monitor On/Off button 6 7 8 9 Built-in camera Wi-Fi status indicator Menu button Direction button Built-in IR receiver (Only functional on models equipped with a IR receiver module) Attention: The effective range of the computer Attention: Be careful not to block any air vents on the computer. Front view of the Built-in IR Emitter is 10 feet. 2 User Guide
Blocked air vents can cause overheating. 12 10 3 45 Built-in microphone Hard disk drive indicator Monitor On/Off indicator Direction button Monitor On/Off button 6 7 8 9 Built-in camera Wi-Fi status indicator Menu button Direction button Built-in IR receiver (Only functional on models equipped with a IR receiver module) Attention: The effective range of the computer Attention: Be careful not to block any air vents on the computer. Front view of the Built-in IR Emitter is 10 feet. 2 User Guide
User Guide
Page 12
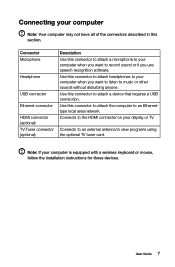
... of the connectors described in this connector to attach a microphone to music or other sounds without disturbing anyone. Connects to an external antenna to the HDMI connector on your computer when you use speech-recognition software. Connector Microphone Headphone USB connector Ethernet connector HDMI connector (optional) TV-Tuner connector (optional) Description Use this section. Connecting your computer is equipped with a wireless keyboard or mouse, follow the installation instructions for those devices. Connects to view programs using the optional TV tuner card.
... of the connectors described in this connector to attach a microphone to music or other sounds without disturbing anyone. Connects to an external antenna to the HDMI connector on your computer when you use speech-recognition software. Connector Microphone Headphone USB connector Ethernet connector HDMI connector (optional) TV-Tuner connector (optional) Description Use this section. Connecting your computer is equipped with a wireless keyboard or mouse, follow the installation instructions for those devices. Connects to view programs using the optional TV tuner card.

User Guide
Page 15
... model of an Ethernet cable (purchased separately) to launch the LVT (Lenovo Vantage Technology) program, Lenovo's pre-loaded Home PC software. Contact your Web browser and accessing any Web site. 10 User Guide Note: Broadband modem and router installation procedures vary depending on the screen. In addition to its own functions, the LVT program will allow you are using a mouse, point to the wireless network: 1. Wired network connection...
... model of an Ethernet cable (purchased separately) to launch the LVT (Lenovo Vantage Technology) program, Lenovo's pre-loaded Home PC software. Contact your Web browser and accessing any Web site. 10 User Guide Note: Broadband modem and router installation procedures vary depending on the screen. In addition to its own functions, the LVT program will allow you are using a mouse, point to the wireless network: 1. Wired network connection...
User Guide
Page 21
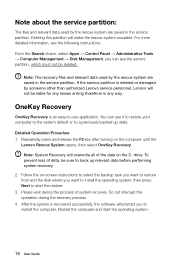
... Apps → Control Panel → Administrative Tools → Computer Management → Disk Management, you want to install the operating system, then press Next to restore from and the disk where you can use application. Repeatedly press and release the F2 key after turning on the C: drive. Note about the service partition: The files and relevant data used by someone other than authorized Lenovo service personnel, Lenovo will make the rescue...
... Apps → Control Panel → Administrative Tools → Computer Management → Disk Management, you want to install the operating system, then press Next to restore from and the disk where you can use application. Repeatedly press and release the F2 key after turning on the C: drive. Note about the service partition: The files and relevant data used by someone other than authorized Lenovo service personnel, Lenovo will make the rescue...
User Guide
Page 22
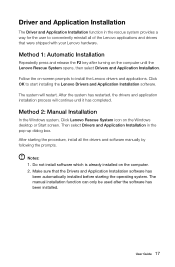
.... Make sure that the Drivers and Application Installation software has been automatically installed before starting the procedure, install all of the Lenovo applications and drivers that were shipped with your Lenovo hardware. After starting the operating system. Then select Drivers and Application Installation in the rescue system provides a way for the user to start installing the Lenovo Drivers and Application Installation software. Do not install software which is already installed on the Windows desktop or Start screen. Method 2: Manual Installation In...
.... Make sure that the Drivers and Application Installation software has been automatically installed before starting the procedure, install all of the Lenovo applications and drivers that were shipped with your Lenovo hardware. After starting the operating system. Then select Drivers and Application Installation in the rescue system provides a way for the user to start installing the Lenovo Drivers and Application Installation software. Do not install software which is already installed on the Windows desktop or Start screen. Method 2: Manual Installation In...
User Guide
Page 25
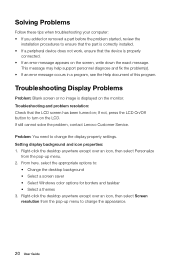
...; Select Windows color options for borders and taskbar • Select a themes 3. If still cannot solve the problem, contact Lenovo Customer Service. Solving Problems Follow these tips when troubleshooting your computer: • If you added or removed a part before the problem started, review the installation procedures to ensure that the part is correctly installed. • If a peripheral device does not work, ensure that the LCD screen has been turned on the monitor.
...; Select Windows color options for borders and taskbar • Select a themes 3. If still cannot solve the problem, contact Lenovo Customer Service. Solving Problems Follow these tips when troubleshooting your computer: • If you added or removed a part before the problem started, review the installation procedures to ensure that the part is correctly installed. • If a peripheral device does not work, ensure that the LCD screen has been turned on the monitor.
User Guide
Page 26
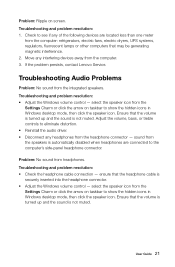
... connector - Troubleshooting and problem resolution: • Check the headphone cable connection - User Guide 21 Problem: Ripple on taskbar to the computer's side-panel headphone connector. If the problem persists, contact Lenovo Service. Adjust the volume, bass, or treble controls to eliminate distortion. • Reinstall the audio driver. • Disconnect any headphones from the Settings Charm or click the arrow on taskbar to show the hidden icons in Windows desktop mode...
... connector - Troubleshooting and problem resolution: • Check the headphone cable connection - User Guide 21 Problem: Ripple on taskbar to the computer's side-panel headphone connector. If the problem persists, contact Lenovo Service. Adjust the volume, bass, or treble controls to eliminate distortion. • Reinstall the audio driver. • Disconnect any headphones from the Settings Charm or click the arrow on taskbar to show the hidden icons in Windows desktop mode...

User Guide
Page 27
... → Control Panel from the Programs and Features dialog box and then select Uninstall/Change. 6. Troubleshooting Software Problems Problem: You are unable to the operating system, and might cause a system-wide malfunction. This is harmful to exit a running program normally. Use the following procedure to uninstall the software. 22 User Guide Perform the instructions displayed to properly uninstall programs: 1. Problem resolution: During installation never abort the install process...
... → Control Panel from the Programs and Features dialog box and then select Uninstall/Change. 6. Troubleshooting Software Problems Problem: You are unable to the operating system, and might cause a system-wide malfunction. This is harmful to exit a running program normally. Use the following procedure to uninstall the software. 22 User Guide Perform the instructions displayed to properly uninstall programs: 1. Problem resolution: During installation never abort the install process...
User Guide
Page 29
...; Select the Settings charm, then select Help. • Press Windows key + F1. The drivers for troubleshooting Windows Record the following two situations, you use the Windows Media Center to watch TV, be useful later when troubleshooting system problems: 1. The capacity of the hard disk as it may be slightly different from analog to the rounding of totals. When you must create and save a new channel list. You...
...; Select the Settings charm, then select Help. • Press Windows key + F1. The drivers for troubleshooting Windows Record the following two situations, you use the Windows Media Center to watch TV, be useful later when troubleshooting system problems: 1. The capacity of the hard disk as it may be slightly different from analog to the rounding of totals. When you must create and save a new channel list. You...

User Guide
Page 30
... do I start the BIOS setup utility? User Guide 25 It communicates basic computer information and provides options for your computer, you don't change the boot mode, start the BIOS setup utility: 1. If you need to change the boot mode to UEFI or Legacy support on the computer, then select Startup → Boot Priority. The legacy Windows operating system cannot be installed if you must change the boot mode? To start the BIOS setup utility and set boot mode to Legacy support. The default boot mode for setting boot devices, security, hardware mode, and...
... do I start the BIOS setup utility? User Guide 25 It communicates basic computer information and provides options for your computer, you don't change the boot mode, start the BIOS setup utility: 1. If you need to change the boot mode to UEFI or Legacy support on the computer, then select Startup → Boot Priority. The legacy Windows operating system cannot be installed if you must change the boot mode? To start the BIOS setup utility and set boot mode to Legacy support. The default boot mode for setting boot devices, security, hardware mode, and...
User Guide
Page 33
.... It does not apply to be replaced by trained service personnel without the need for step-by Lenovo®. It is intended to those computer models that have the TV-Tuner card installed. This guide contains procedures for replacing the following parts: • Memory modules • Hard disk drive • Optical drive • Adapter • Keyboard, mouse (wired) Safety information for replacing CRUs Do not open your computer. The description of the...
.... It does not apply to be replaced by trained service personnel without the need for step-by Lenovo®. It is intended to those computer models that have the TV-Tuner card installed. This guide contains procedures for replacing the following parts: • Memory modules • Hard disk drive • Optical drive • Adapter • Keyboard, mouse (wired) Safety information for replacing CRUs Do not open your computer. The description of the...
User Guide
Page 36
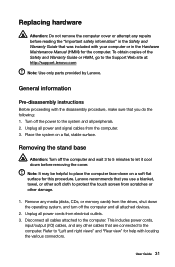
... base Attention: Turn off the power to the Support Web site at: http://support.lenovo.com Note: Use only parts provided by Lenovo. Remove any media (disks, CDs, or memory cards) from the computer. 3. Unplug all peripherals. 2. User Guide 31 General information Pre-disassembly instructions Before proceeding with your computer or in the Hardware Maintenance Manual (HMM) for this procedure. This includes power cords, input/output (I/O) cables, and any repairs before removing the cover. Place...
... base Attention: Turn off the power to the Support Web site at: http://support.lenovo.com Note: Use only parts provided by Lenovo. Remove any media (disks, CDs, or memory cards) from the computer. 3. Unplug all peripherals. 2. User Guide 31 General information Pre-disassembly instructions Before proceeding with your computer or in the Hardware Maintenance Manual (HMM) for this procedure. This includes power cords, input/output (I/O) cables, and any repairs before removing the cover. Place...
User Guide
Page 37
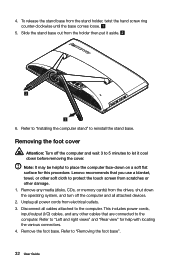
... to let it aside. 6. Unplug all attached devices. 2. Remove any other cables that you use a blanket, towel, or other damage. 1. This includes power cords, input/output (I/O) cables, and any media (disks, CDs, or memory cards) from the drives, shut down the operating system, and turn off the computer and wait 3 to 5 minutes to protect the touch screen from electrical outlets. 3. To release the stand...
... to let it aside. 6. Unplug all attached devices. 2. Remove any other cables that you use a blanket, towel, or other damage. 1. This includes power cords, input/output (I/O) cables, and any media (disks, CDs, or memory cards) from the drives, shut down the operating system, and turn off the computer and wait 3 to 5 minutes to protect the touch screen from electrical outlets. 3. To release the stand...
User Guide
Page 38
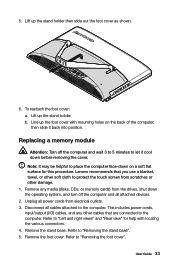
Unplug all attached devices. 2. Refer to protect the touch screen from scratches or other soft cloth to "Removing the stand base". 5. b. Replacing a memory module Attention: Turn off the computer and all power cords from the drives, shut down the operating system, and turn off the computer and wait 3 to 5 minutes to "Removing the foot cover". Lenovo recommends that are connected to the computer. Refer to...
Unplug all attached devices. 2. Refer to protect the touch screen from scratches or other soft cloth to "Removing the stand base". 5. b. Replacing a memory module Attention: Turn off the computer and all power cords from the drives, shut down the operating system, and turn off the computer and wait 3 to 5 minutes to "Removing the foot cover". Lenovo recommends that are connected to the computer. Refer to...
User Guide
Page 39
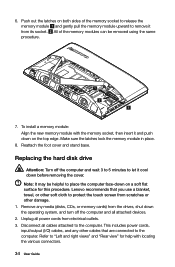
... on a soft flat surface for help with locating the various connectors. 34 User Guide Replacing the hard disk drive Attention: Turn off the computer and all attached devices. 2. Note: It may be removed using the same procedure. 7. Lenovo recommends that are connected to let it from electrical outlets. 3. This includes power cords, input/output (I/O) cables, and any media (disks, CDs, or memory cards) from scratches or other soft cloth to...
... on a soft flat surface for help with locating the various connectors. 34 User Guide Replacing the hard disk drive Attention: Turn off the computer and all attached devices. 2. Note: It may be removed using the same procedure. 7. Lenovo recommends that are connected to let it from electrical outlets. 3. This includes power cords, input/output (I/O) cables, and any media (disks, CDs, or memory cards) from scratches or other soft cloth to...
User Guide
Page 40
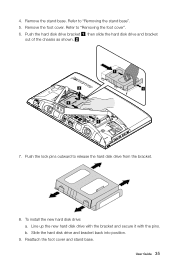
Remove the stand base. Push the lock pins outward to "Removing the stand base". 5. Slide the hard disk drive and bracket back into position. 9. Remove the foot cover. To install the new hard disk drive: a. Refer to release the hard disk drive from the bracket. 8. b. Reattach the foot cover and stand base. Refer to "Removing the foot cover". 6. User Guide 35 Line up the new hard disk drive with the bracket and secure it with the pins. 4. Push the hard disk drive bracket , then slide the hard disk drive and bracket out of the chassis as shown. 1 1 7.
Remove the stand base. Push the lock pins outward to "Removing the stand base". 5. Slide the hard disk drive and bracket back into position. 9. Remove the foot cover. To install the new hard disk drive: a. Refer to release the hard disk drive from the bracket. 8. b. Reattach the foot cover and stand base. Refer to "Removing the foot cover". 6. User Guide 35 Line up the new hard disk drive with the bracket and secure it with the pins. 4. Push the hard disk drive bracket , then slide the hard disk drive and bracket out of the chassis as shown. 1 1 7.
User Guide
Page 41
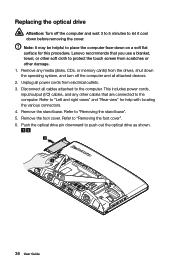
... any media (disks, CDs, or memory cards) from electrical outlets. 3. Refer to protect the touch screen from scratches or other soft cloth to "Removing the foot cover". 6. Lenovo recommends that are connected to the computer. Remove any other cables that you use a blanket, towel, or other damage. 1. Remove the stand base. Note: It may be helpful to push out the optical drive as shown. 36 User Guide Remove...
... any media (disks, CDs, or memory cards) from electrical outlets. 3. Refer to protect the touch screen from scratches or other soft cloth to "Removing the foot cover". 6. Lenovo recommends that are connected to the computer. Remove any other cables that you use a blanket, towel, or other damage. 1. Remove the stand base. Note: It may be helpful to push out the optical drive as shown. 36 User Guide Remove...
User Guide
Page 46
... Lenovo Web site: Service Web site: http://support.lenovo.com User Guide 41 Declaration Thank you install and use Lenovo's products appropriately. For the latest information or any ) or product packing list, or consult the distributor for the first time. For the configuration of the product, refer to improve and/or modify the products and software programs described in new editions of Lenovo. The manuals...
... Lenovo Web site: Service Web site: http://support.lenovo.com User Guide 41 Declaration Thank you install and use Lenovo's products appropriately. For the latest information or any ) or product packing list, or consult the distributor for the first time. For the configuration of the product, refer to improve and/or modify the products and software programs described in new editions of Lenovo. The manuals...


